api design
35 TopicsAzure Function App — Queue-Based Architecture for Long-Running Sync Jobs
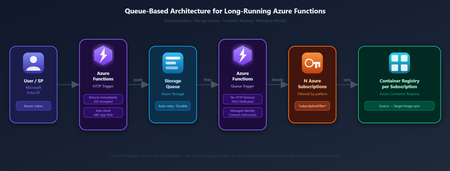
The Problem: HTTP Triggers and Long-Running Jobs Don't Mix Here's a situation you've probably run into: you have a job that needs to loop over dozens of Azure resources, call APIs, and do real work. You wrap it in an HTTP-triggered Azure Function so it can be called on demand. It works great and after a few minutes, the caller gets a 504 Gateway Timeout. The 230-second limit is enforced by Azure Front Door / the platform load balancer. It cannot be overridden by app settings or host configuration. Any HTTP trigger that runs longer than ~3.5 minutes will timeout for the caller. In our case, the job iterates over 30+ Azure subscriptions — for each one it switches context, lists resources, and triggers image imports. Total runtime: anywhere from 2 to 10 minutes depending on how many ACRs need updating. Way over the limit. The Solution: Decouple Request from Execution via a Queue The fix is clean once you see it: the HTTP trigger shouldn't do the work — it should just accept the work and hand it off. That's what a queue is for. The flow splits into two independent phases: Request phase — The HTTP trigger validates the caller (JWT + app role check), packages the job parameters into a queue message, and returns 202 Accepted. This takes under 3 seconds. Execution phase — A Queue Trigger picks up the message and runs the actual sync. No HTTP connection involved, so there's no timeout. On a Dedicated (P-series) plan, execution time is unlimited. Approach What the caller gets Result HTTP trigger → run sync inline Waits for the full job to complete 504 TIMEOUT after 230 seconds HTTP trigger → Queue → Queue Trigger 202 Accepted immediately NO TIMEOUT job runs as long as needed 🤸♀️There's an added bonus - Reliability in Azure Queue Storage: Azure Storage Queues give you automatic retry out of the box. If the job crashes halfway through, the message becomes visible again after a visibility timeout and the Queue Trigger picks it up for a retry — up to 5 attempts before the message is moved to the poison queue. No retry logic to write 🤸♀️. Locking Down the Endpoint Since the HTTP trigger is the public entry point, it needs solid auth. We layer two things: ⭐Use EasyAuth for the "is this a real Entra ID token?" check, and a custom App Role for the "is this person allowed to trigger syncs?" check. These are independent concerns and should stay that way. Layer What it does How EasyAuth (Entra ID) Rejects requests without a valid Entra ID Bearer token — before your code even runs Configured at the Function App level via the Authentication blade App Role check Validates that the token contains the SyncJob.Execute role — only assigned users/SPs can trigger the job Decoded in the function code from the JWT roles claim Managed Identity Authenticates the Function App to Azure APIs (no credentials in code) Connect-AzAccount -Identity — identity assigned via RBAC One gotcha worth knowing: when using v2 tokens (which is the default with modern App Registrations), the aud claim in the token is the raw App ID GUID — not the api:// prefixed URI. You need to explicitly add both forms to your allowedAudiences in EasyAuth, otherwise valid tokens get rejected. APP_ID="<your-app-id>" TENANT_ID="<your-tenant-id>" FUNCTION_APP_URL="https://<your-function-app>.azurewebsites.net" # Interactive login (device code flow — works from any terminal) az login --tenant "${TENANT_ID}" \ --scope "api://${APP_ID}/.default" \ --use-device-code TOKEN=$(az account get-access-token \ --scope "api://${APP_ID}/.default" \ --query accessToken -o tsv) # Trigger the sync — returns 202 immediately curl -s -X POST "${FUNCTION_APP_URL}/api/SyncContainerRegistryHttpTrigger" \ -H "Authorization: Bearer ${TOKEN}" \ -H "Content-Type: application/json" Passing Parameters Through the Queue One nice property of this pattern: the queue message is just JSON, so you can pass whatever parameters the job needs. In our case, we pass a subscriptionFilter wildcard so callers can target a subset of subscriptions without touching any code. The parameter travels the full chain: HTTP body → queue message → Queue Trigger → PowerShell script parameter. Here's how each step handles it. Step 1 — HTTP Trigger reads the body and enqueues the message using the Push-OutputBinding output binding. Azure Functions wires the binding to the queue automatically — no SDK call needed: param($Request, $TriggerMetadata) # ... decode the JWT, check role assignment $queuePayload = @{ triggeredBy = $decoded.Payload.upn ?? $decoded.Payload.oid triggeredAt = (Get-Date -Format 'o') subscriptionFilter = if ($body.subscriptionFilter) { $body.subscriptionFilter } else { "*" } } | ConvertTo-Json -Compress Push-OutputBinding -Name QueueMessage -Value $queuePayload Push-OutputBinding -Name Response -Value ([HttpResponseContext]@{ StatusCode = [System.Net.HttpStatusCode]::Accepted Body = @{ message = "Sync job queued. Check Azure Monitor logs for execution status." } }) ⭐Push-OutputBinding is how Azure Functions PowerShell workers write to output bindings (queues, blobs, HTTP responses…). The binding name QueueMessage maps to the queue defined in function.json — the runtime handles serialisation and delivery. Step 2 — Queue Trigger passes the filter to the script as a named parameter: param($QueueItem, $TriggerMetadata) Write-Host "Triggered SyncContainerRegistry via Storage Queue. Payload: $QueueItem" $subscriptionFilter = if ($QueueItem.subscriptionFilter) { $QueueItem.subscriptionFilter } else { "*" } $SubscriptionFilter = $subscriptionFilter . "$PSScriptRoot/../SyncContainerRegistry/run.ps1" Step 3 — Long running job with the filter as parameter: param($Timer) if (-not $SubscriptionFilter) { $SubscriptionFilter = "*" } $subscriptions = Get-AzSubscription | Where-Object { $_.Name -like $SubscriptionFilter } foreach ($subscription in $subscriptions) { Set-AzContext -SubscriptionId $subscription.Id | Out-Null # ... do the work } Targeting a subset of subscriptions # Sync all subscriptions (default — omit the body) curl -s -X POST "${FUNCTION_APP_URL}/api/SyncContainerRegistryHttpTrigger" \ -H "Authorization: Bearer ${TOKEN}" \ -H "Content-Type: application/json" # Sync only subscriptions matching a pattern curl -s -X POST "${FUNCTION_APP_URL}/api/SyncContainerRegistryHttpTrigger" \ -H "Authorization: Bearer ${TOKEN}" \ -H "Content-Type: application/json" \ -d '{"subscriptionFilter": "*project-alpha*"}' ⭐PowerShell's -like operator uses * as a wildcard anywhere in the string. The pattern *project-alpha* matches sub-mycompany-project-alpha-prd, sub-mycompany-project-alpha-dev, etc. A pattern without a leading * only matches from the start of the string — keep this in mind when naming subscriptions. Pushing a Message Directly via PowerShell You can also push a message straight to the queue without going through the HTTP trigger — useful for testing, scripting, or bypassing the auth layer in a controlled environment. Connect-AzAccount # or -Identity for a Managed Identity context $storageAccount = "<your-storage-account>" $queueName = "sync-job-queue" # Build the payload — same shape the HTTP trigger produces $payload = @{ triggeredBy = $env:USERNAME triggeredAt = (Get-Date -Format 'o') subscriptionFilter = "*project-alpha*" # or "*" for all } | ConvertTo-Json -Compress # Get a queue client via the connected account (no key needed) $ctx = New-AzStorageContext -StorageAccountName $storageAccount -UseConnectedAccount $queue = Get-AzStorageQueue -Name $queueName -Context $ctx $queue.QueueClient.SendMessage($payload) ⭐ -UseConnectedAccount authenticates via the current Connect-AzAccount session — no storage key required, as long as your identity has the Storage Queue Data Message Sender role on the storage account. The Queue Message The HTTP trigger packages the caller identity and filter into a simple JSON payload before enqueuing. The Queue Trigger reads it back as a deserialised PowerShell object — no manual JSON parsing needed. { "triggeredBy": "user@company.com", "triggeredAt": "2026-06-01T11:03:55.570+02:00", "subscriptionFilter": "*project-alpha*" } Design Decisions at a Glance Decision Choice Why Async execution Azure Storage Queue HTTP trigger has a hard 230s timeout. The sync job takes 2–10 minutes. The queue decouples acceptance from execution — and gives us retry for free. Authentication EasyAuth + App Role No credentials in code. Access is controlled via Entra ID app roles — revocable per user without touching infrastructure. Azure identity Managed Identity No secrets to rotate or store. The Function App authenticates to Azure APIs using its platform-assigned identity. Job parameter Wildcard filter via queue payload Lets callers target any subscription subset without code changes. The filter travels through the queue — the Queue Trigger just passes it along. Hosting plan Dedicated (P-series) Consumption plan caps function execution at 10 minutes. A Dedicated plan has no execution time limit — essential when the job can run longer. See you in the Cloud JamesdldEnterprise-ready Claude Desktop with Entra ID, APIM, and Microsoft Foundry (No Backend Required)
How I put corporate sign-in in front of Claude Desktop without writing a single line of backend code. TL;DR — In this post, I show how to securely enable Claude Desktop in enterprise environments using Microsoft Entra ID, Azure API Management, and Microsoft Foundry — without deploying a custom backend. This approach removes API keys from endpoints, enforces per-user identity, and aligns fully with Zero Trust principles. Who this is for: Enterprise architects evaluating secure AI client patterns Developers enabling Claude Desktop in regulated environments Platform teams standardizing identity and governance for LLM access Why this post exists: Microsoft Learn's Configure Claude Desktop with Foundry Models only shows the API-key path — a shared key pasted into every user's Claude Desktop config. That's fine for a quick demo, but it's a non-starter for most enterprises (no per-user identity, no MFA / Conditional Access, hard to revoke, hard to audit). This post fills that gap: same Foundry backend, but with Microsoft Entra ID SSO in front via Azure API Management, so each user signs in with their corporate identity and zero secrets land on the laptop. The problem For many teams experimenting with Claude Desktop, the blocker isn't capability — it's enterprise readiness. How do you enforce identity, eliminate shared secrets, and apply governance without standing up a custom backend service to sit in front of the model? If your team wants to use Claude Desktop with your own Anthropic deployment running on Microsoft Foundry, but with a few non-negotiable requirements: No shared API keys floating around on developer laptops. Per-user identity — every request must be attributable to a real person. MFA and Conditional Access must apply, the same way they do for every other internal app. Central rate-limiting and logging — a centralized control plane for governance. Claude Desktop 1.5+ supports a "Gateway SSO" mode where it can sign each user in with OpenID Connect and forward their token to a custom LLM gateway. Azure API Management (APIM) is a perfect fit for that gateway role: it validates the user's Entra ID token, then re-authenticates itself to Foundry behind the scenes. APIM acts as a centralized policy enforcement layer, enabling identity validation, traffic governance, and secure re-authentication to backend AI services without custom code. The end-to-end flow looks like this: %%{init: {'flowchart': {'nodeSpacing': 60, 'rankSpacing': 80, 'useMaxWidth': true}, 'themeVariables': {'fontSize':'16px'}} }%% flowchart TB User([Corporate user]) Claude["Claude Desktop"] Entra["Microsoft Entra ID<br/>(OIDC + MFA + Conditional Access)"] APIM["Azure API Management<br/>validate-jwt → rewrite headers<br/>(policy gateway)"] Foundry["Microsoft Foundry<br/>Claude deployment"] User -- "1. Sign in (browser PKCE)" --> Entra Entra -- "2. ID token" --> Claude Claude -- "3. POST /v1/messages<br/>Authorization: Bearer ID token" --> APIM APIM -- "4. OIDC discovery / JWKS" --> Entra APIM -- "5. x-api-key (or Managed Identity)" --> Foundry Foundry -- "6. Response" --> APIM APIM -- "7. Response" --> Claude classDef azure fill:#0a4d8c,stroke:#0a3a6b,color:#ffffff; classDef client fill:#f3f3f3,stroke:#888,color:#222; class Entra,APIM,Foundry azure; class Claude,User client; Or in plain text: Claude Desktop │ Authorization: Bearer <Entra ID token from the user's browser sign-in> ▼ Azure API Management (<your-apim>) │ ① validate-jwt → verifies user's Entra ID token │ ② re-auths to Foundry with an API key from a Named value │ Authorization stripped, x-api-key injected ▼ Microsoft Foundry /anthropic/v1/messages │ runs Claude (<your-deployment>) ▼ Response back to the user There are no API keys on user devices. Foundry's key lives only inside APIM. And every request carries the user's oid claim, so I can build dashboards and per-user quotas later. What you need before starting An Azure subscription with a Microsoft Foundry (AI Services) account and a Claude deployment. (Throughout this post I'll just call it Foundry.) An API Management instance, any tier. Permission to register applications in Entra ID for your tenant. Claude Desktop 1.5.0 or later. Azure CLI installed locally. Throughout this post I'll use placeholders for resource names: <apim-name> — your API Management service name <resource-group> — the resource group that holds it <foundry-account> — your Foundry account name <deployment-name> — the name of the Claude model deployment on Foundry Step 1 — Register an Entra ID app for Claude Desktop This is the OIDC client Claude Desktop signs users into. Claude Desktop requires a single-tenant, public PKCE client (no client secret) with a loopback redirect URI, configured under the Mobile and desktop applications platform in Entra ID — the only platform that allows any loopback port. I scripted it so the setup is one command and idempotent: # scripts/register-claude-entra-app.ps1 [CmdletBinding()] param( [string] $TenantId = '<your-tenant-id>', [string] $SubscriptionId = '<your-subscription-id>', [string] $ResourceGroup = '<resource-group>', [string] $ApimName = '<apim-name>', [string] $AppDisplayName = 'Claude Cowork gateway', [string] $RedirectUri = 'http://127.0.0.1/callback' ) az account set --subscription $SubscriptionId | Out-Null # 1. Create (or reuse) the app registration $appId = az ad app list --display-name $AppDisplayName --query "[0].appId" -o tsv if (-not $appId) { $appId = az ad app create --display-name $AppDisplayName ` --sign-in-audience AzureADMyOrg --query appId -o tsv } # 2. Configure as public PKCE client with the Mobile/Desktop redirect URI $objectId = az ad app show --id $appId --query id -o tsv $patch = @{ publicClient = @{ redirectUris = @($RedirectUri) } isFallbackPublicClient = $true } | ConvertTo-Json -Depth 5 -Compress az rest --method PATCH ` --uri "https://graph.microsoft.com/v1.0/applications/$objectId" ` --headers "Content-Type=application/json" --body $patch | Out-Null # 3. Ensure a service principal exists $sp = az ad sp list --filter "appId eq '$appId'" --query "[0].id" -o tsv if (-not $sp) { az ad sp create --id $appId | Out-Null } # 4. Push two Named values into APIM for the validate-jwt policy az apim nv create -g $ResourceGroup --service-name $ApimName ` --named-value-id entra-tenant-id --display-name entra-tenant-id ` --value $TenantId --secret false az apim nv create -g $ResourceGroup --service-name $ApimName ` --named-value-id entra-client-id --display-name entra-client-id ` --value $appId --secret false "Client ID: $appId" Run it once. The output prints the client ID you'll need in Claude Desktop later, and it leaves two Named values in APIM ( entra-tenant-id , entra-client-id ) that the gateway policy will reference. ⚠️ Common pitfall: if the redirect URI ends up under the Web platform instead of Mobile and desktop applications, Entra will demand a client secret on token exchange — Claude won't send one and you'll get Token exchange failed (HTTP 401) . The app type can't be changed after creation, so create a new app if that happens. Step 2 — Create the API in APIM In the portal under APIM → APIs → + Add API → HTTP: Field Value Display name Anthropic API Name anthropicapi Web service URL https://<foundry-account>.services.ai.azure.com/anthropic API URL suffix claude Subscription required Off (Entra ID is our only credential) Add two operations under it: Method URL Display name POST /v1/messages Create message GET /v1/models List models The /v1/models operation isn't strictly needed (Foundry's Anthropic surface doesn't implement it), but having it registered means you can decide later whether to stub it out or proxy it. Step 3 — Add an API key for Foundry as a Named value APIM → Named values → + Add: Name: foundry-key Type: Secret Value: paste a key from the Foundry account's Keys and Endpoint blade. This is the only place the key ever lives. Clients never see it. Alternative — keyless with Entra ID (managed identity): If you prefer not to manage a Foundry key at all, enable the APIM instance's system-assigned managed identity (APIM → Identity → System assigned → On), then grant that identity the Foundry User role on the Foundry account (role ID 53ca6127-db72-4b80-b1b0-d745d6d5456d — previously named Azure AI User; Microsoft renamed it but the ID and permissions are unchanged). In Step 4, replace the set-header that injects x-api-key with: <authentication-managed-identity resource="https://cognitiveservices.azure.com" output-token-variable-name="foundry-token" /> <set-header name="Authorization" exists-action="override"> <value>@("Bearer " + (string)context.Variables["foundry-token"])</value> </set-header> Then you can skip the foundry-key Named value entirely. Don't use the legacy Cognitive Services User role — per the Foundry RBAC doc, roles starting with Cognitive Services don't apply to Foundry scenarios. Step 4 — Write the gateway policy This is the core enforcement layer in the architecture. Open APIs → anthropicapi → All operations → Inbound processing → </> and paste: <policies> <inbound> <base /> <!-- USER → APIM: verify Entra ID token from Claude Desktop --> <validate-jwt header-name="Authorization" failed-validation-httpcode="401" failed-validation-error-message="Unauthorized" require-scheme="Bearer"> <openid-config url="https://login.microsoftonline.com/{{entra-tenant-id}}/v2.0/.well-known/openid-configuration" /> <audiences> <audience>{{entra-client-id}}</audience> </audiences> <issuers> <issuer>https://login.microsoftonline.com/{{entra-tenant-id}}/v2.0</issuer> </issuers> </validate-jwt> <!-- APIM → Foundry --> <set-backend-service base-url="https://<foundry-account>.services.ai.azure.com/anthropic" /> <set-header name="x-api-key" exists-action="override"> <value>{{foundry-key}}</value> </set-header> <set-query-parameter name="api-version" exists-action="skip"> <value>2024-05-01-preview</value> </set-query-parameter> </inbound> <backend><base /></backend> <outbound><base /></outbound> <on-error><base /></on-error> </policies> Two things to notice: validate-jwt uses the OIDC discovery URL — JWKS keys are fetched and cached automatically. It rejects any token whose aud claim is not the client ID of our Entra app, which is exactly what we want. The Authorization header from the user is not forwarded — once validate-jwt succeeds, the request is re-authenticated to Foundry with x-api-key . No user token ever leaves APIM. APIM becomes the security boundary — user identity is validated at the edge, and downstream services never see or rely on user tokens. Step 5 — Configure Claude Desktop Open Claude Desktop → Configure third-party inference and fill it in like this: Field Value Connection Gateway Credential kind Interactive sign-in Gateway base URL https://<apim-name>.azure-api.net/claude Client ID (the appId your script printed) Issuer URL https://login.microsoftonline.com/<tenant-id>/v2.0 Authorization URL / Token URL leave empty Bearer token ID token (default) Scopes leave default ( openid profile email offline_access ) Redirect port leave empty (ephemeral) Model discovery Off Model list → Model ID <deployment-name> (your Foundry deployment name) ℹ️ Why Model discovery is Off — Claude Desktop's discovery uses GET /v1/models , and the Foundry /anthropic surface doesn't implement that endpoint, so it 404s. Listing the model manually skips the call entirely. If you want to leave Model discovery On, stub /v1/models in APIM. Add a GET /v1/models operation to your API and give it this inbound policy that returns an Anthropic-shaped response without ever hitting the backend: <policies> <inbound> <base /> <return-response> <set-status code="200" reason="OK" /> <set-header name="Content-Type" exists-action="override"> <value>application/json</value> </set-header> <set-body>@{ return new JObject( new JProperty("data", new JArray( new JObject( new JProperty("id", "<deployment-name>"), new JProperty("type", "model"), new JProperty("display_name", "Claude on Foundry"), new JProperty("created_at", "2026-01-01T00:00:00Z") ) )), new JProperty("has_more", false), new JProperty("first_id", "<deployment-name>"), new JProperty("last_id", "<deployment-name>") ).ToString(); }</set-body> </return-response> </inbound> <backend><base /></backend> <outbound><base /></outbound> <on-error><base /></on-error> </policies> Add one entry per deployment you want to expose. The benefit of stubbing rather than turning discovery off is that adding new models becomes a policy edit — no need to re-export and redeploy Claude Desktop config to every user. Click Apply Changes then Sign in to your organization. Your browser opens to the normal Entra sign-in page; once approved you're returned to the app, and a quick connection test runs. The success indicator is a small green banner: ✅ Inference — 1-token completion in 1449 ms · via identity provider For broader rollout, hit the Export button at the top of the configuration window — it produces a .mobileconfig (macOS) or .reg (Windows) you can push via Intune / Jamf to every user's machine. Step 6 — Verify both hops In APIM → APIs → anthropicapi → Test → POST /v1/messages I sent: Headers: anthropic-version: 2023-06-01 Body: { "model": "<deployment-name>", "max_tokens": 64, "messages": [{"role":"user","content":"hi"}] } Click Send → Trace, and look at two places: Inbound → validate-jwt: should say succeeded and show the decoded claims (your oid , email , etc.). Backend → Request: outbound URL is https://<foundry-account>.services.ai.azure.com/anthropic/v1/messages?api-version=2024-05-01-preview , with x-api-key: **** present and Authorization absent. Backend → Response: 200, with a Claude message JSON body. That confirms both halves of the chain. Bumps I hit along the way A few common issues encountered during setup — sharing so you can skip them: Symptom Cause Fix Claude shows "Your provider's model list hasn't loaded yet" and /v1/models returns 404 Foundry's Anthropic surface doesn't implement that endpoint Turn Model discovery OFF in Claude Desktop and add the deployment name manually Claude shows "Authentication failed" even though sign-in worked The APIM API still had Subscription required = ON, blocking the call before validate-jwt ran with 401: Access denied due to missing subscription key Uncheck Subscription required on the API Portal Test panel shows "Cannot read properties of undefined (reading 'statusCode')" The test console doesn't attach an Entra token, so validate-jwt 401s and the panel's JavaScript crashes Comment out <validate-jwt> temporarily for portal testing, or test via curl with a real token OIDC discovery failed (HTTP 404) in Claude Desktop Pasted the metadata URL into Issuer URL Issuer must end at /v2.0 , not at /.well-known/openid-configuration Token exchange failed (HTTP 401) App registered under Web platform instead of Mobile and desktop applications Create a new app with the right platform — it can't be changed Where this leaves us This pattern is small in moving parts but has outsized architectural impact: Zero secrets on endpoints. Eliminates API-key sprawl across laptops, MDM profiles, and shared vaults. The Foundry key lives only inside APIM — or disappears entirely when you switch APIM to managed identity. Identity, not credentials. Every Claude Desktop user authenticates against Entra ID in their browser, the same as Office or Teams. MFA, Conditional Access, and Entra ID Protection apply automatically — no parallel auth story to maintain. Per-user observability built in. APIM logs carry the user's Entra oid , email , and group claims. That unlocks per-user dashboards, cost allocation, and abuse detection without any client-side instrumentation. Aligned with Zero Trust. Strong identity at the edge, no implicit trust between hops, single policy chokepoint for inspection and rate-limiting, and full revocability through a single Enterprise Application. Optional but trivial keyless path. Flip APIM to system-assigned managed identity + <authentication-managed-identity resource="https://cognitiveservices.azure.com" /> and one Foundry User role assignment (role ID 53ca6127-db72-4b80-b1b0-d745d6d5456d , formerly Azure AI User) on the Foundry account. See the Foundry RBAC doc — don't use any Cognitive Services * roles for Foundry. What I'd add next llm-token-limit and llm-emit-token-metric policies for per-user quotas and cost visibility. App Insights wiring on the API, with a workbook that pivots on the oid claim. Assignment required = Yes on the Entra Enterprise Application + a security group, so only approved users can sign in. Intune deployment of the exported .reg / .mobileconfig so the gateway URL and client ID land on devices automatically. But that's all incremental. The hard part — getting Claude Desktop, Entra ID, APIM, and Foundry to agree on who's allowed to talk to whom — is done. Total elapsed: about an afternoon, most of it spent learning where each portal hides its switches. Useful links Gateway single sign-on with your identity provider — Claude.ai Documentation Configure Claude Desktop with Foundry Models — Microsoft Learn Role-based access control for Microsoft Foundry — Microsoft Learn2.8KViews0likes3Comments
Microsoft Leads a New Era of Software Supply Chain Transparency
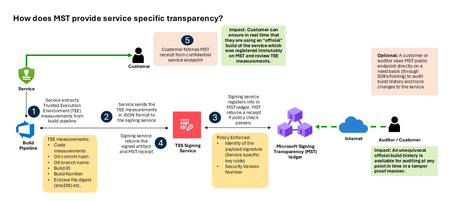
Microsoft announces the general availability of Microsoft’s Signing Transparency (MST) – a first-of-its-kind capability that brings unprecedented visibility and trust to our software supply chain. With this release, Microsoft is leading the industry by recording the build of critical cloud services into a publicly readable and verifiable SCITT standard (Supply Chain Integrity, Transparency, and Trust) compliant ledger. This means every production software build for in scope services like Azure Attestation and Azure Managed HSM (Hardware Security Module), Azure confidential ledger, Microsoft Signing Transparency itself (and others over time) – is now logged in an immutable, tamper-evident record. Only builds that are in the MST ledger are deployed to production; this gives customers confidence that the supply chain for these critical services can be audited at anytime. Notably, the MST ledger is fully open source and built to align with the emerging IETF SCITT standard. By embracing SCITT’s principles and open protocols, Microsoft ensures that MST not only secures our own ecosystem but also contributes to a broader industry movement toward standardized supply chain transparency. The open-source MST ledger serves as a verifiable trust anchor that any organization or researcher can inspect, audit, or even integrate with their own tooling. MST itself meets the highest levels of transparency, backed by a tamper-proof confidential ledger, open-source, and independently verified. Specifically, we are making the foundation of our trust model transparent and accessible to everyone – reinforcing that trust must be earned through proof, not just promises. This launch marks a major milestone in our commitment to Zero Trust principles, extending “never trust, always verify” all the way into the build itself. Building on a public preview introduced late last year, MST’s general availability delivers verifiable transparency at the software level. It transforms traditional code signing with an additive trust layer that is accessible via an open verification model. Every new software update is accompanied by a publicly auditable proof of integrity, enabling security teams to proactively confirm that each update is authentic and unaltered. To help organizations get the most out of this capability, we are also introducing a free tool to explore the contents – Ledger Explorer – an offline tool that allows security teams to examine MST ledger entries, verify cryptographic proofs, and even validate the ledger’s integrity independently. This tool, combined with MST’s open design, ensures that every Microsoft customer – and the broader community – can hold us accountable in real time for the software we run on their behalf. Key Benefits of Microsoft’s Signing Transparency (MST) Verified Code Integrity – Every software release is cryptographically logged in MST’s ledgers. This makes each build tamper-evident and traceable. If an attacker attempts to inject malicious code or sign an unauthorized update, it will be evident through the well-defined validation step built into the SCITT standard. Organizations gain the assurance that code integrity can be independently confirmed at any time. Independent Verification & Zero Trust – MST enables customers and auditors to verify software authenticity on their own, without having to solely rely on vendor attestations. For each update, Microsoft provides a transparency “receipt” (proof of logging) that you can use to prove the update was officially published and unaltered. This fosters a “don’t just trust, verify” approach, empowering security teams to double-check everything running in their environment aligns with what Microsoft intended. Audit-Trail & Compliance – The transparency ledger creates a permanent, auditable timeline of code deployments. Every entry is a record of what was released and when, backed by cryptographic proofs. This simplifies compliance reporting and accelerates forensic analysis. In the event of an incident, you can quickly audit the ledger to see if any unexpected code was introduced. For highly regulated industries, MST offers concrete evidence of software integrity and policy compliance over time. Leadership & Open Standards – We are delivering real transparency now, encouraging a future where all critical software is released with verifiable integrity. MST’s open source implementation and SCITT-compliant design exemplify our commitment to openness and collaboration. We believe widespread adoption of these standards will strengthen supply chain security for everyone, making trust verification a universal practice. Next Steps Microsoft’s Signing Transparency is more than a new security feature and shapes the advances in trust technology. As threats grow more sophisticated, we must evolve the way we assure our customers about the software they depend on. With MST now generally available, we are leading by example: proving that it is possible to open up the traditionally opaque process of software deployment and turn it into a source of strength and trust, i.e. empowering each person with verifiable transparency. We invite the industry to join us on this journey and get started by reading the documentation and exploring Ledger Explorer today! Together, by embracing transparency and open standards, we can turn “trust but verify” from a slogan into an everyday reality for digital infrastructure.
Implementing the Backend-for-Frontend (BFF) / Curated API Pattern Using Azure API Management
Modern digital applications rarely serve a single type of client. Web portals, mobile apps, partner integrations, and internal tools often consume the same backend services—yet each has different performance, payload, and UX requirements. Exposing backend APIs directly to all clients frequently leads to over-fetching, chatty networks, and tight coupling between UI and backend domain models. This is where a Curated API or Backend for Frontend API design pattern becomes useful. What Is the Backend-for-Frontend (BFF) Pattern? The Backend-for-Frontend (BFF)—also known as the Curated API pattern—solves this problem by introducing a client-specific API layer that shapes, aggregates, and optimizes data specifically for the consuming experience. There is very good architectural guidance on this at Azure Architecture Center [Check out the 1st Link on Citation section] The BFF pattern introduces a dedicated backend layer for each frontend experience. Instead of exposing generic backend services directly, the BFF: Aggregates data from multiple backend services Filters and reshapes responses Optimizes payloads for a specific client Shields clients from backend complexity and change Each frontend (web, mobile, partner) can evolve independently, without forcing backend services to accommodate UI-specific concerns. Why Azure API Management Is a Natural Fit for BFF Azure API Management is commonly used as an API gateway, but its policy engine enables much more than routing and security. Using APIM policies, you can: Call multiple backend services (sequentially or in parallel) Transform request and response payloads to provide a unform experience Apply caching, rate limiting, authentication, and resiliency policies All of this can be achieved without modifying backend code, making APIM an excellent place to implement the BFF pattern. When Should You Use a Curated API in APIM? Using APIM as a BFF makes sense when: Frontend clients require optimized, experience-specific payloads Backend services must remain generic and reusable You want to reduce round trips from mobile or low-bandwidth clients You want to implement uniform polices for cross cutting concerns, authentication/authorization, caching, rate-limiting and logging, etc. You want to avoid building and operating a separate aggregation service You need strong governance, security, and observability at the API layer How the BFF Pattern Works in Azure API Management There is a Git Hub Repository [Check out the 2nd Link on Citation section] that provides a wealth of information and samples on how to create complex APIM policies. I recently contributed to this repository with a sample policy for Curated APIs [Check out the 3rd Link on Citation section] At a high level, the policy follows this flow: APIM receives a single client request APIM issues parallel calls to multiple backend services as shown below <wait for="all"> <send-request mode="copy" response-variable-name="operation1" timeout="{{bff-timeout}}" ignore-error="false"> <set-url>@("{{bff-baseurl}}/operation1?param1=" + context.Request.Url.Query.GetValueOrDefault("param1", "value1"))</set-url> </send-request> <send-request mode="copy" response-variable-name="operation2" timeout="{{bff-timeout}}" ignore-error="false"> <set-url>{{bff-baseurl}}/operation2</set-url> </send-request> <send-request mode="copy" response-variable-name="operation3" timeout="{{bff-timeout}}" ignore-error="false"> <set-url>{{bff-baseurl}}/operation3</set-url> </send-request> <send-request mode="copy" response-variable-name="operation4" timeout="{{bff-timeout}}" ignore-error="false"> <set-url>{{bff-baseurl}}/operation4</set-url> </send-request> </wait> Few things to consider The Wait policy allows us to make multiple requests using nested send-request policies. The for="all" attribute value implies that the policy execution will await all the nested send requests before moving to the next one. {{bff-baseurl}}: This example assumes a single base URL for all end points. It does not have to be. The calls can be made to any endpoint response-variable-name attribute sets a unique variable name to hold response object from each of the parallel calls. This will be used later in the policy to transform and produce the curated result. timeout attribute: This example assumes uniform timeouts for each endpoint, but it might vary as well. ignore-error: set this to true only when you are not concerned about the response from the backend (like a fire and forget request) otherwise keep it false so that the response variable captures the response with error code. Once responses from all the requests have been received (or timed out) the policy execution moves to the next policy Then the responses from all requests are collected and transformed into a single response data <!-- Collect the complete response in a variable. --> <set-variable name="finalResponseData" value="@{ JObject finalResponse = new JObject(); int finalStatus = 200; // This assumes the final success status (If all backend calls succeed) is 200 - OK, can be customized. string finalStatusReason = "OK"; void ParseBody(JObject element, string propertyName, IResponse response){ string body = ""; if(response!=null){ body = response.Body.As<string>(); try{ var jsonBody = JToken.Parse(body); element.Add(propertyName, jsonBody); } catch(Exception ex){ element.Add(propertyName, body); } } else{ element.Add(propertyName, body); //Add empty body if the response was not captured } } JObject PrepareResponse(string responseVariableName){ JObject responseElement = new JObject(); responseElement.Add("operation", responseVariableName); IResponse response = context.Variables.GetValueOrDefault<IResponse>(responseVariableName); if(response == null){ finalStatus = 207; // if any of the responses are null; the final status will be 207 finalStatusReason = "Multi Status"; ParseBody(responseElement, "error", response); return responseElement; } int status = response.StatusCode; responseElement.Add("status", status); if(status == 200){ // This assumes all the backend APIs return 200, if they return other success responses (e.g. 201) add them here ParseBody(responseElement, "body", response); } else{ // if any of the response codes are non success, the final status will be 207 finalStatus = 207; finalStatusReason = "Multi Status"; ParseBody(responseElement, "error", response); } return responseElement; } // Gather responses into JSON Array // Pass on the each of the response variable names here. JArray finalResponseBody = new JArray(); finalResponseBody.Add(PrepareResponse("operation1")); finalResponseBody.Add(PrepareResponse("operation2")); finalResponseBody.Add(PrepareResponse("operation3")); finalResponseBody.Add(PrepareResponse("operation4")); // Populate finalResponse with aggregated body and status information finalResponse.Add("body", finalResponseBody); finalResponse.Add("status", finalStatus); finalResponse.Add("reason", finalStatusReason); return finalResponse; }" /> What this code does is prepare the response into a single JSON Object. using the help of the PrepareResponse function. The JSON not only collects the response body from each response variable, but it also captures the response codes and determines the final response code based on the individual response codes. For the purpose of his example, I have assumed all operations are GET operations and if all operations return 200 then the overall response is 200-OK, otherwise it is 206 -Partial Content. This can be customized to the actual scenario as needed. Once the final response variable is ready, then construct and return a single response based on the above calculation <!-- This shows how to return the final response code and body. Other response elements (e.g. outbound headers) can be curated and added here the same way --> <return-response> <set-status code="@((int)((JObject)context.Variables["finalResponseData"]).SelectToken("status"))" reason="@(((JObject)context.Variables["finalResponseData"]).SelectToken("reason").ToString())" /> <set-body>@(((JObject)context.Variables["finalResponseData"]).SelectToken("body").ToString(Newtonsoft.Json.Formatting.None))</set-body> </return-response> This effectively turns APIM into an experience-specific backend tailored to frontend needs. When not to use APIM for BFF Implementation? While this approach works well when you want to curate a few responses together and apply a unified set of policies, there are some cases where you might want to rethink this approach When the need for transformation is complex. Maintaining a lot of code in APIM is not fun. If the response transformation requires a lot of code that needs to be unit tested and code that might change over time, it might be better to sand up a curation service. Azure Functions and Azure Container Apps are well suited for this. When each backend endpoint requires very complex request transformation, then that also increases the amount of code, then that would also indicate a need for an independent curation service. If you are not already using APIM then this does not warrant adding one to your architecture just to implement BFF. Conclusion Using APIM is one of the many approaches you can use to create a BFF layer on top of your existing endpoint. Let me know your thoughts con the comments on what you think of this approach. Citations Azure Architecture Center – Backend-for-Frontends Pattern Azure API Management Policy Snippets (GitHub) Curated APIs Policy Example (GitHub) Send-request Policy ReferenceUsing Azure API Management with Azure Front Door for Global, Multi‑Region Architectures
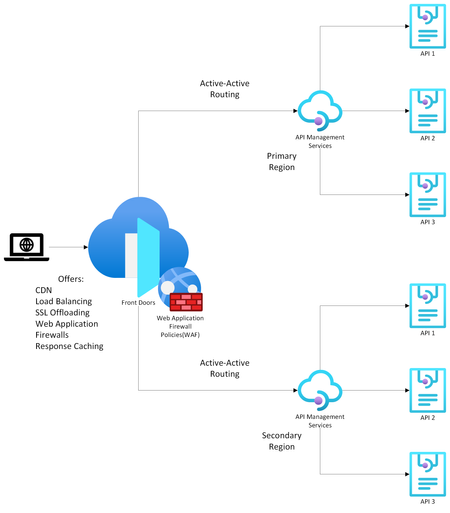
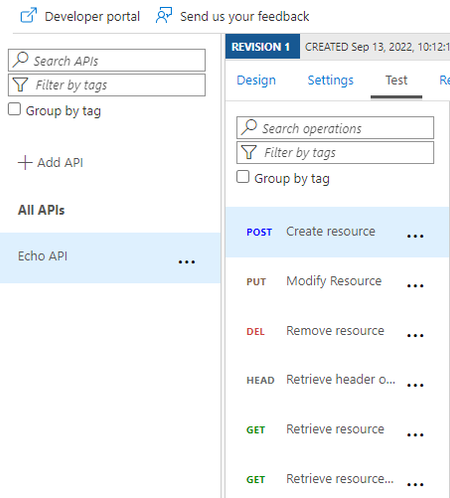
Modern API‑driven applications demand global reach, high availability, and predictable latency. Azure provides two complementary services that help achieve this: Azure API Management (APIM) as the API gateway and Azure Front Door (AFD) as the global entry point and load balancer. Going over the available documentation available, my team and I found this article on how to front a single-region APIM with an Azure Front Door , but we wanted to extend this to a multi-region APIM as well. That led us to design the solution detailed in this article which explains how to configure multi‑regional, active‑active APIM behind Azure Front Door using Custom origins and regional gateway endpoints. (I have also covered topics like why organizations commonly pair APIM with Front Door, when to use internal vs. external APIM modes, etc. but main topic first! Scroll down to the bottom for more info). Configuring Multi‑Regional APIM with Azure Front Door WHAT TO KNOW: If using APIM Premium with multi‑region gateways, each region exposes its own regional gateway endpoint, formatted as: https://<service-name>-<region>-01.regional.azure-api.net Examples: https://mydemo-apim-westeurope-01.regional.azure-api.net https://mydemo-apim-eastus-01.regional.azure-api.net where 'mydemo' is the name of the APIM instance. You will use these regional endpoints and configure them as a separate origin in Azure Front Door—using the Custom origin type. Solution Architecture Azure Front Door Configuration Steps 1. Create an Origin Group Inside your Front Door profile, define a group (Settings -> Origin Groups - > Add -> Add an origin) that will contain all APIM regional gateways. See images below: 2. Add Each APIM Region as a Custom Origin Use the Custom origin type: Origin type: Custom Host name: Use the APIM regional endpoint Example: mydemo-apim-westeurope-01.regional.azure-api.net Origin host header: Same as the host name. Enable certificate subject name validation (Recommended when private link or TLS integrity is required.) Priority: Lower value = higher priority (for failover). Weight: Controls how traffic is distributed across equally prioritized origins. Status: Enable origin. And repeat the same steps for additional APIM regions giving them priority and weightage as you feel appropriate. How to Know Which Region is being Invoked To test this setup, create 2 Virtual Machines (VMs) in Azure - one for each region. For this guide, we chose to create the VMs in West Europe and East US. Open up a Command Prompt from the VM and do a curl on the sample Echo API that comes with every new APIM deployment: Example: curl -v "afd-blah.b01.azurefd.net/echo/resource?param1=sample" Your results should show the region being hit as shown below: How AFD Routes Traffic Across Multiple APIM Regions AFD evaluates origins in this order: Available instances — the Health Probe removes unhealthy origins Priority — selects highest‑priority available origins Latency — optionally selects lowest‑latency pool Weight — round‑robin distribution across selected origins Example When origins are configured as below: West Europe (priority 1, weight 1000) East US (priority 1, weight 500) Central US (priority 2, weight 1000) AFD will: Use West Europe + East US in a 1000:500 ratio. Only use Central US if both West Europe & East US become unavailable. For more information on this nice algorithm, see here: Traffic routing methods to origin - Azure Front Door | Microsoft Learn More Info (as promised) Why Use Azure API Management? Azure API Management is a fully managed service providing: 1. Centralized API Gateway Enforces policies such as authentication, rate limiting, transformations, and caching. Acts as a single façade for backend services, enabling modernization without breaking existing clients. 2. Security & Governance Integrates with Azure AD, OAuth2, and mTLS (mutual TLS). Provides threat protection and schema validation. 3. Developer Ecosystem Developer portal, API documentation, testing console, versioning, and releases. 4. Multi‑Region Gateways (Premium Tier) Allows deployment of additional regional gateways for active‑active, low‑latency global experiences. APIM Deployment Modes: Internal vs. External External Mode The APIM gateway is reachable publicly over the internet. Common when: Exposing APIs to partners, mobile apps, or public clients. You can easily front this with an Azure Front Door for reasons listed in the next section. Internal Mode APIM gateway is deployed inside a VNet, accessible only privately. Used when: APIs must stay private to an enterprise network. Only internal consumers/VPN/VNet peered systems need access. To make your APIM publicly accessible, you need to front it with both an Application Gateway and an Azure Front Door because: Azure Front Door (AFD) cannot directly reach an internal‑mode APIM because AFD requires a publicly routable origin. Application Gateway is a Layer‑7 reverse proxy that can expose a public frontend while still reaching internal private backends (like APIM gateway). [Ref] But Why Put Azure Front Door in Front of API Management? Azure Front Door provides capabilities that APIM alone does not offer: 1. Global Load Balancing As discussed above. 2. Edge Security Web Application Firewall, TLS termination at the edge, DDoS absorption. Reduces load on API gateways. 3. Faster Global Performance Anycast network and global POPs reduce round‑trip latency before requests hit APIM. A POP (Point of Presence) is an Azure Front Door edge location—a physical site in Microsoft’s global network where incoming user traffic first lands. Azure Front Door uses numerous global and local POPs strategically placed close to end‑users (both enterprise and consumer) to improve performance. Anycast is a networking protocol Azure Front Door uses to improve global connectivity. Ref: Traffic acceleration - Azure Front Door | Microsoft Learn 4. Unified Global Endpoint A single public endpoint (e.g., https://api.contoso.com) that intelligently distributes traffic across multiple APIM regions. With all of the above features, it is best to pair API Management with a Front Door, especially when dealing with multi-region architectures. Credits: Junee Singh, Senior Solution Engineer at Microsoft Isiah Hudson, Senior Solution Engineer at Microsoft1.7KViews2likes0CommentsHow To: Send requests to Azure Storage from Azure API Management
In this How To, I will show a simple mechanism for writing a payload to Azure Blob Storage from Azure API Management. Some examples where this is useful is implementing a Claim-Check pattern for large messages or to support message logging when Application Insights is not suitable.Strategic Solutions for Seamless Integration of Third-Party SaaS
Modern systems must be modular and interoperable by design. Integration is no longer a feature, it’s a requirement. Developers are expected to build architectures that connect easily with third-party platforms, but too often, core systems are designed in isolation. This disconnect creates friction for downstream teams and slows delivery. At Microsoft, SaaS platforms like SAP SuccessFactors and Eightfold support Talent Acquisition by handling functions such as requisition tracking, application workflows, and interview coordination. These tools help reduce costs and free up engineering focus for high-priority areas like Azure and AI. The real challenge is integrating them with internal systems such as Demand Planning, Offer Management, and Employee Central. This blog post outlines a strategy centered around two foundational components: an Integration and Orchestration Layer, and a Messaging Platform. Together, these enable real-time communication, consistent data models, and scalable integration. While Talent Acquisition is the use case here, the architectural patterns apply broadly across domains. Whether you're embedding AI pipelines, managing edge deployments, or building platform services, thoughtful integration needs to be built into the foundation, not bolted on later.Join Us for an AMA on Improving Your MCP Servers with Azure API Management
What Will We Cover? In this interactive AMA, you'll learn how to: Expose Azure API Management instances as MCP servers, enabling remote access to your APIs using AI combined with Model Context Protocol. Configure API Management policies to enhance your MCP servers with enterprise-grade capabilities such as rate limiting, authentication, and centralized monitoring. Why This Matters Model Context Protocol (MCP) bridges the gap between AI agents and the real-world data they need to be effective. By integrating MCP with Azure API Management, developers can expose tools to their AI agents while enforcing consistent policies and security standards. Whether you’re deploying custom tools or remote services, this AMA will show you how Azure API Management can be your go-to platform for controlling and scaling MCP access. How to Join Register to Join the Azure AI Foundry Discord Community Event See the events channel 📅 Tuesday, July 22st, 2025 ⏰ 10:00 AM Pacific Time (UTC−07:00) Event Highlights Learn how to expose MCP servers through Azure API Management See how to configure and test policies such as rate limiting Get answers directly from Microsoft product managers and engineers Connect with fellow developers building with MCP, Azure API Management, and Azure AI Foundry Get a Head Start Before the event, check out the documentation to learn how to Expose a REST API in API Management as an MCP server, view the Build and protect MCPs faster with governance in Azure API Manager session from Build 2025, or explore the AI-Gateway labs on GitHub and learn how to use APIM and MCP in the MCP for Beginners course. Don’t miss this opportunity to deepen your understanding of API Management and MCP integration—and get your questions answered live!Cut Costs and Speed Up AI API Responses with Semantic Caching in Azure API Management
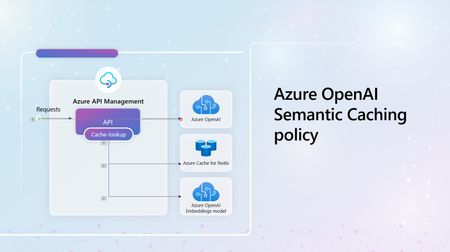
This article is part of a series of articles on API Management and Generative AI. We believe that adding Azure API Management to your AI projects can help you scale your AI models, make them more secure and easier to manage. We previously covered the hidden risks of AI APIs in today's AI-driven technological landscape. In this article, we dive deeper into one of the supported Gen AI policies in API Management, which allows you to minimize Azure OpenAI costs and make your applications more performant by reducing the number of calls sent to your LLM service. How does it currently work without the semantic caching policy? For simplicity, let's look at a scenario where we only have a single client app, a single user, and a single model deployment. This of course does not represent most real-world use-cases, as you often have multiple users talking to different services. Take the following cases into consideration: - A user lands on your application and sends in a query (query 1), They then send the exact same query again, with similar verbiage, in the same session (query 2), The user changes the wording of the query, but it is still relevant and related to the original query (query 3) The last query, (query 4), is completely different and unrelated to the previous queries. In a normal implementation, all these queries will cost you tokens (TPM), resulting in higher cuts in your billing. Your users are also likely to experience some latency as they wait for the LLM to build a response with each call. As the user base grows, you anticipate that the expenses will grow exponentially, making it more expensive to run your system eventually. How does Semantic caching in Azure API Management fix this? Let's look at the same scenario as described above (at a high level first), with a flow diagram representing how you can cut costs and boost your app's performance with the semantic cache policy. When the user sends in the first query, the LLM will be used to generate a response, which will then be stored in the cache. Queries 2 and 3 are somewhat related to query 1, which could be a semantic similarity, or exact match, or could contain a specified keyword, i.e.. price. In all these cases, a lookup will be performed, and the appropriate response will be retrieved from the cache, without waiting on the LLM to regenerate a response. Query 4, which is different from the previous prompts, will require the call to be passed through to the LLM, then grabs the generated response and stores it in the cache for future searches. Okay. Tell me more - How does this work and how do I set it up? Think about this - What would be the likelihood of your users asking related questions or exactly comparable questions in your app? I'd argue that the odds are quite high. Semantic caching for Azure OpenAI API requests To start, you will need to add Azure OpenAI Service APIs to your Azure API Management instance with semantic caching enabled. Luckily, this step has been reduced to just a one-click step. I'll link a tutorial on this in the 'Resources' section. Before you get to configure the policies, you first need to set up a backend for the embeddings API. Oh yes, as part of your deployments, you will need an embedding model to convert your input to the corresponding vector representation, allowing Azure Redis cache to perform the vector similarity search. This step also allows you to set a score_threshold, a parameter used to determine how similar user queries need to be to retrieve responses from the cache. Next, is to add the two policies that you need: azure-openai-semantic-cache-store/ llm-semantic-cache-store and azure-openai-semantic-cache-lookup/ llm-semantic-cache-lookup The azure-openai-semantic-cache-store policy will cache the completions and requests to the configured cache service. You can use the internal Azure Redis enterprise or any another external cache as long as it's a Redis-compatible cache in Azure API Management. The second policy, azure-openai-semantic-cache-lookup, based on the proximity result of the similarity search and the score_threshold, will perform a cache lookup through the compilation of cached requests and completions. In addition to the score_threshold attribute, you will also specify the id of the embeddings backend created in an earlier step and can choose to omit the system messages from the prompt at this step. These two policies enhance your system's efficiency and performance by reusing completions, increasing response speed, and making your API calls much cheaper. Alright, so what should be my next steps? This article just introduced you to one of the many Generative AI supported capabilities in Azure API Management. We have more policies that you can use to better manage your AI APIs, covered in other articles in this series. Do check them out. Do you have any resources I can look at in the meantime to learn more? Absolutely! Check out: - Using external Redis-compatible cache in Azure API Management documentation Use Azure Cache for Redis as a semantic cache tutorial Enable semantic caching for Azure OpenAI APIs in Azure API Management article Improve the performance of an API by adding a caching policy in Azure API Management Learn moduleImprove LLM backend resiliency with load balancer and circuit breaker rules in Azure API Management
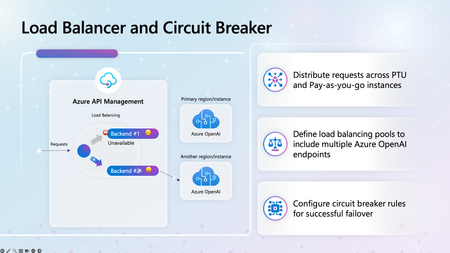
This article is part of a series of articles on Azure API Management and Generative AI. We believe that adding Azure API Management to your AI projects can help you scale your AI models, make them more secure and easier to manage. We previously covered the hidden risks of AI APIs in today's AI-driven technological landscape. In this article, we dive deeper into one of the supported Gen AI policies in API Management, which allows your applications to change the effective Gen AI backend based on unexpected and specified events. In Azure API Management, you can set up your different LLMs as backends and define structures to route requests to prioritized backends and add automatic circuit breaker rules to protect backends from too many requests. Under normal conditions, if your Azure OpenAI service fails, users of your application will continue to receive error messages, an experience that will persist until the backend issue is resolved and becomes ready to serve requests again. Similarly, managing multiple Azure OpenAI resources can be cumbersome, as manual URL changes are required in your API settings to switch between backend entities. This approach lacks efficiency and does not account for dynamic user conditions, preventing seamless switching to the optimal backend services for enhanced performance and reliability. How load balancing will work First configure your Azure OpenAI resources as referenceable backends, defining the base-url and assign a backend-id. As an example, let's assume we have three different Azure OpenAI resources as follows: To set up load balancing across the backends, you can either use one of supported approaches/ strategies or a combination of two to ensure optimal use of your Azure OpenAI resources. 1. Round Robin As the name suggests, API Management will evenly distribute requests to the available backends in the pool. 2. Priority-based For this approach, you organize multiple backends into priority groups, and API Management will follow and assign requests to these backends in order of priority. Back to our example, we are going to assign openai1 the top priority (priority 1), assign openai2 to priority 2 and add openai3 with priority 3 This will mean that requests will be forwarded to openai1 (priority 1), but if the service is unreachable, the calls will reroute to hit openai2 defined in the next priority group and so on. 3. Weighted Here, you assign weights to your backends, and requests will be distributed based on these relative weights. For our example above, we want to be even more specific by saying that while all requests default to openai1, in the event of its failure, we now want requests to be equally distributed to our priority 2 backends (specified by the 50/50 weight allocation) Now, configure your circuit breaker rules The next step is to define rules to that listen to the events in your API, and trip when specified conditions are met. Let's look at the example below to learn more about how this works. Inside your CircuitBreaker property configuration, you define an array that can hold multiple rules This section defines the conditions that must be met for the circuit breaker to trip. a. The circuit breaker will trip if there is at least one failure b. The number of failures specified in count will be monitored within 5-minute intervals c. We are looking out for errors that return a status code of 429 (Too Many Requests), and you can define a range of codes here The circuit will remain tripped for 1 minute, after which it will reset and route traffic to the endpoint Alright, so what should be my next steps? This article just introduced you to one of the many Generative AI supported capabilities in Azure API Management. We have more policies that you can use to better manage your AI APIs, covered in other articles in this series. Do check them out. Do you have any resources I can look at in the meantime to learn more? Absolutely! Check out: - https://learn.microsoft.com/en-us/azure/api-management/set-backend-service-policy https://learn.microsoft.com/en-us/azure/api-management/backends?tabs=bicep https://github.com/Azure-Samples/AI-Gateway/tree/main/labs/backend-pool-load-balancing