agentic workflows
14 TopicsAdding a Fallback Model to Hermes with Microsoft Foundry
So the plan was simple. Leave the Bedrock configuration untouched, then wire Microsoft Foundry in behind it as a fallback, so Hermes always has somewhere else to go when the primary provider is not responding. A few other reasons pushed me towards Foundry in particular: Redundancy that does not need me. If Bedrock is throttled or out of quota, I want Hermes to fail over on its own rather than waiting for me to notice. A catalogue I already pay for. Foundry puts the latest GPT models next to open-weight and partner models in one place, so I can pick a model that suits the task instead of settling for whatever a single provider happens to offer. Enterprise controls out of the box. Region pinning, private networking, content filters and per-deployment quota all sit in the same portal, which makes the setup far easier to defend to a security reviewer. Learning the mechanics before I need them. Working out how Hermes handles a provider chain is much nicer on a quiet Tuesday than during a live outage. Here is the short version, if you are deciding whether to read on. Time: about thirty minutes if nothing goes wrong. Cost: pay-as-you-go tokens only, and none at all while the fallback sits idle. Result: an assistant that keeps answering when your primary provider stops. Before you start, you will need three things: a machine with Hermes already installed and a working primary provider configured, an Azure subscription with access to Microsoft Foundry in a region you can actually deploy into, and enough quota in that region to create a deployment. One thing that made this easy to justify: Foundry deployments bill per token on the standard pay-as-you-go tier. A fallback provider that never gets invoked costs nothing beyond the requests it actually serves, so the insurance is close to free until the day you need it. Chat surface (CLI, messaging) → Hermes Gateway → Primary Amazon Bedrock → Fallback Microsoft Foundry Figure 1: Where the fallback sits. Every request goes through the Hermes gateway to the primary provider; only when that provider is unavailable does the chain continue to Microsoft Foundry. Part 1: Deploying a Model on Microsoft Foundry The first half of this job happens entirely inside the Microsoft Foundry portal and has nothing to do with Hermes yet. All you are really doing here is making sure your Azure subscription can serve a model, and that you hold an endpoint and key Hermes can authenticate with later. 1. Deploy model in Foundry → 2. Copy endpoint + key → 3. hermes fallback add → 4. Authenticate → 5. Select models, test Figure 2: The whole setup in five moves. The first two happen in the Microsoft Foundry portal (orange); the rest happen on the Hermes machine (blue). Go to Microsoft Foundry > Build > Models > Deploy > Deploy a base model. You can deploy a fine-tuned model instead if you already have one, which works just as well with Hermes. Check the region shown at the top of the portal before you commit, because both model availability and deployment quota differ from one region to the next. Then deploy the model you have selected: In this case I deployed gpt-5.6-sol, which is the model Hermes will fall back to. The choice was deliberate rather than exciting. My primary model on Bedrock is a general-purpose chat model, and a fallback is only useful if the answers it gives feel like a continuation of the same conversation rather than a different assistant wearing the same name. The gpt-5.6-sol deployment matches that behaviour closely, it was available in the region I wanted to pin, and the quota I was granted comfortably covers a day of normal use. If a fallback surprises you the first time it fires, it is the wrong fallback. Once the deployment finishes, open it and take note of two values: the target endpoint URI and the API key. Copy both somewhere safe now, because you will be pasting them into Hermes in the next part. If your organisation rotates keys on a schedule, use a key with the longest life you are allowed, since a fallback secured with a credential that expires quietly stops being a fallback. What to copy Where it lives in the portal Where Hermes asks for it Target endpoint URI Deployment > Endpoint > Target URI "Endpoint" prompt in hermes fallback add API key Deployment > Endpoint > Key "API key" prompt, or choose Entra ID instead Deployment name Deployment > Details > Name Shown in the model list Hermes returns Region Top of the portal, next to the resource Must match the region you deployed into Figure 3: Everything Hermes will ask for, and where to find each value before you leave the portal. Part 2: Adding Foundry to Hermes as a Fallback With the Foundry side sorted, everything from here happens in the Hermes CLI. One thing worth knowing before you start: this is the fallback command, not the primary model command, so your existing Bedrock configuration is left completely alone. Nothing in this section can break what is already working, which makes it a good one to try on a live setup. Run the Hermes fallback command: When Hermes asks which provider to add, choose Azure Foundry. The picker still carries the old name; it is the same service that the portal now calls Microsoft Foundry. Paste the target endpoint URI from your deployment, then authenticate with the API key you copied earlier. Hermes also offers Microsoft Entra ID at this prompt, which is the better option if your organisation would rather not have a static key sitting on the machine. If authentication fails here, check the endpoint before you start suspecting the key. In my experience the endpoint is wrong far more often than the credential is, usually because the deployment name at the end of the URI does not match the deployment you actually created. Once authentication succeeds, Hermes lists the deployments your Foundry resource exposes and asks which ones you want to use. You can select more than one, and the order is not cosmetic: Hermes walks down the chain from top to bottom whenever the provider above is unavailable. Treat that list as a priority order, not a shopping basket. What happens to the primary What Hermes does What you see in the chat Responds normally Routes every request to the primary and never touches the chain Nothing. The fallback stays idle Throttled or out of quota Retries the next provider down the chain on the same request A reply, served by the fallback model Endpoint unreachable Keeps failing over on each new request until the primary recovers Slightly different tone and latency, but a working assistant Every provider fails Returns the error rather than hanging An error worth chasing with hermes status Figure 4: The chain in practice. The fallback only earns its keep in the middle two rows, which is exactly why it is easy to forget you configured it. Part 3: Promoting Foundry to the Primary Model At this stage Foundry is sitting in the back seat as a backup. I wanted to reverse the arrangement and make Foundry the primary while Bedrock slides down into the fallback slot, partly because I preferred keeping day-to-day traffic inside my Azure subscription, and partly because I wanted proof the chain works in both directions. Before promotion After promotion Primary: Amazon Bedrock → Primary: Microsoft Foundry Fallback: Microsoft Foundry → Fallback: Amazon Bedrock Figure 5: The promotion, in effect. Nothing is added or removed; the two providers simply trade places in the chain. There is no dedicated "promote" command in Hermes, so the manual route is a short sequence of steps rather than a single instruction: Select the fallback provider/model as the new primary: hermes model Remove the now-duplicate model from the fallback chain: hermes fallback remove Optionally add the old primary model as a fallback: hermes fallback add Restart the messaging gateway: hermes gateway restart Verify the result: hermes status / hermes fallback list That sequence works, and it is good to know what is happening underneath. But since I already had a working provider configured, I would rather just ask Hermes to rearrange itself. This is the part I genuinely enjoy about the tool: the configuration is something you can talk to, not only something you type commands at. Prompt: Okay now please make the model I configured on Microsoft Foundry into the main model, and make the Bedrock one the fallback model! Hermes rewrites the provider chain on its own and confirms the swap once it is done, which is a great deal less error-prone than running the five commands by hand. Part 4: Testing the Switch Configuration you have not tested is just an assumption with extra steps, so the next thing is to confirm Hermes really is talking to Foundry. Type /model when running Hermes to bring up the model picker. You will be prompted to select a provider first. Pick the Microsoft Foundry entry, then choose the specific deployment from the list underneath it. The active model should switch straight away. Send it a plain "Hello" to check that the deployment actually responds, rather than just looking correct in the menu. Appearing in a dropdown and serving a request are two very different things. A second test is worth the thirty seconds it costs: run hermes status to confirm which provider is live, then hermes fallback list to confirm the chain is ordered the way you intended. The picker tells you what you selected; those two commands tell you what Hermes will actually do at three in the morning. Part 5: The Obstacle, and What It Actually Taught Me Every walkthrough has the part the author quietly leaves out. Here is mine: the wrinkle was not the model, it was capacity. My first attempt deployed into the region closest to me out of habit, and the portal turned it down because there was no capacity left for that model at the tier I asked for. The model was clearly listed in the catalogue; being listed and being deployable in your region, on your subscription, at your quota, are three separate questions. Redeploying in a different region fixed it in a couple of minutes, but it meant the endpoint URI changed, which in turn meant the value I had already pasted into Hermes was stale. Re-running hermes fallback add against the new endpoint sorted it out. The lesson is cheap enough to hand over for free: check quota and regional capacity for your specific subscription before you design a walkthrough, a demo or a production fallback around one deployment. In the Foundry portal, Management then Quota shows exactly what you have been granted per region and per model family, which is the only list that matters. Symptom Likely cause Fix Deployment rejected in the portal No capacity for that model at the tier you asked for, in that region Deploy in another region, or drop to a smaller tier Hermes rejects the credential Endpoint URI does not match the deployment you created Re-copy the target URI from the deployment, not the resource Provider authenticates but lists nothing Key belongs to a different Foundry resource Check you are in the right resource, then re-run hermes fallback add Fallback never fires Chain ordered the wrong way round hermes fallback list, then reorder Figure 6: The four things that went wrong, or nearly did, and what fixed each one. There is a silver lining worth stating plainly. Because the fallback chain was already in place, a deployment that refused to come up did not take the assistant down with it. That is precisely the scenario this whole exercise was meant to cover, and it turned up on day one without me having to simulate it. Command Cheat Sheet Everything used in this walkthrough, collected in one place: hermes fallback add: attach a provider to the fallback chain hermes fallback remove: drop a provider from the chain hermes fallback list: show the chain in priority order hermes model: set the primary model hermes gateway restart: restart the messaging gateway after a change hermes status: confirm which provider is currently live /model: switch models from inside a running session Conclusion Adding Microsoft Foundry as a fallback behind my existing Bedrock setup took an afternoon, and most of that was spent recovering from a regional capacity limit I should have checked first. The work itself is small: deploy a model, copy the endpoint and key, run hermes fallback add, authenticate, pick your deployments. The payoff is that Hermes no longer depends on one provider staying healthy. Three things are worth carrying away from this: Check quota, not just the catalogue. The Foundry catalogue shows what Microsoft offers. It does not show what your subscription and region can actually deploy today. Confirm that first, before you build anything on top of a specific deployment. Order your fallback chain deliberately. Hermes works down the list from top to bottom, so the sequence you choose during setup is the failover policy you are going to live with. Put the model you actually trust at the top. Treat the endpoint as part of the credential. Redeploying in a new region changes the endpoint URI, and a fallback pointed at an endpoint that no longer exists is not a fallback. Re-run the setup whenever the deployment moves. The switch from Bedrock primary to Foundry primary also proved the chain runs in both directions, which is the real point. Provider redundancy is only useful if you have watched it work. Next on my list is deliberately breaking the primary provider to confirm the failover triggers on its own, without me typing a single command. If you run this against a different model, region or provider pairing, I would genuinely like to know how it went, particularly if your quota experience was better than mine. Drop it in the comments.286Views0likes0CommentsIntegrating Microsoft Foundry with OpenClaw: Step by Step Model Configuration
Step 1: Deploying Models on Microsoft Foundry Let us kick things off in the Azure portal. To get our OpenClaw agent thinking like a genius, we need to deploy our models in Microsoft Foundry. For this guide, we are going to focus on deploying gpt-5.2-codex on Microsoft Foundry with OpenClaw. Navigate to your AI Hub, head over to the model catalog, choose the model you wish to use with OpenClaw and hit deploy. Once your deployment is successful, head to the endpoints section. Important: Grab your Endpoint URL and your API Keys right now and save them in a secure note. We will need these exact values to connect OpenClaw in a few minutes. Step 2: Installing and Initializing OpenClaw Next up, we need to get OpenClaw running on your machine. Open up your terminal and run the official installation script: curl -fsSL https://openclaw.ai/install.sh | bash The wizard will walk you through a few prompts. Here is exactly how to answer them to link up with our Azure setup: First Page (Model Selection): Choose "Skip for now". Second Page (Provider): Select azure-openai-responses. Model Selection: Select gpt-5.2-codex , For now only the models listed (hosted on Microsoft Foundry) in the picture below are available to be used with OpenClaw. Follow the rest of the standard prompts to finish the initial setup. Step 3: Editing the OpenClaw Configuration File Now for the fun part. We need to manually configure OpenClaw to talk to Microsoft Foundry. Open your configuration file located at ~/.openclaw/openclaw.json in your favorite text editor. Replace the contents of the models and agents sections with the following code block: { "models": { "providers": { "azure-openai-responses": { "baseUrl": "https://<YOUR_RESOURCE_NAME>.openai.azure.com/openai/v1", "apiKey": "<YOUR_AZURE_OPENAI_API_KEY>", "api": "openai-responses", "authHeader": false, "headers": { "api-key": "<YOUR_AZURE_OPENAI_API_KEY>" }, "models": [ { "id": "gpt-5.2-codex", "name": "GPT-5.2-Codex (Azure)", "reasoning": true, "input": ["text", "image"], "cost": { "input": 0, "output": 0, "cacheRead": 0, "cacheWrite": 0 }, "contextWindow": 400000, "maxTokens": 16384, "compat": { "supportsStore": false } }, { "id": "gpt-5.2", "name": "GPT-5.2 (Azure)", "reasoning": false, "input": ["text", "image"], "cost": { "input": 0, "output": 0, "cacheRead": 0, "cacheWrite": 0 }, "contextWindow": 272000, "maxTokens": 16384, "compat": { "supportsStore": false } } ] } } }, "agents": { "defaults": { "model": { "primary": "azure-openai-responses/gpt-5.2-codex" }, "models": { "azure-openai-responses/gpt-5.2-codex": {} }, "workspace": "/home/<USERNAME>/.openclaw/workspace", "compaction": { "mode": "safeguard" }, "maxConcurrent": 4, "subagents": { "maxConcurrent": 8 } } } } You will notice a few placeholders in that JSON. Here is exactly what you need to swap out: Placeholder Variable What It Is Where to Find It <YOUR_RESOURCE_NAME> The unique name of your Azure OpenAI resource. Found in your Azure Portal under the Azure OpenAI resource overview. <YOUR_AZURE_OPENAI_API_KEY> The secret key required to authenticate your requests. Found in Microsoft Foundry under your project endpoints or Azure Portal keys section. <USERNAME> Your local computer's user profile name. Open your terminal and type whoami to find this. Step 4: Restart the Gateway After saving the configuration file, you must restart the OpenClaw gateway for the new Foundry settings to take effect. Run this simple command: openclaw gateway restart Configuration Notes & Deep Dive If you are curious about why we configured the JSON that way, here is a quick breakdown of the technical details. Authentication Differences Azure OpenAI uses the api-key HTTP header for authentication. This is entirely different from the standard OpenAI Authorization: Bearer header. Our configuration file addresses this in two ways: Setting "authHeader": false completely disables the default Bearer header. Adding "headers": { "api-key": "<key>" } forces OpenClaw to send the API key via Azure's native header format. Important Note: Your API key must appear in both the apiKey field AND the headers.api-key field within the JSON for this to work correctly. The Base URL Azure OpenAI's v1-compatible endpoint follows this specific format: https://<your_resource_name>.openai.azure.com/openai/v1 The beautiful thing about this v1 endpoint is that it is largely compatible with the standard OpenAI API and does not require you to manually pass an api-version query parameter. Model Compatibility Settings "compat": { "supportsStore": false } disables the store parameter since Azure OpenAI does not currently support it. "reasoning": true enables the thinking mode for GPT-5.2-Codex. This supports low, medium, high, and xhigh levels. "reasoning": false is set for GPT-5.2 because it is a standard, non-reasoning model. Model Specifications & Cost Tracking If you want OpenClaw to accurately track your token usage costs, you can update the cost fields from 0 to the current Azure pricing. Here are the specs and costs for the models we just deployed: Model Specifications Model Context Window Max Output Tokens Image Input Reasoning gpt-5.2-codex 400,000 tokens 16,384 tokens Yes Yes gpt-5.2 272,000 tokens 16,384 tokens Yes No Current Cost (Adjust in JSON) Model Input (per 1M tokens) Output (per 1M tokens) Cached Input (per 1M tokens) gpt-5.2-codex $1.75 $14.00 $0.175 gpt-5.2 $2.00 $8.00 $0.50 Conclusion: And there you have it! You have successfully bridged the gap between the enterprise-grade infrastructure of Microsoft Foundry and the local autonomy of OpenClaw. By following these steps, you are not just running a chatbot; you are running a sophisticated agent capable of reasoning, coding, and executing tasks with the full power of GPT-5.2-codex behind it. The combination of Azure's reliability and OpenClaw's flexibility opens up a world of possibilities. Whether you are building an automated devops assistant, a research agent, or just exploring the bleeding edge of AI, you now have a robust foundation to build upon. Now it is time to let your agent loose on some real tasks. Go forth, experiment with different system prompts, and see what you can build. If you run into any interesting edge cases or come up with a unique configuration, let me know in the comments below. Happy coding!12KViews2likes2CommentsJuly 2025 Recap: Azure Database for PostgreSQL
Hello Azure Community, July delivered a wave of exciting updates to Azure Database for PostgreSQL! From Fabric mirroring support for private networking to cascading read replicas, these new features are all about scaling smarter, performing faster, and building better. This blog covers what’s new, why it matters, and how to get started. Catch Up on POSETTE 2025 In case you missed POSETTE: An Event for Postgres 2025 or couldn't watch all of the sessions live, here's a playlist with the 11 talks all about Azure Database for PostgreSQL. And, if you'd like to dive even deeper, the Ultimate Guide will help you navigate the full catalog of 42 recorded talks published on YouTube. Feature Highlights Upsert and Script activity in ADF and Azure Synapse – Generally Available Power BI Entra authentication support – Generally Available New Regions: Malaysia West & Chile Central Latest Postgres minor versions: 17.5, 16.9, 15.13, 14.18 and 13.21 Cascading Read Replica – Public Preview Private Endpoint and VNet support for Fabric Mirroring - Public Preview Agentic Web with NLWeb and PostgreSQL PostgreSQL for VS Code extension enhancements Improved Maintenance Workflow for Stopped Instances Upsert and Script activity in ADF and Azure Synapse – Generally Available We’re excited to announce the general availability of Upsert method and Script activity in Azure Data Factory and Azure Synapse Analytics for Azure Database for PostgreSQL. These new capabilities bring greater flexibility and performance to your data pipelines: Upsert Method: Easily merge incoming data into existing PostgreSQL tables without writing complex logic reducing overhead and improving efficiency. Script Activity: Run custom SQL scripts as part of your workflows, enabling advanced transformations, procedural logic, and fine-grained control over data operations. Together, these features streamline ETL and ELT processes, making it easier to build scalable, declarative, and robust data integration solutions using PostgreSQL as either a source or sink. Visit our documentation guide for Upsert Method and script activity to know more. Power BI Entra authentication support – Generally Available You can now use Microsoft Entra ID authentication to connect to Azure Database for PostgreSQL from Power BI Desktop. This update simplifies access management, enhances security, and helps you support your organization’s broader Entra-based authentication strategy. To learn more, please refer to our documentation. New Regions: Malaysia West & Chile Central Azure Database for PostgreSQL has now launched in Malaysia West and Chile Central. This expanded regional presence brings lower latency, enhanced performance, and data residency support, making it easier to build fast, reliable, and compliant applications, right where your users are. This continues to be our mission to bring Azure Database for PostgreSQL closer to where you build and run your apps. For the full list of regions visit: Azure Database for PostgreSQL Regions. Latest Postgres minor versions: 17.5, 16.9, 15.13, 14.18 and 13.21 PostgreSQL latest minor versions 17.5, 16.9, 15.13, 14.18 and 13.21 are now supported by Azure Database for PostgreSQL flexible server. These minor version upgrades are automatically performed as part of the monthly planned maintenance in Azure Database for PostgreSQL. This upgrade automation ensures that your databases are always running on the most secure and optimized versions without requiring manual intervention. This release fixes two security vulnerabilities and over 40 bug fixes and improvements. To learn more, please refer PostgreSQL community announcement for more details about the release. Cascading Read Replica – Public Preview Azure Database for PostgreSQL supports cascading read replica in public preview capacity. This feature allows you to scale read-intensive workloads more effectively by creating replicas not only from the primary database but also from existing read replicas, enabling two-level replication chains. With cascading read replicas, you can: Improve performance for read-heavy applications. Distribute read traffic more efficiently. Support complex deployment topologies. Data replication is asynchronous, and each replica can serve as a source for additional replicas. This setup enhances scalability and flexibility for your PostgreSQL deployments. For more details read the cascading read replicas documentation. Private Endpoint and VNET Support for Fabric Mirroring - Public Preview Microsoft Fabric now supports mirroring for Azure Database for PostgreSQL flexible server instances deployed with Virtual Network (VNET) integration or Private Endpoints. This enhancement broadens the scope of Fabric’s real-time data replication capabilities, enabling secure and seamless analytics on transactional data, even within network-isolated environments. Previously, mirroring was only available for flexible server instances with public endpoint access. With this update, organizations can now replicate data from Azure Database for PostgreSQL hosted in secure, private networks, without compromising on data security, compliance, or performance. This is particularly valuable for enterprise customers who rely on VNETs and Private Endpoints for database connectivity from isolated networks. For more details visit fabric mirroring with private networking support blog. Agentic Web with NLWeb and PostgreSQL We’re excited to announce that NLWeb (Natural Language Web), Microsoft’s open project for natural language interfaces on websites now supports PostgreSQL. With this enhancement, developers can leverage PostgreSQL and NLWeb to transform any website into an AI-powered application or Model Context Protocol (MCP) server. This integration allows organizations to utilize a familiar, robust database as the foundation for conversational AI experiences, streamlining deployment and maximizing data security and scalability. For more details, read Agentic web with NLWeb and PostgreSQL blog. PostgreSQL for VS Code extension enhancements PostgreSQL for VS Code extension is rolling out new updates to improve your experience with this extension. We are introducing key connections, authentication, and usability improvements. Here’s what we improved: SSH connections - You can now set up SSH tunneling directly in the Advanced Connection options, making it easier to securely connect to private networks without leaving VS Code. Clearer authentication setup - A new “No Password” option eliminates guesswork when setting up connections that don’t require credentials. Entra ID fixes - Improved default username handling, token refresh, and clearer error feedback for failed connections. Array and character rendering - Unicode and PostgreSQL arrays now display more reliably and consistently. Azure Portal flow - Reuses existing connection profiles to avoid duplicates when launching from the portal. Don’t forget to update to the latest version in the Marketplace to take advantage of these enhancements and visit our GitHub to learn more about this month’s release. Improved Maintenance Workflow for Stopped Instances We’ve improved how scheduled maintenance is handled for stopped or disabled PostgreSQL servers. Maintenance is now applied only when the server is restarted - either manually or through the 7-day auto-restart rather than forcing a restart during the scheduled maintenance window. This change reduces unnecessary disruptions and gives you more control over when updates are applied. You may notice a slightly longer restart time (5–8 minutes) if maintenance is pending. For more information, refer Applying Maintenance on Stopped/Disabled Instances. Azure Postgres Learning Bytes 🎓 Set Up HA Health Status Monitoring Alerts This section will talk about setting up HA health status monitoring alerts using Azure Portal. These alerts can be used to effectively monitor the HA health states for your server. To monitor the health of your High Availability (HA) setup: Navigate to Azure portal and select your Azure Database for PostgreSQL flexible server instance. Create an Alert Rule Go to Monitoring > Alerts > Create Alert Rule Scope: Select your PostgreSQL Flexible Server Condition: Choose the signal from the drop down (CPU percentage, storage percentage etc.) Logic: Define when the alert should trigger Action Group: Specify where the alert should be sent (email, webhook, etc.) Add tags Click on “Review + Create” Verify the Alert Check the Alerts tab in Azure Monitor to confirm the alert has been triggered. For deeper insight into resource health: Go to Azure Portal > Search for Service Health > Select Resource Health. Choose Azure Database for PostgreSQL Flexible Server from the dropdown. Review the health status of your server. For more information, check out the HA Health status monitoring documentation guide. Conclusion That’s a wrap for our July 2025 feature updates! Thanks for being part of our journey to make Azure Database for PostgreSQL better with every release. We’re always working to improve, and your feedback helps us do that. 💬 Got ideas, questions, or suggestions? We’d love to hear from you: https://aka.ms/pgfeedback 📢 Want to stay on top of Azure Database for PostgreSQL updates? Follow us here for the latest announcements, feature releases, and best practices: Azure Database for PostgreSQL Blog Stay tuned for more updates in our next blog!740Views2likes0CommentsAI Agents in Production: From Prototype to Reality - Part 10
This blog post, the tenth and final installment in a series on AI agents, focuses on deploying AI agents to production. It covers evaluating agent performance, addressing common issues, and managing costs. The post emphasizes the importance of a robust evaluation system, providing potential solutions for performance issues, and outlining cost management strategies such as response caching, using smaller models, and implementing router models.1.7KViews3likes1Comment
Building Agentic Solutions with Autogen 0.4
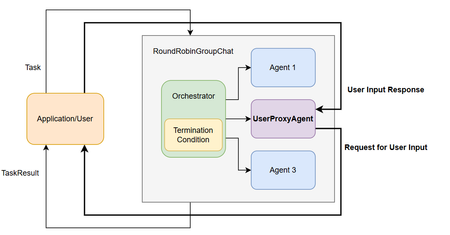
Multi Agent Systems are a consequence of an organized interaction between diverse agents to achieve a goal. Similar to human collaborations, Agentic solutions are expected to collaborate effectively in accordance with the goal to be accomplished. A crucial aspect is adopting the appropriate design pattern depending on the task on hand. Let us look at the design of Agentic Solutions is stages. Stage 1: Determine all the required Agents and define the required tools which can be leveraged by the Agents. The tools may have access requirements which has to be handled with appropriate security constraints. In Autogen, this is supported through multiple patterns which address different requirements. At its core, Autogen provides the ability to leverage LLMs, human inputs, tools or a combination. Autogen 0.4 in particular has provided an high-level API through AgentChat with preset Agents allowing for variations in agent responses. Some of the preset Agents include 1) AssistantAgent is a built-in agent which can use a language model and tools. It can also handle multimodal messages and instructions of the Agents function. 2) UserProxyAgent: An agent that takes user input returns it as responses. 3) CodeExecutorAgent: An agent that can execute code. 4) OpenAIAssistantAgent: An agent that is backed by an OpenAI Assistant, with ability to use custom tools. 5) MultimodalWebSurfer: A multi-modal agent that can search the web and visit web pages for information. 6) FileSurfer: An agent that can search and browse local files for information. 7) VideoSurfer: An agent that can watch videos for information. A Custom Agents can be used when the preset Agents do not address the need. Stage 2: Identify the optimal interaction between the team of agents. This can include a human in the loop proxy agent which serves as an interface for human inputs. Autogen supports multiple interaction patterns 1) GroupChat is a high-level design pattern for interleaved interactions. In Auotgen 0.4, GroupChat got further abstracted with RoundRobinGroupChat or SelectorGroupChat . This means you can choose to go with abstracted options of RoundRobinGroupChat, SelectorGroupChat or customize it to your need with the base GroupChat in the core. RoundRobinGroupChat team configuration where all agents share the same context respond in a round-robin fashion. Broadcasts response to all agents, provides a consistent context. Human In the Loop - UserProxyAgent SelectorGroupChat team where participants take turns broadcasting messages to all other members. A generative model selects the next speaker based on the shared context, enabling dynamic, context-aware collaboration. selector_func argument with a custom selector function to override the default model-based selection. GroupChat in core 2) Sequential Agents Stage 3: Determine the memory and message passing between the Agents Memory can be the context for the Agent which could be the conversation history, RAG which is pulled from a ListMemory or a Custom Memory Store like a Vector DB. Messaging between Agents uses ChatMessage. This message type allows both text and multimodal communication and includes specific types such as TextMessage or MultiModalMessage. Stage 4: Articulate the Termination condition The following Termination options are available in Autogen 0.4 MaxMessageTermination: Stops after a specified number of messages have been produced, including both agent and task messages. TextMentionTermination: Stops when specific text or string is mentioned in a message (e.g., “TERMINATE”). TokenUsageTermination: Stops when a certain number of prompt or completion tokens are used. This requires the agents to report token usage in their messages. TimeoutTermination: Stops after a specified duration in seconds. HandoffTermination: Stops when a handoff to a specific target is requested. Handoff messages can be used to build patterns such as Swarm. This is useful when you want to pause the run and allow application or user to provide input when an agent hands off to them. SourceMatchTermination: Stops after a specific agent responds. ExternalTermination: Enables programmatic control of termination from outside the run. This is useful for UI integration (e.g., “Stop” buttons in chat interfaces). StopMessageTermination: Stops when a StopMessage is produced by an agent. TextMessageTermination: Stops when a TextMessage is produced by an agent. FunctionCallTermination: Stops when a ToolCallExecutionEvent containing a FunctionExecutionResult with a matching name is produced by an agent. Stage 5: Optionally manage the state This is useful in web application where stateless endpoints respond to requests and need to load the state of the application from persistent storage. The state can be saved by using the save_state() call in the AssistantAgent. assistant_agent.save_state() Finally, Logging and Serializing is also available for debugging and sharing. A well-designed Agentic Solution is crucial to be both optimal and effective in accomplishing the assigned goal. References Autogen - https://microsoft.github.io/autogen/stable/index.html1.7KViews3likes2CommentsAI Agents: The Multi-Agent Design Pattern - Part 8
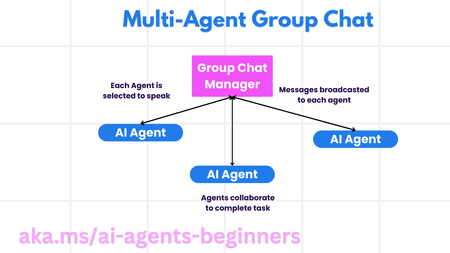
This blog post, Part 8 in a series on AI agents, explores the Multi-Agent Design Pattern, outlining the benefits and key components of building systems with multiple interacting agents. It details the scenarios where multi-agent systems excel (large workloads, complex tasks, diverse expertise), highlights their advantages over single-agent approaches (specialization, scalability, fault tolerance), and discusses the fundamental building blocks for implementation, including agent communication, coordination mechanisms, and architectural considerations. The post introduces common multi-agent patterns (group chat, hand-off, collaborative filtering) and illustrates these concepts with a refund process example. Finally, it includes a practical assignment and provides links to further resources and previous posts in the series.5.8KViews1like0CommentsAI Agents: Planning and Orchestration with the Planning Design Pattern - Part 7
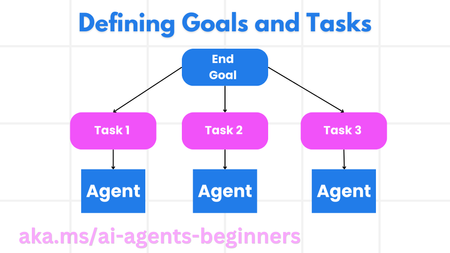
This blog post, Part 7 in a series on AI agents, focuses on the Planning Design Pattern for effective task orchestration. It explains how to define clear goals, decompose complex tasks into manageable subtasks, and leverage structured output (e.g., JSON) for seamless communication between agents. The post includes code snippets demonstrating how to create a planning agent, orchestrate multi-agent workflows, and implement iterative planning for dynamic adaptation. It also links to a practical example notebook (07-autogen.ipynb) and further resources like AutoGen Magnetic One, encouraging readers to explore advanced planning concepts. Links to the previous posts in the series are provided for easy access to foundational AI agent concepts.3KViews1like0CommentsAI Agents: Building Trustworthy Agents- Part 6
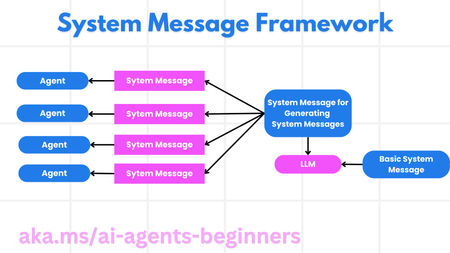
This blog post, Part 6 in a series on AI agents, focuses on building trustworthy AI agents. It emphasizes the importance of safety and security in agent design and deployment. The post details a system message framework for creating robust and scalable prompts, outlining a four-step process from meta prompt to iterative refinement. It then explores various threats to AI agents, including task manipulation, unauthorized access, resource overloading, knowledge base poisoning, and cascading errors, providing mitigation strategies for each. The post also highlights the human-in-the-loop approach for enhanced trust and control, providing a code example using AutoGen. Finally, it links to further resources on responsible AI, model evaluation, and risk assessment, along with the previous posts in the series.988Views3likes0CommentsStep-by-Step Tutorial: Building an AI Agent Using Azure AI Foundry
This blog post provides a comprehensive tutorial on building an AI agent using Azure AI Agent service and the Azure AI Foundry portal. AI agents represent a powerful new paradigm in application development, offering a more intuitive and dynamic way to interact with software. They can understand natural language, reason about user requests, and take actions to fulfill those requests. This tutorial will guide you through the process of creating and deploying an intelligent agent on Azure. We'll cover setting up an Azure AI Foundry hub, crafting effective instructions to define the agent's behavior, including recognizing user intent, processing requests, and generating helpful responses. We'll also discuss testing the agent's conversational abilities and provide additional resources for expanding your knowledge of AI agents and the Azure AI ecosystem. This hands-on guide is perfect for anyone looking to explore the practical application of Azure's conversational AI capabilities and build intelligent virtual assistants. Join us as we dive into the exciting world of AI agents.18KViews2likes2CommentsAI Agents: Mastering Agentic RAG - Part 5
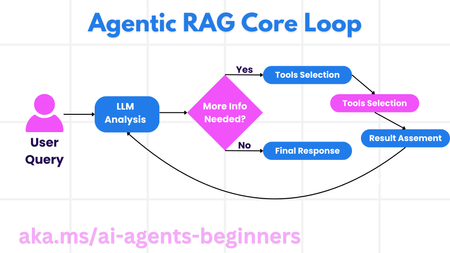
This blog post, Part 5 of a series on AI agents, explores Agentic RAG (Retrieval-Augmented Generation), a paradigm shift in how LLMs interact with external data. Unlike traditional RAG, Agentic RAG allows LLMs to autonomously plan their information retrieval process through an iterative loop of actions and evaluations. The post highlights the importance of the LLM "owning" the reasoning process, dynamically selecting tools and refining queries. It covers key implementation details, including iterative loops, tool integration, memory management, and handling failure modes. Practical use cases, governance considerations, and code examples demonstrating Agentic RAG with AutoGen, Semantic Kernel, and Azure AI Agent Service are provided. The post concludes by emphasizing the transformative potential of Agentic RAG and encourages further exploration through linked resources and previous blog posts in the series.4KViews1like0Comments