First published on TECHNET on Sep 27, 2011
SQL Server 2008 R2 provides a Sysprep functionality as an advanced installation option: it is a two-step installation process just like the Windows Sysprep tool, which allows user to install SQL Server setup files (Prepare Image step) and then configure to finish SQL Server installation later (Complete Image step). SQL Server Sysprep can be used prior to Windows Sysprep to create an operating system image/VHD that includes an unconfigured SQL Server installation. After completing the configuration of the operating system, users can then configure and complete the SQL Server install.
In addition to the configuration support of Windows operating system (through Guest OS Profile), VMM 2012 added the functionality to support the configuration of SQL Server through SQL Server Profile . With VMM 2012, users can deploy applications (or services in the VMM terms) that contain SQL Server installation.
How to prepare a SQL Server image
It’s strongly recommended to follow the SQL Server instructions on a VM to prepare an image. You can find how to do it with UI from here:
http://blogs.msdn.com/b/petersad/archive/2009/12/17/sql-server-2008-r2-sysprep-step-by-step.aspx
You can also prepare image from command prompt: go to SQL Server folder where setup.exe is located, and run:
Setup.exe /q /ACTION=PrepareImage /FEATURES=SQL,RS /InstanceID =<MyInstanceID> /IACCEPTSQLSERVERLICENSETERMS
( Note : InstanceID is not the same as InstanceName although they both can be specified during SQL Server installation: InstanceID is only used during SQL Server installation, and it is actually an identifier so that you can prepare multiple SQL Server instances and refer to a specific one to configure in the Complete Image step; whereas InstanceName is used after SQL Server installation to connect to a SQL Server instance. It is important to make a note of the InstanceID used during the sysprep operation as this value will be needed when creating the VMM SQL Server Profile below.)
After it finishes, you can run Windows Sysprep tool to prepare a VHD and hand it off to VMM.
http://technet.microsoft.com/en-us/library/cc721973(WS.10).aspx
How to use VMM SQL Server profile to deploy SQL Server
SQL Server Profile is supported for services, but not for standalone VM creation. Therefore, there are three main steps to use SQL Server profile to deploy VMs and configure SQL Server:
1. Create SQL Server profile.
2. Create Service Template.
3. Deploy Service.
Here are some more details about each step:
1. Create SQL Server profile.
1a. Open VMM admin console; click “Library” in the navigation pane; expand “Profiles” you will see SQL Server Profiles; right click “SQL Server Profiles” and choose “Create SQL Server Profile”.

1b. Specify desired SQL Server configurations. In the “New SQL Server Profile dialog”, give a name for the SQL Server profile in the “General” tab; click “SQL Server Configuration” tab; click “New SQL Server Deployment”.
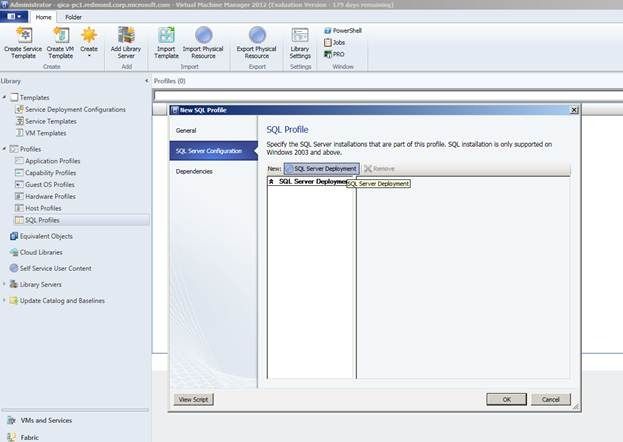
Note : Each SQL Server Deployment corresponds to the configuration of one SQL Server instance. If the configuration of multiple SQL Server instances is desired on the same VM, you need to create multiple SQL Server Deployments.
Most of the settings in this dialog can be mapped to SQL Server setup configurations (SQL Server setup settings can be found here: http://msdn.microsoft.com/en-us/library/ms144259.aspx ). Some are VMM artifacts though, for example, the “Name”, “Installation Run As Account” (specify the account to run SQL Server setup), “Timeout (seconds)” (specify the timeout for this SQL Server installation) properties. Here are the details of each property:
Name : Required. It specifies the name of this SQL Server Deployment and is a VMM artifact.
Instance Name : Optional. It specifies the SQL Server instance name, if not set, default instance name (MSSQLSERVER) will be used.
Instance Id : Required. This is the instance Id that you choose during SQL Server prepare image step.
Installation Run As Account : Optional. The Run As Account under which you want to run the SQL Server setup. It is mainly needed for two reasons: the Complete Image step still needs to access SQL Server installation media, if the SQL Server installation media is in a network share which requires a domain account to access; or, when SQL service accounts need to be domain accounts, which will be validated by SQL Server setup running under this installation account.
This property is VMM artifact: if not specified, VMM service account will be used. Alternatively, you can specify it as a service setting with the double at (“@”) syntax (service setting name enclosed by a starting and trailing “@”, for example, “@SQLInstallAccount@”), and therefore allow to specify the Run As Account later at deployment time. This account has to be in the VM’s administrators group for the SQL Server install to succeed, since SQL Server setup requires administrator privilege.
Product Key : Optional. It specifies the product key for the edition of SQL Server. If it is not specified and the SQL Server does not have volume license, Evaluation is used. Just like Installation Run As Account, this property can also use service setting with the double at (“@”) syntax.
Timeout (seconds) : Optional. It specifies the timeout in seconds that SQL Server installation has to finish, and the installation process will be killed when this timeout is reached. The default value is 1 hour.

Media Source : Required. It specifies the path to the installation media folder where setup.exe is located. The Complete Image step still needs to access SQL Server installation media. Most commonly, you can either copy the installation media to the VHD or to a network share.
Note: If network share is used, the Installation Run As Account must be specified and have access to the network share, and it must have administrator privilege for the guest VM as well. Otherwise, the install process cannot launch.
SQL Server Administrators : Required. Use this parameter to provision logins to be members of the sysadmin role.
Security Mode : Optional. It specifies the SQL Server security mode. If not specified, Windows authentication will be used.
SA Password Run As Account : It specifies the password for the SQL Server sa account, and it is required when the security mode is SQL Server authentication. This field can also use configurable service settings (e.g. @SQL Server SA Run As Account@).
Enable remote connections using TCP/IP : Optional. It specifies the state of the TCP protocol for the SQL Server service.
Enable remote connections using named pipes : Optional. It specifies the state of the Named Pipes protocol for the SQL Server service.
SQL Server configuration file : Among all the settings that SQL Server setup allows to configure, VMM chooses some most commonly used settings and allow users to configure them through VMM UI. For the rest of settings, user can provide an .ini configuration file that includes the desired configurations. This should sound familiar for those who have previously used the Windows OS answer file for VMM OS profile. Note that this configuration file must be present in a VMM Library Share in order for it to be available.
For example, a sample SQL Server configuration file (sqlConfig.ini) looks like:
[SQLSERVER2008]
AGTSVCSTARTUPTYPE="Manual"
FARMADMINPORT="0"
SQLSVCSTARTUPTYPE="Automatic"

SQL Server Service Run As Account : Required. It specifies the startup account for the SQL Server service.
SQL Server Agent Run As Account : Required. It specifies the account for the SQL Server Agent service.
Reporting Services Run As Account : Optional. It specifies the startup account for Reporting services.
Note : If Windows built-in accounts (“NT AUTHORITY\SYSTEM”, “ NT AUTHORITY\LocalService”, “NT AUTHORITY\NetworkService”) are desired, VMM built-in Run As Accounts can be used. Similar to Installation Run As Account, you can specify them as a service setting using the double at (“@”) syntax and allow them to be determined at deployment time.

1c. Click “OK” to save the SQL Server profile.
2. Create Service Template
2a. Create VM Template. In the “Configure SQL Server” tab, pick the SQL Server profile that we just created.

2b. Create Service Template. In the navigation pane, pick “Library” tab; Expand “Templates”, right click on “Service Templates” and choose “Create Service Template”; Fill in “Name” and “Release”, choose “Single Machine” from “Patterns” and click “OK”. Then in the service template designer, drag and drop the vm template that we just created from “VM Templates” list on the left to the designer canvas; and click “Save and Validate” on the ribbon.

3. Deploy Service. Click “Configure Deployment” on the ribbon. Here is the “Jobs” view of the service deployment.

We can go to the VM and look at the SQL Server setup logs “%programfiles%\Microsoft SQL Server\100\Setup Bootstrap\Log\ ”. The file summary.txt shows that the second step of SQL Server install, i.e., the CompleteImage step, has finished successfully.

Servicing a service with SQL Server profile changes
After a service has been deployed, we can apply changes to it by servicing the service. There are two types of servicing: conventional servicing and image-based servicing, and the main difference between them is that image-based servicing will destroy the VMs in the service and re-create VMs, and more changes (e.g., administrator password, etc.) can be applied since image-based servicing acts like a fresh service deployment.
Servicing a service with SQL Server profile changes is not supported for conventional servicing. This means, if a service’s current service template and pending service template differ in SQL Server profile (e.g., a SQL Server install has been added/removed, or the configuration settings for the same SQL Server install change), these SQL Server profile changes will not be applied during conventional servicing. Below is the conventional servicing UI which shows the warning that SQL Server profile changes will not be applied.

Servicing SQL Server profile is supported for image-based servicing though, but it is not recommended , since the old databases will be destroyed and you will lose data! The following is image-based servicing UI where the actions show VMM will install a SQL Server instance, and it does not have the warning of SQL Server profile change not applicable.

Diagnosing SQL Server deployment failures
When the SQL Server deployment fails, you may take a look at the time-stamped SQL Server setup logs (e.g., 20110516_114104) inside the VM under “%programfiles%\Microsoft SQL Server\100\Setup Bootstrap\Log\ ”. If the time-stamped log folder does not exists, the cause is most likely that VMM did not successfully launch the SQL Server setup process; otherwise, the failure is most likely due to incorrect SQL Server settings (e.g., user gives incorrect InstanceId to VMM).
Note : In the failure case, restarting the service deployment/servicing job will skip the failed SQL Server deployment. The following application deployments that depend on the SQL Server instance (e.g., SQL Server data-tier applications) will fail too. Users have to figure out the cause of the failure and fix it out of band (e.g., manually install SQL Server) before restarting the VMM job.
SQL Server Setup process is not successfully launched

One possible reason for this type of failures is that wrong Media Source is specified where the SQL Server setup.exe file should be located.
Another possible reason is the “Installation Run As Account” specified for VMM to use does not have administrator privilege, but SQL Server setup requires administrator privilege and hence the failure. There are two possible solutions:
a. Users can re-prepare the vhd image by adding the account for “Installation Run As Account” to the administrators group, and then run Windows Sysprep tool.
b. If you are using an OS of Windows 2008 or above, you have another option to use a custom OS answer file (.xml) as below (need to replace the domain and user name as highlighted).
<?xml version="1.0" encoding="utf-8"?>
<unattend xmlns="urn:schemas-microsoft-com:unattend">
<servicing></servicing>
<settings pass="oobeSystem">
<component name="Microsoft-Windows-Shell-Setup" processorArchitecture="x86" publicKeyToken="31bf3856ad364e35" language="neutral" versionScope="nonSxS" xmlns:wcm="http://schemas.microsoft.com/WMIConfig/2002/State" xmlns:xsi="http://www.w3.org/2001/XMLSchema-instance">
<OOBE>
<HideEULAPage>true</HideEULAPage>
<HideWirelessSetupInOOBE>true</HideWirelessSetupInOOBE>
<NetworkLocation>Work</NetworkLocation>
<ProtectYourPC>3</ProtectYourPC>
</OOBE>
<ShowWindowsLive>false</ShowWindowsLive>
<DisableAutoDaylightTimeSet>false</DisableAutoDaylightTimeSet>
<BluetoothTaskbarIconEnabled>false</BluetoothTaskbarIconEnabled>
<TimeZone>Eastern Standard Time</TimeZone>
<UserAccounts>
<DomainAccounts>
<DomainAccountList wcm:action="add">
<Domain>contoso</Domain>
<DomainAccount wcm:action="add">
<Name>user1</Name>
<Group>Administrators</Group>
</DomainAccount>
</DomainAccountList>
</DomainAccounts>
</UserAccounts>
<DoNotCleanTaskBar>true</DoNotCleanTaskBar>
</component>
</settings>
</unattend>
Modify the VM template to pick the above created answer file (in the “OS Configuration” tab of the VM template, choose “Answer File”). Then create a service template with this VM template and deploy service as aforementioned.

2. SQL Server setup process is launched but terminated due to the timeout is reached. An obvious solution is to increase the timeout.

3. SQL Server setup fails due to incorrect settings. If the SQL Server setup process is successfully launched, a time-stamped log folder will be created under “%programfiles%\Microsoft SQL Server\100\Setup Bootstrap\Log\ ”. The summary.txt file tells us that ComplateImage step failed with some exit/error code (in this case, I intentionally gave a wrong SQL Server InstanceId to VMM). This KB article from MSDN tells user how to read SQL Server setup log files:
http://support.microsoft.com/kb/955396

Hope this is useful information,
Qingbo Cai, System Development Engineer, SCVMM
Updated Mar 11, 2019
Version 4.0System-Center-Team Microsoft
MicrosoftJoined February 15, 2019
System Center Blog
Follow this blog board to get notified when there's new activity


