This post is a continuation in the series which describes the System Center common platform components implemented in Service Manager. Previous posts:
The System Center Platform in Service Manager Part 1: Introduction
The System Center Platform in Service Manager Part 2: The Model-Based Database
The System Center Platform in Service Manager Part 2: The Model-Based Database - Try It!
The System Center Platform in Service Manager Part 3: The System Center Data Access Service
The System Center Platform in Service Manager Part 4: The System Center Management Service
The System Center Platform in Service Manager Part 4: The System Center Management Service – Try It!
The System Center Platform in Service Manager Part 5: The Management Configuration Service
The System Center Platform in Service Manager Part 6: The Data Warehouse
In the last post in this series, we learned about the Data Warehouse and Reporting Infrastructure. In this post, I’ll show you how you can extend the data warehouse schema to store additional data we don’t store out of the box. Then I’ll show you the quick and dirty way to write a report over that data.
For most people (including myself when I first started this project) the data warehousing terminology can absolutely sound like a foreign language. If you are going to be working with the Service Manager data warehouse I strongly recommend that you become intimately familiar with these concepts:
Out of the box, we don’t provide a dimension or facts for installed software in Service Manager 2010. It’s easy enough to add those and to create a report for it so I’ll show you how in this post. Remember the purpose of this series of blog posts on the System Center common platform is just to give you an overview of each of the pieces of the architecture and a quick example you can try on your own to get some hands on experience. There is much more that you can do with the data warehouse and reporting than what I will show in this post.
First, let’s start by creating a new management pack. Remember to save your MP so that the file name is the same as the ID of the management pack. Here is the Manifest section. You can see that we need to make a reference to the system MP and the Data Warehouse base management packs. We also need to take a dependency on the Software Library MP because that MP contains the ClassType definition of the Software Item class we are going to create dimensions and facts for. We also need a reference to the Windows Library MP because the relationship fact we are going to create is going to store which software items are installed on each computer.
Please keep in mind that this MP will only work with Service Manager Beta 2 ( recently released ) or later.
<ManagementPack xmlns:xsd="http://www.w3.org/2001/XMLSchema" xmlns:xsl="http://www.w3.org/1999/XSL/Transform" ContentReadable="true" SchemaVersion="1.1" OriginalSchemaVersion="1.1">
<Manifest>
<Identity>
<ID>Microsoft.Demo.DataWarehouse.Software</ID>
<Version>7.0.5229.0</Version>
</Identity>
<Name>DEMO - Data Warehouse Software Extensions</Name>
<References>
<Reference Alias="System">
<ID>System.Library</ID>
<Version>7.0.5229.0</Version>
<PublicKeyToken>31bf3856ad364e35</PublicKeyToken>
</Reference>
<Reference Alias="SoftwareLibrary">
<ID>System.Software.Library</ID>
<Version>7.0.5229.0</Version>
<PublicKeyToken>31bf3856ad364e35</PublicKeyToken>
</Reference>
<Reference Alias="DWBase">
<ID>Microsoft.SystemCenter.Datawarehouse.Base</ID>
<Version>7.0.5229.0</Version>
<PublicKeyToken>31bf3856ad364e35</PublicKeyToken>
</Reference>
<Reference Alias="Windows">
<ID>Microsoft.Windows.Library</ID>
<Version>7.0.5217.0</Version>
<PublicKeyToken>9396306c2be7fcc4</PublicKeyToken>
</Reference>
</References>
</Manifest>
Immediately after the Manifest section we are going to start declaring data warehouse elements. First we start with the Warehouse element which contains all of the other elements related to the data warehouse.
<Warehouse>
Inside of there the first thing we are going to do is declare an Outrigger for the Publisher Name property of the Software Item class. This will essentially create another table in the data warehouse database where each unique value in the Publisher Name property of Software Item will be stored (i.e. Microsoft, Adobe, Google, etc.) We can later use this table to drive a drop down on the report parameter header so the user can choose to only show software items from specific publishers.
<Outriggers>
<Outrigger ID="Publisher" Accessibility="Public">
<Attribute ID="PublisherName" PropertyPath="$Context/Property[Type='SoftwareLibrary!System.SoftwareItem']/Publisher$" />
</Outrigger>
</Outriggers>
Next, we’ll declare a Dimension for the Software Item class:
<Dimensions>
<Dimension ID="SoftwareItemDim"
Accessibility="Public"
InferredDimension="true" Target="SoftwareLibrary!System.SoftwareItem" HierarchySupport="Exact"
Reconcile="false">
<InclusionAttribute ID="IsVirtualApplication" PropertyPath="$Context/Property[Type='SoftwareLibrary!System.SoftwareItem']/ IsVirtualApplication $"
SlowlyChangingAttribute="false" />
<InclusionAttribute ID="LocaleID" PropertyPath="$Context/Property[Type='SoftwareLibrary!System.SoftwareItem']/ LocaleID $" SlowlyChangingAttribute="false" />
<InclusionAttribute ID="MajorVersion" PropertyPath="$Context/Property[Type='SoftwareLibrary!System.SoftwareItem']/ MajorVersion $" SlowlyChangingAttribute="false" />
<InclusionAttribute ID="MinorVersion" PropertyPath="$Context/Property[Type='SoftwareLibrary!System.SoftwareItem']/ MinorVersion $" SlowlyChangingAttribute="false" />
<InclusionAttribute ID="ProductName" PropertyPath="$Context/Property[Type='SoftwareLibrary!System.SoftwareItem']/ ProductName $" SlowlyChangingAttribute="false" />
<InclusionAttribute ID="Publisher" PropertyPath="$Context/Property[Type='SoftwareLibrary!System.SoftwareItem']/ Publisher $" SlowlyChangingAttribute="false" />
<InclusionAttribute ID="VersionString" PropertyPath="$Context/Property[Type='SoftwareLibrary!System.SoftwareItem']/ VersionString $" SlowlyChangingAttribute="false" />
</Dimension>
</Dimensions>
You can see that this maps exactly to the ClassType definition of Software Item in the System.Software.Library MP:
Note: don’t include ClassType definition this in your MP! This is just to show you what the ClassType definition looks like (in the System.Software.Library MP) that you are referencing from your dimension.
<ClassType ID="System.SoftwareItem" Accessibility="Public" Base="System!System.LogicalEntity">
<Property ID="IsVirtualApplication" Key="true" Type="bool" />
<Property ID="LocaleID" Key="true" Type="int" />
<Property ID="MajorVersion" Type="string" />
<Property ID="MinorVersion" Type="string" />
<Property ID="ProductName" Key="true" Type="string" />
<Property ID="Publisher" Key="true" Type="string" />
<Property ID="VersionString" Key="true" Type="string" />
</ClassType>
Next we want to declare the Relationship Fact about the relationship of software being installed on Windows Computers:
<Facts>
<RelationshipFact ID="ComputerHasSoftwareItemInstalled" Accessibility="Public" Domain="DWBase!Domain.ConfigurationManagement" TimeGrain="Daily" SourceType="Windows!Microsoft.Windows.Computer" SourceDimension="DWBase!ComputerDim">
<Relationships RelationshipType="SoftwareLibrary!System.DeviceHasSoftwareItemInstalled" TargetDimension="SoftwareItemDim" />
</RelationshipFact>
</Facts>
</Warehouse>
I’ts important to note here that the relationship type is defined as between SoftwareItem and Device (again this is from the System.Software.Library MP not the MP you are creating):
<RelationshipType ID="System.DeviceHasSoftwareItemInstalled" Base="System!System.Reference" Accessibility="Public">
<Source ID="Device" Type="System!System.Device" />
<Target ID="SoftwareItem" Type="System.SoftwareItem" />
</RelationshipType>
Because Microsoft.Windows.Computer inherits from System.Device and a dimension is already defined for Microsoft.Windows.Computer we can just point to that dimension (SourceDimension=”DWBase!ComputerDim” above) instead of creating a new Device dimension.
Now we just need to include the usual LanguagePack section and we are done!
<LanguagePacks>
<LanguagePack ID="ENU" IsDefault="true">
<DisplayStrings>
<DisplayString ElementID="Microsoft.Demo.DataWarehouse.Software">
<Name>DEMO - Data Warehouse Software Extensions</Name>
<Description>This management pack adds a Software dimension and a Software installed on Computer fact for demo purposes. Provided by Microsoft. No warranty expressed or implied.</Description>
</DisplayString>
<DisplayString ElementID="Publisher">
<Name>Publisher</Name>
<Description>A list of all unique publishers of software.</Description>
</DisplayString>
<DisplayString ElementID="SoftwareItemDim">
<Name>Software Item Dimension</Name>
<Description>All software items.</Description>
</DisplayString>
<DisplayString ElementID="ComputerHasSoftwareItemInstalled">
<Name>Computer Has Software Item Installed Fact</Name>
<Description>All software items installed on computers.</Description>
</DisplayString>
</DisplayStrings>
</LanguagePack>
</LanguagePacks>
</ManagementPack>
Note: The complete management pack is attached to this post.
Now, what you want to do is import this into Service Manager either using the UI or the Import-SCSMManagementPack PowerShell cmdlet. After the MP Sync process kicks off the Management Pack will by synchronized automatically to the data warehouse.
Following that the Deployment process will kick in and automtically create the schema for you in the DWRepository and DWDataMart databases.
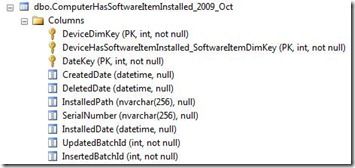
In the end, you should see tables like this in both the DWRepository and DWDataMart databases:
Publisher Outrigger:

SoftwareItemDim Dimension:

ComputerHasSoftwareItemInstalled Fact:
There are also database views that are created automatically:


OK, now we are ready to create a report! For this example, I’ll show you how to use the SQL Server Business Intelligence Design Studio (“BIDS”) to create the report. This is a feature of SQL Server that can be installed using the SQL Server installation setup.exe. Please re-run setup and add it if you did not add it when you first installed SQL Server. You can install this either on your server or on a remote location like your desktop as long as you have network connectivity and permissions to publish the reports to the SQL Server Reporting Services server.
After you launch BIDS, you need to create a new project:

Provide a name for your project like ‘SoftwareReport’ and click OK:

In the Solution Explorer right click on ‘Shared Data Sources’ and choose ‘Add New Data Source’:

Provide a name for your Data Source like ‘DWDataMart’ ….
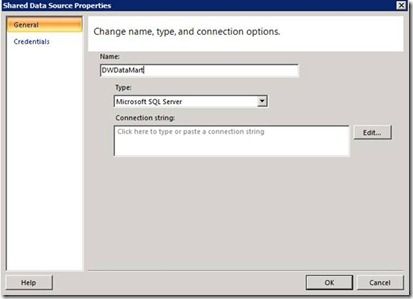
… and then click the Edit button to get to this dialog where you can enter your server name and select the DWDataMart database from the drop down.

Make sure you click the Test Connection to verify connectivity! Then click the OK button on the Connection Properties dialog and then on the Shared Data Source Properties dialog.
Now you should have a data source shown in the tree in the Solution Explorer:

Now, right click on the Reports folder in the Solution Explorer and choose ‘Add New Report’

Click Next on the Report Wizard welcome screen:

Make sure the new data source you just created (‘DWDataMart’) is selected and click Next

Click the Query Builder button:

Click the Add Table button in the toolbar:

In the Add Table dialog, select the Views tab and select the ‘SoftwareItemDimvw’ view and click Add and then click Close:

Select the properties you care about showing in the report:

And then click OK.

Now that you are back in the Report Wizard, click Next on this ‘Design the Query’ dialog:
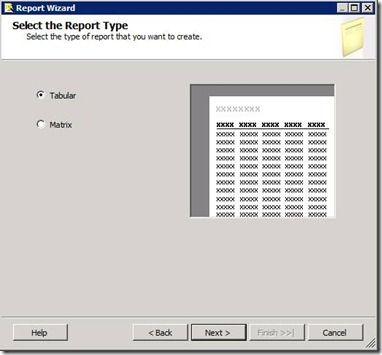
Select Tabular and Click Next:
Add the fields to the report something like this:

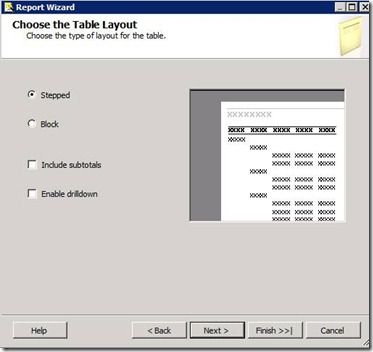
Leave this screen as is and click Next:
Choose a style:

Give your report a name like ‘Software Items’ and click Finish:

Now you should have your report in the Solution Explorer:

And in the middle you should see the report design area:

You can play around with column widths, colors, and all kinds of other formatting options here to make it look how you would like, but for now let’s just go ahead and publish this report as is.
Right click on the SoftwareReport project node in the Solution Explorer and choose Properties:

In the Properties enter the path to the SQL Server Reporting Services reportserver URL and click OK.

Choose Build --> Deploy Software Report from the menu:

Now you should be able to view your report in the browser or the Service Manager console. To view in the browser navigate to the URL of your SQL Reporting Services server and click on the SoftwareReport folder:

And then click on the Software Items link:

And you’ll see a report like this:

In order to see this report in the Service Manager console you need to move this report folder to the System Center\Service Manager folder. You can do that by going back to the Home, and then clicking the Show Details button on the right. Then you’ll see all the folders in a list:

Select the SoftwareReport folder’s checkbox and then click the Move button on the toolbar. Then select the /System Center/Service Manager folder in the tree and click OK:

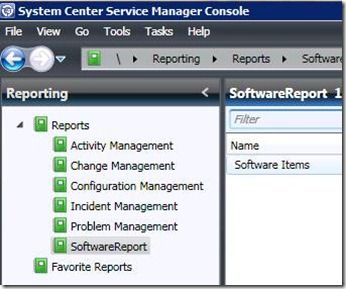
Now if you launch the Service Manager console you should see this report folder and its report:
And you can get the same report by running the report from there:

In future blog posts, we’ll describe some of the fancier things you can do to extend the data warehouse and create reports.