This blog post was written by Neil Lydick,one of the developers on the Service Manager team. Thanks for the write up Neil! This is very comprehensive!
Before you read this post you should read Sean Christensen’s excellent overview of the Service Catalog .
===============================
The Service Manager Request Offering wizard is a powerful feature that allows customers to create Silverlight web forms that solicit input from end users and store the resulting information in the CMDB. A request author can engineer complex, automated, user-driven solutions without writing a single line of code.
Request authors rely on the Request Offering wizard to accomplish two primary objectives:
1. To design a set of questions (prompt text, UI, and field validation) that will appear to end-users initiating a self-service request on the SM2012 Web Portal
2. To map user responses to class properties and relationships in Service Manager’s modeled CMDB
This blog post will examine each of the decisions that need to be made in order to author a Request Offering and publish it on the Portal. It will also provide examples and guidance for achieving several common scenarios.
Configuring General Settings
The Request Offering wizard experience begins on the “General” page, pictured in Figure 1.

Figure 1: General Page
Here, a request author configures the following elements of the Request Offering:
1. Identifying UI : The title, image, and description that will appear in the Service Catalog are specified here.
2. Template : When a request offering is submitted through the self-service portal, a set of objects is created in the CMDB in accordance with the template selected in the “Select template” drop down. The drop down allows request authors to select Incident templates or Service Request templates. On a later wizard page (“Map Prompts”, discussed below), user responses to request offering prompts can be mapped to properties on the selected template object or any of its embedded activities.

Figure 2: General Page, Select template drop down active
3. Management Pack : In the “Management pack” drop down, the request author specifies the unsealed management pack in which the Request Offering will reside. Request Offerings are written directly into management pack XML and can be exported and imported seamlessly between SM 2012 installations.
Creating User Prompts
On the “User Prompts” page of the RO wizard, a request author configures the set of prompts that will be displayed to the end user. Each user prompt typically represents (1) a question that the service provider will ask the user in order to take action on his or her request or (2) read-only information that the service provider will supply to the user to so that he or she can better answer a question.

Figure 3: User Prompts Page
The text of each prompt is typed in-line into the corresponding row of the DataGrid (under the column “User Prompts or Information”). Questions are displayed in the web portal in the same numerical order in which they appear within the grid. Request authors may interact with the question grid using the “Enter” key, drag-and-drop mouse gestures, and a set of icon-themed menu buttons that allow the author to add a question, delete a question, and manipulate the order of existing questions.
Along with the text for each prompt, the request author must select a “Response Type” and a “Prompt Type.” The response type lets the author specify whether the question can be answered, and, if so, whether a response is required; the prompt type indicates the type of Silverlight control that will be displayed to the end-user alongside the prompt text (to either display information to the user and/or receive the user’s input).
The response type field assumes one of three values:
Required: the prompt can be answered by the user and a value must be provided
Optional: the prompt can be answered by the user but the user may leave the prompt unanswered
Display Only: the prompt cannot be answered by the user and exists only for informational purposes
Display-Only prompts can be useful when the request author wishes to convey information to the end-user so that the user can make an informed response to a later question. One of the available prompt types, Query Results, displays CMDB data to the user. In a computer-provisioning request offering, a display-only prompt could, for example, be configured to display the set of computers on which the end user is already a primary user. The user could then examine the configuration of the existing computers prior to requesting a new configuration.
Prompt Type
The Prompt Type drop down allows request authors to select the Silverlight control that will be rendered directly below the text of the configured prompt in the web portal. By default, each text-control pair appears on a “wizard” page in a group of 5 prompts. The number of prompts appearing on a single page can be configured in the Settings.xml file on the SCSM Portal Web Server (\inetpub\wwwroot\System Center Service Manager Portal\ContentHost\Clientbin\Settings.xml) by altering the value for setting key “DefaultNumberQuestionsPerPage.”
The default layout of an RO wizard portal page is displayed in Figure 4:

Figure 4: Layout of Request Offering wizard pages in SM 2012 Portal
The “Prompt Control” to be rendered includes any one of the nine different control types described below:
|
Icon |
Control Name |
Description |
SDK Property Output Type |
Silverlight Rendering |
|
|
Date |
Allows the user to select or view a date |
datetime |
|
|
|
Decimal |
Allows the user to input or view a numerical value containing a decimal point |
double |
|
|
|
File Attachment |
Allows the user to attach a file to the request offering |
*special: Attaches the user-selected file as a System.FileAttachment object through the System.WorkItemHasFileAttachment relationship |
|
|
|
Integer |
Allows the user to input or view an integer value |
int |
|
|
|
MP Enumeration List |
Allows the user to select or view one of the child enumerations associated with a parent enumeration type |
enum (*bound to a specific enum type) |
|
|
|
Query Results |
Allows the user to select or view one or more CMDB objects |
*special: Can attach user-selected Configuration Items to the target template instance or a child activity through the System.WorkItemAboutConfigItem and System.WorkItemRelatesToConfigItem relationships; can attach Work Items to the target template instance or a child activity through the System.WorkItemRelatesToWorkItem relationship. |
|
|
|
Simple List |
Allows the user to specify a set of string values from which the user can select an option |
string |
|
|
|
Text |
Allows the user to enter or view text input |
string |
|
|
|
True/False |
Presents a checkbox to the user |
bool |
|

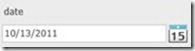


Table 1: Summary of Request Offering Control Types
The description column above indicates the type of interactive control that will display to the user for each prompt type. Just as UI controls in Windows Presentation Foundation or Silverlight deliver user input in a prescribed .NET format (e.g.: string, DateTime) to the application that hosts to the control, so too do Service Manager’s portal controls deliver user input to properties of class instances within Service Manager. The SDK property type into which each control’s user input can be written is summarized in column three of the table above.
Figure 5 displays a sample Request Offering wizard page which contains five different prompt types:

Figure 5: Request Offering Wizard Page on SM 2012 Portal
Mapping to the Service Manager CMDB Model
Service Manager abstracts the SQL tables in its underlying relational database and instead exposes Classes and Relationships , which are object types that the user can create in order to store data. The objects that the user interacts with through the UI – Incidents, Change Requests, Computers, Software Items, etc. – all comprise instances (i.e.: SQL table rows) of specific classes and relationships in Service Manager’s type system. Many great blog posts already discuss Service Manager’s extensible database model, and we’ll omit some of the details of the SM CMDB model here.
Classes in service manager store individual units of data in Properties (i.e.: SQL columns) that assume 1 of 10 different property types: int, decimal, double, string, datetime, guid, bool, enum, richtext and binary.
Consider the Incident class, which is defined in the System.WorkItem.Incident.Library ManagementPack as follows:
<ClassType ID="System.WorkItem.Incident" Accessibility="Public" Base="WorkItem!System.WorkItem.TroubleTicket" Hosted="false" Abstract="false">
<Property ID="TargetResolutionTime" Type="datetime" />
<Property ID="Escalated" Type="bool" DefaultValue="False" />
<Property ID="Source" Type="enum" EnumType="IncidentSourceEnum" />
<Property ID="Status" Type="enum" EnumType="IncidentStatusEnum" />
<Property ID="ResolutionDescription" Type="string" MaxLength="4000" />
<Property ID="NeedsKnowledgeArticle" Type="bool" DefaultValue="False" />
<Property ID="TierQueue" Type="enum" EnumType="IncidentTierQueuesEnum" />
<Property ID="HasCreatedKnowledgeArticle" Type="bool" DefaultValue="False" />
<Property ID="LastModifiedSource" Type="enum" EnumType="IncidentSourceEnum" />
<Property ID="Classification" Type="enum" EnumType="IncidentClassificationEnum" />
<Property ID="ResolutionCategory" Type="enum" EnumType="IncidentResolutionCategoryEnum" />
<Optimization ID="System.WorkItem.Incident.Status.Index">
<Property ID="Status" />
</Optimization>
</ClassType>
If a CheckBox control is presented to the user and an Incident template designated to be created when the request offering is submitted, then, per the table above, the (True/False) output of that CheckBox can be transmitted to each of the properties of type bool contained within the Incident class and any of its parent classes (i.e.: Incident properties: Escalated , NeedsKnowledgeArticle , HasCreatedKnowledgeArticle ; WorkItem properties: IsDowntime , IsParent ). Likewise, a DateTime control can write its output values to TargetResolutionTime on the Incident class or compatible properties on Incident parent classes.
The ultimate goal of a Request Offering is to transfer input values from the prompt controls rendered in the user’s browser to database objects within ServiceManager’s CMDB. As the user enters values into each prompt control, the prompt records the user’s response and makes the value that the user entered available to:
1. Compatible properties in the template that will be created when the request offering is submitted (the specific available properties depend on the template selected in the “Select template” drop down on the General wizard page).
2. A Query Results prompt that has taken a dependency on the value that the user entered for the prompt (more on this below).
Configuring User Prompts
Once the Request Offering author has selected the type of control to display to the user, he or she can configure the parameters of that control on the next wizard page: “Configure Prompts.” This is the page on which the interactive behavior of each prompt control is defined.

Figure 6: Configure Prompts Page
Each prompt control (except True/False ) is configured by:
1. Selecting the row in the DataGrid that corresponds to the prompt.
2. Selecting the “Configure” button (Alt+G) at the top left of the DataGrid
The True/False prompt type displays a CheckBox and does not include configuration options. As a result, it appears in a grey row within the list of prompts in the DataGrid.
All prompt types except Query Results and Simple List have default control configurations that can be used if no customization is required. The Query Results and Simple List control types require configuration by the user and surface in the DataGrid with a red row header until they have been successfully configured. The Query Results control accepts configuration input that specifies the type of object that it will display to the user; the Simple List control accepts a user-supplied list of string values to present to the user within a Silverlight drop-down. The configuration options for these controls are described below.
Each configurable prompt type supports the following configuration options:

By default, the date control allows users to input any date. Two options exist for constraining the set of dates that can be input by the user:
1. Absolute Date Range (“Limit available dates to a specific range”): The request author can impose restrictions on the earliest and/or latest dates available to the user by selecting the desired calendar dates.

Figure 7: Setting an Absolute Date Constraint
2. Relative Date Range (“Constrain available dates using the user’s current time”): In many common scenarios, a request author would like to limit the end-user to a set of dates that appear within a certain range of today’s date (e.g.: make this change effective by/grant permissions to the user until). To accommodate such scenarios, the Date control configuration allows the user to limit the earliest selectable date to a relative starting date in days before or after the user’s current time and the latest selectable date to an offset 0 or more days after that starting date.

Figure 8: Setting a Relative Date Constraint
Figure 9 shows the Date control rendered in a browser window:

Figure 9: Request Offering Date Control


The integer and decimal controls share a similar configuration form that allows the user to limit the minimum and maximum values that can be entered into the Silverlight TextBox receiving user input. The Silverlight TextBox appearing in the portal determines if the number entered by the user is within the expected range and displays an informative warning if the value is incorrect.

Figure 10: Setting Decimal Constraints

The File Attachment control presents a “Browse…” dialog that allows the user to select a file on his/her local system for upload to the Service Manager server. When the Request Offering is submitted by the user with a valid attached file, a System.FileAttachment object is created for the file, and the bytes that compose the file are copied into the “Content” binary property of the System.FileAttachment object. After the System.FileAttachment object is created, a new System.WorkItemHasFileAttachment relationship is created to link the System.FileAttachment object to the template instance created when the request offering is submitted.
The File Attachment control accepts one configuration parameter: the maximum size of the file that the user can submit. The default value for maximum file size is 2 MB; the maximum allowable limit is 10 MB.

Figure 11: Configuring the File Attachment Control
Figure 12 shows the File Attachment control in the browser.

Figure 12: File Attachment Control

The configuration form for the MP Enumeration List control allows the request author to select the parent enumeration type from which the child enumerations displayed in the portal will originate. When a parent enumeration type is selected for the MP Enumeration control, the enum output of the MP Enumeration List control is considered “bound.” When a parent enumeration type is not selected for the MP Enumeration control, the enum output is considered “unbound.”

Figure 13: Configuring the MP Enumeration List Control
If, for example, the request author wanted to allow the user to set the “Status” property of the incident created when the request offering is submitted (class: System.WorkItem.Incident, property: Status), he or she would select the Incident Status (i.e.: IncidentStatusEnum) enumeration (the enum type that can be assigned to the Status property of System.WorkItem.Incident).
In many cases, the desired parent enumeration value may not be apparent to the Request Offering author even though the desired target property (e.g.: System.WorkItem.Incident/Status) is. Recognizing this, Service Manager allows the Request Offering author to bind the MP Enumeration List control to an enum type on the “Map Prompts” wizard page by presenting the output of all unbound MP Enumeration List controls as valid inputs to any enum property. (The Map Prompts page is described later in this blog post. It allows users to map control outputs to properties.) Once an MP Enumeration List control’s output is selected as the input for an enum property, the MP Enumeration List control becomes bound to the enum type corresponding to that property.
Figure 14 shows the MP Enumeration List control bound to ActivityAreaEnum.

Figure 14: MP Enumeration List Control

The Simple List configuration form allows request authors to enter a set of strings that will surface to the user in a Silverlight drop-down. Strings are presented to the user in the web portal in the same order in which they appear within the DataGrid. The order of strings can be modified with the up and down arrows located above the DataGrid.
In addition to specifying an ordered set of strings, the Request Author can designate any of the entered strings to be the default value for the ComboBox. This is done by selecting the row containing the desired default string and then selecting the “Set as default” button located above the DataGrid.
The example Simple List configuration in Figure 15 produces the browser control Figure 16.

Figure 15: Configuring the Simple List Control

Figure 16: Simple List Control

The Text control presents a Silverlight TextBox to the user. User input to the TextBox can be validated against content and length requirements.
The following options are available for validating content:
1. Allow any string (the default)
2. Allow only E-mail addresses
3. Allow only 10-digit (U.S./Canada-style) phone numbers
4. Allow phone numbers entered in the ITU-T E.123 standard
5. Allow only website URLs
6. Allow values that conform to a custom regular expression submitted by the Request Offering author. The Request Offering author may also specify a ToolTip that assists the user when an incorrect value is entered.
In addition to the options above, the request author may supply a minimum and maximum allowed length for the input string.
When constraining the length of the string, it is important to consider the following: the string output of the Text control can be mapped to string properties in the template object selected for the request offering. These properties will have their own SDK-validated minimum-length and maximum-length requirements. It is good practice to set the minimum allowed length for the Text control to an integer value that represents the largest MinLength of all the SDK properties to which the output string will be mapped. Similarly, the maximum allowed length of the Text control should be set to the smallest MaxLength in the set of mapped properties.
If the portal end-user enters a string value that violates either the content or length requirements imposed upon the Text control, an informative validation warning will be presented on the portal wizard page.

Figure 17: Text Configuration Form

The Query Results prompt type allows users to view and select CMDB objects from a Silverlight DataGrid.
Configuring a Query Results prompt encompasses several steps. A request offering author will typically:
1. Constrain the set of objects displayed in the grid to instances of a specific class or type projection, and, optionally, provide SDK query criteria as an additional filter
2. Select the list of object properties that will be rendered as columns within the DataGrid
3. Customize behaviors associated with the rendered grid rows
4. Determine the relationship(s) that will be added for the selected CMDB objects and the source object to which the objects will be attached (i.e.: the template instance or one of its embedded activities)
The Query Results configuration form is divided into 4 tabbed sections. The role of each tabbed section is as follows.
1. Select Class

Figure 18: Select Class Tab, Query Results Configuration Form
The “Select Class” tab allows users to select the type of instance (i.e.: Computer, Incident, etc.) that will display in the DataGrid on the portal. By selecting the “Combination Classes” entry in the drop-down at the top right of the tab, Users can display instances of a type projection that spans multiple classes and relationships. Type projections are used in cases when:
1. The set of instances displayed to the end-user contains properties from more than one class type (e.g.: an Incident and its Affected User)
2. The set of instances displayed to the user relies upon Relationship Criteria , criteria that filters the set of instances to display using related instances (e.g.: Incidents where the Affected User has first name “Bob”)
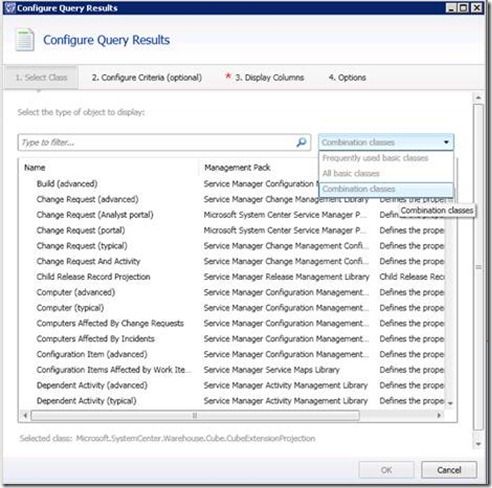
Figure 19: Selecting Combination Classes (Type Projections)
2. Configure Criteria (optional)
The “Configure Criteria” tab permits users to limit the set of class or type projection instances shown to the end-user. This control works almost exactly the same as the “Criteria” wizard page in the Create View wizard.
Figure 20 shows the Configure Criteria tab after the Incident class (System.WorkItem.Incident) has been selected.

Figure 20: Configure Criteria Tab (Incident Class Selected)
On this page, the request author can scroll through the properties available for the selected class and check (i.e.: in the CheckBox) the properties on which a filter should be established. Clicking the “Add Constraint” button establishes a filter on the checked properties.
Figure 21 illustrates the process of selecting properties for a filter. In the figure, the Incident “Impact” property, an enum property that an analyst can set to High, Medium, or Low, is selected.

Figure 21: “Impact” Property Selected For Filter
Once the Add Constraint button is clicked, filters for each selected property appear in the Criteria list at the bottom of the tab. Clicking the Add Constraint button for the selected property in Figure 21 results in the criteria list in Figure 22.

Figure 22: “Impact” Property Criteria
The user interface for setting a filter varies depending on the criteria operator selected (in Figure 22 the selected operator is “equals”) and the type of property on which a filter is being established. Since Incident Impact is an enum, the available filtered values appear in the above rendering within a drop-down.
Selecting other properties and clicking the Add Constraint button results in a filter that is the intersection (AND) of multiple filters. The filter below, for example, limits the set of Incidents displayed to those having “High” Impact AND a DisplayName that contains the text “VIP”.

Figure 23: Filter for Incident Using Impact and DisplayName Properties
If a filter for a property already exists within the Criteria list and a second filter is added by checking that same property and clicking the Add Constraint button, then the new filter is unioned (OR’ed) with the existing filter for the property.
The Criteria list in Figure 24 was produced by adding a constraint for “Impact” a second time. It expands the previous criteria to retrieve all Incidents with either “High” OR “Medium” Impact that also have a Display Name that contains the text “VIP”.

Figure 24: Filter for Incident Using Impact and DisplayName Properties, Second Impact Value Specified
To remove a filter, the request author can click the red “X” appearing at the right side of that filter.
Tokens
The Configure Criteria tab in the Query Results configuration form differs from the criteria configuration page on the Create View wizard in one important way: a “Set Token” menu option appears to the right of the user input control for each filter. The Set Token menu is highlighted with a red rectangle in Figure 25.

Figure 25: Set Token Menu
Using the Set Token menu, a request author can set a filter value to user input that is typed into a previously appearing prompt in the portal wizard. Since this filter value is derived from user input that is not known at the time that the request offering is authored, a database filter is created on-the-fly once a value is entered by the user. A Token , then, refers to the output of any previous prompt that is compatible (in type) with the property on which the filter is being set .
Suppose that the request author has defined 2 prompts: (1) a Text prompt that asks the user for the name of a computer and (2) a Query Results prompt that we would like to configure so that it returns all of the computers having a DisplayName that matches the string that the user typed into the first prompt. The prompts are defined as in Figure 26.

Figure 26: Initial Definition of Text Prompt and Dependent Query Results Prompt
To configure the Query Results prompt to show the expected data, the request author would select the corresponding prompt and click the Configure button. Figure 27 shows the “Configure Prompts” page for these prompts.

Figure 27: Configure Prompts for Text Prompt and Dependent Query Results Prompt
After opening the Query Results configuration form for “Computer List,” the request author would select “Windows Computer” as the class to display on the first tab of the Query Results configuration form (Figure 28).

Figure 28: Select “Windows Computer”
In the Configure Criteria tab, the request author would add a filter on the “Display Name” property. Clicking Set Token on this filter produces the menu in Figure 29.

Figure 29: Set Token for Windows Computer Display Name Filter
In the Select Token sub menu, two available tokens for this prompt appear:
1. Token: Portal User Name . This is a string property that is available on any portal Request Offering page. It contains the username of the account viewing the page.
2. 1. Search for computers named:: String . This is the output from the first prompt.
Available prompt outputs are formatted in the Select Token submenu as <Prompt Ordinal>. <Prompt Text>: <Prompt Output Type>. Here, the request author would select the token containing “Search for computers named:,” which is the prompt text from the first prompt. Clicking this token will result in the Criteria list in Figure 30.

Figure 30: Token-Enabled Criteria on Windows Computer Display Name
Note that the TextBox is now grayed-out and the selected token is displayed inside, indicating that a token is in use. If the request author were to insert additional Text prompts before the Query Results prompt, the output of these additional Text prompts would also appear in the Select Token submenu.
The request author can remove a filter’s association with a Token by selecting “Clear Token” on the Set Token menu. Clearing a token re-enables user input on the TextBox and allows the request author to enter a filter criteria manually.
The Criteria presented in Figure 30 introduces an ordering constraint on the Query Results prompt and its Text prompt predecessor. Because the Query Results prompt relies upon the user input of the Text control that precedes it, the Text control cannot be repositioned to appear after the Query Results control. Attempting to do this on the User Prompts page while the Criteria is active yields the warning in Figure 31.

Figure 31: Warning Message Resulting From Reordering Dependent Prompt
One interesting thing to note is that, for enum property filters, the set of available tokens includes output from all preceding MP Enumeration List controls that are bound to a matching enum type. For example: a filter on the Status property of System.WorkItem.Incident will only show available tokens from predecessor MP Enumeration List controls that are bound to IncidentStatusEnum.
Configuring Criteria for Projections
If the request author selects a combination class (i.e.: type projection) in the Select Class tab instead of a simple class, the property display on the Configure Criteria tab page adjusts to enable criteria on the relationships available in the projection. Selecting the “Incident (portal)” combination class, for example, produces the display in Figure 32.

Figure 32: Configuring Criteria on Incident (portal) Combination Class
The seed object of the projection (here: Incident) appears as the root node in the tree. All of the projection components appear under the root. Establishing filters on the root object or a projection component entails:
1. Selecting the node in the tree on which a filter should be applied (in the TreeView on the left)
2. Selecting a type constraint class that limits the type of object retrieved (in the drop-down on the top right)
3. Checking properties on the type constraint class and clicking the Add Constraint button
Suppose a request author would like to show the set of Incidents assigned to analyst John Doe. The criteria would be constructed in the following steps.
1. Click the projection component corresponding to the “Assigned To User” relationship (Figure 33):

Figure 33: Incident (portal) Criteria Configuration, “Assigned To User” Component Selected
2. Select the “Domain User or Group” class (System.Domain.User) class as a type constraint. System.Domain.User is the SM class for Windows users (Figure 34):

Figure 34: Incident (portal) Criteria Configuration, “Assigned To User” Component Selected, “Domain User or Group” Type Constraint Selected
3. Select the First Name and Last Name properties (Figure 35):

Figure 35: Incident (portal) Criteria Configuration, “Assigned To User” Component Selected, “Domain User or Group” Type Constraint Selected, “First Name” and “Last Name” properties selected
4. Click the Add Constraint button and set the required values (Figure 36).

Figure 36: Incident (portal) Criteria Configuration, “Assigned To User” Component Selected, “Domain User or Group” Type Constraint Selected, “First Name” and “Last Name” filter created
At step 4, the request author has a filter that returns all incidents that have a System.Domain.User Assigned-To user with name John Doe. We can append constraints from other parts of the projection, creating, for example a filter that returns all high impact incidents assigned to John Doe that contain an analyst comment with the text urgent (Figure 37) .

Figure 37: Incident (portal) Criteria Configuration, Filter on Properties from Multiple Projection Components
3. Display Columns
In the “Display Columns” tab of the Query Results configuration form, a request author selects the set of columns to display to the user in the DataGrid that renders on the portal. Each column corresponds to a property in the selected class or type projection.
Figure 38 shows a Silverlight DataGrid that was configured to display System.WorkItem.Incident objects with two display columns containing the Id and Title of each incident. Figure 39 shows the display column configuration that produced the DataGrid in Figure 38.

Figure 38: Silverlight DataGrid Configured to Display Incidents

Figure 39: Incident Class with Two Display Columns Selected
A property is added to the set of columns to display by selecting the CheckBox adjacent to that property. Checking a property instantly adds the property to the “Columns to display” list view at the bottom of the tab, which shows the name, property type, and display name of the columns to display. By default, the display name of the column header in the Silverlight DataGrid defaults to the display name of the selected property. This column header can be edited inline and replaced with a string value.
Arrow icon buttons at the top right of the Columns to display ListView allow the user to change the order in which columns are displayed on the portal (the topmost row in the ListView corresponds to the leftmost column rendered in the Silverlight DataGrid). To remove a column, a request author can uncheck the corresponding property or select the column in the ListView and then click the icon button with the red “X” directly above the list view.
When a combination class is selected in the Select Class tab, the Display Columns tab includes a projection tree view that contains all of the “ cardinality-one ” projection components under the projection seed. The relationships underlying certain projection components cannot be created for more than one <source, target> pair. Objects at the other end of these projection components, referred to as cardinality-one, can always be rendered without the need to render some instance rows multiple times. For example, an incident can only ever be assigned to one person at a time (“cardinality-one”). Incidents can have more than one knowledge article related to them ( not “cardinality-one”).
Selecting display columns for a projection instance is similar to selecting criteria for projection instances. A request author must select the object in the projection tree from which the properties will originate, select the class containing the properties to display from the drop down at the top right of the tab, and then check-off the columns that should be displayed.
Suppose a request author wants to display a Query Results control that contains a grid of Incidents with columns in the following order: ID, Title, Assigned To User’s First Name, Assigned To User’s Last Name, Status.
The goal DataGrid is presented in Figure 40.

Figure 40: Incident Type Projection Display with Five Columns (Id, Title, Assigned-To-User First Name, Assigned-To-User Last Name, Status)
To create this DataGrid using an Incident (portal) type projection, the request author would:
1. Select the root object in the Incident projection (Figure 41).

Figure 41: Display Columns Tab, Incident (portal) Projection Seed Selected
2. Select the incident class in the class drop down (Figure 42).

Figure 42: Display Columns Tab, Incident (portal) Projection Seed Selected, Incident Class Selected
3. Check the desired properties from incident (ID, Title, Status)

Figure 43: Display Columns Tab, Incident (portal) Projection Seed Selected, Incident Class Selected, {Id, Title, Status} Properties Selected
4. Select the Assigned To User relationship (Figure 44)

Figure 44: Display Columns Tab, Incident (portal) Assigned To Component Selected
5. Select the Domain User or Group class (System.Domain.User) (Figure 45).

Figure 45: Display Columns Tab, Incident (portal) Assigned To Component Selected, Domain User or Group Class Selected
6. Check the desired properties of the Assigned-To user: First Name and Last Name. The selected view columns are color-coded to match the projection component from which they originated (Figure 46).

Figure 46: Display Columns Tab Incident (portal) Assigned To Component Selected, Domain User or Group Class Selected, {First Name, Last Name} Properties Selected
7. Select the row representing the Status column and then click the down arrow twice to position it at the end of the column set (Figure 47).

Figure 47: Display Columns Tab Incident (portal), Status Column Repositioned
At step 7, the display columns are correctly configured.
A request author should note the following characteristics of display columns:
1. When the Query Results control queries the CMDB for data, the database query instructs the CMDB to return instances in sorted order using the first two display columns. The instances are later re-sorted in memory if a portal end-user clicks on a column header in the Silverlight DataGrid.
2. The Query Results control can present a maximum of 10 display columns.
4. Options
The last page of the Query Results configuration wizard allows the user to customize the behavior of the DataGrid control. Here, the request author can specify the relationship(s) that will be created to link user-selected objects in the DataGrid to an object on the target template selected for the Request Offering.

Figure 48: Options Tab
The options, depicted in Figure 48, are as follows:
1. Enable multi-select (“Allow the user to select multiple objects”): Checking this field allows users to select more than one object in the Silverlight DataGrid.
2. Hide portal generic form (“Do not show object details when object is clicked”): Each row of the DataGrid presents a subset of an instance’s properties to the user. The first column renders the text of its property as a hyperlink. By default, when a user clicks on this hyperlink, a details window emerges and displays all of the properties of the instance. For projection instances, related objects in the projection appear in a separate tab (see Figure 51). Checking this option disables the hyperlink and prevents the details window from appearing.
3. Add user-selected objects to template object as related items : If this field is checked, the portal will create System.WorkItemRelatesToConfigItem or System.WorkItemRelatesToWorkItem relationship instances to link each of the objects selected by the user to the target instance specified in the drop-down immediately beneath the check box. The appropriate relationship is selected based on the type of object being displayed in the Query Results control. The instances available in the drop-down include the target template instance selected for the Request Offering and any of its embedded activities.
4. Add user - selected objects to template object as affected configuration items : This field is enabled only if the objects being displayed in the Query Results control inherit from Configuration Item (System.ConfigItem). If this field is checked, the portal will create System.WorkItemAboutConfigItem relationship instances to link each of the objects selected by the user to the target instance selected in the drop-down. The instances available in the drop-down include the target instance and any of its embedded activities.
Query Results Control Features

Figure 49: Query Results Control
Figure 49 shows a Query Results control that has been configured to display Incident Projections to the user. Four columns from the underlying object have been configured for display (2 from the incident, 2 from the user assigned to the incident).

Figure 50: Query Results Control, annotated
Figure 50 highlights key features of the control, which include:
1. (red) Refresh Button : A refresh button that queries the CMDB and updates the set of instances displayed.
2. (blue) Apply Filter Button : A search textbox that filters the retrieved instances. The filter text is activated when the magnifying glass is clicked.
3. (yellow) Selection CheckBox : A row is selected by “checking” the CheckBox in the first column.
4. (green) Generic Form Hyperlink : If the Generic Form is enabled in the Options tab, clicking the hyperlink in this column displays the form.
Figure 51 depicts the Generic Form that is shown when the hyperlink for incident IR152 is clicked in Figure 50.

Figure 51: Generic Form Displayed in Child Window
Feeding Display Columns Forward
After a Query Results control has been successfully configured, each of the properties selected as display columns appear in the “Prompt Output” column of the “Configure Prompts” page of the Request Offering wizard.
Consider the Query Results prompt configured in Figure 52, which displays the Domain and UserName of Domain User or Group (System.Domain.User) objects to the user.

Figure 52: Query Results Control Configured to Display User Properties
Each selected display column (Domain, UserName) emerges from the Query Results control as an available output. Query Results controls are noteworthy in that they produce column-based output values from the user’s selection. Any of the column values present in the row selected by the user can be “ fed-forward ” into subsequent Query Results prompts. As a result, user selection in one Query Results prompt can influence the set of objects displayed in a following Query Results prompt.
Suppose we would like to take the Query Results prompt created above, which displays a list of users, and transmit the user’s selection to a second prompt that shows the set of incidents to which that user is assigned. To realize this scenario, a request author can create a second Query Results prompt on the Incident (portal) projection type with the criteria displayed in Figure 53.

Figure 53: Query Results Criteria Configuration That Uses a Previously Selected Instance
Here, the Domain and UserName columns selected by the user in the first prompt correctly constrain the set of Incident instances returned in the second.
The output values of a Query Results control are available as tokens to later prompts only when that Query Results control is configured with multi-select disabled (in the Options page). If multi-select were enabled in the Query Results control displaying user information in Figure 52, tokens from the control could not have been selected as they are in Figure 53.
Map Prompts
When a request author arrives at the Map Prompts page, he or she has already (1) designated the template that will be created when the request offering is submitted and (2) defined and configured the set of prompts that will appear to the end-user on the portal. On the Map Prompts page, a request author routes the output from each of the prompts into one or more compatible properties on the target template instance or one of its embedded activities. When the request offering is submitted by the user, output values from each control are saved into the properties to which they are mapped. Thus, the values in the template are merged together with the input provided by the user to create the object that will be submitted to the database.

Figure 55: Map Prompts Page
The mapping is performed as follows:
1. First, the request author selects the target template instance or one of its embedded activities in the TreeView at the top of the wizard page (highlighted in blue in Figure 55). This is the object into which outputs will be mapped.
2. Second, the request author may choose to select the “Display all properties” radio button (pictured in yellow in Figure 55) so that all properties of the target object are visible.
3. Third, the request author selects the ComboBox drop down (pictured in red in Figure 55) to view the available outputs that can be mapped to the given property. Selecting an output value in this drop down links the output value to the property. The following rules apply to mapping:
a. A prompt output can be mapped to a property if its SDK output type (i.e.: string, enum, int) matches the SDK type of the property.
b. The first selectable output is always blank. This special, blank output clears any existing mapping for a property.
c. The same prompt output may be mapped to more than one property.
d. The Prompt Outputs from Query Results controls (listed on the Configure Prompts page) cannot be mapped to a property. Query Results output is only available as tokens for subsequent Query Results controls. (The rationale behind this is that any selected objects will be attached via a relationship, so individual properties need not be mapped.)
e. Unbound enum output from MP Enumeration List controls can be mapped to any enum property. Once mapped, the enum output becomes bound to the enum type of the property to which it is mapped.
f. If a property mapped to an enum prompt output is cleared and there are no other mappings that use that enum prompt output, the enum output returns to an unbound state.
g. Any prompt output can be mapped to a string property. The output is auto-converted to a string.
h. String prompt outputs can be mapped to richtext properties.
i. No output can be mapped to binary properties.
j. If a default value is specified for a property, that default value will be rendered in the Silverlight control whose output is mapped to that property. If a prompt is mapped to more than one property, the default value shown in the control is nondeterministic.
Knowledge Article
Links to relevant knowledge articles can be established on the “Knowledge Article” page. These articles are associated with the request offering when it is displayed on the web portal.

Figure 56: Knowledge Articles Page
Publish
Completing the “Publish” page ends the Request Offering wizard experience. On this page, request authors can designate an owner for the request offering and set the request offering status as either “Draft” or “Publish.” Only published request offerings are visible in the self-service portal. A request offering created in “Draft” status mode can later be promoted to “Publish” status.

Figure 57: Publish Page
If the status of the request offering is set to “Publish,” validation runs before the wizard completes to alert the user to any configuration errors in the request offering. Two common configuration errors include:
1. Failing to map a Required user prompt to at least one property on the Map Prompts page
2. Failing to specify a target relationship for a Required Query Results prompt when that prompt’s outputs are not transmitted through token criteria to a subsequent Query Results prompt. Checking either of the two relationship checkboxes on the Options page of the Query Results configuration form bypasses this error.
Next up….
We’ll post some demo videos of creating service catalog content in SCSM 2012!