Posted on behalf of Eamon O’Reilly, Principal Program Manager, Automation & Integration
Last week, we released a preview service of Microsoft Azure Automation based on the work we did in System Center R2 Service Management Automation.
You can read more about the service on http://azure.microsoft.com/en-us/documentation/services/automation/
To sign up for the preview you can visit http://azure.microsoft.com/en-us/services/preview/ and click on the Azure Automation Try it link.
You can also view the Azure Automation announcement video from //Build on https://channel9.msdn.com/Events/Build/2014/3-621 . Joe starts about 30 minutes into the video.
Once you are in preview, you will want to start using some runbooks to manage your Azure services. I’ll go step by step through the process assuming you have not used the Azure PowerShell cmdlets before to manage Azure.
To get started, you need to have a management certificate in your Azure subscription that will allow you to manage your services from within Azure Automation. Our team is currently investigating loading certificates so that you do not need to do this manually. You can track the progress of this feature on the Azure feedback forum: http://feedback.azure.com/forums/246290-azure-automation/suggestions/5741122-automatically-install-root-certificates .
You will need the makecert.exe to create a self-signed certificate. This tool is available in the Windows Software Development Kit (SDK) for Windows 8 http://msdn.microsoft.com/en-us/library/windows/desktop/hh852363.aspx or in Visual Studio. I’ll show the process from the Windows SDK.
Step 1: Download and install the SDK from the above link as shown in the below image:

Step 2: You only need to install the Windows Software Development Kit so you can deselect the others since makecert.exe is available in the base install.

Step 3: Create a self-signed certificate that you will add to your Azure subscription and use when managing services from Azure Automation. You can learn more about the management certificate on http://msdn.microsoft.com/en-us/library/azure/gg551722.aspx . Open up an administrator command prompt as shown below and change directory to the location of makecert.exe.

Step 4: Create a certificate using the below command (replacing AzureManagement with a name you choose). You will later add this to the management certificates in Azure settings.
C:\Program Files (x86)\Windows Kits\8.0\bin\x64>makecert -sky exchange -r –n "CN=AzureManagement" -pe -a sha1 -len 2048 -ss My "AzureManagement.cer"
Note: Copy / pasting the above line of code may not work. If you hit the error "Too many parameters," try typing it manually.

Step 5: On a Windows 8.1 or Windows 2012 R2 you can use the built in PowerShell cmdlets to export the certificate with a private key into a pfx file that you can import into the Azure Automation service.
You can read more about this cmdlet on http://technet.microsoft.com/en-us/library/hh848635.aspx .
Open up an administrator PowerShell shell and run the following commands:
$MyPwd = ConvertTo-SecureString -String "CbA123321AbC" -Force –AsPlainText (replacing the password with one that you choose)
$AzureCert = Get-ChildItem -Path Cert:\CurrentUser\My | where {$_.Subject -match "AzureManagement”} (replacing AzureManagement with the name you gave your certificate in step 4)
Export-PfxCertificate -FilePath C:\AzureManagementCert.pfx -Password $MyPwd -Cert $AzureCert (This will create the AzureManagementCert.pfx in the c:\ drive of your computer)

Alternatively, if you want to do this through the UI using the MMC console you can do the below steps:
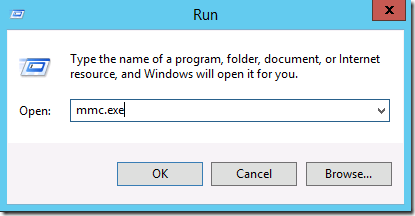
Add/Remove Snap-in from the File menu.

Select Certificates snap-in for My user account.


Navigate to Personal\Certificates and right click on the certificate you created and click export.

Export the private key.

Select .PFX as the format to export.

Give a password for the certificate that you will need when you import this .pfx file in Azure Automation.


Step 5: Log in to the Microsoft Azure Management portal ( https://manage.windowsazure.com ) and select the Settings -> Management Certificates area. Click the upload command and upload the certificate you created in Step 4 (the one with the .cer extension).

Step 6: Upload the management certificate (.pfx extension) into Microsoft Azure Automation and create a Connection Asset. Go to Automation-> <Automation Account you created> ->Assets area. Click Add Setting and select Add Connection. You will need your Azure subscription ID during the wizard. This can be found on the dashboard of the automation account under quick glance or in the settings area of the portal where you uploaded the first certificate.
Give any name you want to this connection as you will refer to this later in runbooks you create.

For the automation certificate name you can give any name as you will create a certificate setting with this name to store the management certificate in the next step.

Step 7: Create a credential setting of type certificate with the same name you gave during the creation of your Azure connection in step 6. You will now upload the .pfx certificate with the password you created in step 5.


Now let’s use this Azure management connection in our Runbooks!
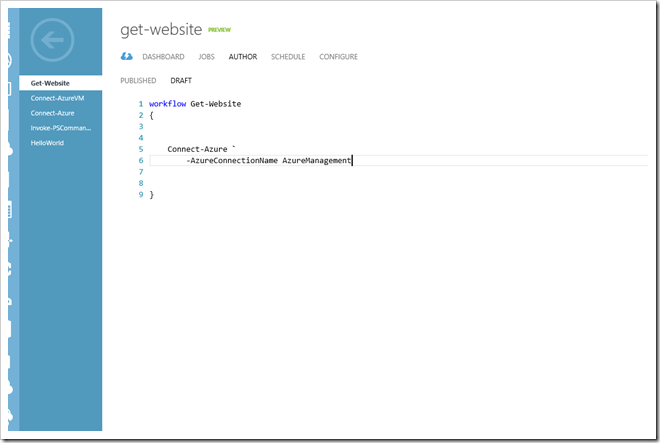
Step 8: Import the connect-azure.ps1 file from http://gallery.technet.microsoft.com/scriptcenter/Connect-to-an-Azure-f27a81bb and publish this runbook. You can then start the runbook and enter the name of your Azure connection you created in step 6 for the parameter. If you view this runbook job when it completes it should not have any failures.


Step 9: Create a new runbook called Get-Website that we will use to get a list of web sites you have in your azure subscription. Navigate to this runbook and click on the Author space and then draft.


Step 10: From within the Runbook page, click the INSERT -> Runbook command and select the Connect-Azure runbook you published earlier.


Step 11: Replace the <System.String> with the name of your Azure Connection.
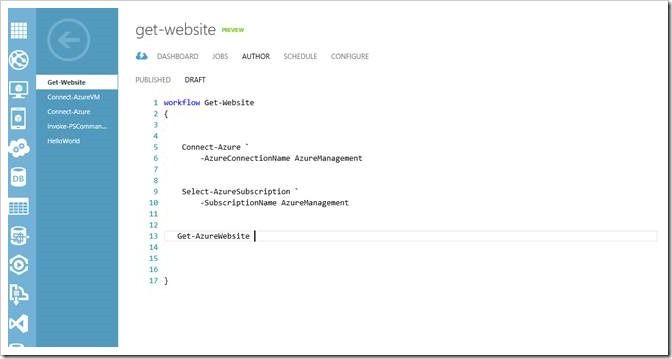
Step 12: Click the INSERT->Activity command and select Select-AzureSubscription so you can specify which subscription you want to manage if you have multiple ones.


Step 13: Remove all of the optional parameters except for the –SubscriptionName and type in the name of the Azure Connection you used above.

Step 14: Add in a call into an Azure service like websites by clicking INSERT->Activity command and selecting Get-AzureWebSites


Step 15: Remove the –Name parameter as we can just retrieve all the websites and not just a specific one.
Step 16: Click on the Test command and start the runbook. You should see the list of websites in your subscription if you have any created.


You now have the basic process in place to use any Azure cmdlet to manage all of your Azure services using the same steps. You can also reuse the Connect-Azure runbook whenever you need to manage Azure resources in Automation.