
Installation Requirements
At the time of this writing, the software requirements for DPM 2012 R2 are as follows. Some apply only to new installations. Upgrades from DPM 2012 SP1 may not require the items with an asterisk (*)
- Windows Server 2008 R2 SP1 or later.
- DPM upgrade requires DPM 2012 SP1 UR3 (4.1.3417.0) or later.
- Pre-installed SQL Server. Only the latest versions of SQL Server 2008 and SQL Server 2012 are supported. While it is possible to protect SQL Server 2014 using DPM 2012 R2, SQL Server 2014 cannot be used as a DPM configuration database to store backup information for workloads it protects.
- Microsoft .NET Framework 4.0 (setup automatically installs this if not present).
- Visual C++ 2010 Redistributables (setup automatically installs this if not present).
- Windows Single Instance (setup automatically installs this if not present).
- Windows Installer 4.5 or later (setup automatically installs this if not present).
- Windows PowerShell 3.0 (setup automatically installs this if not present).
- Microsoft Application Error Reporting (setup automatically installs this if not present).
For the most current information regarding complete hardware and software requirements for DPM 2012 R2, please see the following:
Preparing your environment for System Center 2012 R2 Data Protection Manager (DPM)
Other Pre-Installation Considerations
Other items of note regarding the installation or upgrade of DPM 2012 R2 include the following:
- As stated above, you must have an instance of SQL Server installed and running for the DPM database. The instance can be collocated on the DPM server or on a remote computer.
- You will need a disk to be used as dedicated space for DPM data storage.
- The DPM protection agent must be installed on computers you want to protect.
- The computer on which you install DPM must be a member of an Active Directory domain.
- You must be logged on to the AD domain and have administrative privileges on the server where you want to upgrade or install DPM 2012 R2.
-
You cannot install DPM on the following:
- A management server for Microsoft System Center Operations Manager. This includes any version of OpsMgr 2007 OpsMgr 2012/OpsMgr 2012 R2.
- An application server (other than Hyper-V).
- A computer that has cluster services enabled, including a Hyper-V cluster.
Types of Deployments
DPM 2012 R2 can be deployed in a variety of ways:
- As a physical standalone server: You can deploy DPM as a physical standalone server to backup on-premises data. Note that physical DPM servers can’t be deployed in a cluster, but you can manage multiple physical servers from a single console by installing Central Console on System Center Operations Manager.
- As a Hyper-V virtual machine: You can run DPM as a virtual machine hosted on an on-premises Hyper-V host server, to back up on-premises data. For a list of considerations in this environment see Install DPM as a virtual machine on an on-premises Hyper-V server.
- As a Windows virtual machine in VMWare: From DPM 2012 R2 with Update 5 onwards You can deploy DPM to provide protection for Microsoft workloads running on Windows virtual machines in VMWare. In this scenario DPM can be deployed as a physical standalone server, as a Hyper-V virtual machine, or as a Windows virtual machine in VMWare.
- As an Azure virtual machine: From DPM 2012 R2 Update 3 onwards you can run DPM as a virtual machine in Azure to back up cloud workloads running as Azure virtual machines. For information about this deployment see Install DPM as an Azure virtual machine.
Please note that the installation example in this document is for a physical standalone server.
Installing Software Prerequisites
While many of the prerequisites will automatically be installed as needed when running DPM 2012 R2 setup, it is generally a good idea to have these prerequisites installed beforehand. This way, if there are an issue with the installation of a prerequisite it can be addressed before attempting the installation of DPM itself. Below we will go into detail on installing some of the required prerequisites before performing a standard DPM installation.
Update Rollup 3 for System Center 2012 Service Pack 1If you are performing an upgrade from DPM 2012 SP1 to DPM 2012 R2, you must be running DPM 2012 SP1 UR3 (version 4.1.3417.0) or later. Information on how to obtain and install Update Rollup 3 for System Center 2012 Service Pack 1 can be found in the following Microsoft KB article:
2836751 - Description of Update Rollup 3 for System Center 2012 Service Pack 1 ( https://support.microsoft.com/en-us/kb/2836751 )
Microsoft .NET Framework 4.0Microsoft .NET 4.0 is required before DPM 2012 R2 will continue setup. Microsoft .NET Framework 4 is installed by default on Windows Server 2012 and later, however you may receive the error below on Windows Server 2008:

If you encounter the error message “Microsoft .NET Framework 4 is not installed on this computer”, it can be installed manually from the \Redist\DotNetFrameworks folder on the DPM installation media as shown below.

To install, execute dotNetFx40_Full_x86_x64.exe to launch the setup wizard.
Windows Management Framework 3.0Windows Management Framework 3.0 is required before DPM 2012 R2 will continue setup. WMF 3.0 is installed by default on Windows Server 2012 and later, however you may receive the error below on Windows Server 2008:

If you find that you need to install Windows Management Framework 3.0 manually, it can be download from the following location:
Windows Management Framework 3.0 ( http://www.microsoft.com/en-us/download/details.aspx?id=34595 )
After the installation is complete, be sure to reboot the computer before continuing setup.
Microsoft .NET Framework 3.5Microsoft .NET Framework 3.5 is a required prerequisite before you can install the Microsoft SQL Server 2012 SP1 Management tools. DPM 2012 R2 setup requires the Microsoft SQL Server 2012 SP1 Management tools when using a remote SQL Server instance . Note that if you are going to pre-install SQL Server locally, it will install the SQL Management tools as part of SQL setup and you can skip this step.
NOTE When using a Remote SQL 2008 R2 server, the Microsoft SQL Server 2012 SP1 management tools are backwards compatible with SQL Server 2008 R2. If SQL 2008 R2 is pre-installed locally on the DPM Server, then the Microsoft SQL Server 2008 R2 Management tools will be used by DPM.
Depending on which operating system you are using for DPM 2012 R2, you can either install .NET 3.5 from the DPM installation media, or you can add it as a Windows Server 2012 feature which will require Windows 2012 installation media.
Installing on Windows Server 2008 computers
Microsoft .NET Framework 3.5 can be installed from the \Redist\DotNetFrameworks folder on the DPM installation media as shown below.

Execute dotNetFx35setup.exe to launch the setup wizard. Be aware that installation of this component requires Internet access.
Installing on Windows Server 2012 and Windows Server 2012 R2 computers
You will need to install .NET Framework 3.5 features from the Add Roles and Features wizard as shown below.

During the feature installation, you will need the Windows installation media. Click on Specify an alternate source path to specify the path to the SXS folder as shown here:


When specifying a remote SQL Server 2008 R2 or SQL Server 2012 instance to use for the DPM database, DPM 2012 R2 requires that the Microsoft SQL Server 2012 SP1 management tools be installed on the DPM Server.
NOTE As mentioned previously, when installing DPM 2012 R2 on Windows Server 2012 or Windows Server 2012 R2, you must install .NET Framework 3.5 Features from the Add Roles and Features wizard prior to installing the SQL Server 2012 SP1 management tools or all of the required tools will fail to be installed properly.
The Microsoft SQL Server 2012 SP1 management tools can be downloaded from the following location:
Microsoft® SQL Server® 2012 Service Pack 1 (SP1) Express
Download SQLManagementStudio_X64_ENU.exe (64-bit) or SQLManagementStudio_x86_ENU.exe (32-bit) and run it to start the wizard.
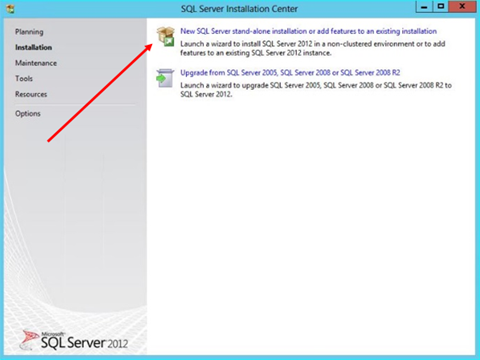
When the wizard starts, select the installation option, then click on the option New SQL Server stand-alone installation or add features to an existing installation .
Be sure that the following features are selected, then complete the installation:

Verifying Software Prerequisites
To verify if a computer has all of the prerequisites installed prior to installing DPM, you can look in Control Panel -> Programs and Features . The screenshot below shows only the DPM prerequisite software that was installed manually. The .NET 3.5 framework can be seen under Windows features. The below screenshot does not include SQL Server itself for the local DPMDB.


Installing and Configuring a Remote SQL Server (optional)
DPM 2012 R2 requires a preinstalled SQL Server 2008 R2 SP2 or SQL Server 2012 SP1 instance to be specified during setup. The SQL instance can be installed on the local computer, on a remote standalone computer or on a clustered SQL server. The steps below provide an example of the steps necessary to install and configure a remote SQL instance using SQL Server 2008 R2 Service Pack 2.
When you use a remote instance of SQL Server for DPM, please note the following:
- The remote instance of SQL Server must be running SQL Server 2008 R2 with Service Pack 2 or later, or SQL Server 2012 SP1, Standard or Enterprise Edition.
- The remote instance of SQL Server cannot be installed on a domain controller.
- The computer running SQL Server must be located in the same domain as the DPM server.
- For the DPM server to access a remote instance of SQL Server through Windows Firewall, on the remote computer you must configure an incoming exception for SQLservr.exe for the specific instance used so that the necessary TCP protocol ports are not blocked. This is covered in detail in the section below titled Setting SQL Firewall rules on a Remote SQL Server .
1. On the product media or network share for the SQL Server 2008 installation media, double-click setup.exe and then in the SQL Server Installation Center , click Installation in the navigation pane.
2. On the Installation page, click New SQL Server stand-alone installation or add features to an existing installation .

3. When the SQL Server 2008 Setup Wizard opens, on the Setup Support Rules page, click Show details and review the status of the support rules and correct any failures before proceeding. When all rules have passed, click OK .

4. On the Product Key page, enter a valid license key, and then Next .
5. On the License terms, accept the terms then then Next.
6. On the Setup Support Files page, click Install .
7. On the Setup Role page, select SQL Server Feature Installation and then click Next .
8. On the Feature Selection page, select the following features and click Next :
- Database Engine Services and both sub features, SQL Server Replication and Full-Text Search
- Reporting Services
- Management Tools – Basic (also enables the Management Tools- Complete feature)
- SQL Client Connectivity SDK

9. Review the Installation Rules and then click Next .
10. On the Instance Configuration page, click Named instance , enter a name for the instance of SQL Server and then click Next .
TIP Avoid instance names used by previous DPM installation instances like MSDPM2010, MSDPM2012 etc. Make the instance name unique but intuitive like DPMSQLDB.
11. Review Disk Space Requirements page, then click Next .
12. On the Server Configuration page, use the following table to configure the SQL Server services.
|
SQL Server service |
Configuration |
|
SQL Server Agent |
Enter the name and password of a domain account that you want this service to run under, and then set the Startup type to Automatic . |
|
SQL Server Database Engine |
Enter the name and password of a domain account that you want this service to run under. Keep default Startup type of Automatic. |
|
SQL Server Reporting Services |
Enter the name and password of a domain account that you want this service to run under. Keep default Startup type of Automatic. |
|
SQL Full-text Filter Daemon Launcher |
Do not change the default setting of Manual |
|
SQL Server Browser |
Change the default Startup type to Automatic . |
NOTE It is recommended to use a single, dedicated domain user account to run SQL Server Agent, SQL Server Database Engine, and SQL Server Reporting Services.

13. On the Database Engine Configuration page, accept Windows authentication mode as the authentication mode, and then in the Specify SQL Server administrators area, add the SQL Server administrators group the user account that you will use to connect to the remote instance of SQL Server when you install DPM. To add your own user account, click Add Current User . You can add additional user accounts if needed.
NOTE Ensure that the user account you use is added to the SQL Server administrators group and to the Local Administrators group on the SQL Server.
14. Retain the default settings on all subsequent pages, and then on the Ready to Install page click Install .
Installing the DPM support files on the remote SQL ServerInstall the DPM support files (SQLprep) on the remote SQL Server computer by performing the following steps. If the remote SQL Server is a cluster, install the DPM Support tools on all nodes of the cluster.
1. On the remote SQL Server computer, insert the DPM product DVD and start setup.exe . On the DPM Installation menu, click on the DPM remote SQL Prep option.
2. Follow the steps in the wizard to install the Microsoft Visual C++ 2010 Redistributable package.
3. The DPM support files will be installed automatically.
Setting SQL Firewall rules on a Remote SQL ServerDPM needs to be able to communicate to the remote SQL Server using a few TCP protocol ports. By default, the report server listens for HTTP requests on TCP port 80 . The default instance (MSSQLSERVER) of the Database Engine always uses TCP port 1433 , however that can be changed.
The SQL Server Browser service allows users to connect to instances of the Database Engine that are not listening on port 1433 without knowing the port number. To use SQL Server Browser, you must open UDP port 1434 . On the other hand, a named instance of SQL Server (IE: DPMSQLDB) uses Dynamic ports by default. This can also be changed if desired.
In any case, the current port number used by the Database Engine is listed in the SQL Server error log. You can view the error log using SQL Server Management Studio and connecting to the named instance, then viewing the current log under Management -> SQL Server Logs. Look for "Server is listening on ['any' <ipv4> XXXXX]. Where XXXXX is the port number.

If you want to change the TCP port that the SQL Database Engine is listening on, you can do that using the SQL Server Configuration Manager tool:
SQL Server Configuration Manager
Assigning a TCP/IP port number to the SQL Server Database Engine1. Within the console pane in SQL Server Configuration Manager, expand SQL Server Network Configuration, then expand Protocols for <instance name> and double-click TCP/IP.
2. In the TCP/IP Properties dialog box on the IP Addresses tab, several IP addresses will appear in the format IP1, IP2, up to IPAll. One of these is for the IP address of the loopback adapter, 127.0.0.1. Additional IP addresses will appear for each IP address on the computer. Right-click each address and then click Properties to identify the IP address that you want to configure.
3. If the TCP Dynamic Ports dialog box contains a 0 value, indicating the Database Engine is listening on dynamic ports, delete the value.
4. In the IP n Properties area box in the TCP Port box, type the port number you want that IP address to listen on and then click OK.
5. In the console pane, click SQL Server Services.
6. In the details pane, right-click SQL Server (<instance name>) and then click Restart to stop and restart SQL Server.

The screen shot below shows Dynamic port 49298 being used. If you wanted to change it to be a static port, you would simply remove the Dynamic port number and enter a static port number under the TCP port.
Now that you know the ports used, you can create the necessary firewall rules to allow communication using those ports.
Opening a static port in Windows Firewall for TCP accessTo open the necessary static ports on the remote SQL Server computer, complete the following:
1. On the Start menu, click Run , type WF.msc , and then click OK .
2. In Windows Firewall with Advanced Security , on the left pane, right-click Inbound Rules and then click New Rule in the action pane.
3. In the Rule Type dialog box, select Port , and then click Next .
4. In the Protocol and Ports dialog box, select TCP . Select Specific local ports and then type the port number of the instance of the Database Engine, such as 1433 for the default instance. Click Next .
5. In the Action dialog box, select Allow the connection and then click Next .
6. In the Profile dialog box, select any profiles that describe the computer connection environment when you want to connect to the Database Engine and then click Next .
7. In the Name dialog box, type a name and description for this rule and then click Finish .
Opening dynamic ports in Windows Firewall for TCP accessIf using dynamic ports on the remote SQL Server computer, complete the following:
1. Open Services.cpl and locate the SQL Server (Instance_name), then double-click to get the " Path to executable ".
2. Copy the path (e.g. C:\program files\Microsoft SQL Server\MSSQL11.Instance_name\MSSQL\binn\SQLservr.exe )
3. On the Start menu, click Run , type WF.msc , and then click OK .
4. In the Windows Firewall with Advanced Security , in the left pane, right-click Inbound Rules , and then click New Rule in the action pane.
5. In the Rule Type dialog box, select Program , and then click Next.
6. In the Program dialog box, select This program path . Click Browse , and navigate to the instance of SQL Server that you want to access through the firewall and select the SQLServr.exe and click Next . By default, SQL Server is at C:\Program Files\Microsoft SQL Server\MSSQL11.Instance_name\MSSQL\Binn\SQLservr.exe .
7. In the Action dialog box, select Allow the connection , and then click Next.
8. In the Profile dialog box, select any profiles that describe the computer connection environment when you want to connect to the Database Engine, and then click Next.
9. In the Name dialog box, type a name and description for this rule, and then click Finish.
NOTE When installing DPM and using a SQL cluster, the remote SQL Reporting Server must have port 80 opened so that the DPM server can connect to SQL reporting during and after setup.
Opening ports in Windows Firewall using the command line (optional)As an alternate method, you can use the command line below to open the required ports. This will work with both static and dynamic ports. Be aware that certain parameters in the example below may need to be modified for your particular environment.
Netsh advfirewall firewall add rule name=DPM_SQLServr.exe dir=in action=allow program=\"%PROGRAMFILES%\Microsoft SQL Server\MSSQL11.INSTANCE_NAME\MSSQL\binn\SQLservr.exe\" profile=Domain
Netsh advfirewall firewall add rule name=DPM_UDP_Port_1434 dir=in action=allow protocol=UDP localport=1434 profile=Domain
Netsh advfirewall firewall add rule name=DPM_TCP_Port_80 dir=in action=allow protocol=TCP localport=80 profile=Domain
Installing the DPM 2012 R2 server
This section provides an example of installing a standard DPM 2012 R2 server or upgrading an existing server from DPM 2012 SP1.
Installation of DPM 2012 R2 is very different from previous versions. In many ways it has been simplified, and once the prerequisite software is installed, a clean installation of DPM only takes approximately ten minutes to complete. We will walk through the entire process for a common setup and upgrade scenarios, however since many of the steps are redundant, we will concentrate more on the parts that are different.
There are three common installation scenarios and several upgrade scenarios. Each one requires that prerequisite software be preinstalled before setup will continue.
NEW INSTALLATION SCENARIOS
1. Installing DPM 2012 R2 using a pre-installed local dedicated SQL instance.
2. Installing DPM 2012 R2 using a pre-installed Remote standalone SQL instance.
3. Installing DPM 2012 R2 using a pre-installed Remote SQL Clustered Instance. This requires a separate SQL Server used for reporting services.
COMMON UPGRADE SCENARIOS
1. Upgrading DPM 2012 SP1 using a local SQL instance to DPM 2012 R2.
2. Upgrading DPM 2012 SP1 using a remote SQL instance to DPM 2012 R2.
3. Upgrading DPM 2012 SP1 using a local instance and migrating to a remote SQL server instance during setup.
4. Upgrading DPM 2012 SP1 using a remote instance and migrating to a local SQL server instance during setup.
5. Upgrading DPM 2012 SP1 using a local instance and migrating to a remote SQL server Cluster instance during setup.
6. Upgrading DPM 2012 SP1 using a Local instance and migrating to a different local SQL server instance during setup.
7. Upgrading DPM 2012 SP1 using a remote instance and migrating to a different remote SQL server instance during setup.
8. Upgrading DPM 2012 SP1 using a remote instance and migrating to a remote SQL server Cluster instance during setup.
NOTE There is no direct upgrade from DPM 2012 to DPM 2012 R2. You must be running DPM 2012 SP1 with UR3 KB2877075 (4.0.3417.0) or later in order to upgrade to DPM 2012 R2.
Installation and Upgrade Steps1. Log onto the computer that will host DPM (or the existing DPM computer) using a domain user account that is a member of the Local Administrators group.
2. Run setup.exe from the root of the DPM 2012 R2 installation media. The DPM Setup screen should appear:

Note how the setup screen is divided into three sections: Install , Before you begin and Additional Resources . Each is explained below.
Install
- Data Protection Manager: This option installs DPM 2012 on the computer where you launched the setup wizard.
- DPM Central Console: Installing this will allow users to manage multiple DPM servers using an Operations Manager console, or to manage DPM 2010 servers using a standalone DPM console.
- DPM Protection Agent: This allows users to install the protection agent directly from the DPM media.
- DPM Remote Administration: Remote administration allows users to manage different DPM servers from a single location. This is just a remote console which allows standard DPM functionality but not the advanced features available when leveraging Operations Manager.
- DPM Self Service Recovery: This will install the files necessary to use the DPM Self Service Recovery (SSR) tool to recover SQL files from remote computers without the need for the DPM console.
- DPM Remote SQL Prep: This gives users the ability to run SQL prep against a SQL installation in order to prepare it to be used as a remote SQL instance for a DPM 2012 R2 installation.
Before you begin
- View Release Notes: This is self-explanatory and will open a copy of the release notes.
- Read Installation Guide: This will open up a walkthrough for the installation procedures and notes.
- Run the Prerequisite Checker: This will direct users to a web location.
Additional Resources
- Review License Terms: Gives a view of the Data Protection Manager License terms.
- Visit DPM Web Site: As expected, this takes users to the public DPM website.
3. To continue installation, select the Data Protection Manager option. Under the section titled Install .
4. The Microsoft Software License Terms page will appear. Accept the EULA and click OK .

Setup will then check to see if the prerequisite software is installed on the system. If the setup process is able to install a missing prerequisite it will do so, otherwise you may be prompted to manually install a missing component.
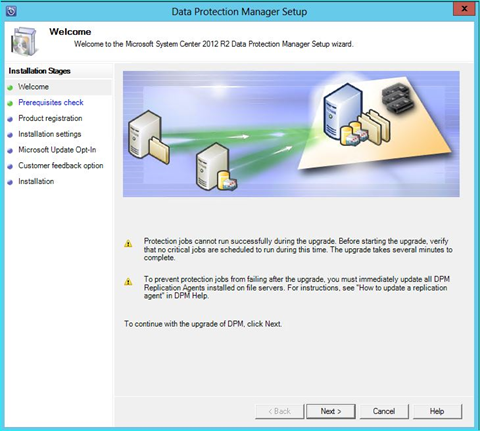
5. Once the prerequisite checks pass, the Microsoft® System Center 2012 R2 screen will appear.
6. On the Welcome screen, click Next. Note that if you are doing an upgrade, you may receive additional warnings such as the ones shown below.
7. On the
Prerequisites check
page, you will have two choices for SQL Server configuration. These options are different from previous versions of DPM.
Use stand-alone SQL Server
: DPM will use either a
local
or a
remote
non-clustered SQL Server instance that already exists.
Use clustered SQL Server: DPM will use a SQL Server cluster instance and a separate SQL server for reporting server instance that already exists.

Scale Considerations when using a common Shared Instance
- Each DPMDB requires 2.5 GB of additional RAM. For instance, if 12 DPM servers share one instance of SQL Server, the computer running SQL Server must have 32 GB of additional RAM above the Windows recommended.
- The disk volume on which the database is stored should have RAID configuration for better performance.
If using a standalone SQL Server, select the Use stand-alone SQL Server option to have DPM use either a local or remote SQL 2008 R2 SP1 or SQL 2012 SP1 instance. Enter the SQL Server name and instance name in the form of SQLSERV\INSTANCE, valid credentials that have permissions to the SQL server, then click the Check and Install button to begin the system prerequisite check process.
If using a SQL cluster, select the Use clustered SQL server to use a remote SQL 2008 R2 SP1 or SQL 2012 SP1 instance. Enter the SQL Server names and instance names in the form of SQLSERV\INSTANCE, valid credentials that have permissions to the SQL servers, then select the Check and Install button to begin the system prerequisite check process.
If this is an upgrade, the Instance of SQL Server box will be prepopulated with the existing SQL Server name and Instance that DPM 2012 SP1 is currently using. The credentials page will be greyed out as it will use current user credential to perform the upgrade.
NOTE The minimum SQL Server version for either the DPMDB or the Reporting Server is SQL Server 2008 R2 SP2 or SQL 2012 SP1. They do not need to be the same versions for each SQL Instance entered.
The Check and Install process will check to be sure all prerequisites are met. Below is a partial list of checks performed during this phase of setup.
- OSVersion is Windows 2008 or newer
- SQL server instance(s) specified are valid and accessible via TCP connection
- SQL Server version(s) are supported via WMI query
- Machine CPU speed and Memory requirements are met
- Version of Microsoft management Console meets minimum version
- Applicable KB's are installed: KB962975,KB975759,KB2279787,KB2223201
- Windows PowerShell meets minimum version
- .NET requires reboot
- SIS Filter is installed
- Windows installer meets minimum version
- Reboot is required
- SQL Server tools are installed
- SQL Agent startup type
- Library Sharing is enabled
- Active Directory check
- SQL Edition
- Client TCP Enabled
- Does remote SQL have DPM installed
- Remote DPMDB found (Migration scenario)
- Disk Space requirements met (local and remote)
- DPM Support file (SQL prep) for remote SQL DB
- DPMDB Version
- DPMDB backup check
If there are any problems discovered, the DPM setup process will either popup an error message or show what prerequisite check failed in the details panel.
TIP You can easily view all prerequisite checks and find problems by running the following commands:
CD C:\Program Files\Microsoft System Center 2012 R2\DPM\DPMLogs
Find /I "=" Dpmsetup.log >dpmchecks.txt
Notepad dpmchecks.txt
The following are good check results, so you can ignore them:
Results = 0
* Exception : expecting the following exception. Ignoring intentionally
* Exception : Ignoring the following exception intentionally
Below are a few samples of some errors and warnings you may receive at this point in the process.
Probably the most common will be the popup message here which is generated if the SQL Server instance specified is not accessible. A firewall is the most likely cause. See the section labeled:
Setting SQL Firewall rules on a remote SQL Server
to remedy this error.

Text: DPM Setup is unable to connect to the specified instance of SQL Server. (ID: 4307)
You may also receive various user credential based error messages such as those in the screen shot below.

The error messages above were the result of using the default local installation of SQL and not using recommended dedicated accounts or a System Account.
8. Enter the necessary information on the Product Registration page and click Next.

9. The setup process will now confirm the amount of space required in order to install DPM on the Installation settings page as shown below. Note that you can change the location of the DPM program files.

10. For the Microsoft Update Opt-In and Customer feedback options pages, choose the appropriate options and click next.


11. Verify the settings on the Summary of Settings page and then select Install or Upgrade to begin the installation. For a new installation of DPM, the Summary of Settings page will appear as follows:

For an upgrade of DPM, the Summary of Settings page will look more like this:

NOTE The DPMsetup.log file has moved. It is now located in the C:\Program Files\Microsoft System Center 2012 R2\DPM\DPMLogs folder.
When setup is complete, you will see the status along with the firewall rules that DPM added as shown below.


The DPMSETUP.LOG will show the details of the specific firewall rules that were added. An example is included here:
Information : Calling netsh process with arguments : advfirewall firewall add rule name="Microsoft System Center 2012 R2 Data Protection Manager" dir=in program="C:\Program Files\Microsoft System Center 2012 R2\DPM\DPM\bin\msdpm.exe" profile=Any action=allow
After the DPM setup process completes and you press CLOSE, Windows Update will be launched automatically to look for updates.

As was stated in the beginning, DPM 2012 R2 can be deployed in a variety of ways. Hopefully if you need to setup a standalone DPM 2012 R2 server sometime in the future, the example here will help you get up and going as quickly and as trouble free as possible,
J.C. Hornbeck | Solution Asset PM | Microsoft GBS Management and Security Division
Get the latest System Center news on Facebook and Twitter :


System Center All Up: http://blogs.technet.com/b/systemcenter/
Configuration Manager Support Team blog:
http://blogs.technet.com/configurationmgr/
Data Protection Manager Team blog:
http://blogs.technet.com/dpm/
Orchestrator Support Team blog:
http://blogs.technet.com/b/orchestrator/
Operations Manager Team blog:
http://blogs.technet.com/momteam/
Service Manager Team blog:
http://blogs.technet.com/b/servicemanager
Virtual Machine Manager Team blog:
http://blogs.technet.com/scvmm
WSUS Support Team blog: http://blogs.technet.com/sus/
The RMS blog: http://blogs.technet.com/b/rms/
App-V Team blog: http://blogs.technet.com/appv/
MED-V Team blog: http://blogs.technet.com/medv/
Server App-V Team blog: http://blogs.technet.com/b/serverappv
The Surface Team blog: http://blogs.technet.com/b/surface/
The Application Proxy blog: http://blogs.technet.com/b/applicationproxyblog/
The Forefront Endpoint Protection blog :
http://blogs.technet.com/b/clientsecurity/
The Forefront Identity Manager blog :
http://blogs.msdn.com/b/ms-identity-support/
The Forefront TMG blog:
http://blogs.technet.com/b/isablog/
The Forefront UAG blog:
http://blogs.technet.com/b/edgeaccessblog/