First published on TECHNET on Feb 07, 2017
DPM can backup a variety of workloads as SQL, SharePoint, Exchange, Hyper-V VMs, File Servers, among others. While doing so, DPM creates an initial replica of the data, and takes the following backups incrementally, optimizing Storage and Network resources. However, at times, due to the large size of the Data-source, the initial replication over the network may consume a lot of time and network resources. In such cases, it is suggested that the Initial Replica be created manually to save on these.
In this blog, our guest, Heyko Oelrichs talks about how the initial replication can be performed with SC 2016 DPM with Modern Backup Storage.
With DPM 2016 we’ve changed the whole architecture how DPM stores its backup data. Our new storage model, called Modern Backup Storage (MBS), utilizes VHDX files to store its backup data and removed the use of physical disks, overallocation and the need of colocation of workloads. (For more information about MDS check out Introducing DPM 2016 Modern Backup Storage .)
This redesign changed the procedure for manually creating initial replicas, also called pre-seeding or pre-staging, with DPM 2016 and MBS. In DPM 2016 we’re no longer creating “real” replica volumes that are always accessible.
If you select to create the initial replica manually, e.g. when your protected workload is only available through a small WAN link, you will need to perform some additional steps to mount the replica VHDX.
Here we’ll show you how to do this step-by-step:


At this point, the replica is not mounted. If you look at the mountpoint from a command prompt or in Explorer, it will not be shown. It’s empty.
To mount this replica, you’ll need to run some PowerShell commands to manually mount the replica VHDX before you’re able to copy data.
$pg = Get-DPMProtectionGroup | ? Name -eq 'DPM DBs'

$ds = Get-DPMDatasource -ProtectionGroup $pg | ? name -eq 'ReportServer'

Start-DPMManualReplicaCreation -Datasource $ds

The last command mounted the Replica VHDX-file so the initial replica data can be copied to it.
Note, leave your session opened to re-use $ds later to dismount the VHDX-file.
Now you can see the mounted drive in the already known destination path:

The replica volumes contain the expected folder structure:

Now you can start to copy your workload data to the mounted replica volume. In our example case these are SQL database and logfiles. You’ve to set this database offline to be able to copy these files.
You’ve to keep the original folder structure. What this means is shown in the following example: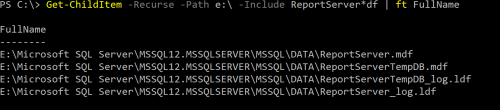
Our Database Files are stored in
That means that we’ve to copy the data to the following destination path:
31d8e7d7-8aff-4d54-9a45-a2425986e24c\d6b82768-738a-4f4e-b878-bc34afe189ea\
Full\E-Vol\Microsoft SQL Server\MSSQL12.MSSQLSERVER\MSSQL\DATA\ReportServer.mdf
When you’re done you have to dismount the volume by using the following ps command.
Stop-DPMManualReplicaCreation -Datasource $ds
This dismounts the Replica Volume VHDX File:

Replica volume for datasource ReportServer dismounted successfully. Run a consistency check job to start scheduled backups.
The final step is to run a consistency check:
Start-DPMDatasourceConsistencyCheck -Datasource $ds
Normal backups will be taken once the replica is healthy.

Hope this blog helps you perform manual replica creation with ease.
DPM can backup a variety of workloads as SQL, SharePoint, Exchange, Hyper-V VMs, File Servers, among others. While doing so, DPM creates an initial replica of the data, and takes the following backups incrementally, optimizing Storage and Network resources. However, at times, due to the large size of the Data-source, the initial replication over the network may consume a lot of time and network resources. In such cases, it is suggested that the Initial Replica be created manually to save on these.
In this blog, our guest, Heyko Oelrichs talks about how the initial replication can be performed with SC 2016 DPM with Modern Backup Storage.
With DPM 2016 we’ve changed the whole architecture how DPM stores its backup data. Our new storage model, called Modern Backup Storage (MBS), utilizes VHDX files to store its backup data and removed the use of physical disks, overallocation and the need of colocation of workloads. (For more information about MDS check out Introducing DPM 2016 Modern Backup Storage .)
This redesign changed the procedure for manually creating initial replicas, also called pre-seeding or pre-staging, with DPM 2016 and MBS. In DPM 2016 we’re no longer creating “real” replica volumes that are always accessible.
If you select to create the initial replica manually, e.g. when your protected workload is only available through a small WAN link, you will need to perform some additional steps to mount the replica VHDX.
Here we’ll show you how to do this step-by-step:
- When adding a new datasource to protection, select “Manually” in the “Choose Replica Creation Method” dialog in the create/modify Protection Group wizard.
- This results in a new protected datasource with the status: Manual replica creation pending
- To figure out the Replica Path select the datasource and click on “Click to view details” next to “Replica path”.
- This opens a new dialog window “Details of Replica Path” where you’ll find the Source and Destination Path of your Datasource.
- Copy the path and save it in a notepad. It’ll look like the following. E:\ on DPM2016TP5-01.contoso.local C:\Program Files\Microsoft System Center 2016\DPM\DPM\Volumes\Replica\31d8e7d7-8aff-4d54-9a45-a2425986e24c\d6b82768-738a-4f4e-b878-bc34afe189ea\Full\E-Vol\
- The first part of the copied string is the source. The second part, separated by a whitespace, is the destination. The destination contains the following information:
DPM Install Folder C:\Program Files\[..]\DPM\Volumes\Replica\
Physical ReplicaID 31d8e7d7-8aff-4d54-9a45-a2425986e24c\
Datasource ID d6b82768-738a-4f4e-b878-bc34afe189ea\
Path Full\E-Vol\
At this point, the replica is not mounted. If you look at the mountpoint from a command prompt or in Explorer, it will not be shown. It’s empty.
To mount this replica, you’ll need to run some PowerShell commands to manually mount the replica VHDX before you’re able to copy data.
First of all select your protection group:
$pg = Get-DPMProtectionGroup | ? Name -eq 'DPM DBs'
The next step is selecting the correct Datasource in your Protection Group:
$ds = Get-DPMDatasource -ProtectionGroup $pg | ? name -eq 'ReportServer'
Now you are able to mount the replica volume:
Start-DPMManualReplicaCreation -Datasource $ds
The last command mounted the Replica VHDX-file so the initial replica data can be copied to it.
Note, leave your session opened to re-use $ds later to dismount the VHDX-file.
Now you can see the mounted drive in the already known destination path:
The replica volumes contain the expected folder structure:
Now you can start to copy your workload data to the mounted replica volume. In our example case these are SQL database and logfiles. You’ve to set this database offline to be able to copy these files.
You’ve to keep the original folder structure. What this means is shown in the following example:
Our Database Files are stored in
E:\Microsoft SQL Server\MSSQL12.MSSQLSERVER\MSSQL\DATA\ReportServer.mdf
That means that we’ve to copy the data to the following destination path:
C:\Program Files\Microsoft System Center 2016\DPM\DPM\Volumes\Replica\
31d8e7d7-8aff-4d54-9a45-a2425986e24c\d6b82768-738a-4f4e-b878-bc34afe189ea\
Full\E-Vol\Microsoft SQL Server\MSSQL12.MSSQLSERVER\MSSQL\DATA\ReportServer.mdf
When you’re done you have to dismount the volume by using the following ps command.
Stop-DPMManualReplicaCreation -Datasource $ds
This dismounts the Replica Volume VHDX File:
Replica volume for datasource ReportServer dismounted successfully. Run a consistency check job to start scheduled backups.
The final step is to run a consistency check:
Start-DPMDatasourceConsistencyCheck -Datasource $ds
Normal backups will be taken once the replica is healthy.
Hope this blog helps you perform manual replica creation with ease.
Updated Mar 11, 2019
Version 4.0System-Center-Team
Former Employee
Joined February 14, 2019
System Center Blog
Follow this blog board to get notified when there's new activity