
(function(d, s, id) {<br/> var js, fjs = d.getElementsByTagName(s)[0];<br/> if (d.getElementById(id)) {return;}<br/> js = d.createElement(s); js.id = id;<br/> js.src = "//connect.facebook.net/en_US/all.js#xfbml=1";<br/> fjs.parentNode.insertBefore(js, fjs);<br/>}(document, 'script', 'facebook-jssdk'));
So everything is running fine, but then the phone rings….there’s been a catastrophic failure of a critical server that needs to be up and running yesterday. You have a Bare Metal backup of this server in DPM - so now what? Which buttons do I click? Which options do I choose?
Just like a System State backup, BMR uses the Windows Server Backup feature on the target server for both a BMR backup and restore. There is one main difference on the backup process however. A System State backup saves the System State locally to the target server before transferring the data to DPM; a BMR backup copies the snapshot directly to the BMR storage pool.
Let’s walk through the process of completing a Bare Metal Restore to a DPM protected server. We are operating under the assumption that you have successfully installed the DPM agent on a protected server and have a successful BMR backup for that server. The process is as below.
General BMR Restore Process
1. Recovery the BMR to a network share
2. Give the share correct permissions
3. Boot to the 2008 or 2008R2 install DVD
4. Select the “Repair your computer” option
5. Go through the prompts for the restore
Bare Metal Restore Walkthrough
This environment involves:
1 member server
1 DC
1 Data Protection Manager 2010
Walkthrough
We will start by making sure we have the BMR recovery points created. Once done, we will restore the recovery point to a network share.
Here we see that we have a BMR backup successfully taken which resides on the DPM server:

Recover the BMR to a network share
We go to the recovery tab and select the server for which we have the BMR backup taken. Right click
o
n Bare Metal Recovery and elect to “Recover”:

The Recovery wizard starts and we select to restore to a network folder:

We then select the folder on the local DPM server previously created for the restore:

Note: The network share does not have to reside on the DPM server, but rather any share that is accessible to the target server.
We then choose to “apply security settings of the destination computer”:

We then see a summary of our choices:

Once started, we can see the Recovery Status:

We can also go to the Monitoring tab and select the “Jobs” tab to also see the job in progress there as well.

Once finished, we will need to give the share in which we restored to proper permissions.
Giving the share the correct permissions
Looking at the folder structure, we see the following:

It’s the “DPM_Recovered_At_<Date-Time>” folder we will need to give “read” permissions to. In this case we will share the folder with the name of “BMRRestore”:

And will give this folder “read” permissions:

Boot the target server to the 2008 or 2008R2 install DVD .
After you place the install DVD into the target server, elect to go through the install process:

Select to “Repair your computer” in the bottom left corner:

You will get a display that will show the currently installed operating systems that are options to perform the BMR for. In this case, we have just one selection:

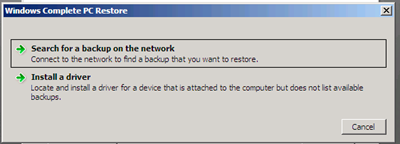
The recovery tool window now populates. We will select the “Windows Complete PC Restore” option:

A prompt now displays a failure for a backup location. You can select “cancel” as we will be performing a BMR restore over the network and not from a local location residing on this server:

Once “cancel” is selected you will see a window that will allow us an option to “Restore a different backup” radio button. Once you select that, choose “next”:

In the next window, we select the “Advanced” button:

From this, we need to specify to “Search for a backup on the network”:

This is assuming that you have a functioning DHCP server on the network to allocate ip addresses.
NOTE : Again, at this point we are operating under the assumption that there is a functioning DHCP server online providing ip addresses. If not then netsh can be used to assign an ipaddress.
a. Shift+F10 to open a command window
b. Ipconfig - to list interfaces and ip addresses - make a note of the network connection name "Local Area Connection" if you have more than one
c. Navigate the netsh command to:
netsh
interface
tcp
ipv4
Example syntax: set address "Local Area Connection" static 192.168.1.1 255.255.255.0 192.168.1.1 1
In the next window, you will specify the server and share name.
Type in the \\<servername>\<ShareName> In this case
\\DPM2010\BMRRestore
":
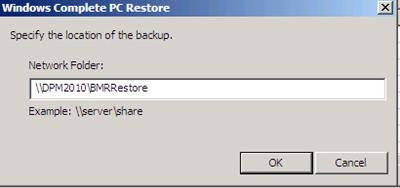
Credentials have to be specified”

Here is the output that you should see which shows the location, recent backup information and server name:

Once selected and you click “Next” the following is shown:

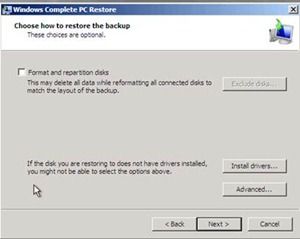
Select the backup available and then “Next”. The following screen shows some advanced options that you may want to select if you have specific disk drivers to install along with some advanced options:
This is now a confirmation shown":

You then get a confirmation that all data will be erased during the BMR recovery process:

After selecting “OK”, the process begins:

Once completed the server reboots and the Bare Metal Recovery is complete.
Hopefully this helps you understand the steps needed for a successful Bare Metal Restore of a protected server. As a suggestion to exercise a disaster recovery scenario, it is always beneficial to test out these steps in a test environment and be familiar with what is involved.
Resources:
BMR recovery walkthrough video: http://www.microsoft.com/showcase/en/us/details/bec0b1c6-d1fd-41f0-b4bc-df5791dfc68d
Prescriptive Guidance on BMR vs System State By Data Source: http://technet.microsoft.com/en-us/library/ff634241.aspx
Shane Brasher | Senior Support Escalation Engineer
App-V Team blog:
http://blogs.technet.com/appv/
AVIcode Team blog:
http://blogs.technet.com/b/avicode
ConfigMgr Support Team blog:
http://blogs.technet.com/configurationmgr/
DPM Team blog:
http://blogs.technet.com/dpm/
MED-V Team blog:
http://blogs.technet.com/medv/
OOB Support Team blog:
http://blogs.technet.com/oob/
Opalis Team blog:
http://blogs.technet.com/opalis
Orchestrator Support Team blog:
http://blogs.technet.com/b/orchestrator/
OpsMgr Support Team blog:
http://blogs.technet.com/operationsmgr/
SCMDM Support Team blog:
http://blogs.technet.com/mdm/
SCVMM Team blog:
http://blogs.technet.com/scvmm
Server App-V Team blog:
http://blogs.technet.com/b/serverappv
Service Manager Team blog:
http://blogs.technet.com/b/servicemanager
System Center Essentials Team blog:
http://blogs.technet.com/b/systemcenteressentials
WSUS Support Team blog:
http://blogs.technet.com/sus/

