Customizing Forms in SCSM can be pretty tricky. It seems like it is going to be really easy – just drag, drop, move, resize, etc. right? Well – yes, if you know a little bit about what is going on with the technology involved and have seen some examples. Otherwise it can be REALLY frustrating trying to do it. I’m going to do a few blog posts on how to customize forms to provide some tips and tricks and explain some of the technology involved to hopefully make it easier to customize forms using the Authoring Tool.
I’ll use examples from the “real world” that customers or partners have raised and how I have shown them how to do it. First I will start with the scenario where a customer is adding a new user relationship type between incident and user and wants to put a new user picker on the incident form.
First the customer tried to drag, drop, and configure and ended up with this in design mode (notice the new label and user picker control on the right labeled ‘Caller/Anforderer’):

Great! Right? Well, no because when he imported it into Service Manager it looked like this:

What happened?!!
Well – I don’t know exactly in this case since I didn’t look at the customization XML that was generated but one important thing to understand about XAML forms technology is that everything is controlled on a layout system comprised of containers and controls. Containers are things like Grids and StackPanels. Controls are things like text boxes, user pickers,labels, etc. Containers can contain containers and controls. Controls can even contain other controls but we won’t get into that in SCSM form customization scenarios. Every control on the form is positioned in relative position to other controls and the size can be relative to the container control or a fixed size. For example, you could say that a given control is going to start at 5 pixels away from the left of the container or other neighbor control and 5 pixels from the top. This is what the Right, Left, Top, and Bottom Margin properties are for:

You can specify the size of the control by setting the Layout properties:

When you say something has Auto height or Width it will expand to fill up the container in that direction. If you specify a minimum height or width the control will never get smaller than that in that direction. These numbers are in terms of the number of pixels. The alignment property can be Stretch (span across the container), Center, Left, or Right for the Horizontal alignment and Stretch, Center, Top, or Bottom for the Vertical alignment. This determines what side(s) of the container the control will line up with.
I’ll go into more detail on these things in a later post but for now let’s get back to the example. The reason the control didn’t end up where it was expected to was because in the designer the form was a certain width and when the customer loaded it up in the console it was a different width. Because the new controls were positioned with the incorrect layout and margin property values it ended up being in an unexpected place because relative to the size of the new form it ended up on top of another control in the container!
How do we avoid this?
The easy way is to use the concept of a StackPanel to our advantage. A StackPanel control is a container control in which every control inside it is stacked on top of each other either vertically or horizontally. Typically in SCSM forms we put a given label and the control that corresponds to it inside of a StackPanel. The entire form is typically actually a series of StackPanels inside of StackPanels! Trying to add another control into the area to the right of the Alternate Contact Method field is actually pretty tricky because of the way the form is originally laid out in a grid with StackPanels inside. This is what the form looks like when you first drag a control over it:

The green lines indicate Grid rows and columns. If you drop your control onto the form in this mode the behavior is going to be a little bit unexpected because it is going to start positioning your control in more absolute terms which is going to behave strangely as the form resizes. What you want to do instead is drop your controls inside of StackPanels on the form which are already programmed to resize correctly. In this case my suggestion to the customer was to drop the new controls into the same StackPanel that contains the Affected User stack panel out of the box so that it would look like this when he was done:

Here’s is how to do that step by step:
When you mouse over something that looks like this with a gray dotted line around it that is a StackPanel. All of the controls inside of it will be stacked on top of each other (typically vertically, but it can also be horizontal).

If you drop your control in there it will be added to the bottom of the StackPanel like this:

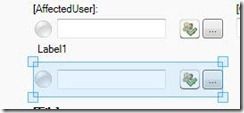
At this point there are three controls stacked on top of each other in the StackPanel – the ‘Affected User’ label, the Affected User user picker control and the new label (‘Label1’).
You can then drag a UserPicker control on there in the same way and have it go just under the label:
Now just set the label string, bind the user picker control and you’re set.
I put in a Top margin of 5 for the new label control to separate it from the user picker above a bit.
I also added in Top margin of –5 (yes, you can use negative numbers!) to move the user picker control closer to the label.
Now here are a couple of general tips on form customization:
1) CTRL + Z will undo customizations. If you don’t like the way something turned out just hit CTRL + Z to undo it. It’s better to undo the customization and try something different than continue to just tweak and tweak over and over. Remember that the Authoring Tool is essentially recording your every move and those modifications will be replayed on the form in the console before it is shown to the user.
2) You can undo all the customizations on the form by right clicking on the customization form in the Management Pack Explorer and choosing ‘Undo all customizations’

Hopefully that helps!