First published on TECHNET on Dec 21, 2009
This question comes up quite often – “How do I get additional AD properties into the Service Manager CMDB?” Like this , or this , or this . These properties might be either properties which exist in AD that we don’t sync in by default with the out of box AD connector OR they might be AD schema extension properties that a customer has added to AD.
In this blog post, I’m going to show you how you can create an automated AD connector that runs on a schedule that does the following:
- Queries Active Directory using the new Active Directory PowerShell cmdlets in Windows Server 2008 R2 to get user data properties out of Active Directory.
- Writes the user data to a CSV file on the management server.
- Uses the Import-SCSMInstance PowerShell cmdlet shipped with Service Manager to import the data in the CSV file into Service Manager.
This particular process can be slightly modified to create all kinds of “connectors”. For example:
- you could use PowerShell to query something besides AD and write to the CSV file
- you could use the authoring console to run a JScript/VBScript instead of PowerShell that creates the CSV file
- you could run a .exe or .bat file that generates the CSV file
- you could have some other process place the CSV file in the right place and use Service Manager to just import the CSV file periodically
To fully understand this example, please read up on the CSV import process first if you haven’t already. I definitely recommend trying out a few of the examples so you get the feel for it.
For this particular example, this is what we are going to do:
1) Using the techniques describe in the previous post on Deriving and Extending Classes we need to create a management pack that extends the System.Domain.User class to add a new property for storing the user’s web page address. This property exists in AD out of the box, but we don’t sync it in as part of the out-of-the-box AD connector in Service Manager. This could just as well be a custom property that you have created in AD.
Here is our class extension to add the WWWHomePage property to the System.Domain.User class:
<ClassType ID="Microsoft.Demo.AD.Extension.Connector" Accessibility="Public" Abstract="false" Base="System!System.Domain.User" Hosted="false" Singleton="false" Extension="true">
<Property ID="WWWHomePage" Type="string" AutoIncrement="false" Key="false" CaseSensitive="false" MaxLength="2000" MinLength="0" Required="false" MinValue="-2147483648" MaxValue="2147483647" />
</ClassType>
Don’t forget to put in the DisplayStrings !
2) Next, we need to create our workflow so we open up this management pack in the Service Manager Authoring Console. Do this by launching the Authoring Console and then File –> Open and point to the MP .xml file.
3) Right click on the Workflows node in the MP explorer and choose Create.

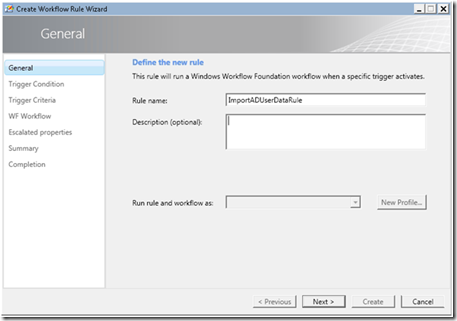
4) In the first page of the workflow wizard provide a rule name and click Next.
5) On the next page, select Timer for the trigger condition and click next:

6) On the next page, enter the schedule you want to use and click Next:

7) On the next page, provide a name for the workflow and click Next:

8) On the next page, click Create:

9) And finally, Close.

10) Now, drag a PowerShell script activity from the Toolbox onto the design surface:

11) Select the PowerShell script activity and do two things in the Properties pane
a) enter the Script server name – this is the FQDN of the Service Manager management server in this case.
Note: if you start from the management pack I provide in the attachment to this blog post, please make sure you change the server name by opening the MP in the authoring console and recompile the workflow assembly by saving the management pack.
b) click the … button next to the Script Body property

12) This will bring up this dialog. Paste your script into it:
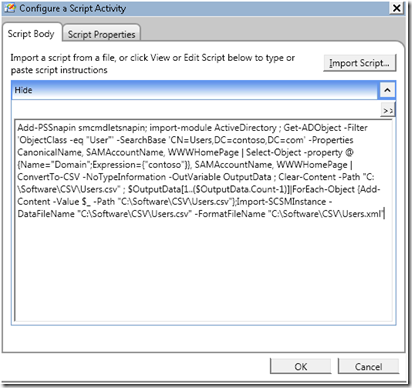
Here is my script:
Add-PSSnapin smcmdletsnapin ; import-module ActiveDirectory ; Get-ADObject -Filter 'ObjectClass -eq "User"' -SearchBase ' CN=Users,DC=contoso,DC=com ' -Properties CanonicalName, SAMAccountName, WWWHomePage | Select-Object -property @{Name="Domain";Expression={" contoso "}}, SAMAccountName, WWWHomePage | ConvertTo-CSV -NoTypeInformation -OutVariable OutputData ; Clear-Content -Path " C:\Software\CSV\Users.csv " ; $OutputData[1..($OutputData.Count-1)]|ForEach-Object {Add-Content -Value $_ -Path " C:\Software\CSV\Users.csv "};Import-SCSMInstance -DataFileName " C:\Software\CSV\Users.csv " -FormatFileName " C:\Software\CSV\Users.xml "
Note : those items highlighted in the script will need to be changed to match your environment!
Let’s take this apart a bit…
- Add-PSSnapin smcmdletsnapin; –> This adds the Service Manager PowerShell snapin so we can later use the Import-SCSMInstance cmdlet to insert the data into Service Manager.
- import-module ActiveDirectory ; –> This adds the Active Directory PowerShell module so we can call Get-ADObject.
- Get-ADObject -Filter 'ObjectClass -eq "User"' -SearchBase 'CN=Users,DC=contoso,DC=com' -Properties CanonicalName, SAMAccountName, WWWHomePage --> this AD cmdlet gets an AD object. Setting ObjectClass equal to “User” ensures that we only get User objects'. Since computers also have a User entry in AD we need to further filter this down by only getting users out of a particular Organizational Unit such as the out-of-box OU called ‘Users’ that most users typically go into in AD. Note: You’ll need to change your –SearchBase parameter value to something that works in your situation (unless you are using the Contoso demo VM environment). The Properties parameter specifies which properties we want to get out of AD. You’ll always want to get the SAMAccountName since you’ll need that for the data import later.
- Select-Object -property @{Name="Domain";Expression={"contoso"}}, SAMAccountName, WWWHomePage --> Since the objects returned by Get-ADObject are not modifiable we need to select them into a custom object. Since we know the domain we can just hard code that. Note: you’ll need to change this for your environment as well.
- ConvertTo-CSV -NoTypeInformation -OutVariable OutputData –> Next we pipe the data into CSV format and store it in an variable called OutputData.
- Clear-Content -Path "C:\Software\CSV\Users.csv" –> this deletes the current data in the .csv data file. Note: You’ll need to change this for your environment.
- $OutputData[1..($OutputData.Count-1)]|ForEach-Object {Add-Content -Value $_ -Path "C:\Software\CSV\Users.csv"}; –> This takes each item in the OutputData (except for the first row which has header names in it instead of data) and writes it to the CSV file. Note: You’ll need to change the file path for your environment.
- Import-SCSMInstance -DataFileName "C:\Software\CSV\Users.csv" -FormatFileName "C:\Software\CSV\Users.xml" –> Lastly, we call Import-SCSMInstance to import the data into Service Manager.
13) Now, click OK on the script body dialog.
14) Right click on the Management Pack in the MP explorer and choose Save.

15) A new .dll file should appear in the same folder as your MP .xml file. Copy this file to the Service Manager folder (%ProgramFiles%\Microsoft System Center\Service Manager 2010) on your Service Manager management server.
16) Until this option is exposed in the authoring console, you’ll need to set the run as account manually in the XML. To do this – open the XML file and find the WriteActionModuleType element. Add an attribute there called RunAs and set the value to a RunAs account. In my case, I used the Operational System Account. That’s the name for it in the console, but in the XML it is DatabaseWriteActionAccount.
<WriteActionModuleType ID="ImportADUserDataRuleWorkflow.PowerShellScript.12a3a306_28ac_4161_97dd_60d0cf9451e0.MT" Accessibility="Public" RunAs="SystemCenter!Microsoft.SystemCenter.DatabaseWriteActionAccount" Batching="false">
If your Operational System Account has the privilege to query the domain, I would suggest using it.
Save these changes to your MP.
17) Import the MP into Service Manager using either the admin console or the Import-SCSMManagementPack PowerShell cmdlet.
18) For purposes of testing this demo out, you can add a Home Page property value in AD to a user by opening the AD Users and Computers snapin, navigating to a user, opening the properties dialog and entering a value in the Web page textbox:

19) Close and reopen your Service Manager console to refresh the cache.
20) Wait until your “connector” runs and then open that user in the Service Manager console and select the Extensions tab to see your extended property and it’s value that was automatically imported in by your custom workflow!

If your workflow doesn’t seem to be working, see this blog post on workflow troubleshooting .
Attached is the demo MP.
-Travis
Follow me on twitter! https://twitter.com/radtravis
Updated Mar 11, 2019
Version 4.0System-Center-Team Microsoft
MicrosoftJoined February 15, 2019
System Center Blog
Follow this blog board to get notified when there's new activity


