Note: This blog post is intended for a developer audience, especially partners working on building extensions to Service Manager or customers looking to make advanced customizations to Service Manager.
In this guest blog post, Ryan Stolte who is the CTO and Founder of one of our partners, Bay Dynamics , is going to show how with a few lines of XAML to create a custom UserControl and some MP XML, you can create custom dashboards embedded in the Service Manager console. This example uses the Overview View Type in which you can put whatever XAML you want including custom controls. Lastly, I want to point out that because Ryan uses a Management Pack Bundle to package the solution, it is deployed seamlessly to all Service Manager consoles automatically when the MP is imported.
Thanks for writing this up Ryan! We're all excited about the IT Analytics solution you guys are putting together for Service Manager!
Introduction
System Center Service Manager provides a core set of capabilities for organizations to implement an ITIL based service management program. As a part of any effective service management program, we need to measure our performance to understand what is happening now, how we're doing over time, and identify areas to improve.
Bay Dynamics offers IT Analytics™ software that helps organizations continuously measure and continuously improve their service management program through the use of strategic Key Performance Indicators, operational dashboards, and fast and flexible OLAP cubes that represent all core processes and configuration items in Service Manager.
SQL Server Reporting Services is a very capable reporting platform leveraged by both Service Manager and IT Analytics to deliver visually informative dashboards and reports to users. In this example, we will show how an organization can extend Service Manager by adding a dashboard oriented report to a context relevant location within the Service Manager Console.
Along the way, we'll demonstrate how to:
- Create a custom Overview View Type to host a WPF User Control and display it in the content area for a folder
- Create a WPF user control that hosts a Windows Forms based control
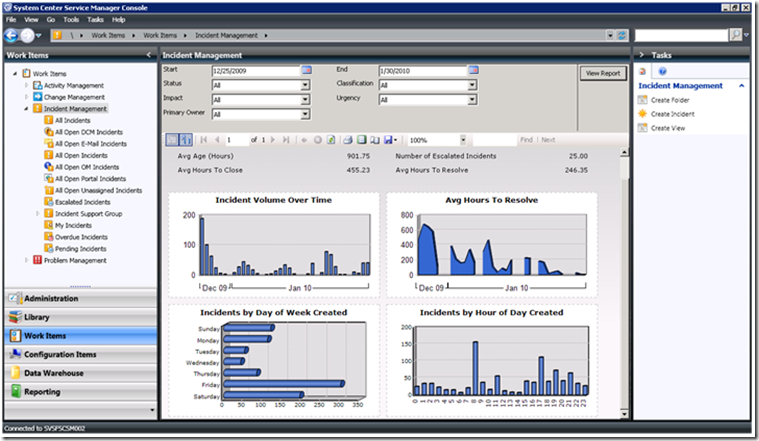
- Combine them all together to host the SSRS ReportViewer 2008 control to host a dashboard for your users, as shown below:
Implementation
First, create a new WPF Application in Visual Studio to host our control. We will distribute this control within an assembly, so we need to change the output type to be a class library. Next, add a new WPF User Control to the project to host our SSRS Report. We'll add the content to our control through code, so the only change we'll make is to give the Grid a name, for convenient referencing later on, and remove the Height and Width to allow this control to fill the entire available area in the Service Manager Console.
<UserControl x:Class="BayDynamics.Examples.IncidentDashboard.IncidentDashboardControl"
xmlns="http://schemas.microsoft.com/winfx/2006/xaml/presentation"
xmlns:x="http://schemas.microsoft.com/winfx/2006/xaml">
<Grid x:Name="thisReportGrid" />
</UserControl>
Next we need to add our building blocks to this control. We want to use the SSRS Report Viewer control, so we need to ensure that this control is available to our development environment. Try adding a reference to Microsoft.ReportViewer.WinForms as shown below.

If the assembly isn't available in the list, you can download the Microsoft Report Viewer 2008 Redistributable from:
Note that you'll need to restart Visual Studio after you've installed the Report Viewer to see the new reference. In order to use the Report Viewer in our new control, we're going to use a WindowsFormsHost, so we also need to add references to System.Windows.Forms and WindowsFormsIntegration.
Now that we have all of our prerequisites in place, we can tie things together via code. First we create a WindowsFormsHost object and a ReportViewer object, and set the ReportViewer as a child of the WindowsFormsHost. Then we add our WindowsFormsHost object to the outermost grid defined in the XAML.
We then have a few lines of code that tell the Report Viewer that we'll be using a hosted report by setting the ProcessingMode to Remote, and give it the SSRS URL and path to the report we'd like to show. For a more reusable design, this control could be parameterized to pass in the SSRS URL and report name, but we'll hard code them in our example (don't forget to replace the <SERVERNAME> and <PATHTOREPORT> placeholders below). Finally, now that everything is connected, we ask the Report Viewer to refresh the report, which will cause it to actually render our dashboard.
public partial class IncidentDashboardControl : System.Windows.Controls.UserControl
{
public IncidentDashboardControl()
{
InitializeComponent();
System.Windows.Forms.Integration.WindowsFormsHost thisWindowsFormsHost
= new System.Windows.Forms.Integration.WindowsFormsHost();
Microsoft.Reporting.WinForms.ReportViewer thisReportViewer
= new Microsoft.Reporting.WinForms.ReportViewer();
thisWindowsFormsHost.Child = thisReportViewer;
thisReportGrid.Children.Add(thisWindowsFormsHost);
thisReportViewer.ProcessingMode = ProcessingMode.Remote;
thisReportViewer.ServerReport.ReportServerUrl
= new Uri("http://<SERVERNAME>/reportserver");
thisReportViewer.ServerReport.ReportPath
= "/SystemCenter/ServiceManager/<PATHTOREPORT>";
thisReportViewer.RefreshReport();
}
}
That's it for the control. Now we need a management pack that uses the output assembly as a resource and displays our new user control in the root of the Incident Management Folder. As a starting point, here is a shell of a management pack that has references to the other management packs we'll need for this example in the Manifest.
<ManagementPack ContentReadable="true" SchemaVersion="1.1" xmlns:xsd="http://www.w3.org/2001/XMLSchema" xmlns:xsl="http://www.w3.org/1999/XSL/Transform">
<Manifest>
<Identity>
<ID>BayDynamics.Examples.IncidentDashboard</ID>
<Version>1.0.0.0</Version>
</Identity>
<Name>Example Incident Dashboard</Name>
<References>
<Reference Alias="SMIncident">
<ID>ServiceManager.IncidentManagement.Library</ID>
<Version>7.0.5244.0</Version>
<PublicKeyToken>31bf3856ad364e35</PublicKeyToken>
</Reference>
<Reference Alias="System">
<ID>System.Library</ID>
<Version>7.0.5244.0</Version>
<PublicKeyToken>31bf3856ad364e35</PublicKeyToken>
</Reference>
<Reference Alias="SMConsole">
<ID>Microsoft.EnterpriseManagement.ServiceManager.UI.Console</ID>
<Version>7.0.5244.0</Version>
<PublicKeyToken>31bf3856ad364e35</PublicKeyToken>
</Reference>
</References>
</Manifest>
<PresentationTypes></PresentationTypes>
<Presentation></Presentation>
<Resources></Resources>
</ManagementPack>
The first addition to the management pack definition we need is a new Overview ViewType that will host our dashboard. The following code segment can be used generically to host any custom content you define in a user control, the details are really in the definition of the View itself.
<PresentationTypes>
<ViewTypes>
<ViewType ID="BayDynamics.Examples.IncidentDashboardViewType" Accessibility="Public">
<Configuration>
<xsd:any minOccurs="0" maxOccurs="unbounded" processContents="skip" xmlns:xsd="http://www.w3.org/2001/XMLSchema" />
</Configuration>
<ViewImplementation>
<Assembly>SMConsole!WpfViewsAssembly</Assembly>
<Type>Microsoft.EnterpriseManagement.UI.WpfViews.Overview</Type>
</ViewImplementation>
</ViewType>
</ViewTypes>
</PresentationTypes>
Now we need to create an instance of our new ViewType. The following code will be fairly consistent for any custom overview view type you may create. The TypeID should match the new ViewType created previously, and then the real uniqueness is what you add to the Content element. In our case, we're simply going to add enough XAML to add our user control to a simple grid. We refer to our assembly by adding the namespace to the Grid element, and then add our control within the grid referencing that namespace.
<Presentation>
<View ID="BayDynamics.Examples.IncidentDashboardView" Accessibility="Public" Enabled="true" Target="System!System.Entity" TypeID="BayDynamics.Examples.IncidentDashboardViewType" Visible="true">
<Category>Overview</Category>
<Configuration>
<Definitions />
<Presentation>
<Header />
<Content>
<Grid xmlns="http://schemas.microsoft.com/winfx/2006/xaml/presentation"
xmlns:x="http://schemas.microsoft.com/winfx/2006/xaml"
xmlns:local="clr-namespace:BayDynamics.Examples.IncidentDashboard; assembly=BayDynamics.Examples.IncidentDashboard">
<local:IncidentDashboardControl />
</Grid>
</Content>
</Presentation>
</Configuration>
</View>
</Presentation>
We also need to tell the management pack about our assembly so the reference we make to it in the View is valid. We do so by adding it as a resource as shown below.
<Resources>
<Assembly ID="Resource.BayDynamics.Examples.IncidentDashboard" Accessibility="Public" FileName="BayDynamics.Examples.IncidentDashboard.dll" QualifiedName="BayDynamics.Examples.IncidentDashboard" />
</Resources>
The last thing we need to do is tell the management pack to load our new View when a user clicks on the Incident Management folder. You can use the lessons learned in a previous post to look up folders by name in the Folders table of the CMDB, and then follow that through to the proper Folder ID to use. Once we have the Folder ID, we create a FolderItem and provide a unique ID, the Folder ID, and use the ID of our View for the ElementID.
<FolderItems>
<FolderItem ElementID="BayDynamics.Examples.IncidentDashboardView" ID="BayDynamics.Examples.IncidentDashboardView.FolderItem" Folder="SMIncident!ServiceManager.Console.IncidentManagement" />
</FolderItems>
Deploying this Solution
To deploy this example, we need to create a Management Pack Bundle with the MP .xml file and user control .dll. For guidance on creating a Management Pack Bundle, click here . Note that the file path for the .dll in the example above assumes the .xml and .dll files are in the same folder. In the complete project source provided we've left the path relative to the solution debug output path for convenience in testing.
Once you have the .mpb created, import the management pack into Service Manager and navigate to the Incident Management folder to see your new dashboard!
Remember, our example uses the Microsoft Report Viewer control, and if that is not deployed on the same machine that you're using the Service Manager Console on, you will see an error. If you have issues with the control, you can download the Microsoft Report Viewer 2008 Redistributable from:
The complete source code is available here: