With Visual Studio 2015 and the Azure SDK, you’re ready to get started coding for the cloud. Let’s create a simple website and publish it to Azure, all within Visual Studio 2015, and see how this works.
You should have already:
- Installed Visual Studio Community 2015
- Installed the Azure SDK 2.7 [JST1] [BG2]
- Activated your free Azure student subscription through Microsoft DreamSpark
(If you haven’t done these steps yet, check out our other blog entry on how to get started with Visual Studio 2015 and Azure . Then come right back here and we’ll start coding.)
Launch & Connect
Open Visual Studio Community 2015
If you haven’t already, sign in to your Microsoft Account by clicking “Sign in” in the upper right corner. You need to use the same Microsoft Account that you used with DreamSpark and Azure already.

Once you sign in, Visual Studio 2015 will automatically recognize your Azure subscription. It’s automagic
Open Cloud Explorer
Cloud Explorer is Visual Studio 2015’s direct connection to Azure. Let’s open that tool now from the menu by clicking:
View / Other Windows / Cloud Explorer

And just like that, here’s your Azure subscription! Or rather, here is mine:

See that Actions pane at the bottom? (You can get the same thing if you right click on one of your web apps.) It’s pretty handy: “Open in portal” will open your web app within the Azure Portal while “Open in Browser” pops open your default web browser and goes straight to your live web app.
But we’re going to make something new! Let’s get started.
Create a New Web Site Solution
Go to the menu and click:
File / New / Web Site

You’ll then see this window where you click ASP.NET Empty Web Site:

Then you’ll see your Solution Explorer on the right with your brand new WebSite solution!
Make a Homepage
From Solution Explorer, right click on your WebSite solution and click:
Add / Add New Item
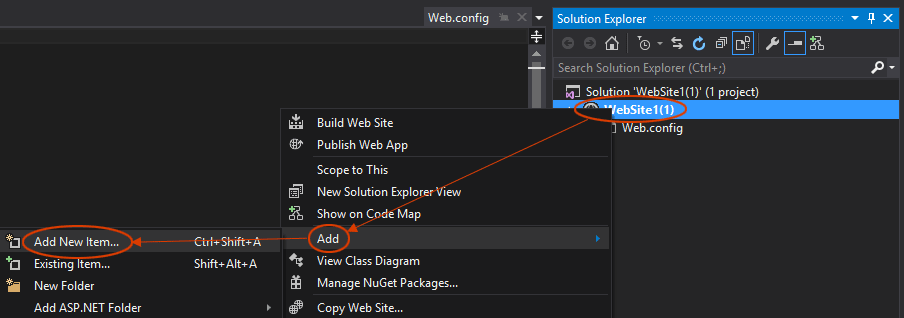
Or you can hit Ctrl+Shift+A.
This gives you a new window where you’ll click HTML Page and Add:

Now Solution Explorer will show your new empty web page file:

It’s called HtmlPage.html. We’ll make this your homepage for the project, so we should rename it to index.html . That’s a standard name for a homepage and web browsers will find it more easily.
Do you know how to rename a file in a Visual Studio project? There are two ways:
1) Right-click on HtmlPage.html and click Rename from the pop-up window
2) Look below Solution Explorer in the Properties window where it shows the File Name field. Click HtmlPage.html there and rename it to index.html.
All set? Let’s do a little web coding!
Code Your Web Page
Let’s make as simple a web page as we can just so we can see Visual Studio 2015 and Azure in action. Your index.html file should now be open in the main window. (If not, double click it in the Solution Explorer.)
It already has this text:
     <!DOCTYPE html>


     <html>


     <head>


     <title></title>


     <meta charset="utf-8" />


     </head>


     <body>


     </body>


     </html>
Click the cursor in between <title> and </title>. We need to give your web page a title – let’s call it Hello Cloud! Just type that right in between.
     <!DOCTYPE html>


     <html>


     <head>


     <title>Hello Cloud!</title>


     <meta charset="utf-8" />


     </head>


     <body>


     </body>


     </html>
Then click on that blank link in between <body> and </body>. Type this in just as it appears:
     <h1>Hello Cloud!</h1>


     <p>Check out this sweet website I made in Visual Studio 2015!</p>
So now you’ve got a complete web page! It should all look like this:
     <!DOCTYPE html>


     <html>


     <head>


     <title>Hello Cloud!</title>


     <meta charset="utf-8" />


     </head>


     <body>


     <h1>Hello Cloud!</h1>


     <p>Check out this sweet website I made in Visual Studio 2015!</p>


     </body>


     </html>
Done! Let’s ship this thing and go home. All we need to do is publish it as a web app to Azure.
Publish Your Web App
Back in Solution Explorer, right-click on your WebSite solution and click Publish Web App:

This opens a Publish Web window. “Profile” should already be selected on the left. Click Microsoft Azure Web Apps, and then from the next pop-up window click New…

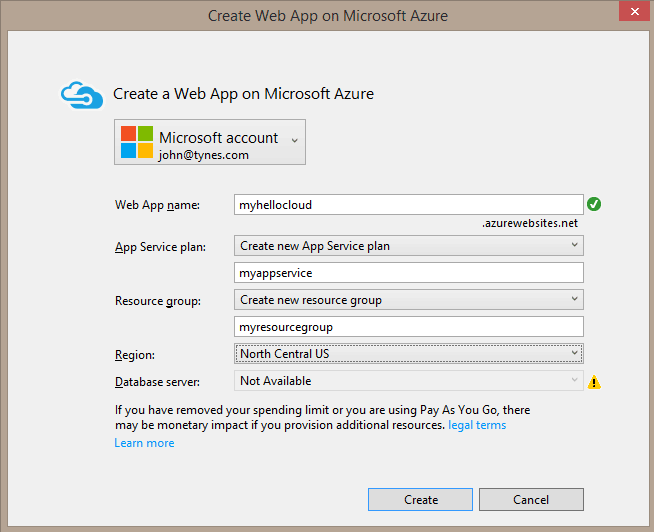
Now it’s time to do some serious Azure stuff. We’re going to name your web app and assign it a bunch of Azure attributes: an App Service plan, a Resource group, and a Region. Here’s the window:

Let’s do a few things:
- Click in the blank field by Web App name and type a name for your web app. This will be the URL for your website. Whatever you type will be put in front of “.azurewebsites.net”. In my example here, I named my web app “myhellocloud” so my website URL will be myhellocloud.azurewebsites.net. (In fact, you can go look at mine right now if you want.) Since I used “myhellocloud” you’ll need to type something else.
- For App Service plan , click the dropdown and select “Create new App Service plan”.
- For Resource group , click the dropdown and select “Create new resource group”.
- For Region , click the dropdown and select the region closest to you in the world.
Now your window looks like this:

So let’s fill in those two fields! You can name your App Service plan and resource group whatever you want.
What is an App Service plan? It’s just a set of attributes that you can reuse across multiple apps. The attributes include a pricing tier (let’s stick with “Free”!) and a Subscription (if you have multiple Azure subscriptions). The plan you create right now will probably work for all the web apps you build while you’re a student. You can name yours whatever you want. I’ve named mine “myappserviceplan”.
What is a Resource group? It’s just a label that lets you group multiple Azure resources together so it’s easy to select them all at once in the Azure Portal. Pro coders who use Azure might group together a bunch of specific resources so they can view them all at once, monitor them as a group, track the costs and billing for that group, and so on. Since it’s just a label you can name it whatever you want. I’ve named mine “myresourcegroup”.
What is a Region? The dropdown lists every Azure datacenter in the world that you can host your web app in. Each datacenter is a giant warehouse full of computers running Azure resources. So when you select a Region, you’re choosing just where in the world is the computer that your web page will actually live on. That’s kind of cool! Usually you want the one closest to you, but hey, choosing a Region is cheaper than a plane ticket so why not send your web app someplace you always wanted to go? I chose the North Central US because apparently I like the Great Lakes a lot or something.
Here is what my window looks like now:
Let’s click Create and see what happens! Oh, this happens:

After a little while, or maybe a few minutes, the web app is set up and it’s time to actually publish your web page. Here’s the window – all you do is click Publish:

The window goes away. Quick, look at the bottom of your screen! The Output window shows a bunch of mysterious things happening, which are really just the progress of publishing your homepage to the Azure datacenter in the region you selected.
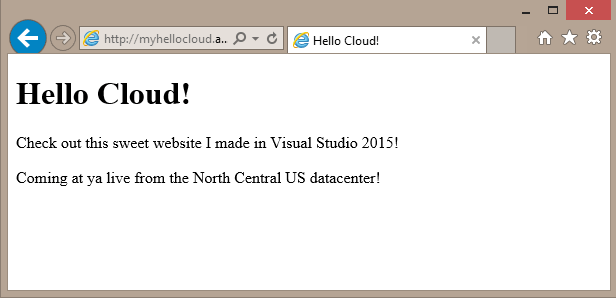
And then whoa – your browser pops open a window and suddenly there’s your homepage, live on the Internet from North Central US! (Or wherever you selected your Region.)

Want to see my site live for real? It’s right here:
http://myhellocloud.azurewebsites.net/
Back to Cloud Explorer
Remember Cloud Explorer? Why did we open that thing anyway? Let’s go back and check on it. Do two things:
1) Click the Refresh button. That’s the blue circle arrow near the top.
2) Double click Web Apps in the list to expand its contents.
THERE IT IS! My new web app, myhellocloud, is right there in Cloud Explorer. I can right-click it (or use the Actions panel) to open it in my browser anytime. I can also open it in the Azure Portal, but we can explore that some other time.
Make a Change and Publish Again!
Wow, that was a lot of steps! What if I want to change one little thing and republish my homepage? Let’s try it.
Your index.html file is probably still open. If not, double click it in Solution Explorer.
     <!DOCTYPE html>


     <html>


     <head>


     <title>Hello Cloud!</title>


     <meta charset="utf-8" />


     </head>


     <body>


     <h1>Hello Cloud!</h1>


     <p>Check out this sweet website I made in Visual Studio 2015!</p>


     </body>


     </html>
Click your cursor at the end of that </p> line and hit Enter to start a new line. Then type something like this:
<p>Coming at ya live from the North Central US datacenter!</p>
Whatever you type has to have that <p> at the start and </p> at the end.
So now my index.html looks like this:
     <!DOCTYPE html>


     <html>


     <head>


     <title>Hello Cloud!</title>


     <meta charset="utf-8" />


     </head>


     <body>


     <h1>Hello Cloud!</h1>


     <p>Check out this sweet website I made in Visual Studio 2015!</p>


     <p>Coming at ya live from the North Central US datacenter!</p>


     </body>


     </html>
Sweet! Let’s publish this again. Think it’ll take forever? Wrong! Just right-click your Web Site solution again over there in Solution Explorer and click Publish Web App from the pop-up window:

Then you’ll see this window again:
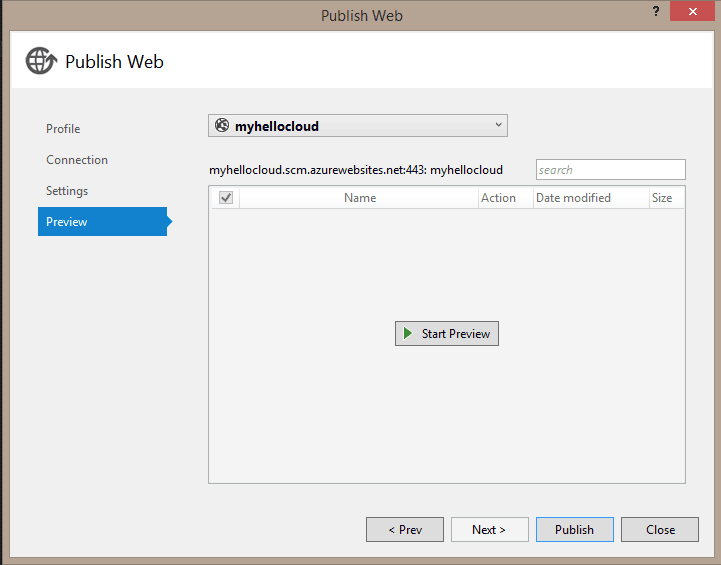
All you do is click Publish. The window goes away, that Output window at the bottom of the screen goes crazy for a few seconds, and then BAM you’re at your updated homepage!
If you don’t see the change you made, hit F5 to refresh your browser.
Whew! Now you’ve made your first web page in Visual Studio 2015 and Azure. Pretty sweet!
Thanks for coming on this little journey. I wonder what you’ll make next?
John Scott Tynes
Microsoft Imagine Program Lead
Connecting aspiring student developers with tools, resources and experiences to turn innovative ideas into reality.