Most of the articles found on this site assume that you are working on a computer running a Microsoft Lync Server 2010 service or server role, and that the Lync Server Management Shell has been installed on that computer. We did that for two reasons: 1) That’s the easiest way to do things; and, 2) It lets us put the focus on the task at hand (e.g., creating a new voice policy) rather than the preliminary commands required to manage Lync Server from a computer where the Management Shell has not been installed.
But while that might make our lives easier, it doesn’t necessarily make your lives easier. After all, you might want to do at least some of your management tasks remotely; for example, you might want to configure your Address Book servers or enable a few user accounts while sitting at your desk rather than at a Lync Server front end machine. Fortunately, that’s very possible to do; unfortunately, it’s not immediately obvious how you would go about doing that.
But that’s OK; that’s why we decided to put together this Quick Start guide to remote management of Microsoft Lync Server 2010.
Step 1: Make Sure You’re Running Windows PowerShell 2.0
What happens if you’re not running Windows PowerShell 2.0? Nothing – literally. You must have Windows PowerShell 2.0 or you will never, ever be able to use PowerShell to manage Lync Server. If you aren’t sure what version of PowerShell you’re running then start up Windows PowerShell and type this at the PowerShell prompt:
Get-Host
In turn you should get back something similar to this:
Name : ConsoleHost
Version : 2.0
InstanceId : b4c50031-fcae-4d6e-ab0b-200b6beecf9f
UI : System.Management.Automation.Internal.Host.InternalHostUserInterface
CurrentCulture : en-US
CurrentUICulture : en-US
PrivateData : Microsoft.PowerShell.ConsoleHost+ConsoleColorProxy
IsRunspacePushed : False
Runspace : System.Management.Automation.Runspaces.LocalRunspace
If the Version property isn’t equal to 2.0 then you’re not running PowerShell 2.0.
But hey, don’t cry; after all, you can always download and install the latest and greatest version of Windows PowerShell from here: http://support.microsoft.com/kb/968929 .
As soon as you’re confident that you’re running PowerShell 2.0 you can move on to Step 2.
And no, no rush; take your time. We’ll wait.
Step 2: Create a Windows PowerShell Credentials Object
OK, admittedly, this step might be optional: it depends on the user account you used when you logged on to Windows in the first place. For this Quick Start guide, however, we’re going to assume that the account you used to log on to Windows isn’t the same account you use to manage Lync Server. (That’s a security best practice, and we know that everyone always follows our security best practices.) Regardless, we need to create a credentials object (a very secure credentials object, we might add) that contains our user name and password. To do that, first type the following at the command prompt, substituting your domain name for litwareinc and your logon name for kenmyer (make sure you’re using the domain name and logon name for your Lync Server administrator account):
$credential = Get-Credential "litwareinc\kenmyer"
That should bring up a credentials dialog box that looks a little something like this:
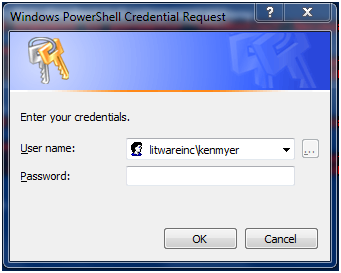
Type your password in the Password box and then press ENTER. When you do so, the dialog box will disappear and you should see something like this:
UserName Password
-------- --------
litwareinc\kenmyer System.Security.SecureString
If you do, then you’ve successfully created the credentials object. But save your self-congratulations for later; it’s time for Step 3. If you don’t see something like this type $credential at the PowerShell prompt and then press ENTER. If you still don’t see something like this then you’ll need to go back and try Step 2 from the beginning.
Step 3: Creating a Remote PowerShell Session
Now the fun part begins: it’s time to make a connection to one of your front end Lync Server machines (in this case, atl-cs-001.litwareinc.com). How do you do that? Why, by running the following PowerShell command, of course:
$session = New-PSSession -ConnectionUri "https://atl-cs-001.litwareinc.com/OcsPowershell" -Credential $credential
When you run this command, it might not look like anything happened. To verify that something did happen (and that you were able to make a connection to atl-cs-001) type $session at the Windows PowerShell prompt and then press ENTER. If all went well you should see something similar to this:
Id Name ComputerName State ConfigurationName Availability
-- ---- ------------ ----- ------------------ ------------
1 Session 1 atl-cs-00... Opened Microsoft.PowerShell Available
OK, so now are we ready to start managing Lync Server remotely? Well, almost. First, however, we have to import our new PowerShell session; that’s because we still don’t have access to all the Communications Server cmdlets. To verify that, type the following at the Windows PowerShell prompt and then press ENTER:
Get-CsVoicePolicy
You should get back an error message stating that:
The term ‘Get-CsVoicePolicy’ is not recognized as the name of a cmdlet, function, script file, or operable program. Check the spelling of the name, or if a path was included, verify that the path is correct and try again.
So should you check the spelling and try again? No. Instead, move on to Step 4.
Step 4: Importing the Remote PowerShell Session
When you import a PowerShell session you will finally have access to all the Lync Server cmdlets. (Well, maybe not all of them; we’ll explain that in a moment.) To import your new session, just type the following at the Windows PowerShell prompt and then press ENTER:
Import-PsSession $session
There will likely be a momentary pause while PowerShell retrieves all the relevant cmdlets, functions, scripts, and other Communications Server-paraphernalia, and then, at long last, you should see something like this onscreen:
ModuleType Name ExportedCommands
Script tmp_77b73956-53ca-4e7a... {New-CsNetworkInterSitePol...}
And now if you type Get-CsVoicePolicy you should get back, well, you should get back information about all your voice policies.
Well, assuming you have permission to run Get-CsVoicePolicy in the first place. It’s important to keep in mind that Lync Server enforces RBAC (Role-Based Access Control) on all remote management sessions. What does that mean? Well, in Lync Server, the administrative tasks you are allowed to carry out are based on the RBAC roles that have been assigned to you; in turn, each RBAC role is assigned a number of Lync Server cmdlets. For example, suppose you’ve been assigned a hypothetical RBAC role that gives you access to only four cmdlets:
· Disable-CsUser
· Enable-CsUser
· Get-CsUser
· Set-CsUser
What do you suppose is going to happen if you try to run the command Get-CsVoicePolicy ? You got it: you’re going to get back this same error message:
The term 'Get-CsVoicePolicy' is not recognized as the name of a cmdlet, function, script file, or operable program. Check the spelling of the name, or if a path was included, verify that the path is correct and try again.
Why that error message? Here’s why: When you import your PowerShell session RBAC ensures that the only Lync Server cmdlets that get imported are the ones that have been assigned to your RBAC role. If you want to see all the Lync Server cmdlets you have access to during your remote session, type this command at the PowerShell prompt and then press ENTER:
Get-Command *-Cs* -CommandType Function
Note . Yes, that command does return functions rather than cmdlets. But that’s because PowerShell imports cmdlets as functions rather than as cmdlets.
If your RBAC role limits you to four cmdlets then Get-Command is only going to return the following items:
Disable-CsUser
Enable-CsUser
Get-CsUser
Set-CsUser
As you can see, the Get-CsVoicePolicy cmdlet was never imported. That’s why PowerShell says it has no idea what you’re talking about when you try to run Get-CsVoicePolicy.
Note : To learn more about RBAC in Lync Server, read A Brief Introduction to Role-Based Access Control – Part 1 .
Incidentally, even if you’re the Grand Pooh-Bah of Lync Server you won’t have access to all the Lync Server cmdlets when working remotely. That’s because a handful of cmdlets -- such as Test-CsComputer – can only be run locally; they will not work in a remote session. Fortunately, Lync Server is smart enough not to hand over those cmdlets when you import the PowerShell session. You might not have all the cmdlets available to you in a remote session, but you can rest assured that all the cmdlets that are available to you will work as expected.
Note . Of course, that doesn’t mean that you won’t occasionally run into things that don’t work as expected. For example type this at the Windows PowerShell prompt and then press TAB:
Get-CsV
PowerShell should respond by invoking tab expansion and changing your command to this:
Get-CsVoiceConfiguration
OK, now type this at the PowerShell prompt and then press TAB:
Get-Help Get-CsV
You might expect that PowerShell would invoke tab expansion and change your command to this:
Get-Help Get-CsVoiceConfiguration
For better or worse, however, it won’t expand Get-CsV, at least not in this case. Why not? Well, when you invoke TAB expansion when using Get-Help PowerShell looks for a cmdlet that starts with Get-CsV. However, we don’t have any cmdlets that start with Get-CsV; remember, all our Lync Server cmdlets were imported as functions . As a result, tab expansion won’t work with Get-Help. If you want more information about Get-CsVoiceConfiguration you’ll just have to type in the entire command:
Get-Help Get-CsVoiceConfiguration
Step 5: Ending Your Remote Windows PowerShell Session
What? All that work and now you want to quit ? OK, fine; all good things must come to an end, right? If you want to end your remote management session just type the following at the Windows PowerShell prompt and then press ENTER:
Remove-PsSession $session
That’s all you have to do.
Step 6: What Comes Next?
As you might expect, there are plenty of nuances we haven’t covered yet; we’ll have to get to those at a later date. In the meantime, though, this should get you started. Which, needless to say, is about all you can ask from a Quick S tart guide.