First published on CloudBlogs on Feb 03, 2015
With the release of iOS 7, Apple introduced the Per-App VPN feature which caters to both IT Professional and end user experiences. With this feature, IT Professionals can specify which managed apps can use VPN on an Intune managed iOS device. It also makes the connection experience seamless for the user by abstracting the steps taken to connect to a VPN server when accessing corporate documents. This blog post will teach you how to set up Per-App VPN for your enterprise using Microsoft Intune (cloud only) and deliver that awesome experience to your users.
On the VPN Server
-
Make sure you’re using Certificate based Authentication.
-
Make sure you add the Certificate Authority (CA) that issues certificates for authentication to mobile devices.
If the Certificate Authority presented by the device matches one of the CAs in the Trusted CA list of the VPN server, then the VPN server successfully authenticates the device.
In the Intune Admin Console
Provision a Trusted Certificate Profile
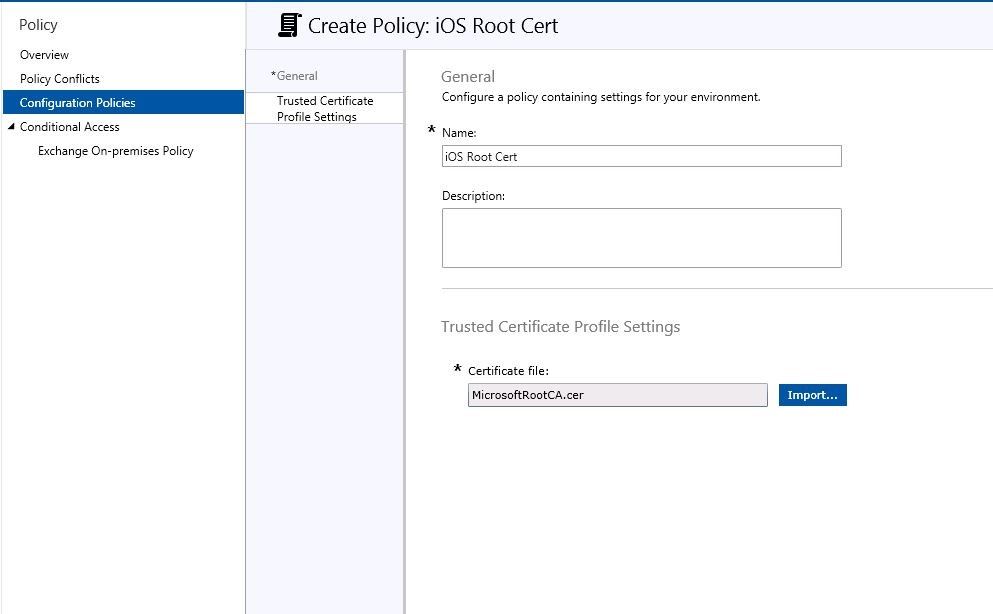
This is the Root Certificate that is issued by the Certificate Authority to the VPN server. To prove its identity the VPN server presents this Certificate Authority which must be accepted automatically by the device. To ensure automatic approval of the Certificate Authority you must provision a Trusted Certificate Profile that contains the Root Certificate issued by the Certificate Authority. In the following screenshots the “MicrosoftRootCA.cer” is the Root Certificate.

The Certificate Authority (CA) that provisions the identity certificate to the VPN server must be trusted by the iOS device. To do so, create a Trusted Certificate Profile. Go to your VPN’s admin console and export the certificate it presents you to trust its identity. Import that certificate here and deploy the Trusted Certificate Profile to all iOS devices you expect to run Per-App VPN. This profile instructs the iOS device to automatically trust the CA that the VPN server presents.
Once you deploy this profile along with the VPN profile to your iOS device, test out the trust establishment process:
-
Install a 3 rd party VPN app to connect to specific VPN (e.g., Junos Pulse app to connect to Juniper VPN)
-
Open the Junos Pulse app and create a VPN connection that will connect to your Juniper VPN host
-
If you have successfully completed the steps mentioned above, you should be able to connect to the Juniper VPN instantly without any notifications to trust the VPN server. Note: this is crucial because it helps establish automatic trust with the VPN server and puts you on the right path for creating a zero-touch experience for per-app VPN connections.
Provision a SCEP Cert Profile
Once you have established automatic trust with the VPN server, you need to provide credentials to the iOS device that can be utilized by the VPN client and not prompt the user for any authentication details. To do so, create and deploy a SCEP Profile.

Once you have deployed the SCEP profile, make sure you take a note of the CA that provisions this certificate.
-
If the SCEP CA is different from the VPN’s CA – you need to add the SCEP CA to a list of trusted CA’s in your VPN Server
-
If not – you do not need to do anything.
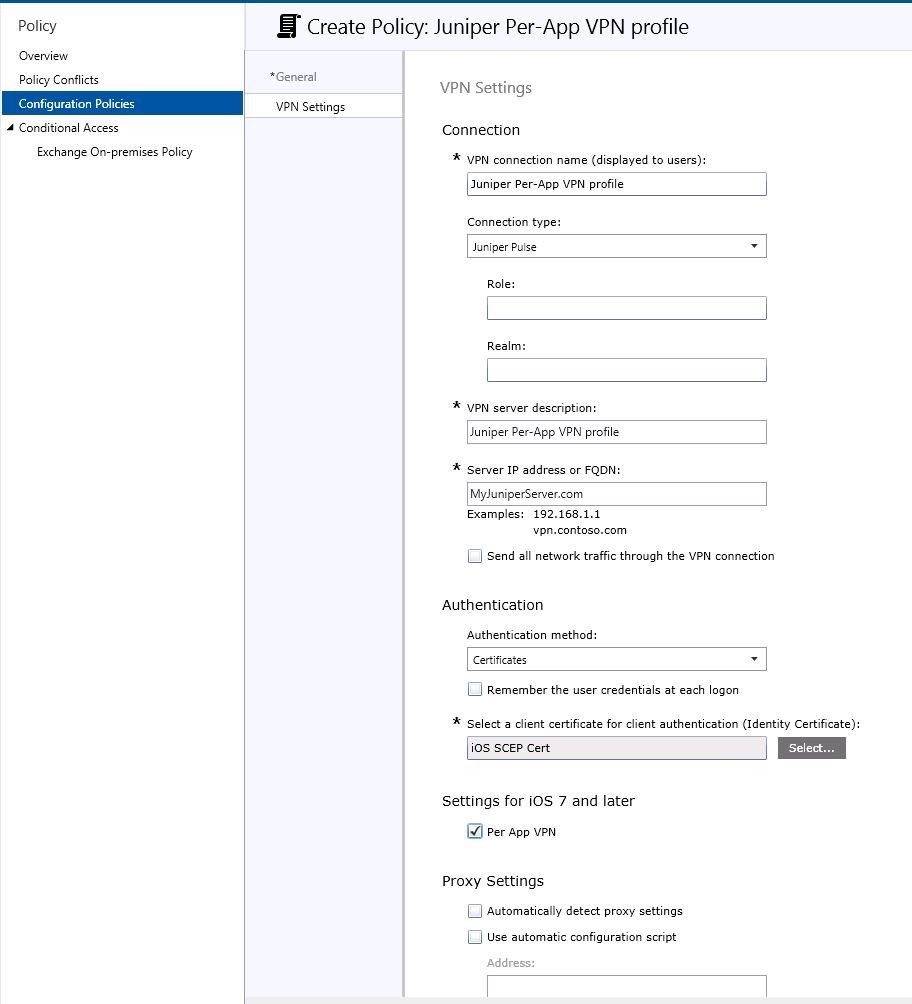
Provision a Per-App VPN Profile
Now that you have fulfilled both phases of the zero-touch experience, create and deploy a VPN profile for iOS devices. A couple of points to keep in mind here:
-
Select Certificates as the authentication method
-
Select the SCEP certificate you created earlier – this will ensure that user credentials will get tagged along with this VPN profile
-
Check the Per App VPN checkbox. Your VPN profile should look similar to screenshot below:
Associate an App with the VPN Profile
Once you create a Per-App VPN profile, navigate to the Software node and add a managed app . Select the app and click on Manage Deployments . Then click on the VPN Profile tab and you will notice the VPN you just created will appear in the dropdown for VPN Policy as shown in screenshot below.

Select the Per-App VPN Profile and finish the wizard. This will ensure that the managed app (Bing for iPad in screenshot) will be associated with [Test] iOS Per-App VPN when this policy is deployed to iOS device users. Ensure you deploy this app to the same group of users that have been targeted for the Per-App VPN profile you created earlier.
On the iOS Device
-
Make sure you’re running iOS 7 or later
-
Make sure you deploy ALL of the above mentioned policies to the SAME group of users. Failure to do so will most definitely break the Per-App VPN experience
-
Must have the appropriate 3 rd party app installed:
-
Juniper
-
Checkpoint
-
F5
-
SonicWall
-
-
Make sure you have a zero-touch experience:
-
User taps on the 3 rd party VPN app
-
Taps on Connect
-
VPN successfully connects without any extra prompts.
-
User must not be asked to trust the VPN server (i.e., User must not see the Dynamic Trust dialog box)
-
User must not enter any credentials
-
User must be connected to VPN upon tapping the connect button
-
-
Troubleshooting
Overall the entire Per-App VPN experience on the iOS device is invisible to the user. While it creates a great user experience, it also makes it difficult to troubleshoot any issues.
If you’d like to take a deeper look into the logs/events created by the iOS device, connect your iOS device to a PC and open IPCU (iPhone Configuration Utility). You can install it from here . Once you connect your iOS device, open the console on IPCU and voila – you should get a live log from the device.
Additional Resources
For more information about using VPN profiles with Microsoft Intune, see Help users connect to their work using VPN profiles with Microsoft Intune in the Microsoft Intune Documentation Library. Also, make sure to bookmark this blog and check back frequently as we plan to post new content weekly. And if you’ve not yet tried out Intune, sign up for a free 30-day trial today .
- Karan Daftary, Program Manager
Published Sep 08, 2018
Version 1.0TechCommunityAPIAdmin Community Manager
Community ManagerJoined August 30, 2017
Microsoft Security Blog
Follow this blog board to get notified when there's new activity


