First published on CloudBlogs on Oct, 21 2013
In System Center 2012 Configuration Manager SP1 CU3, operating system deployment of Windows 8.1 is supported by using the WinPE (Windows Pre-Execution Environment) and USMT (User State Migration Tool) from ADK (Assessment and Deployment Kit) 8.1. However, there are manual steps to prepare the WinPE ready for importing into the Configuration Manager Environment as well as needing to create a new USMT software package to work with task sequence. Although WinPE from ADK 8.1 can be imported, servicing it in Configuration Manager is not supported and certain options for boot image customization are not available, including adding and removing optional components, enabling command support, changing the background image and adding drivers.
This blog post provides steps about how to prepare WinPE from ADK 8.1 for import into Configuration Manager and how to create USMT packages for use with Windows 8.1 operating system deployment:
Install ADK 8.1
The first step is to install ADK 8.1 on a separate computer, don’t install it on the computer with the Configuration Manager site installed.
Creating the boot images
Refer the documentation on http://technet.microsoft.com/en-us/library/dn387582.aspx for how to customize a boot image that uses Windows PE 5.
Once finished, copy the WinPE wim file to the Configuration Manager site server, and import it using the Add Boot Image Wizard
Creating the USMT packages
Refer the documentation on http://technet.microsoft.com/en-us/library/hh397289.aspx#BKMK_USMTPackage for how to create a USMT package.
For ADK 8.1, you may need to copy the USMT to the site server from the machine with ADK 8.1 installed “ C:Program Files (x86)Windows Kits8.1Assessment and Deployment KitUser State Migration Tool ” Then create a software distribution package without a program as outlined in the above link. Use this new USMT package when creating a task sequence deploying Windows 8.1. Note that the default USMT package won’t work with any Operating System Deployment task sequence targeting Windows 8.1.
How to use PXE for Windows 8.1 deployment
Deploy the WinPE 4.1 boot image to the PXE-enabled distribution point if the task sequence to deploy Windows 8.1 is advertised to PXE. Open the properties of the WinPE 4.1 boot image, click Data Source, and check the option “ Deploy this boot image from the PXE-enabled distribution point ” As shown in the screenshot below:
Offline Servicing for Windows 8.1
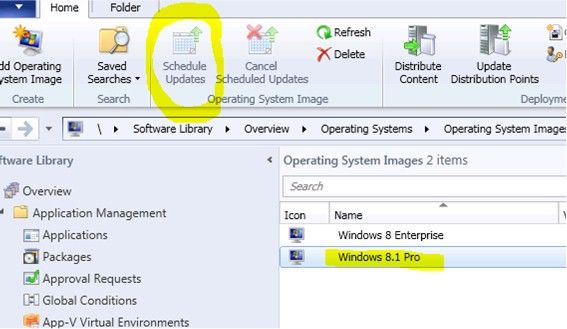
Configuration Manager SP1 CU3 does not support Offline Servicing for Windows 8.1. If you have a Windows 8.1 image in your Configuration Manager site, you may find that Schedule Updates are disabled by default.
However, there are manual steps to accomplish offline servicing using ADK 8.1.
- Copy the Windows 8.1 wim file from the image source path at the Configuration Manager site to the machine with ADK 8.1 installed.
- Use the DISM from ADK 8.1 to mount the image and then use the /add-package option to install the updates.
Dism /Image:C:Windows8.1 /Add-Package /PackagePath:C:updatesupdate.cab
Multiple updates can be installed at once. This commits the change to the image once it finishes the updates installation.
- Copy the image back to the Configuration Manager site’s Windows Deployment Image source location, and update the distribution point of that image package in the Configuration Manager console. See the screenshot below for an example:
An alternative option to offline servicing is to use the software update installation after the operating system is deployed.
-- Chaohao Xu
This posting is provided "AS IS" with no warranties and confers no rights.
Published Sep 08, 2018
Version 1.0yvetteomeally Microsoft
 Microsoft
Joined August 30, 2016
Microsoft Security Blog
Follow this blog board to get notified when there's new activity


