Introduction
This blog post is a complement to the Azure blog article published recently about the same topic :
http://azure.microsoft.com/blog/2014/11/11/high-availability-for-a-file-share-using-wsfc-ilb-and-3rd-party-software-sios-datakeeper/
The setup can also be used to provide HA for the SAP (A)SCS instance. The corresponding paper is in progress and will be
published in the near future.
To do all the basic testing of the shared disk WSFC approach described in the Azure blog above I used a set of Azure
Powershell functions which made my life easier. The focus of this current post is on sharing the experience and
learnings as well as the PS code itself – see blog attachment.
IMPORTANT :
- the published PS script is NOT an official Microsoft tool
- the published PS script is NOT meant to be used for setting up production environments
-
the priorities of the PS script were NOT efficiency, security or programming style but just to simplify
the test setup -
the only purpose is to reduce the efforts of setting up a test WSFC environment in order to install
SIOS Datakeeper and get familiar with the technology e.g. in form of a PoC -
the PS script is not meant to be a replacement for an even more comfortable Azure template
approach like it exists for SQL Server AlwaysOn
http://azure.microsoft.com/blog/2014/08/25/sql-server-alwayson-template-in-microsoft-azure-portal-gallery/
I personally cannot work on such a template offering. Therefore I just wanted to share the PS script
I used and the learnings for those who work already with Azure Powershell
To give an idea about what to expect – here is a screenshot of the main script menu :

The PS script will create the test environment as mentioned in the Azure blog post up to the point where one has to install
SIOS Datakeeper manually. The setup can be seen on the diagram below which was also published on the Azure blog :

Once the 3rd-party software SIOS Datakeeper is installed the script can be used to finalize the setup by creating a cluster file
server role as well as the Azure ILB configuration and a file share which is then highly available. All the details about how to
use the script and what it does are explained in the step-by-step section further down.
How the Azure PS script works
The basic principle of the Azure PS script is the following :
- there are a few settings which have to be entered and which are stored in a local script config file
-
then there is a big list of global variables which define the components of the test setup ( e.g. cluster name ).
User and password are hardcoded in clear text in form of global variables :
User : fstest Password : Azure4U!! -
the idea was to just use pure Azure Powershell and the Azure custom script extension feature
( http://azure.microsoft.com/blog/2014/04/24/automating-vm-customization-tasks-using-custom-script-extension/ ) -
the PS scripts which will be called by the Azure custom script extension will be generated and uploaded by
the main Azure PS script -
due to certain permission issues a general approach was used in all cases ( if needed or not ) when working
with the Azure custom script extension as described here :
http://azure.microsoft.com/blog/2014/07/15/automating-sql-server-vm-configuration-using-custom-script-extension/
This is the reason why the main Azure PS script will in fact generate two PS scripts for every custom script extension
update : one PS script which will be called by the extension and a second one which will be called out of the first one.
The caller script will set appropriate permissions / user context -
one more item related to the custom script extension. Uploaded PS scripts will be called asynchronously. So the
question is how to synchronize with the local Azure PS script running on-premise ? To avoid complexity by
introducing some kind of status file or whatever - a slow but simple and robust alternative was chosen. The
calling PS script triggered by the custom script extension simply shuts down the VM when the task is done. The
local main Azure PS script waits until the VM is stopped and restarts it -
the Azure PS script sets $ErrorActionPreference to “Stop”. This will be changed at a few critical places to
implement specific error handling but put back to “Stop” afterwards.
In case something unexpected happens – restart the script, use the cleanup menu items and try again
Limitations, learnings and prerequisites
Limitations
- as already mentioned in the introduction the Azure PS script can NOT be used to set up production systems
-
user and password which are used for VM admin login are currently hardcoded in clear text in form of
global variables - the script error handling is not complete. It will fail when used by multiple users at the same time
- the script will not handle situations when changing the setup directly via the Azure portal ( e.g. deleting VMs )
-
certain tasks on Azure require exclusive access. The script can handle a few of those situations but will fail in
many cases when Azure config changes are going on at the same time triggered by other users or admins -
when adding a new vnet or a DNS entry to an existing vnet there is a small time slot where some changes will
be made to the Azure network config file which was downloaded before. Afterwards the updated config file
will be uploaded again to Azure to activate the changes.
In case someone else might have changed something in the Azure network configuration exactly at the time
after the network config download by the script and before it was uploaded again these additional changes
might be overwritten by the script upload. Chances are pretty small that this could happen. But at least in
theory it might occur. -
right now the Azure PS script will turn off a bunch of security settings ( e.g. Firewall ) and not turn them on
again at the end. Which means that the VMs created by the script are NOT secure and cannot be used for
production environments
Learnings
Azure Powershell
- try-catch didn’t work as expected. Therefore I used my own error handling by setting $ErrorActionPreference
- “return $variable” in a PS function is sometimes special. Therefore I switched to using [REF]
-
there is a blog which describes a permission issue when using the Azure custom script extension for
SQL Server setup :
http://azure.microsoft.com/blog/2014/07/15/automating-sql-server-vm-configuration-using-custom-script-extension/
Unfortunately the scenario explained in the blog above was still not enough to make the cluster setup work. I had
to work with “Enable-WSManCredSSP” and the “-Authentication credssp” option for the PS invoke command to
create a cluster via Powershell via the Azure custom script extension -
the cleanup functions in the script had permission issues when trying to cleanup AD entries on the domain
controller VM. The workaround was to remove the cluster on the cluster node VMs using the
cmdlet option “-CleanupAD”
Other
-
I run into an issue when installing .Net Framework 3.5 :
.Net Framework 3.5 installation issue on WS2012 R2
This is fixed in the latest WS2012 R2 OS Azure Gallery Image. The installation of SIOS Datakeeper requires
.Net Framework 3.5. So either use the latest WS2012R2 image or prepare a private OS image where .Net
Framework 3.5 is installed – also see info in the Prerequisites section below. -
as long as the VM which is used to create a private image isn’t part of an Azure vnet everything should be fine.
Otherwise there might be issues when installing .Net Framework 3.5. One possible workaround in this situation
might be to add 8.8.8.8 as a DNS inside the VM :
http://up2v.nl/2014/03/01/unable-to-install-net-framework-3-5-feature-in-azure-windows-server-images/ -
when working with the Azure custom script extension it will happen during development that the uploaded
PS script might not do what one thinks it should do. There are two things which help a lot for troubleshooting :
a, inside the Azure VM where the PS script should have done something one can check the log “WaAppAgent”
in “C:\WindowsAzure\Logs”. This will show if there were maybe any issues with the custom script extension
feature
b, again inside the Azure VM one will find the PS scripts which were triggered by the custom script extension
in “C:\Packages\Plugins\Microsoft.Compute.CustomScriptExtension\1.1\Downloads”
“1.1” was the version used during the test phase. This might change in the future.
In the directory above one will find subdirectories with numbers as names. Inside these subdirectories the
custom script extension downloaded the PS scripts which were generated and uploaded to the test storage
container before. So just start them to see what happens to narrow down the root cause in case something
went wrong
Prerequisites
There are currently three important prerequisites :
-
the script was only tested using Windows Server 2012 R2. When working with a private OS image it has to be built
using Windows Server 2012 R2 - when using a private OS image the PS script expects that .Net Framework 3.5 is already installed on the image
-
the current version of the script requires the existence of at least one virtual network in the selected Azure
subscription. If it doesn’t exist please spend 5 minutes to create a dummy virtual network
In general it’s recommended to use the latest Azure Powershell version.
Step-by-step How-To Guide
Make sure that there is at least one virtual network defined in the Azure subscription which you intend to use.
Hardcoded login for the VMs in the PS script as global variable -> User : fstest Password : Azure4U!!

Figure 1 :
- download the script and save it in a folder. Rename the script in compliance with your wishes
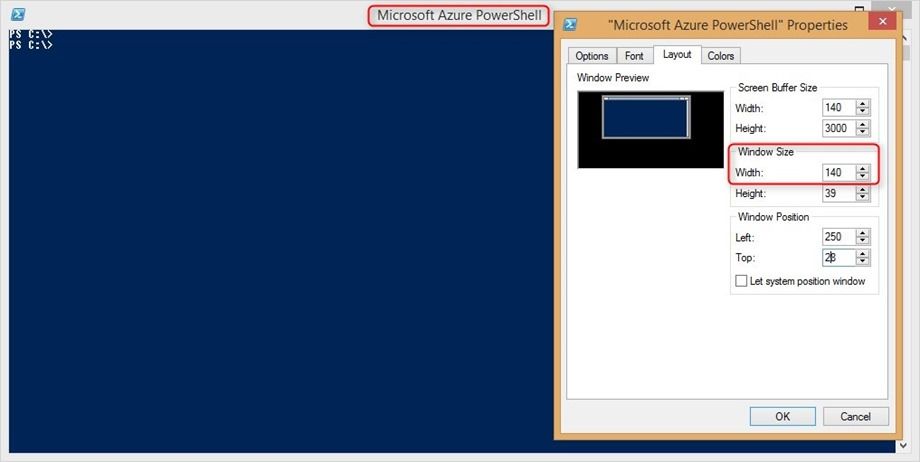
Figure 2 :
-
change the layout of your Azure Powershell window and increase the width to 140. This makes the
script output more readable

Figure 3 :
- change the layout of the standard Azure Powershell window and increase the width to 140. This
- open an Azure Powershell window where you have access to an Azure subscription
-
go to the folder where you saved the script and start the script using the parameter “-script_param_configpath”
and use the absolute folder path as the value for this script parameter - the script will use this path value to create a little local configuration file for storing a few basic settings

Figure 4 :
- when calling the script the first time it will give a warning regarding the missing configuration file
-
the creation of the configuration file will be the first activity one has to do out of the script before
starting with any VM setup. The script will force this

Figure 5 :
-
this is the main script menu. As mentioned before – when calling the script the first time
one has to select option ‘1’ first and create the configuration file before trying anything else

Figure 6 :
-
regarding Azure connectivity it’s also possible to use an additional parameter when calling the script :
“-script_param_logintype” with value “azure” - this parameter will trigger the start of an Azure login dialog to establish the connection

Figure 7 :
-
after choosing option ‘1’ in the main script menu a submenu shows up asking for a few basic configuration settings
which will be saved in the local configuration file - to enter one of the values one has to enter the corresponding number
-
the “Test Namespace Prefix” will be used for all objects on Azure created by the script to make it easy to identify them
also via the Azure portal - regarding the OS image it’s possible to either enter an official WS2012 R2 image from the gallery or a private image

Figure 8 :
- entering the OS image name will trigger another submenu which allows the choice between private and public image
- selecting the public image type will provide a list of all available WS2012 R2 Azure Gallery images
-
IMPORTANT : MAKE SURE TO SELECT THE LATEST VERSION WHICH HAS NO ISSUES WITH .Net Framework 3.5
INSTALLATION. AT THE TIME OF CREATING THIS BLOG POST IT WAS THE OCTOBER VERSION.

Figure 9 :
-
when saving the script config file it will check four basic objects and automatically create them in
case they don’t exist yet :
a, Local tempdir ( e.g. used for generated PS scripts )
b, Vnet
c, Storage Account
d, Storage Container which will keep the PS scripts used by the Azure Custom Script Extension feature
For the test to take the screenshots the global tempdir variable was set to “C:\azure_test_tempdir\”. But the attached
PS script has the value “C:\temp\”. Please edit the PS script and change the path if required.

Figure 10 :
-
as an alternative one can use a private image. To do this first create a script config file choosing
a public or any existing private OS image and save the config file. This will initially create the
test storage account as seen in the steps described above -
then follow this guidance to create a private image. Make sure that the correct WS2012 R2 OS
version gets used to create a dummy VM just for the purpose to create the image :
-
when going through the portal dialog or maybe creating the VM via Azure Powershell make sure
that the newly created storage account will be used. This assures that all vhd files related to the
private OS image later on will end up in the test storage account. Otherwise the script cleanup
won’t work 100% and there might be some vhd files left -
before creating the final private OS image via sysprep and “capture” one has the chance to install
any required patches and especially the .Net Framework 3.5. -
IMPORTANT : WHEN USING A PRIVATE OS IMAGE THE SCRIPT EXPECTS THAT .NET FRAMEWORK 3.5
IS ALREADY INSTALLED !

Figure 11 :
-
in the “capture” process one should use the test prefix also for the private image name.
This makes it much easier to identify the objects which belong to the test setup

Figure 12 :
-
after creating the private image one will find three blobs in the “vhds” container of the newly created storage account :
a, the original vhd file from the dummy VM which was captured
b, a status file related to the dummy VM
c, the vhd file of the private image created by the “capture” process

Figure 13 :
- now one can go back to edit the script config file and enter a new OS image name
- after choosing the “private OS image” item the script will list all available private images including the new one

Figure 14 :
-
once the vnet, storage account and storage container are created after saving the config file the first time
the test environment is ready for setup the test VMs - using item ‘11’ in the main menu will show the currently existing test objects on Azure
-
as long as no VMs were created yet it should look like above – the vnet, storage account and storage container as well
as the OS image exist and everything else is missing

Figure 15 :
- the main script menu allows to create the domain controller VM and the two cluster node VMs separately
-
the easiest way would be to simply choose item ‘5’ which will trigger the complete test setup to the point
where the installation of SIOS Datakeeper is required ( which has to be done manually ) - after some initial checks the script will set up the domain controller VM including a test domain

Figure 16 :
- the last step of the DC setup is about the DNS entry in the Azure vnet
-
don’t be confused by the error message of the script. This is related to the fact that the Azure command
to update the Azure network config returns while the process on Azure is still in progress - the script has a retry loop to handle this situation. It usually took about 8 minutes to succeed in the test lab environment
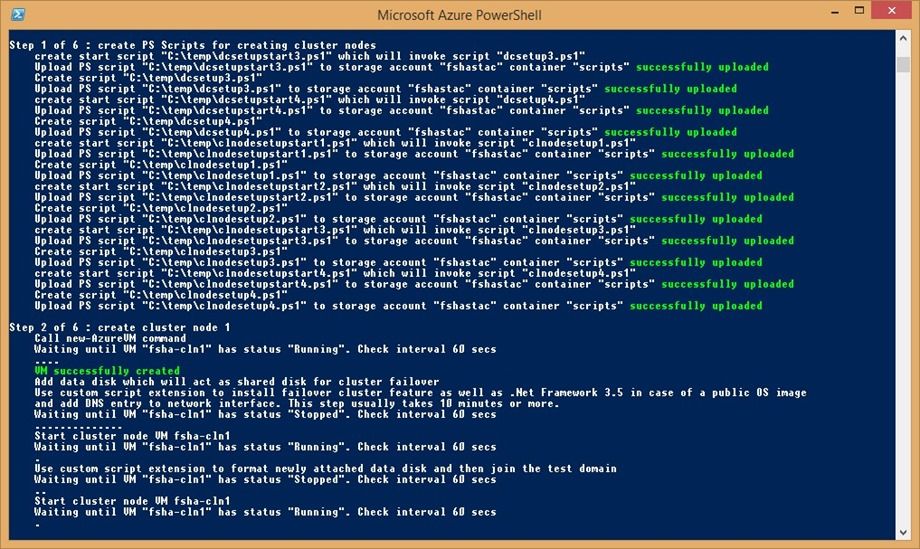
Figure 17 :
- once the DC VM is ready the script will start to create and configure the two cluster node VMs
-
like with the DC VM it will first generate a set of PS scripts and upload them to Azure. These
scripts will be used by the Azure custom script extension feature to configure the VMs -
the script will also attach a data disk and create a volume on it which will later on act as the
shared disk for the cluster with the help of SIOS Datakeeper

Figure 18 :
- after creating the VMs the script will join the VMs to the test domain and create the test cluster
- in addition it creates a file share on the DC VM and use it as a file share witness for the cluster

Figure 19 :
- after the complete test setup option ‘11’ in the main script menu will show all the objects which were created on Azure

Figure 20 :
-
looking at the DC VM one will see what the script created/configured :
a, there are DNS entries for the DC VM, the two cluster node VMs and the test cluster which belong to the test domain
b, there are AD entries for the cluster node VMs and the test cluster
c, there is a share which acts as the cluster file share witness
d, appropriate share and folder permissions were set by the script

Figure 21 :
- on the cluster node VMs the Failover Cluster Manager shows the test cluster which was created by the script

Figure 22 :
- the test cluster was created with a pre-defined static IP address
- the test script added the file share created on the DC VM as a file share witness to the cluster

Figure 23 :
- next step is the manual installation of SIOS Datakeeper. This is pretty simple and straight forward
-
just watch out when selecting the service logon. Here one has to select the first option
‘Domain …..’

Figure 24 :
-
as the domain user just use the test domain name and the pre-defined user which is hardcoded
in the script

Figure 25 :
-
once SIOS Datakeeper is installed on both VMs ( which requires a reboot of every cluster node VM )
it’s time to create a so-called ‘mirror’ which later on represents the shared disk for the cluster -
just enter the name of the first cluster node VM ( in the sample : fsha-cln1 ). If the setup by the
script worked correctly Datakeeper will automatically enter the correct domain name, IP address
and the Volume S: which was created by the script

Figure 26 :
- the second cluster node VM will be added as the Datakeeper ‘mirror target’ ( in the sample : fsha-cln2 )

Figure 27 :
-
in the ‘Details’ section it’s important to configure “Synchronous” replication in order to get a “shared disk”
for the test cluster

Figure 28 :
-
Datakeeper finds the existing test cluster and asks to add the Datakeeper volume as storage to
the test cluster - here one has to select “Yes”

Figure 29 :
- finally we see the fully configured Datakeeper mirror using OS volume S: across the two cluster node VMs

Figure 30 :
- last but not least the Failover Cluster Manager shows the new disk which was added by Datakeeper
-
the picture has to look exactly like this to support the next step executed via the script which will
create a file server role and the file share and configures the Azure Internal Load Balancer – ILB

Figure 31 :
-
after SIOS Datakeeper installation as described above one can select item ‘9’ in the main script menu to
trigger the post SIOS installation processing - this step of the script will add a file server role and a file share to the test cluster and configure the Azure ILB

Figure 32 :
-
the Azure Powershell cmdlet ‘get-azureinternalloadbalancer’ shows the ILB which was created by the script.
It has the pre-defined static IP address 10.0.0.99 and was created on the cloud service of the two cluster node
VMs ( in the sample : fsha-cscl )

Figure 33 :
-
the Azure Powershell cmdlet ‘get-azureendpoint’ shows the two endpoints which are ILB related and were created
by the script. As a search filter the pre-defined ILB probe port 59999 was used. The two ports 443 and 445 were used
to make the file share sample work as expected

Figure 34 :
- looking inside the first cluster node VM one can see the new file server role which was created by the script
-
the IP address is the one of the Azure ILB. This is the “trick” from a network perspective to make the failover
cluster work
-
IMPORTANT : IT IS NOT ENOUGH TO JUST CHANGE THE IP ADDRESS OF THE ROLE IN FAILOVER CLUSTER
MANAGER. A SPECIFIC PS COMMAND IS NECESSARY WHICH IS IMPLEMENTED IN THE SCRIPT.
-
the ILB configuration works in principle similar as for SQL Server AlwaysOn :
http://azure.microsoft.com/blog/2014/10/01/sql-server-alwayson-and-ilb/

Figure 35 :
- checking the ‘Shares’ tab one can see the file share which was also added by the script

Figure 36 :
- finally checking the DC VM one can see the new DNS and AD entries for the new file server role
-
and using the virtual name of the cluster resource it’s now possible to access the file share : “\\fshafsrole\fsha_share”
which still works after a cluster failover
Q.E.D.
 Microsoft