Howdy folks, If the questions and comments I get on Twitter and LinkedIn are any indication, a lot of you are going to excited about today’s news:
We’ve turned on the public preview of the Azure AD admin experience in the new Azure portal!
If you want to skip the reading and just start using it, click here . But I recommend you keep reading to get a quick tour of many of the exciting capabilities of this new experience. There’s a ton of richness you might not be expecting! As many of you know, we’re in the process of moving the management experience for all Azure services from the ‘classic’ portal at https://manage.windowsazure.com to the new portal at https://portal.azure.com . Azure AD is moving to the new portal in phases. In this first phase we focused on the core Azure AD experiences. Phase one is now complete with the start of public preview. In phase two you’ll see us iterating rapidly, making refinements to the experience and adding new capabilities. Within a few months the new portal will have all the features of the classic portal and quite a few more. Our new management experience has been designed based on your feedback. You told us about your challenges in leveraging cloud services that build on your existing environment. You asked us to make it easier and faster to integrate with those services, and simpler to manage access to them. Based on your feedback, we developed four key principles which we used to guide our designs:- Simple, streamlined experiences . Our new experience is easier to learn and simpler to use. This lets you quickly deliver value for your organization. The key to this principle is a set of streamlined flows for completing routine management tasks.
- Insight through data. You told us that you wanted greater visibility into what’s going on in your environment. In our new experience, you will see contextually-relevant data everywhere you look enabling you to make great decisions quickly.
- Visibility for high-priority issues. To manage “at scale” in a large organization, you asked for better visibility into the important issues that need your attention. Our new experience will make it easier for you to find and fix problems in your environment, and to prevent future problems.
- Alignment with other services. You asked us to align the management experiences for Azure AD with other Microsoft services that you use. Our new management experience will be strongly aligned with the other Microsoft services you use like Office 365, Azure and Intune.
Fig 1. Azure AD in the new Azure portal
Trying it out
You can use this preview for most of your day-to-day directory administration tasks related to users, groups, and applications. You also can also use the preview for many of the tasks to get your Azure AD configured for a production environment, things like verifying your custom domain names, getting started with Azure AD Connect, and configuring custom branding and self-service password reset. To try it yourself, sign into the Azure portal at https://portal.azure.com as a global administrator of your directory. In the coming weeks, we’ll update the new experience so that it works well for other directory roles such as user administrators and password administrators. You can watch this video to see an overview of navigation and capabilities in the new experience.
Video: Getting Started with Azure AD in the new Azure Portal
Easier access
One of the cool things about the new Azure portal is that you don’t need an Azure subscription to use it! So you and other administrators in your organization can manage your tenant in the new portal without any of you needing to get and manage access to an Azure subscription. Just sign in as usual with your work or school account.Landing in the right place
You’ll begin using the preview in the Overview blade for your directory. To see it, click Azure Active Directory in the left navigation menu of the portal.
Fig 2. Azure Active Directory in the left navigation menu
You can also find Azure Active Directory in the More services menu. If Azure Active Directory isn’t already pinned to your left navigation menu, you can pin it manually. Open the More services menu, enter ‘Azure Active Directory’ in the Filter box, and click the star to the right of Azure Active Directory. That way it’ll be easy for you to find it the next time you visit the new portal.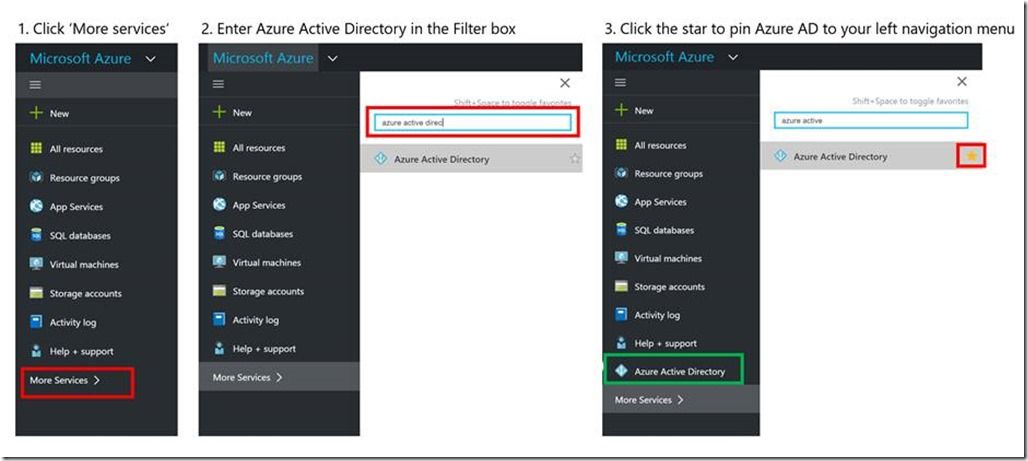
Fig 3. Pinning Azure Active Directory to your left navigation bar by clicking the star
Overview blade
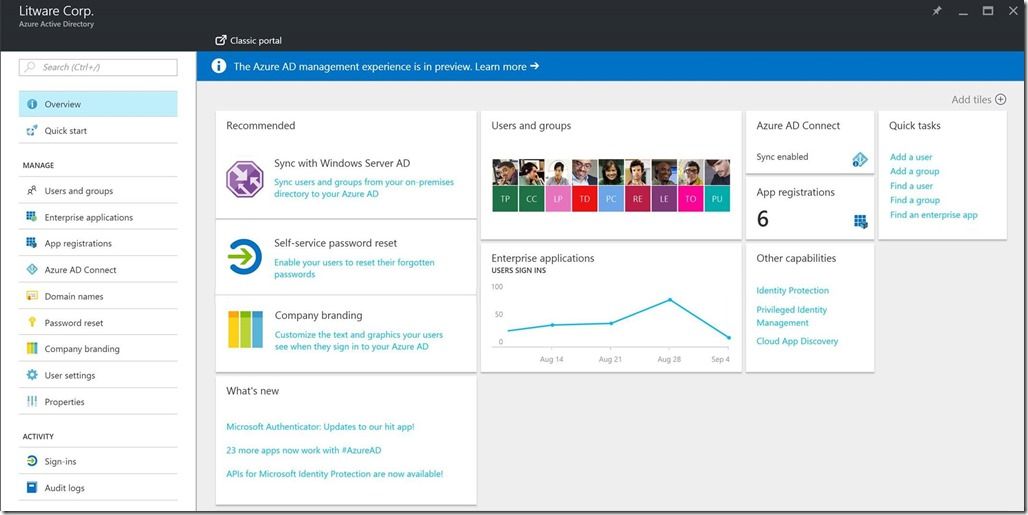
The overview blade gives you access to everything you need in your directory. The ‘resource menu’ on the left of the blade lets you navigate to core Azure AD resources and features such as users and groups, applications, Azure AD Connect, as well as to directory-wide features such as domain names.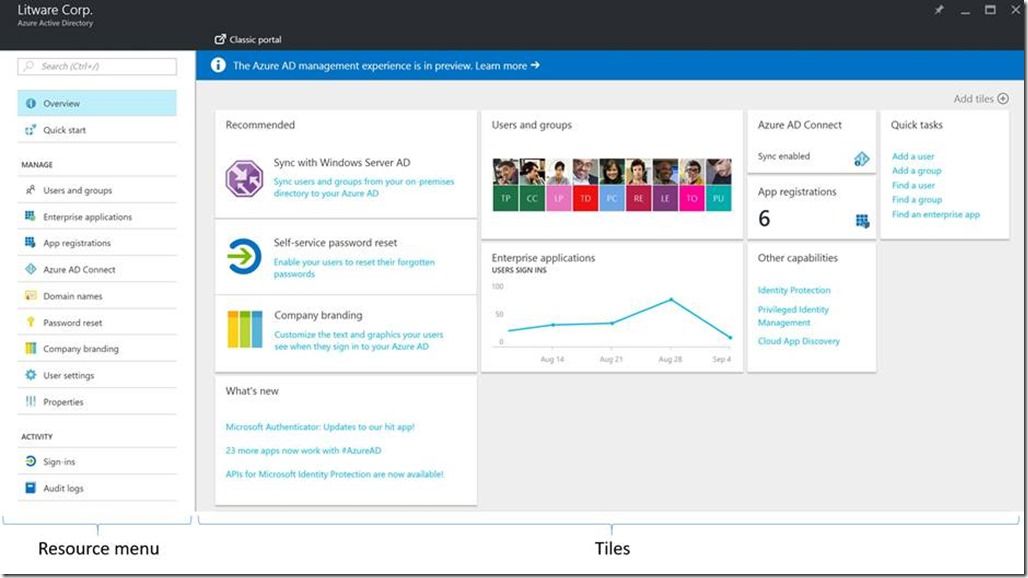
Fig 4. Overview blade for Azure Active Directory
The tiles on the right give you easy visual access to begin using those features and more. The Recommended tile is a starting-off point for you to configure important features: directory sync, self-service password reset, and company branding. The Other capabilities tile lets you navigate to newer Azure AD capabilities such as Identity Protection and Privileged Identity Management. The Quick tasks tile on the right gives you an easy way to begin common management tasks for users, groups, and apps.Managing users and groups
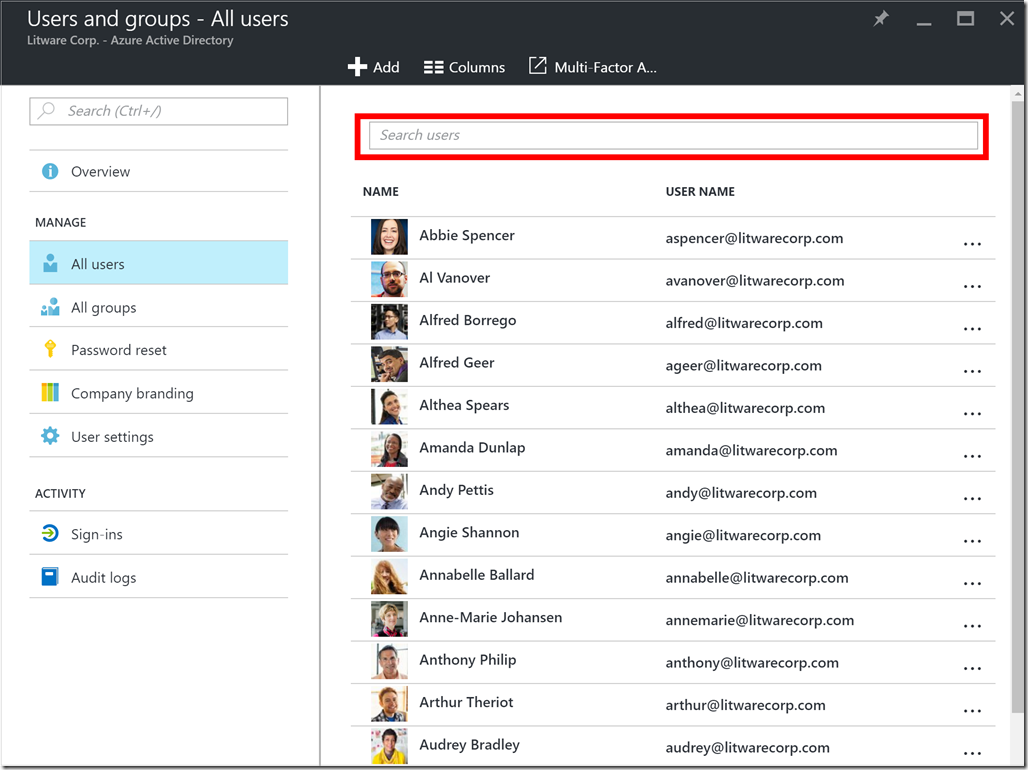
Our new experience makes it easier for you to manage users and groups in your organization. To try it, click the Users and groups item on the resource menu. You can also get to this experience using the left navigation bar of the portal: click on the More services menu, and select Users and groups . The users and groups blade is where you go to can complete tasks related to users and groups in your tenant. For example, to find a user, click on the Users tab in the resource menu of the Users and groups blade. Then, on the list of all users, click the Search users box on the right of the blade, and type the name of the user you want to manage.Fig 5. Searching for a user in the ‘All users’ blade
When you see the name of the user that you’re looking for, click on their name to begin managing the user. When you open an individual user, you’ll land on the overview for the user. The overview shows at-a glance information about the user. You’ll see a graph of the user’s sign-ins over the past month, and the number of groups in which the user is member. In the ‘command bar’ at the top of the blade, you will see a button to reset the user’s password. You will also see a delete button that will be enabled for any user who is not synced from your Windows Server AD. You can use the button to delete the user from your tenant.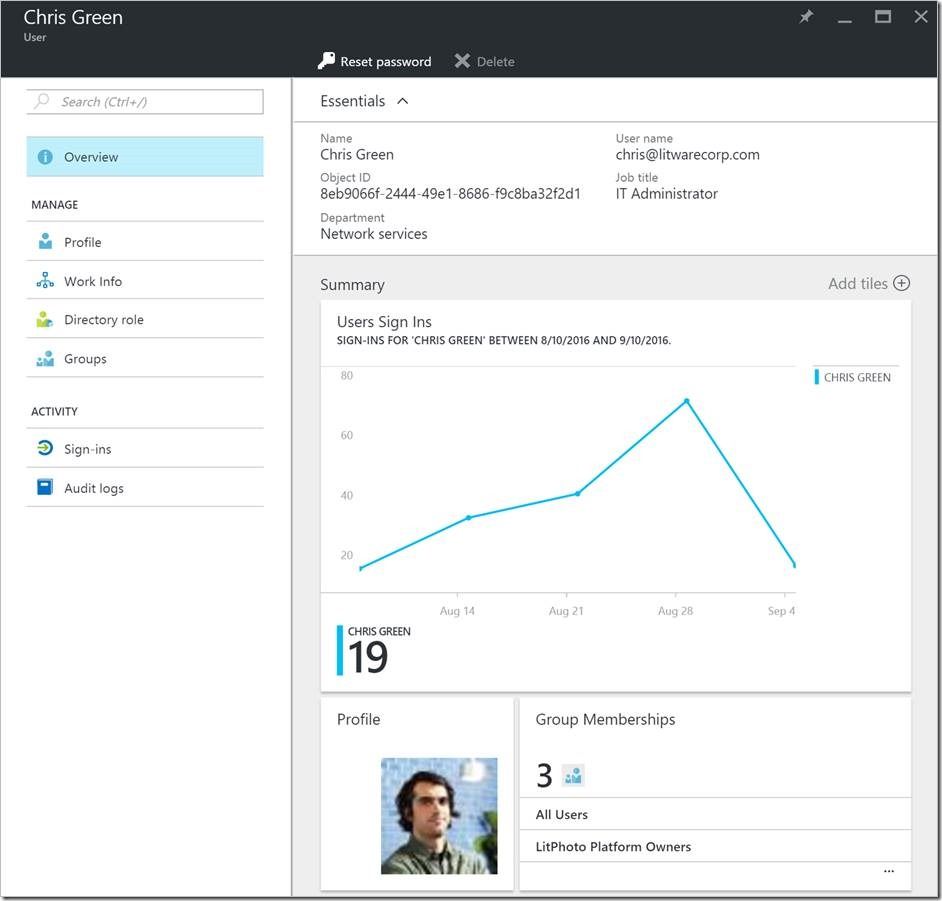
Fig 6. Managing a user in the new portal: Overview blade
User-centric access
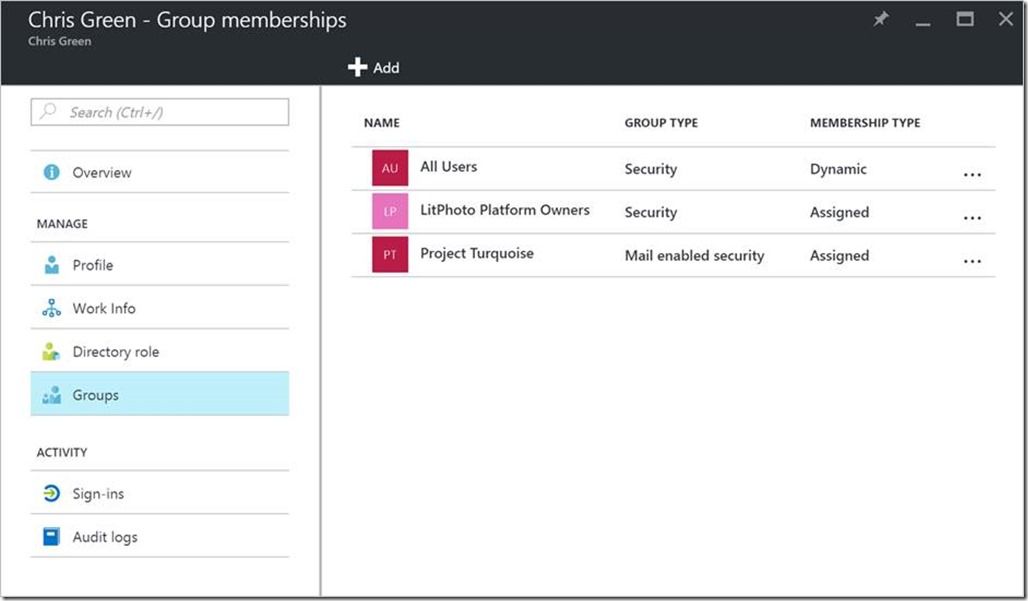
One of the coolest things we’ve added in our new experience is a user-centric view of an individual user’s access to resources. For example, click on the Groups item in the resource menu for a user, to see the groups in which the user is a member, either by assignment or by dynamic membership.Fig 7. Managing group memberships for an individual user
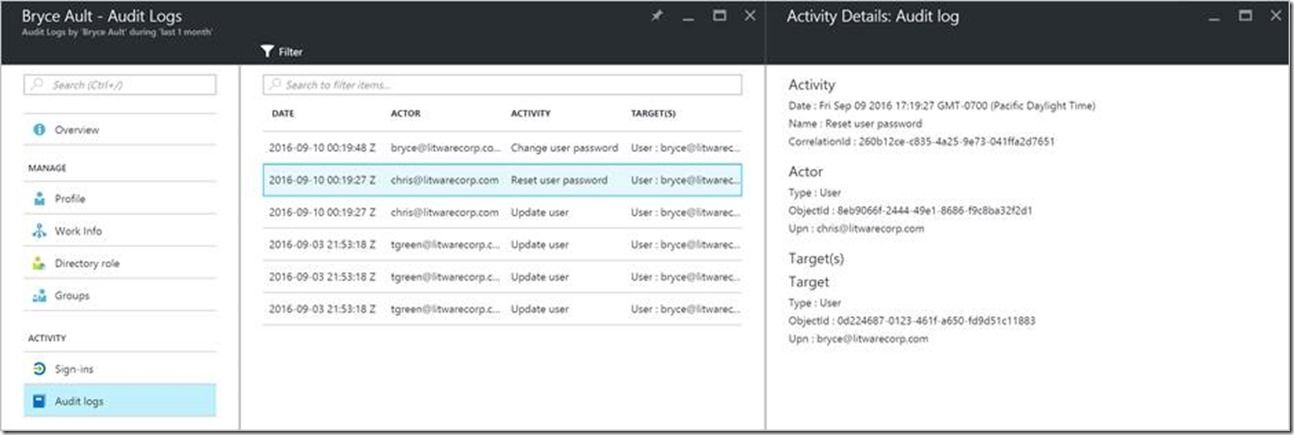
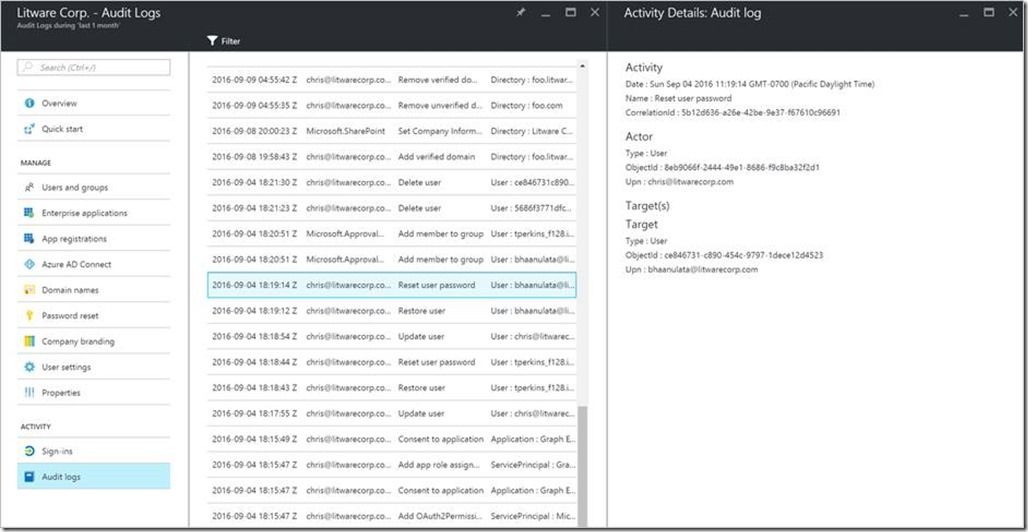
On the Directory role blade you can see and manage the user’s assignment to any tenant-wide administration roles, including roles for Office 365 services, and new roles such as Security administrator and Security reader. In the Activity section of the resource menu, you can click on the Sign-ins item see a page that show history of the user’s sign-ins to applications. Another cool feature we’ve added in our preview experience is the ability to see audit logs for a user without navigating away from the user. Click on Audit logs to see a list of audit activity related to the user, such as the user being added or removed from a group, or being assigned to an administrative role in the directory. Click on any item in the list to see more details about the activity in the Activity Details blade. This will streamline the experience when you are troubleshooting issues related to an individual user.Fig 8. Audit logs for an individual user
User management features
The preview experience also lets you configure important features for your users. For example, click on Password reset in the resource menu, and you can enable self-service password reset for your organization, and configure how your users can reset their forgotten passwords. Click on Custom branding to configure the text and graphics that your users see when they sign in to an application, or use their access panel. On the User settings page you can control whether your users can perform certain tasks that require directory access. For example, you can control whether users can add applications, or invite guests to collaborate on resources such as SharePoint sites or Azure resources. Features and licensing To use premium features in the new experience, you will need a subscription that includes those features. For example, you’ll need a subscription that includes Azure AD Premium to see certain activity data such as the all users sign-in data. To get a free trial for Azure AD Premium or the Enterprise Mobility Suite, click on one of the premium features, such as the Users Sign Ins graph on the Users and groups overview. Then, select a service, and click the Activate button for that service.Fig 9. Activating a free trial of Enterprise Mobility Suite
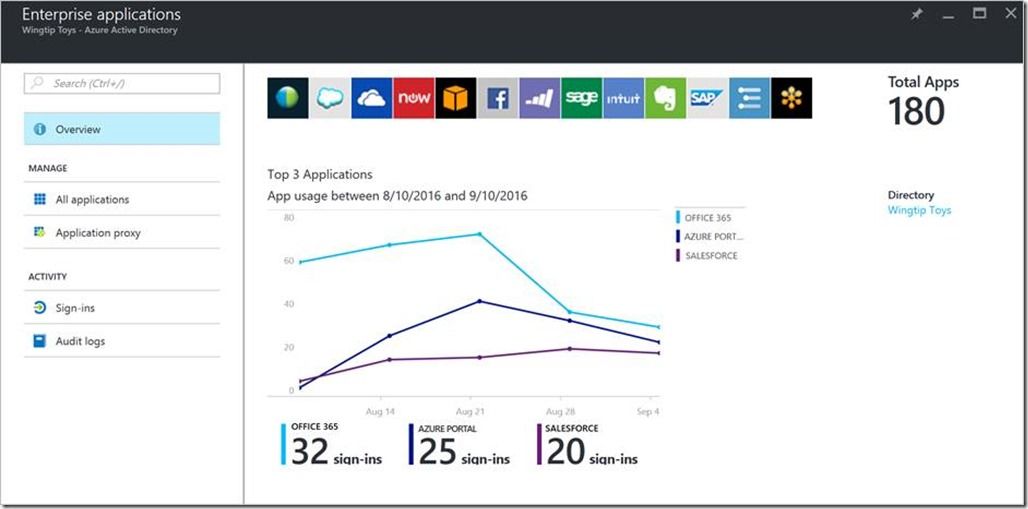
A new app management experience: Enterprise applications and app registrations You’ll notice some changes in the way you manage applications in the new portal. On the directory overview blade, you’ll see items on the resources menu and tiles for Enterprise applications and App registrations. In Enterprise applications, you’ll find and manage the applications that your users access: SaaS apps that you have added from the app gallery, line of business apps that are integrated with Azure AD, and apps that your users or admins have added themselves. Here you can assign access to an application, view sign-ins and audit logs for the application, configure single-sign on, and perform other application management tasks.Fig 10. Enterprise applications and App registrations on the resource menu for the directory
If you or your organization have developed any custom line-of-business or multi-tenant apps and integrated those with Azure AD, you can see the registration data for those apps by clicking on the App registrations blade . The app registration blade is where a developer can manage the properties of the app registration, such as the reply URLs for the app, and the permissions that the app needs on other APIs. With the distinct views for enterprise apps and app registrations, we’re aiming to help IT Pros and developers focus on the resources and tasks that are most important to their roles. We’re still working out the right naming and presentation for these, so if you have suggestions, we’d love to hear from you.Managing enterprise applications
To manage access to the applications that your employees use, click on the Enterprise applications item in the resource menu for the directory.Fig 11. Managing apps in the new Azure AD management experience
Watch this video to see a quick tour of the experience.
Video: Managing enterprise apps using Azure AD
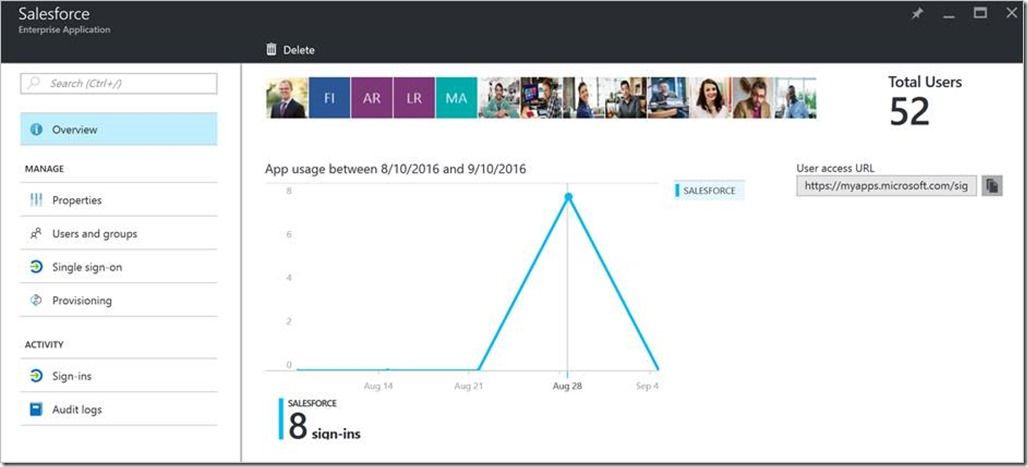
On the Overview blade for Enterprise applications, you can see all the apps you can manage access to, as well as the see top apps used in your organization. Click on Sign ins in the resource menu to drill into detailed activity reports for application sign-ins. Click on Audit logs to see updates to applications in your organization. On the Application proxy blade you download and configure the Application proxy connectors for any on-premises apps that you want to expose to cloud users. To manage an individual app, click on the All applications item on the resource menu. Use the search box above the list of app names to find the app that you want to manage. Then, click on the app’s name to open it. You’ll see a new app-centric overview blade that shows thumbnail photos of the users and groups assigned to the app, and a graph of recent sign-ins.Fig 12. Overview for an individual application
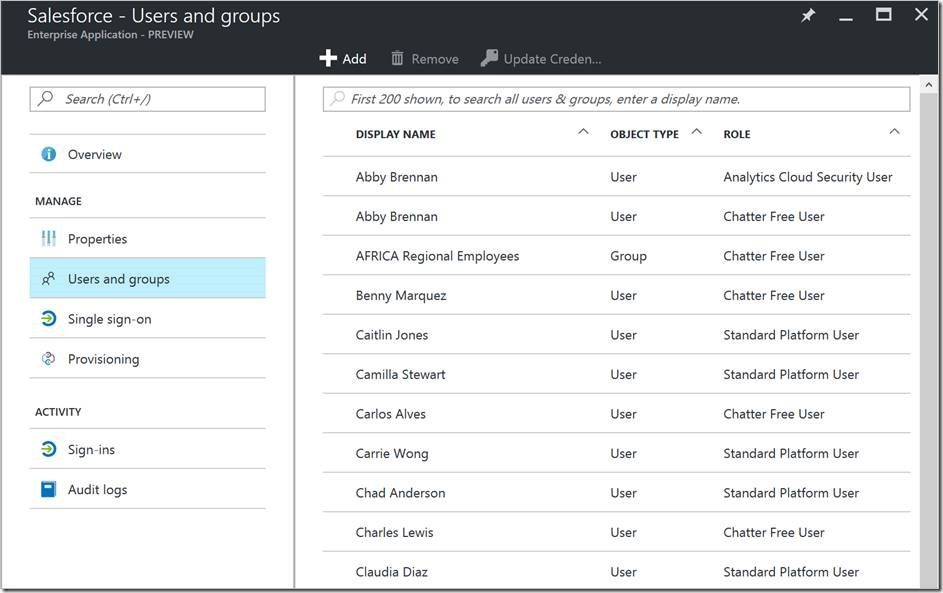
You can open other blades from the resource menu to view and manage the application’s properties, including its name, logo, single-sign on and provisioning settings, and application proxy configuration. You’ll see a significant improvement in this preview experience on the Users and groups blade for an application. Now you can see all user and group assignments to an application in a single view.Fig 13. Viewing users and groups assigned to an app
Now you can assign users and groups to the application using a consistent, search-centric interface. To see this, click the Add button on the Users and groups tab for an individual application. You’ll find the Add button in the black ‘command bar’ region just above the grid itself.Fig 14. Assigning users and groups to an app
The preview experience gives you insight into activity for an individual app, just like it does for an individual user. For example, when you are looking at an app you can click on Sign-ins in the resource menu to see recent sign-ins to the app. Click on Audit logs to see audit events for the application.Insight through data – activity in your tenant
You can also look at activity not just per-resource, but across all resources in your tenant. To see it, click on the Audit logs item in the resource menu of the directory blade. There you’ll see a list of recent audit events in your tenant. Click an item in the list to see details about the activity, such as who made the change, what was the target resource, and what was changed on that resource. Use the search box to filter this to activities that you’re interested in. Use the filter button to see audit events from a specific time interval.Fig 15. Viewing activity in the tenant-wide audit log
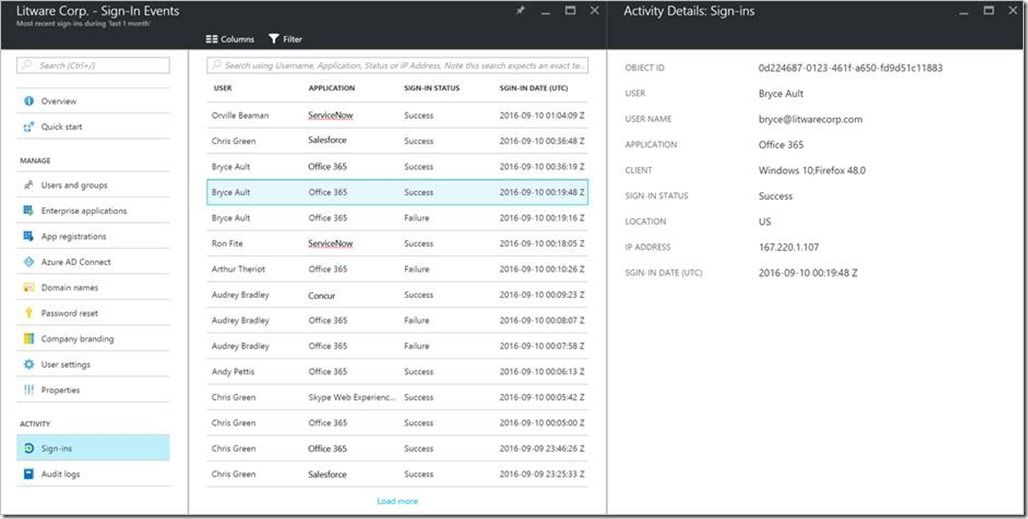
The Audit logs blade on Users and groups shows a view of audit events that is automatically filtered to events related to users and groups. Likewise, the Enterprise apps blade also has Audit logs in its resource menu. Click it to see audit events related to applications. You can get similar insight into sign-ins. To see it, click on Sign-ins in the resource menu of the directory. You’ll see a list of recent sign ins to applications across all users in your tenant. Click the filter button in the command bar to see sign-ins from a specific time interval. You can also use this list to see sign-ins for a single user. To do so, just enter the user’s name in the search box above the list. To see more details for an individual sign in, click an item in the list. In the Activity details blade you can see who signed in, when, from where, and from what device & IP address.Fig 16. Viewing recent sign-ins, and details for one of those sign ins
Developing line-of-business and multi-tenant apps
In the new portal, a developer can create and manage the app registrations for custom line-of-business and multi-tenant apps. To manage existing app registrations, or to create a new one, click on the ‘App registrations’ tile on the directory overview, or select ‘App registrations’ from the ‘More Services’ menu. We’ve included some enhancements in this experience, such as the ability to edit the application manifest directly in the portal, without needing to download, edit, and upload the JSON file.Using the preview
One thing you’ll notice as you begin using our first preview is that it only has a subset of the capabilities from the classic portal. So for now you’ll need to go back to the classic portal for tasks like such as adding a new SaaS application, creating a directory, or assigning licenses. But that won’t be the case for long! We’re working on all of these, and a lot more. Every Azure AD capability in the classic portal will soon be available in the new Azure portal.The new portal is the future
We know you prefer to use one portal for your Azure AD management tasks, and we’re driving toward that as fast as we can. We’re focusing our engineering resources on the new portal: you won’t see new Azure AD features back-ported into the classic portal. Instead, we’ll be focusing on ensuring that you can do all the existing tasks, and many new ones, with high-quality experiences in the new portal. Once usage has moved to the new portal we’ll deprecate our experience in the classic portal.Feedback
We hope you love using the preview experience. And keep the feedback coming! We want to hear about anything you love, or hate, or ideas for improvement for the new experience. Post your feedback in the ‘Admin Portal’ section of our feedback forum . There’s a lot that’s new in this preview. And as Alex always says, we’d love to receive any feedback or suggestions you have! Cheers, Jeff Staiman Senior Program Manager Microsoft Identity Division Microsoft