First published on MSDN on Dec 13, 2012
In Windows Server 2012, a Failover Cluster can be created in an environment that has access only to a Read Only Domain Controller (RODC) but not a Read Write Domain Controller (RWDC). This deployment model can be useful in a branch office with unreliable network connectivity or in a perimeter network (DMZ) where the cluster resides outside a firewall.
In a previous blog, we discussed how a cluster can be created in a restrictive active directory environment . In the blog, we explained the role of a Cluster Name Object (CNO) and Virtual Computer Object (VCO) in a Failover Cluster. With a Read Only Domain Controller, the Cluster Service is unable to create a CNO or VCO. Therefore, these computer objects will need to be pre-created on a RWDC and then replicated to the cluster RODC, before the cluster creation process is commenced. This blog provides the steps on how this can be done: 1) Using the graphical interface 2) Using Windows PowerShell© These steps should be followed to first pre-create a CNO (computer object that has the same name as your cluster) and a VCO for each clustered service or application (computer object has the same name as the clustered service or application and is created in the same container as the CNO).
1. On an RWDC launch the Active Directory Users and Computers snap-in (type dsa.msc) or to configure using a script open a Windows PowerShell© prompt in Administrator mode.
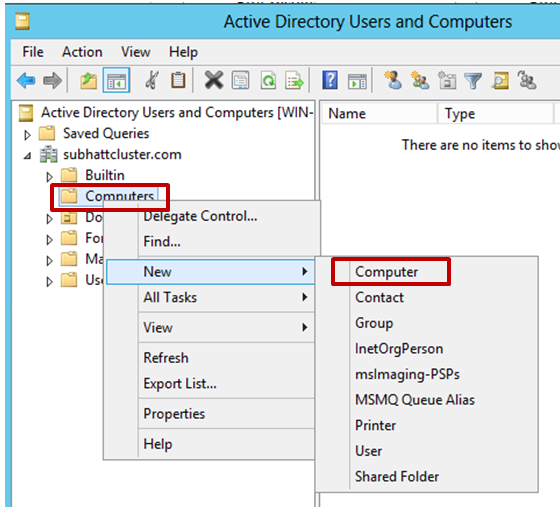
2. Right-click Computers or the organizational unit (OU) container in which computer accounts are created in your domain and create a new Computer object for your cluster CNO (Cluster Name) or VCO(Clustered Application or Service Name):

Using PowerShell:
To create the Computer object in the default Computers container:
new-adComputer -name “myclusterCNO” -dnshostname “testcluster.com”

To Create the Computer object in an alternate OU:
new-adComputer -name “myclusterCNO” -dnshostname “testcluster.com” -Path $OUDistinguishName -Enabled $true
3. For a CNO, give the user account that will be used to create the cluster, full control of the computer object created. For VCOs, ensure that you give the Cluster account (CNO) full permission to access the object. For instance for a cluster myclusterCNO in domain testcluster, the account testcluster\myclusterCNO should have permission to the VCO.


Using PowerShell:
$objUser = New-Object System.Security.Principal.NTAccount(“domain\user”)
$objADAR = New-Object System.DirectoryServices.ActiveDirectoryAccessRule($objUser, “GenericAll”,"Allow")
$adName = get-AdComputer -Identity “myclusterCNO”

$targetObj = get-adobject -Identity $adName.DistinguishedName -properties *
$ntSecurityObj = $targetObj.nTSecurityDescriptor
$ntSecurityObj.AddAccessRule($objADAR)
Set-ADObject $adName –Replace @{ntSecurityDescriptor=$ntSecurityObj}

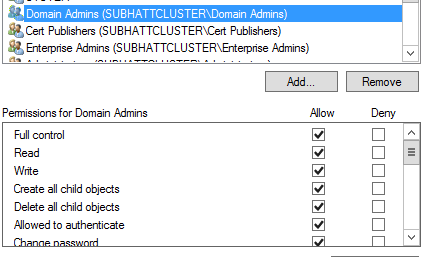
You can verify through the graphical interface that the permissions have now propagated for the user account:

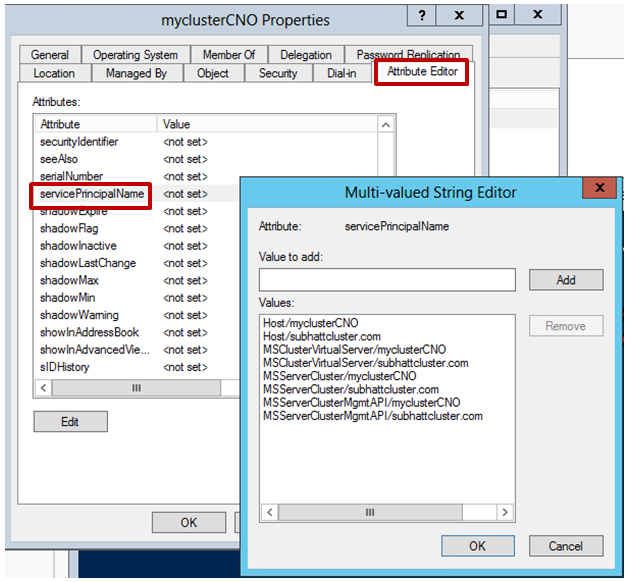
4. Next modify the following attributes for the computer object:

Using PowerShell:
$adName = get-AdComputer -Identity “myclusterCNO”
$dn = $adName.DistinguishedName
set-adcomputer -Identity $dn -add @{'msds-supportedencryptiontypes'= 28}
set-adComputer -Identity $dn -ServicePrincipalName @{Add="Host/myclusterCNO", "Host/testcluster.com", "MSClusterVirtualServer/myclusterCNO", "MSClusterVirtualServer/testcluster.com", "MSServerClusterMgmtAPI/myclusterCNO", "MSServerClusterMgmtAPI/testcluster.com"}
For CNO also add:
set-adComputer -Identity $dn -ServicePrincipalNames @{Add=" MSServerCluster/myclusterCNO", "MSServerCluster/testcluster.com"}

5. Add the CNO or the VCO SAM account name to the Allow RODC Password Replication Group


Using PowerShell:
Add-ADDomainControllerPasswordReplicationPolicy -Identity “RODC” -AllowedList "testCluster$","vcoName$”
6. Finally, replicate the CNO or VCO computer object created on the RWDC to the RODC:
repadmin /rodcpwdrepl <RODC server name> <RWDC server name> <distinguished name of the CNO or VCO without quotes e.g.: CN=myClusterCNO,CN=Computers,DC=testcluster,DC=com >
Now that you have the computer objects pre-staged and replicated to your RODC, you are ready to create a cluster in a RODC environment. In a previous blog we provided the steps to create a Failover Cluster .
Thanks!
Subhasish Bhattacharya
Senior Program Manager
Clustering and High Availability
Microsoft Corporation
In Windows Server 2012, a Failover Cluster can be created in an environment that has access only to a Read Only Domain Controller (RODC) but not a Read Write Domain Controller (RWDC). This deployment model can be useful in a branch office with unreliable network connectivity or in a perimeter network (DMZ) where the cluster resides outside a firewall.
In a previous blog, we discussed how a cluster can be created in a restrictive active directory environment . In the blog, we explained the role of a Cluster Name Object (CNO) and Virtual Computer Object (VCO) in a Failover Cluster. With a Read Only Domain Controller, the Cluster Service is unable to create a CNO or VCO. Therefore, these computer objects will need to be pre-created on a RWDC and then replicated to the cluster RODC, before the cluster creation process is commenced. This blog provides the steps on how this can be done: 1) Using the graphical interface 2) Using Windows PowerShell© These steps should be followed to first pre-create a CNO (computer object that has the same name as your cluster) and a VCO for each clustered service or application (computer object has the same name as the clustered service or application and is created in the same container as the CNO).
Steps to configure the CNO and VCO for a RODC Environment:
1. On an RWDC launch the Active Directory Users and Computers snap-in (type dsa.msc) or to configure using a script open a Windows PowerShell© prompt in Administrator mode.
2. Right-click Computers or the organizational unit (OU) container in which computer accounts are created in your domain and create a new Computer object for your cluster CNO (Cluster Name) or VCO(Clustered Application or Service Name):

Using PowerShell:
To create the Computer object in the default Computers container:
new-adComputer -name “myclusterCNO” -dnshostname “testcluster.com”

To Create the Computer object in an alternate OU:
new-adComputer -name “myclusterCNO” -dnshostname “testcluster.com” -Path $OUDistinguishName -Enabled $true
3. For a CNO, give the user account that will be used to create the cluster, full control of the computer object created. For VCOs, ensure that you give the Cluster account (CNO) full permission to access the object. For instance for a cluster myclusterCNO in domain testcluster, the account testcluster\myclusterCNO should have permission to the VCO.
- On the View menu ensure that Advanced Features is selected.
- Right-click on the computer object created in step 2 and select Properties:

- Select the Security tab and add the user account used for cluster creation.
- Select the newly created user account and give it Full Control for the computer object:

Using PowerShell:
$objUser = New-Object System.Security.Principal.NTAccount(“domain\user”)
$objADAR = New-Object System.DirectoryServices.ActiveDirectoryAccessRule($objUser, “GenericAll”,"Allow")
$adName = get-AdComputer -Identity “myclusterCNO”

$targetObj = get-adobject -Identity $adName.DistinguishedName -properties *
$ntSecurityObj = $targetObj.nTSecurityDescriptor
$ntSecurityObj.AddAccessRule($objADAR)
Set-ADObject $adName –Replace @{ntSecurityDescriptor=$ntSecurityObj}

You can verify through the graphical interface that the permissions have now propagated for the user account:

4. Next modify the following attributes for the computer object:
|
Attribute Name |
Value |
|
Dnshostname |
<FQDN> |
|
sAMAccountName Must be less than 15 characters |
<Cluster name>$
|
|
msds-supportedencryptiontypes
|
28 |
|
Service Principle Name |
List which includes the following entries: Host/<computer object name> Host/<FQDN> MSClusterVirtualServer/<computer object Name> MSClusterVirtualServer/<FQDN> MSServerClusterMgmtAPI/<Computer Object Name> MSServerClusterMgmtAPI/<FQDN>, For CNO also add: MSServerCluster/<computer object Name> MSServerCluster/<FQDN>
|
- You can modify the attributes by selecting the Attribute Editor tab on the computer object properties page:

Using PowerShell:
$adName = get-AdComputer -Identity “myclusterCNO”
$dn = $adName.DistinguishedName
set-adcomputer -Identity $dn -add @{'msds-supportedencryptiontypes'= 28}
set-adComputer -Identity $dn -ServicePrincipalName @{Add="Host/myclusterCNO", "Host/testcluster.com", "MSClusterVirtualServer/myclusterCNO", "MSClusterVirtualServer/testcluster.com", "MSServerClusterMgmtAPI/myclusterCNO", "MSServerClusterMgmtAPI/testcluster.com"}
For CNO also add:
set-adComputer -Identity $dn -ServicePrincipalNames @{Add=" MSServerCluster/myclusterCNO", "MSServerCluster/testcluster.com"}

5. Add the CNO or the VCO SAM account name to the Allow RODC Password Replication Group
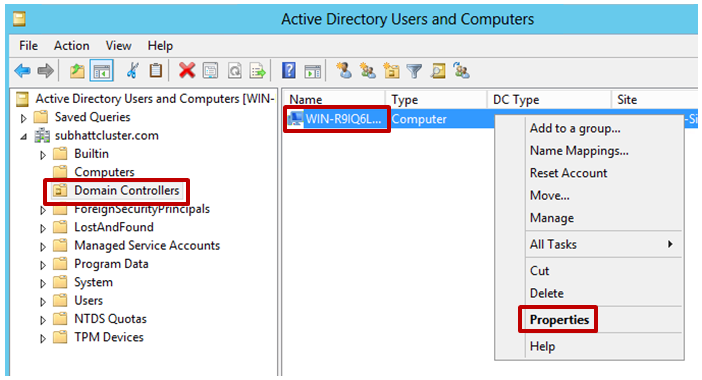
- Select the Domain Controller container from dsa.msc
- Right-click on the Computer Object corresponding to the RODC

- Select the Password Replication Policy tab in the property pane for the RODC Computer Object.
- Add the CNO and VCO SAM account names(with $ at the end)> to the Allow RODC Password Replication Group:

Using PowerShell:
Add-ADDomainControllerPasswordReplicationPolicy -Identity “RODC” -AllowedList "testCluster$","vcoName$”
- Supply the CNO and VCO SAM account name(with $ at the end) as arguments to the AllowedList parameter
6. Finally, replicate the CNO or VCO computer object created on the RWDC to the RODC:
repadmin /rodcpwdrepl <RODC server name> <RWDC server name> <distinguished name of the CNO or VCO without quotes e.g.: CN=myClusterCNO,CN=Computers,DC=testcluster,DC=com >
Now that you have the computer objects pre-staged and replicated to your RODC, you are ready to create a cluster in a RODC environment. In a previous blog we provided the steps to create a Failover Cluster .
Thanks!
Subhasish Bhattacharya
Senior Program Manager
Clustering and High Availability
Microsoft Corporation
Updated Mar 15, 2019
Version 2.0Rob-Hindman Microsoft
 Microsoft
Joined June 05, 2017
Failover Clustering
Follow this blog board to get notified when there's new activity