If you are an Exchange Online or Exchange Online Protection (EOP) customer and you have configured connectors, this post contains important information that might impact your organization. To make sure that your mail flow isn’t interrupted, we strongly recommend that you read this post and take any necessary action before the deadline (July 5th, 2017).
If your organization has a hybrid deployment (on-premises plus Office 365), you often need to relay emails to the Internet via Office 365—i.e. emails from your on-premises environment (mailboxes, applications, scanners, fax machines, etc.) that are sent to Internet recipients will be routed to Office 365 first, then sent out. Figure: Email relayed from your on-premises email servers to the Internet via Office 365
For this relay to work, your organization needs to follow these steps:
- Create one or more connectors in Office 365 to authenticate emails coming from your on-premises mail servers, using either the sending IP address or a certificate.
- Configure your on-premises servers to relay via Office 365.
- Configure your setup so that:
a) The sender domain belongs to your organization (i.e. you have registered your domain with Office 365). For more information, see Add Domains in Office 365. OR b) Your on-premises email server is configured to use a certificate to send email to Office 365, and the CN (Common-Name) or SAN (Subject Alternate Name) in the certificate contains a domain name you have registered with Office 365 and you have created a certificate based connector in Office 365 with that domain.If neither step 3a nor 3b is true, Office 365 will NOT be able to know deterministically whether the email sent from your on-premises environment belongs to your organization. Therefore, it is important that organizations with hybrid deployments ensure that they fulfill either step 3a or 3b. This protects your organization, your domain, and your IP reputation. Beginning July 5, 2017 (changed from Feb. 1, 2017), Office 365 will no longer support relaying emails if a hybrid customer has not configured either step 3a or 3b (see detail above). Such emails will get rejected with the following error message: “550 5.7.64 Relay Access Denied ATTR36. For more details please refer to https://support.microsoft.com/kb/3169958.″ Additionally, if your organization needs the following scenarios to continue to work (and most hybrid organizations do), you need to ensure that you follow step 3b.
- Your organization needs to send NDR (Non-Delivery Report) or bounce messages to a recipient on the Internet and needs to relay them through Office 365.
- You need to send emails on behalf of domains that do not belong to your organization.
- Your on-premises users have forwarding rules configured, and messages need to be relayed through Office 365. For example:
- Contoso.com is your organization’s domain.
- A user in your organization’s on-premises server, kate@contoso.com, has enabled forwarding of all her messages to kate@tailspintoys.com.
- If john@fabrikam.com sends a message to kate@contoso.com, the message gets automatically forwarded to kate@tailspintoys.com. From Office 365’s point of view, the message is sent from john@fabrikam.com to kate@tailspintoys.com.
- Because Kate’s mail is being forwarded, neither the sender domain nor the recipient domain belongs to your organization.
![clip_image002[6] clip_image002[6]](https://techcommunity.microsoft.com/legacyfs/online/media/2017/01/clip_image0026_thumb.png) Figure: When step 3b is followed, a forwarded email from contoso.com will be allowed to be relayed via Office 365
For more details, see the step-by-step instructions below.
Figure: When step 3b is followed, a forwarded email from contoso.com will be allowed to be relayed via Office 365
For more details, see the step-by-step instructions below.
Create or Edit a certificate-based connector in Office 365
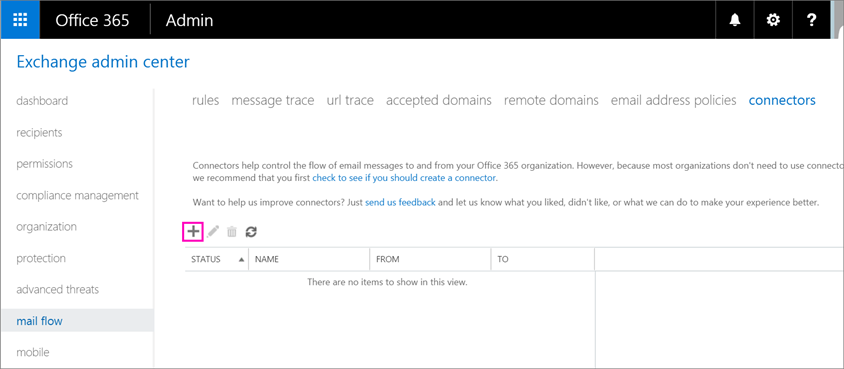
For Office 365 to relay messages to internet that match with the scenarios listed above, you need to follow the below steps. 1. Sign in to Office 365 admin center, and go to Admin > Exchange. 2. Go to mail flow > connectors, and do one of the following:
If there are no connectors, choose ’+’ (Add) to create a connector.
 If a connector already exists, select the connector, and choose Edit to modify it.
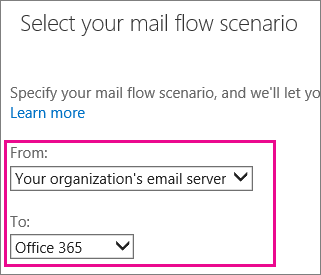
 3. On the Select your mail flow scenario page, choose From: Your organization’s email server and To: Office 365. This creates a connector that indicates that your On-premises server is the sending source for your messages.
 4. Enter connector name and other information, and then choose Next.
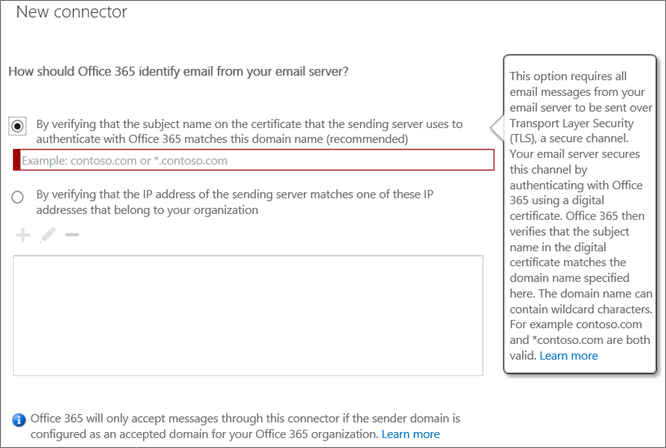
5. On the New connector or Edit connector page, choose the first option to use a TLS certificate to identify the sender source of your organization’s messages. The domain name in the option should match the CN name or SAN in the certificate you are using to send email and this domain must be a domain you have registered with Office 365 (see Add Domains in Office 365).
For example:
- The certificate you plan to use has CN or SAN as contoso.com. In that case, you can enter contoso.com in the dialog below and register contoso.com in Office 365 (see Add Domains in Office 365)
- The certificate you plan to use has CN or SAN as <hostname>.contoso.com or mail.contoso.com. In that case, you could enter *.contoso.com in the dialog below, and register contoso.com in Office 365 (see Add Domains in Office 365)
Note: Existing hybrid customers that used the Hybrid Configuration Wizard to configure their connectors SHOULD check their existing connector and ensure that it is using *.contoso.com instead of mail.contoso.com or <hostname>.contoso.com, since mail.contoso.com or <hostname>.contoso.com may not be a registered domains with Office 365.

Register your domain with Office 365
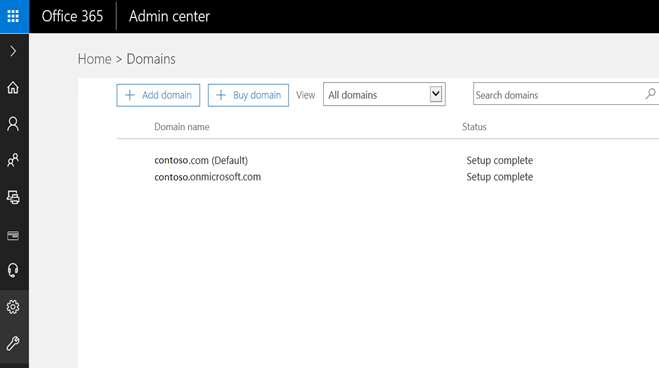
You can follow the steps to register your domain here - Add Domains in Office 365. Go to Setup > Domains in the O365 Admin Center to see the list of domains registered:
Prepare your on-premises email servers to relay messages through Office 365
- If your organization uses Exchange server for its on-premises server, you need to configure your server to send messages over TLS. To do this, follow Set up your email server to relay mail to the Internet via Office 365, which is part 2.2 of “Set up connectors to route mail between Office 365 and your own email servers.” If you have already used Hybrid Configuration Wizard, then continue to use it, but ensure to use a certificate that matches the criteria outlined in step 5 of the previous section.
- Install a certificate in your on-premises environment. For details, follow “Step 6: Configure an SSL certificate” of Configure mail flow and client access.
Updated Jul 01, 2019
Version 2.0The_Exchange_Team Microsoft
 Microsoft
Joined April 19, 2019
Exchange Team Blog
You Had Me at EHLO.