"I wish I could let my users create and manage their own groups - provided they all follow a consistent group naming scheme!" This is an oft-mentioned comment by Exchange administrators who are constantly bombarded with group update support requests from their users. Requests could be for creating new groups, adding/removing members, removing groups, and so on. In many organizations, such group management requests are typically considered extraneous and not core Exchange administration work. Our Exchange administrators would ideally prefer to delegate such tasks to their user base as long as suitable controls are in place to ensure that nothing goes haywire.
To enable end-user group management scenarios, the following controls are typically expected to be in place:
- GRANT/REVOKE Group creation, management and removal rights to users
- CONFIGURE a Group Naming Policy to ensure consistent group naming across the organization
- PREVENT inappropriate terms from being used as part of group names
With Exchange Server 2010 SP1, administrators can now use Exchange Control Panel (ECP) to setup the above controls and hand off common group management tasks to their users!
This article will walk you - as the administrator, through the above controls step by step.
GRANT/REVOKE Group creation, management and removal rights to users
By default, end users are not allowed to create and manage their own groups. This is controlled via RBAC through Role Assignment Policies. The Default Role Assignment Policy that ships out of the box has a number of switches that control what end users can do. The one switch we are interested in is "MyDistributionGroups" as highlighted below. As mentioned, this is OFF by default, and prevents your users from creating and managing their own groups.
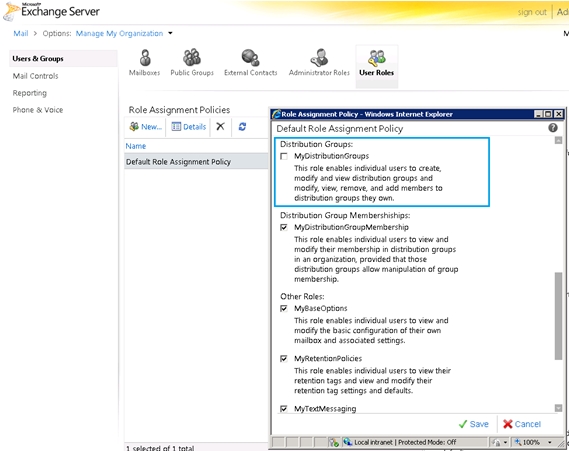
So, the first thing we will do is enable this control.
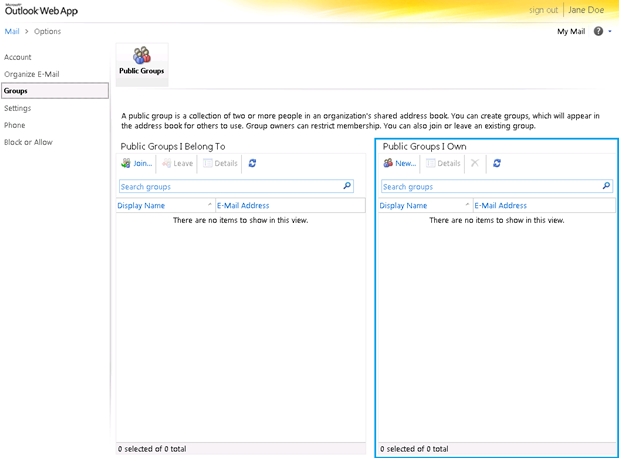
Now, let's login to ECP, as an end user, Jane Doe, and look at what she sees when she navigates to the Groups UI. To the right of the page, Jane now sees a new list called "Public Groups I Own", which previously wasn't available. From this list, she can create and manage her own groups now.
CONFIGURE a Group Naming Policy to ensure consistent group naming across the organization
Now that you have enabled end-user group creation and management for your end users, the next step is to enforce some standard naming scheme for all groups created by them. You have received directions from the Compliance department in your organization that requires all end-user created groups to follow the convention below:
DL-<COUNTRY>-<DEPT NAME>-<GROUP NAME>
Where:
<COUNTRY> represents the ISO Country Code to which the user belongs to
<DEPT NAME> represents the Department to which the user belongs to
<GROUP NAME> represents the value that the end user provides to name his/her group
Thus, as Jane works in Morocco's (ISO Country Code "504") Customer Facing department (represented as "CSFACE" in Active Directory), if she were to create a group herself for managing customer feedback in her area called "Feedback", her group would automatically be called DL-504-CSFACE-Feedback.
Additionally, the Compliance department has also provided you a list of inappropriate words that need to be blocked from being used in group names.
Now, let's see how you, the administrator, gets all this configured. Let's login to ECP and under "Manage My Organization", navigate to the Users & Groups view, and then click the "Public Groups" tab. At the bottom, we see an area called "Group Naming Policy". This is new in SP1, and this is where we can setup the required group naming scheme.
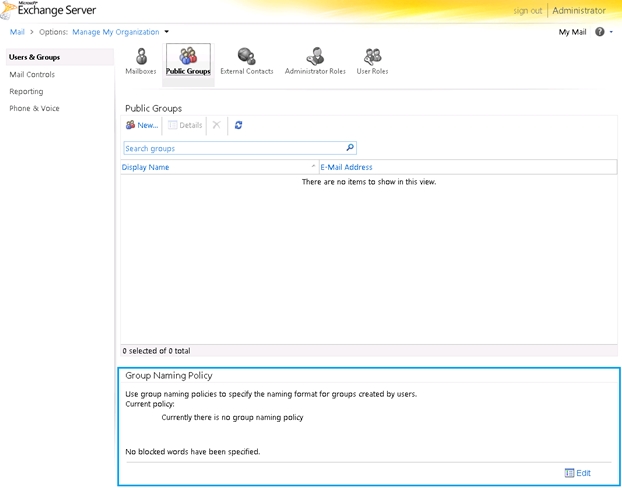
On clicking Edit, the following dialog pops up:
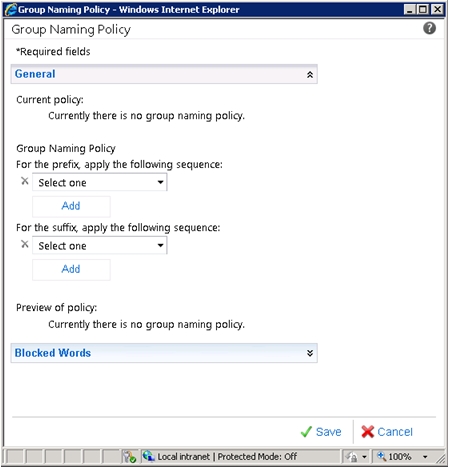
The dialog has 2 main areas: "General" where you can setup the actual group naming policy itself and "Blocked Words" which lets you setup a list of inappropriate words. Let's setup the policy first.
There are essentially 3 parts to a group naming policy:
- A PREFIX, which appears before the user entered group name
- The Group Name value itself, as provided by your user
- A SUFFIX, which appears after the user entered group name
Thus, in our example:
- PREFIX: DL-<COUNTRY>-<DEPT NAME>-
- Group Name: <GROUP NAME>, which is just a placeholder for the user entered value
- SUFFIX: None in this case
Now, let's use the Group Naming Policy ECP dialog to set this up.
The Prefix or Suffix parts can both contain sequences of user attributes or string literals. User attributes are AD attributes as maintained by your organization. ECP makes available the following list of user attributes: "City", "Company", "Country Code", "Country or Region", "Department", "Office", "State", "Title", "Custom Attribute 1-15". Any of these can be used in your group naming policy, in any order.
For our case, we use user attributes "Country Code" and "Department", and some free-form string literals for the "DL" and "-" (hyphens) that need to appear in the group name. The end result is as shown below:
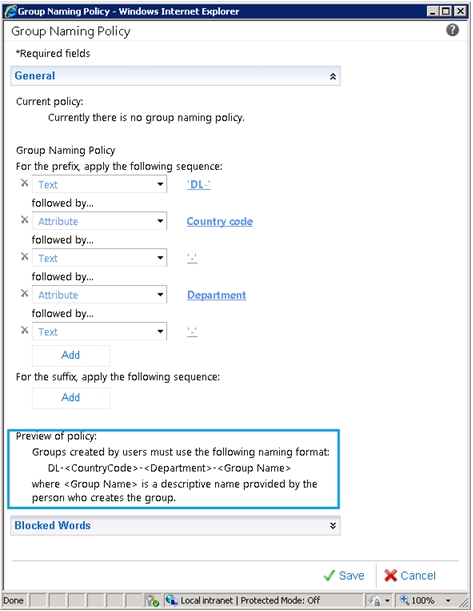
As you can see, all we have done is simply define a sequence of strings (comprised of user attributes and free-form text) as part of the Prefix. At the bottom of the dialog, a helpful preview is also presented.
Next: let's setup the Blocked Words bit. We will collapse the "General" area, and expand the "Blocked Words" area:
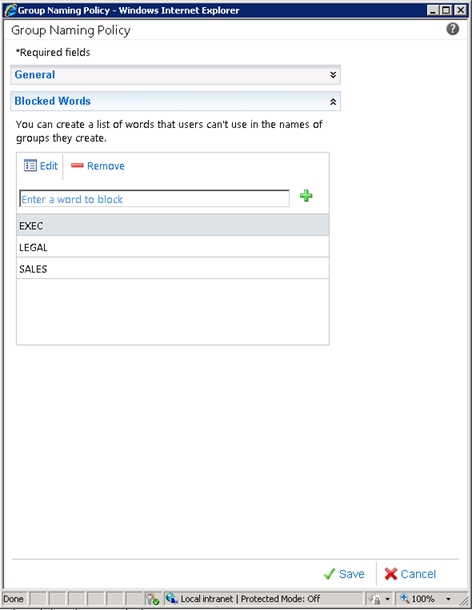
This is a standard ECP Add/Remove list of values, and you have just finished setting up the Blocked Words list. We click Save, and we are done with our group naming policy configuration.
Note that the main "Public Groups" tab is now refreshed to show that a group naming policy has just been setup:

Well - now let's test and see how this works with our end users!
< font size="2">Let's login as Jane again. She attempts to create her "Feedback" group in ECP, as shown below:
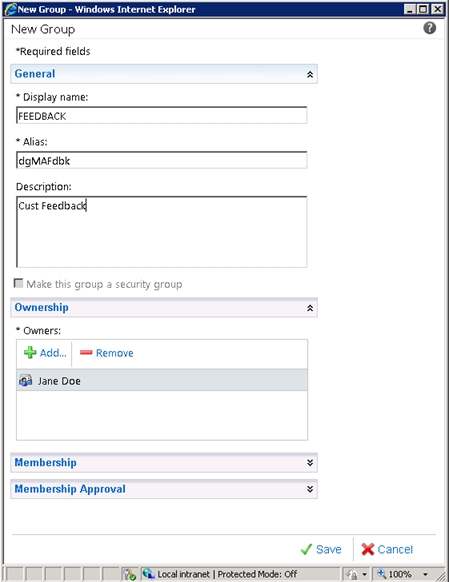
So, all looks familiar until Jane clicks Save. When she clicks Save, she gets the following prompt:

The group naming policy comes into play, and ensures that the group is named as per the policy.
And Jane's Groups view in ECP has been refreshed as well, as shown below:

Well, our setup works very well and you, the administrator are very happy (and relieved) that you no longer have to deal with group creation and management chores every day! =)
- Sanjay Ramaswamy
Published Apr 21, 2010
Version 1.0The_Exchange_Team Microsoft
 Microsoft
Joined April 19, 2019
Exchange Team Blog
You Had Me at EHLO.