Exchange Server 2007 introduced a new GUI management console (Exchange Management Console) to replace the Exchange System Manager (ESM) of previous versions. This earlier blog post The new Exchange 2007 Management Console overview gives an overview of the console. In this blog post I'll show some tips and tricks of the console.
Tip#1: Specify the domain controller for your configuration data
Under the Organization Configuration or Server Configuration node, there is a "Modify Configuration Domain Controller" context menu to launch the Configuration Domain Controller dialog. This allows you to specify a domain controller to be used for AD read and write for organization or server configuration.
This is possible in Exchange 2003 ESM by selecting the DC to be used when manually adding Exchange System Manager snap-in into an MMC session, but it's a lot easier here in Exchange 2007!
Tip#2: Modify the scope and the maximum number of recipients to display
By default, recipients in the current domain and up to 1000 maximum recipients are displayed in the result pane of the Recipient Configuration node. It may take quite a long time to load all recipients if there are a lot of recipients to display. Administrators can control the scope of recipients shown to be the whole forest, a whole domain, or by OU within a domain by using the "Modify Recipient Scope" context menu of the Recipient Configuration node. There is also a "Modify the Maximum Number of Recipients to Display" context menu to control the maximum number of recipients to display in the GUI.
Setting your scope controls which recipient objects will be displayed in the GUI result panes, and also controls which recipient objects will be found by the GUI pickers in many cases. For instance, if you configure your scope to be a particular OU, then you will only be able to specify this OU or one of its children as the target of a new mailbox creation and you will only be able to select a user from this OU or one of its children while enabling a mailbox. This can help to reduce the size of the result-set you have to filter through while doing administrative tasks if your tasks are easily scoped to a particular part of the directory!
In the Active Directory Users and Computers (ADUC) tool you see objects only under an OU scope, while Exchange 2007 recipient management allows you to define your scope to be an OU, domain, or even forest-wide increasing administrative flexibility!
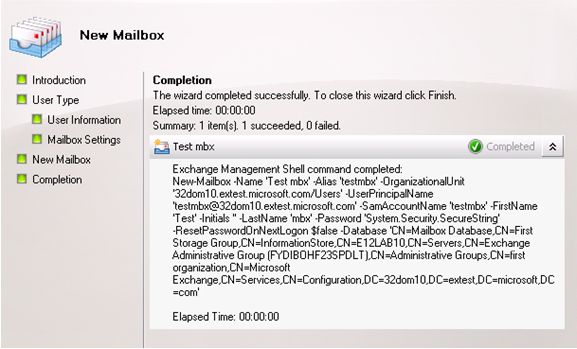
Tip#3: Equivalent Shell One-liner provided after completion of each wizard
Since the Exchange Management Console builds on top of Exchange Management Shell (EMS), every wizard runs one or more "one-liners" (single-line of EMS command) to achieve the work required of the wizard. The one-liner for each wizard is displayed at the Completion page. This can be copied (Ctrl+C) and the command portion can then be pasted to be run in EMS cmdline.
The one-liner can be used as an example of the required syntax and altered to meet specific needs while learning PowerShell scripting.
Tip#4: Filtering
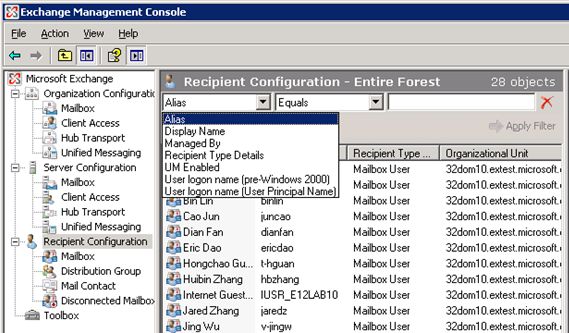
Filters are used in the result pane for Server Configuration and Recipient Configuration nodes and within picker dialogs.
Administrators can save a filter as the default filter, so that next time this filter is used when the result pane is visited. Just like specifying OU as the recipient scope, filtering by certain attributes also improve UI performance if there are a large number of recipients to display.
One great example of how this can be used is to simulate an Administrative Group view using filtering. Simply create a filter in the Server Workcenter that specifies the criteria used to distinguish your servers into your desired "Administrative Group" set - based on some aspect of server name or based on AD site membership, for instance!
Look for a separate blog post on Filtering soon!
Tip#5: Set visual effects of the Console
Visual Effects is another option which can be configured for the console. It can be used to set the visual effects to be always on, never on, or automatic.
Visual effects setting controls how Exchange wizards display by enabling or disabling the cool Exchange 2007 "skin" applied to the wizards by default. .
You might want to turn this off if you prefer the classic look within the console or if you experience performance issues with the visual effects.
Tip#6: Show/Hide the action pane in the console window
Action pane is shown to the right side of Exchange Management Console by default. It lists actions that are currently available to the selected node in the navigation tree and selected objects in the result pane. These options are also available as context menu items for the selected node or objects.
Action pane can be hidden to provide more space in the control window, by un-checking the Action pane checkbox in the Customize View dialog. The Customize View dialog can be launched via the View->Customize menu.
Tip#7: Modify the number of items to display on each page of Queue Viewer
To change the number of queues or messages on the Queues page or Messages page, specify the "Number of items to display on each page" field in the Queue View Options dialog. The value 1000 is used by default.
You can use this setting to control the number of items included in each page shown in the Exchange 2007 queue viewer. No matter what value you use here, the number of items shown will be complete - for instance, if you have 10 pages shown with 1000 items per page, you can modify this value to end up with 1 page of 10000 items each or to 100 pages of 100 items each.
Tip#8: Create a custom console snap-in
It's possible to create a custom console snap-in for any of the 4 nodes under the root Microsoft Exchange node in the EMC navigation tree. This "reduced" custom console can be used to isolate visibility of additional management capabilities of the Exchange 2007 management console. Below are the steps creating a Recipient Management only console, which exposes just recipient management capabilities to administrators or helpdesk:
Step 1: Open MMC.exe directly (no snap-ins added)
Step 2: Add the Exchange Snap-in to this empty MMC console
Step 3: Select the Recipient Configuration node. Right click and choose "New Window from Here"
Step 4: Under File->Options, configure the Console mode as desired.
Step 5: Save this custom MMC to an MSC file. This MSC file can be used to launch your new Recipient Management only console!
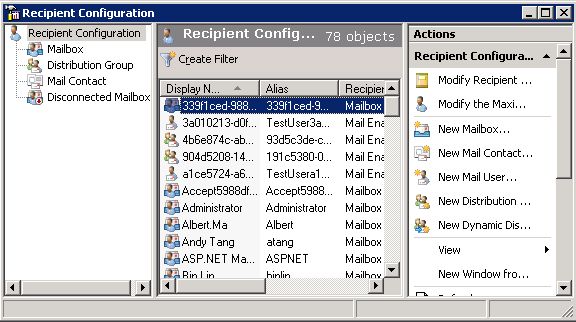
Below is a snapshot of a Recipient Management only console:
The steps creating a reduced console for Organization Configuration, Server Configuration and Toolbox are the same except in Step3, the appropriate node should be selected.
Tip#9: Use the error provider information
In most cases, when you have something entered incorrectly within Exchange 2007 console property pages or wizards, the console will let you know something isn't entered correctly by producing an error provider icon (!) next to the incorrect entry. Hover over this error provider to get more information on the cause of the failure.
Published Oct 20, 2006
Version 1.0The_Exchange_Team Microsoft
 Microsoft
Joined April 19, 2019
Exchange Team Blog
You Had Me at EHLO.


