First published on MSDN on Mar 01, 2017
In the previous post on AMS I’ve shown how to create a new media channel, and wrote some simple code for uploading a video to AMS. In this post, I want to elaborate a bit more on the uploading of video files.
A best practice for uploading video files to AMS is, that each asset contains a unique instance of media content. Each asset should not contain multiple edits of a file, in order to reduce difficulties submitting encoding jobs and streaming and securing the delivery of the asset later in the workflow.
For instance, the trailer of your movie is stored in a different asset than the feature-length movie. In this case the trailer can have a wide viewership, but the viewing of actual movie can be restricted.
Azure Media Services provides an OData REST service which built on OData v3. By using v3, you can submit HTTP request bodies in atom-pub or JSON, and you can receive the response in the same format. The Media SDK for .Net, which I am using in my samples, is a wrapper around the REST API.
For more information about using the REST API for uploading video assets see:
The AMS SDK supports various video, image and audio file types which can be uploaded to the AMS portal. However, the AMS portal only allows formats being uploaded that are supported by the Azure Media Encoder.
Content encoded with the following formats are allowed to be imported:
The following video file formats are supported for input:
For more information on supported input formats and codecs, see: ‘ Media Encoder Standard Formats and Codecs ’.
AMS provides the ability to secure your video when it’s being uploaded to the AMS portal. All video files are associated with an Asset object in the AMS SDK. When you create a new Asset object for your video, you must specify an Encryption option as parameter. Each file added to the Asset will then use the Encryption option you specified.
The AssetCreationOptions enumeration comes in four different flavors:
For more information about protecting your content, see ‘ AMS Protecting content overview ’.
So, enough background information for now. Let’s do some coding!!
For more information about how to set up an AMS account and retrieving your account key, as well as some more information on setting up the Visual Studio solution, refer to my previous post . For this sample, I will use the same account and key which are used in the previous post.
In this sample, we are going to use a more professional approach. Where in the previous sample, the video files were only uploaded, this time we will encode the video file, add a policy, a locator and secure the upload.
So, the following tasks are performed by the sample code:
Open Visual Studio and create a new C# console application. Install the windowsazure.mediaservices.extensions NuGet Package, add a reference to the System .Configuration assembly and add the appropriate App Settings to the App.config.
[code language="csharp"]
using System.Configuration;
using System.Threading;
using System.IO;
using Microsoft.WindowsAzure.MediaServices.Client;
[/code]
Open the program.cs file and add the following using statements to it:
[code language="csharp"]
class Program
{
// Read values from the App.config file.
private static readonly string _mediaServicesAccountName =
ConfigurationManager.AppSettings["MediaServicesAccountName"];
private static readonly string _mediaServicesAccountKey =
ConfigurationManager.AppSettings["MediaServicesAccountKey"];
private static CloudMediaContext _context = null;
private static MediaServicesCredentials _cachedCredentials = null;
static void Main(string[] args)
{
_cachedCredentials = new MediaServicesCredentials(_mediaServicesAccountName,
_mediaServicesAccountKey);
_context = new CloudMediaContext(_cachedCredentials);
IAsset inputAsset = CreateAssetAndUploadSingleFile(@"C:\SampleVideo.mp4", AssetCreationOptions.StorageEncrypted);
EncodeToAdaptiveBitrateMP4Set(inputAsset);
}
static public IAsset CreateAssetAndUploadSingleFile(string singleFilePath, AssetCreationOptions assetCreationOptions)
{
if (!File.Exists(singleFilePath))
{
Console.WriteLine("File does not exist.");
return null;
}
var assetName = Path.GetFileNameWithoutExtension(singleFilePath);
//create a new input asset
IAsset inputAsset = _context.Assets.Create(assetName, assetCreationOptions);
var assetFile = inputAsset.AssetFiles.Create(Path.GetFileName(singleFilePath));
Console.WriteLine("Created assetFile {0}", assetFile.Name);
//create a 30-day read and list access policy
var policy = _context.AccessPolicies.Create(
assetName,
TimeSpan.FromDays(30),
AccessPermissions.Read | AccessPermissions.List);
//create a SAS locator to display the asset
var locator = _context.Locators.CreateLocator(LocatorType.Sas, inputAsset, policy);
Console.WriteLine("Upload {0}", assetFile.Name);
assetFile.Upload(singleFilePath);
Console.WriteLine("Done uploading {0}", assetFile.Name);
locator.Delete();
policy.Delete();
return inputAsset;
}
static public IAsset EncodeToAdaptiveBitrateMP4Set(IAsset asset)
{
// Declare a new job.
IJob job = _context.Jobs.Create("Media Encoder Standard Job");
// Get a media processor reference, and pass to it the name of the
// processor to use for the specific task.
IMediaProcessor processor = GetLatestMediaProcessorByName("Media Encoder Standard");
// Create a task with the encoding details, using a string preset.
// In this case "H264 Multiple Bitrate 720p" preset is used.
ITask task = job.Tasks.AddNew("My encoding task",
processor,
"H264 Multiple Bitrate 720p",
TaskOptions.None);
// Specify the input asset to be encoded.
task.InputAssets.Add(asset);
// Add an output asset to contain the results of the job.
// This output is specified as AssetCreationOptions.None, which
// means the output asset is not encrypted.
task.OutputAssets.AddNew("Output asset",
AssetCreationOptions.None);
job.StateChanged += new EventHandler<JobStateChangedEventArgs>(JobStateChanged);
job.Submit();
job.GetExecutionProgressTask(CancellationToken.None).Wait();
return job.OutputMediaAssets[0];
}
private static void JobStateChanged(object sender, JobStateChangedEventArgs e)
{
//Eventhandler for monitoring the job state
Console.WriteLine("Job state changed event:");
Console.WriteLine(" Previous state: " + e.PreviousState);
Console.WriteLine(" Current state: " + e.CurrentState);
switch (e.CurrentState)
{
case JobState.Finished:
Console.WriteLine();
Console.WriteLine("Job is finished. Please wait while local tasks or downloads complete...");
break;
case JobState.Canceling:
case JobState.Queued:
case JobState.Scheduled:
case JobState.Processing:
Console.WriteLine("Please wait...\n");
break;
case JobState.Canceled:
case JobState.Error:
// Cast sender as a job.
IJob job = (IJob)sender;
// Display or log error details as needed.
break;
default:
break;
}
}
private static IMediaProcessor GetLatestMediaProcessorByName(string mediaProcessorName)
{
var processor = _context.MediaProcessors.Where(p => p.Name == mediaProcessorName).
ToList().OrderBy(p => new Version(p.Version)).LastOrDefault();
if (processor == null)
throw new ArgumentException(string.Format("Unknown media processor", mediaProcessorName));
return processor;
}
}
[/code]
By executing this code, the video will be uploaded to the AMS account, a 30-day access policy is created for the file, a locator Url is created on which the video can be displayed and the video is encoded using a Media Encoder.
When you navigate to the AMS portal, you can see that there are two assets created:
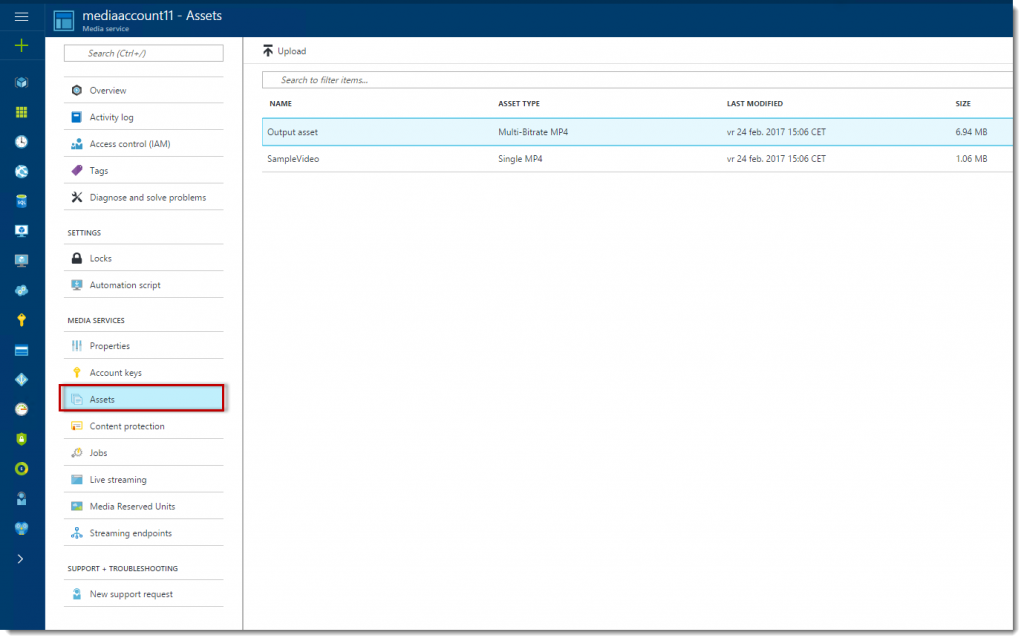
Click the ‘Output Asset’, scroll down and you will see that the original file is encoded and that there are multiple files now. From here, you can publish the asset.

This concludes this series of posts about Azure Media Services. Below is a list with reference materials used for this article. They provide a good starting point for building your own Azure Media Services solutions:
Authored by Sjoukje Zaal
In the previous post on AMS I’ve shown how to create a new media channel, and wrote some simple code for uploading a video to AMS. In this post, I want to elaborate a bit more on the uploading of video files.
Some Background information
A best practice for uploading video files to AMS is, that each asset contains a unique instance of media content. Each asset should not contain multiple edits of a file, in order to reduce difficulties submitting encoding jobs and streaming and securing the delivery of the asset later in the workflow.
For instance, the trailer of your movie is stored in a different asset than the feature-length movie. In this case the trailer can have a wide viewership, but the viewing of actual movie can be restricted.
AMS REST API
Azure Media Services provides an OData REST service which built on OData v3. By using v3, you can submit HTTP request bodies in atom-pub or JSON, and you can receive the response in the same format. The Media SDK for .Net, which I am using in my samples, is a wrapper around the REST API.
For more information about using the REST API for uploading video assets see:
AMS supported video input formats
The AMS SDK supports various video, image and audio file types which can be uploaded to the AMS portal. However, the AMS portal only allows formats being uploaded that are supported by the Azure Media Encoder.
Content encoded with the following formats are allowed to be imported:
- 264 (Baseline, Main, and High Profiles)
- MPEG-1
- MPEG-2 (Simple and Main Profile)
- MPEG-4 v2 (Simple Visual Profile and Advanced Simple Profile)
- VC-1 (Simple, Main, and Advanced Profiles)
- Windows Media Video (Simple, Main, and Advanced Profiles)
- DV (DVC, DVHD, DVSD, DVSL)
The following video file formats are supported for input:
- 3GPP, 3GPP2 (.3gp, .3g2, .3gp2)
- Advanced Systems Format (ASF) (.asf)
- Advanced Video Coding High Definition (AVCHD) (.mts, .m2tf)
- Audio-Video Interleaved (AVI) (.avi)
- Digital camcorder MPEG-2 (MOD) (.mod)
- Digital video (DV) camera file (.dv)
- DVD transport stream (TS) file (.ts)
- DVD video object (VOB) file (.vob)
- Expression Encoder Screen Capture Codec file (.xesc)
- MP4 (.mp4)
- MPEG-1 System Stream (.mpeg, .mpg)
- MPEG-2 video file (.m2v)
- Smooth Streaming File Format (PIFF 1.3) (.ismv)
- Windows Media Video (WMV) (.wmv)
For more information on supported input formats and codecs, see: ‘ Media Encoder Standard Formats and Codecs ’.
Securing your video when uploading to AMS
AMS provides the ability to secure your video when it’s being uploaded to the AMS portal. All video files are associated with an Asset object in the AMS SDK. When you create a new Asset object for your video, you must specify an Encryption option as parameter. Each file added to the Asset will then use the Encryption option you specified.
The AssetCreationOptions enumeration comes in four different flavors:
- None
- StorageEncrypted
- CommonEncryptionProtected
- EnvelopeEncryptionProtected
For more information about protecting your content, see ‘ AMS Protecting content overview ’.
So, enough background information for now. Let’s do some coding!!
Setting up your Application
For more information about how to set up an AMS account and retrieving your account key, as well as some more information on setting up the Visual Studio solution, refer to my previous post . For this sample, I will use the same account and key which are used in the previous post.
In this sample, we are going to use a more professional approach. Where in the previous sample, the video files were only uploaded, this time we will encode the video file, add a policy, a locator and secure the upload.
So, the following tasks are performed by the sample code:
- Create an empty Asset
- Create an AssetFile instance, which is associated to the Asset
- Create an AccesPolicy that defines the access permissions and the duration of the Asset
- Create a Locator instance that provides access to the Asset. The Locator provides an access point by creating Url. This way the account key does not have to be shared, the files can be accessed using a custom Url.
Open Visual Studio and create a new C# console application. Install the windowsazure.mediaservices.extensions NuGet Package, add a reference to the System .Configuration assembly and add the appropriate App Settings to the App.config.
[code language="csharp"]
using System.Configuration;
using System.Threading;
using System.IO;
using Microsoft.WindowsAzure.MediaServices.Client;
[/code]
Open the program.cs file and add the following using statements to it:
[code language="csharp"]
class Program
{
// Read values from the App.config file.
private static readonly string _mediaServicesAccountName =
ConfigurationManager.AppSettings["MediaServicesAccountName"];
private static readonly string _mediaServicesAccountKey =
ConfigurationManager.AppSettings["MediaServicesAccountKey"];
private static CloudMediaContext _context = null;
private static MediaServicesCredentials _cachedCredentials = null;
static void Main(string[] args)
{
_cachedCredentials = new MediaServicesCredentials(_mediaServicesAccountName,
_mediaServicesAccountKey);
_context = new CloudMediaContext(_cachedCredentials);
IAsset inputAsset = CreateAssetAndUploadSingleFile(@"C:\SampleVideo.mp4", AssetCreationOptions.StorageEncrypted);
EncodeToAdaptiveBitrateMP4Set(inputAsset);
}
static public IAsset CreateAssetAndUploadSingleFile(string singleFilePath, AssetCreationOptions assetCreationOptions)
{
if (!File.Exists(singleFilePath))
{
Console.WriteLine("File does not exist.");
return null;
}
var assetName = Path.GetFileNameWithoutExtension(singleFilePath);
//create a new input asset
IAsset inputAsset = _context.Assets.Create(assetName, assetCreationOptions);
var assetFile = inputAsset.AssetFiles.Create(Path.GetFileName(singleFilePath));
Console.WriteLine("Created assetFile {0}", assetFile.Name);
//create a 30-day read and list access policy
var policy = _context.AccessPolicies.Create(
assetName,
TimeSpan.FromDays(30),
AccessPermissions.Read | AccessPermissions.List);
//create a SAS locator to display the asset
var locator = _context.Locators.CreateLocator(LocatorType.Sas, inputAsset, policy);
Console.WriteLine("Upload {0}", assetFile.Name);
assetFile.Upload(singleFilePath);
Console.WriteLine("Done uploading {0}", assetFile.Name);
locator.Delete();
policy.Delete();
return inputAsset;
}
static public IAsset EncodeToAdaptiveBitrateMP4Set(IAsset asset)
{
// Declare a new job.
IJob job = _context.Jobs.Create("Media Encoder Standard Job");
// Get a media processor reference, and pass to it the name of the
// processor to use for the specific task.
IMediaProcessor processor = GetLatestMediaProcessorByName("Media Encoder Standard");
// Create a task with the encoding details, using a string preset.
// In this case "H264 Multiple Bitrate 720p" preset is used.
ITask task = job.Tasks.AddNew("My encoding task",
processor,
"H264 Multiple Bitrate 720p",
TaskOptions.None);
// Specify the input asset to be encoded.
task.InputAssets.Add(asset);
// Add an output asset to contain the results of the job.
// This output is specified as AssetCreationOptions.None, which
// means the output asset is not encrypted.
task.OutputAssets.AddNew("Output asset",
AssetCreationOptions.None);
job.StateChanged += new EventHandler<JobStateChangedEventArgs>(JobStateChanged);
job.Submit();
job.GetExecutionProgressTask(CancellationToken.None).Wait();
return job.OutputMediaAssets[0];
}
private static void JobStateChanged(object sender, JobStateChangedEventArgs e)
{
//Eventhandler for monitoring the job state
Console.WriteLine("Job state changed event:");
Console.WriteLine(" Previous state: " + e.PreviousState);
Console.WriteLine(" Current state: " + e.CurrentState);
switch (e.CurrentState)
{
case JobState.Finished:
Console.WriteLine();
Console.WriteLine("Job is finished. Please wait while local tasks or downloads complete...");
break;
case JobState.Canceling:
case JobState.Queued:
case JobState.Scheduled:
case JobState.Processing:
Console.WriteLine("Please wait...\n");
break;
case JobState.Canceled:
case JobState.Error:
// Cast sender as a job.
IJob job = (IJob)sender;
// Display or log error details as needed.
break;
default:
break;
}
}
private static IMediaProcessor GetLatestMediaProcessorByName(string mediaProcessorName)
{
var processor = _context.MediaProcessors.Where(p => p.Name == mediaProcessorName).
ToList().OrderBy(p => new Version(p.Version)).LastOrDefault();
if (processor == null)
throw new ArgumentException(string.Format("Unknown media processor", mediaProcessorName));
return processor;
}
}
[/code]
By executing this code, the video will be uploaded to the AMS account, a 30-day access policy is created for the file, a locator Url is created on which the video can be displayed and the video is encoded using a Media Encoder.
When you navigate to the AMS portal, you can see that there are two assets created:
Click the ‘Output Asset’, scroll down and you will see that the original file is encoded and that there are multiple files now. From here, you can publish the asset.
Summary
This concludes this series of posts about Azure Media Services. Below is a list with reference materials used for this article. They provide a good starting point for building your own Azure Media Services solutions:
Published Feb 12, 2019
Version 1.0Sjoukje Zaal
MVP
Joined July 16, 2016
Microsoft Developer Community Blog
Follow this blog board to get notified when there's new activity