Azure Kubernetes Service Workload Protection
The objective of this blog is to provide a concise guide on how to increase the security of your Kubernetes workloads by implementing Workload Identity and Network Policy in AKS. These features enable secure access to Azure KeyVault and control traffic flow between pods, providing an additional layer of security for your AKS cluster. Finally, as the icing on the cake, there are instructions on how to use Microsoft Defender for Containers to detect vulnerabilities in container images.
Preconditions
This post builds on a previous blog. The instructions there will equip you with a private AKS cluster and a lot of surrounding services, like Azure Container Reqistry, Application Gateway with WAF, etc. If you have completed the instructions there, you can simply continue with this guide.
You could also create a more simple AKS cluster, using Microsoft quickstart guides here: https://learn.microsoft.com/en-us/azure/aks/tutorial-kubernetes-prepare-app?tabs=azure-cli. However, if you do you will have to take care to populate some environment variables to match the instructions below, like e.g. AKS_CLUSTER_NAME and STUDENT_NAME.
1.1 Deployment
First, create some environment variables, to make life easier.
1.1.1 Prepare Environment Variables for Infrastructure
[!Note] The Azure KeyVault name is a global name that must be unique.
FRONTEND_NAMESPACE="frontend"
BACKEND_NAMESPACE="backend"
SERVICE_ACCOUNT_NAME="workload-identity-sa"
SUBSCRIPTION="$(az account show --query id --output tsv)"
USER_ASSIGNED_IDENTITY_NAME="keyvaultreader"
FEDERATED_IDENTITY_CREDENTIAL_NAME="keyvaultfederated"
KEYVAULT_NAME="<DEFINE A KEYVAULT NAME HERE>"
KEYVAULT_SECRET_NAME="redissecret"
1.1.2 Update AKS Cluster with OIDC Issuer
Enable the existing cluster to use OpenID connect (OIDC) as an authentication protocol for Kubernetes API server (unless already done). This allows the cluster to integrate with Microsoft Entra ID and other identity providers that support OIDC.
az aks update -g $SPOKE_RG -n $AKS_CLUSTER_NAME-${STUDENT_NAME} --enable-oidc-issuer
Get the OICD issuer URL. Query the AKS cluster for the OICD issuer URL with the following command, which stores the reult in an environment variable.
AKS_OIDC_ISSUER="$(az aks show -n $AKS_CLUSTER_NAME-${STUDENT_NAME} -g $SPOKE_RG --query "oidcIssuerProfile.issuerUrl" -otsv)"
The variable should contain the Issuer URL similar to the following: https://eastus.oic.prod-aks.azure.com/9e08065f-6106-4526-9b01-d6c64753fe02/9a518161-4400-4e57-9913-d8d82344b504/
1.1.3 Create Azure KeyVault
Create the Azure Keyvault instance. When creating the Keyvault, use "deny as a default" action for the network access policy, which means that only the specified IP addresses or virtual networks can access the key vault.
Your bastion host will be allowed, so use that one when you interact with Keyvault later.
az keyvault create -n $KEYVAULT_NAME -g $SPOKE_RG -l $LOCATION --default-action deny
Create a private DNS zone for the Azure Keyvault.
az network private-dns zone create --resource-group $SPOKE_RG --name privatelink.vaultcore.azure.net
Link the Private DNS Zone to the HUB and SPOKE Virtual Network
az network private-dns link vnet create --resource-group $SPOKE_RG --virtual-network $HUB_VNET_ID --zone-name privatelink.vaultcore.azure.net --name hubvnetkvdnsconfig --registration-enabled false

az network private-dns link vnet create --resource-group $SPOKE_RG --virtual-network $SPOKE_VNET_NAME --zone-name privatelink.vaultcore.azure.net --name spokevnetkvdnsconfig --registration-enabled false
Create a private endpoint for the Keyvault
First we need to obtain the KeyVault ID in order to deploy the private endpoint.
KEYVAULT_ID=$(az keyvault show --name $KEYVAULT_NAME \
  --query 'id' --output tsv)
Create the private endpoint in endpoint subnet.
az network private-endpoint create --resource-group $SPOKE_RG --vnet-name $SPOKE_VNET_NAME --subnet $ENDPOINTS_SUBNET_NAME --name KVPrivateEndpoint --private-connection-resource-id $KEYVAULT_ID --group-ids vault --connection-name PrivateKVConnection --location $LOCATION
Fetch IP of the private endpoint and create an A record in the private DNS zone.
Obtain the IP address of the private endpoint NIC card.
KV_PRIVATE_IP=$(az network private-endpoint show -g $SPOKE_RG -n KVPrivateEndpoint \
 --query 'customDnsConfigs[0].ipAddresses[0]' --output tsv)
Note the private IP address down.
echo $KV_PRIVATE_IP
Create the A record in DNS zone and point it to the private endpoint IP of the Keyvault.
  az network private-dns record-set a create \
  --name $KEYVAULT_NAME \
  --zone-name privatelink.vaultcore.azure.net \
  --resource-group $SPOKE_RG
Point the A record to the private endpoint IP of the Keyvault.
az network private-dns record-set a add-record -g $SPOKE_RG -z "privatelink.vaultcore.azure.net" -n $KEYVAULT_NAME -a $KV_PRIVATE_IP
Validate your deployment in the Azure portal.
-
Navigate to the Azure portal at https://portal.azure.com and enter your login credentials.
-
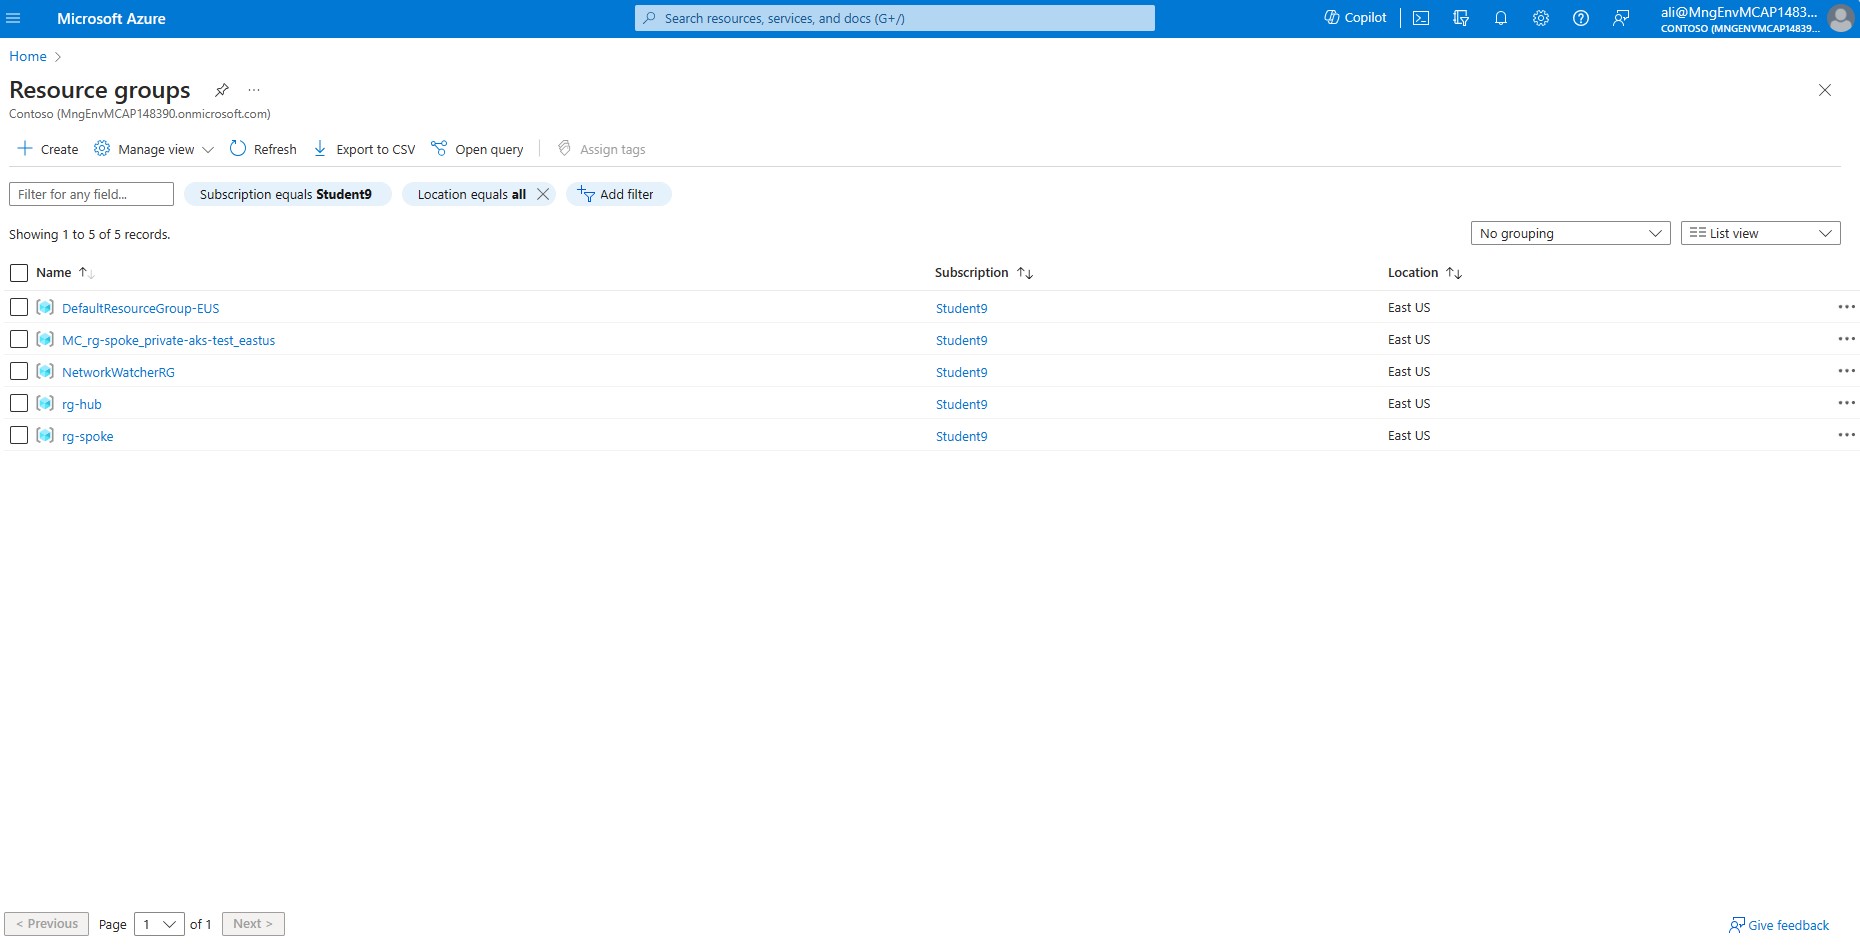
Once logged in, click on Resource groups to view all of your resource groups in your subscription. You should see the 3 Resouce groups created during previous steps: MC_rg-spoke_private-aks-xxxx_eastus, rg-hub and rg-spoke.
Select rg-spoke
-
Verify that the following resources exists: an Azure KeyVault instance, KeyVault private endpoint, Private endpoint Network interface, and a private DNS zone called privatelink.vaultcore.azure.net.
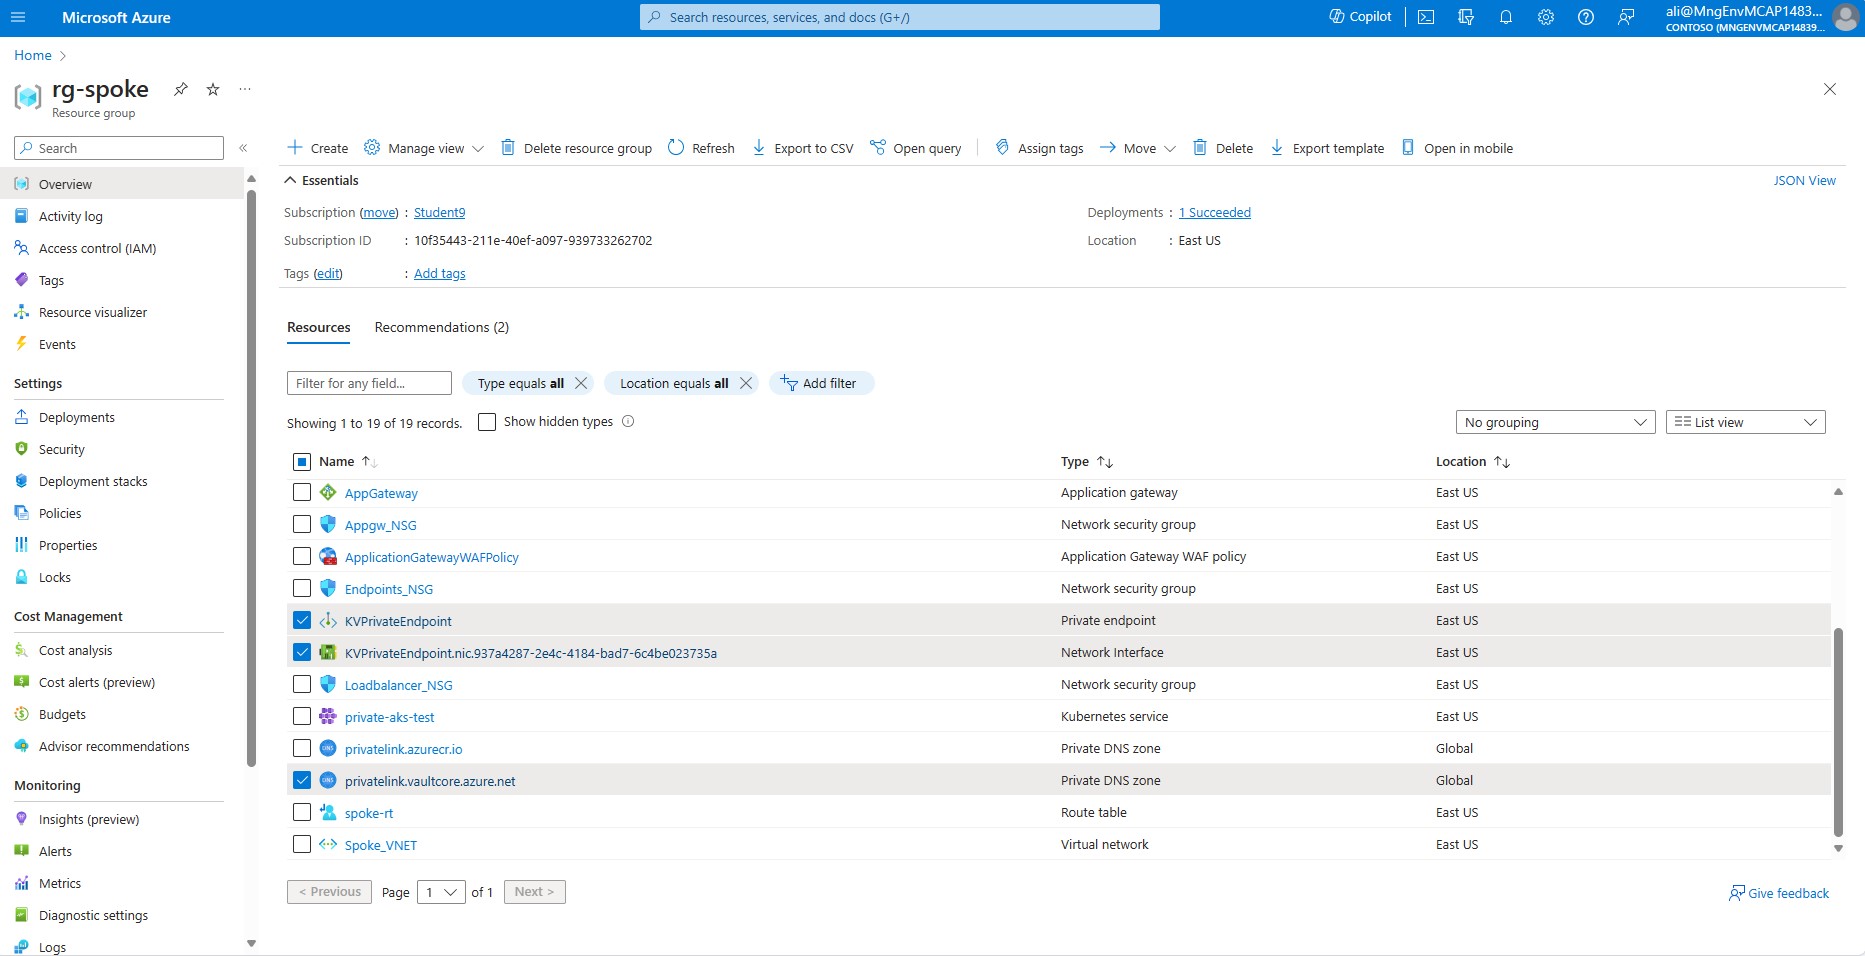
-
Select the Private DNS zone, called privatelink.vaultcore.azure.net.
-
On your left hand side menu, under Settings click on Virtual network links.
-
Validate that there is a link name called hubnetdnsconfig and the link status is set to Completed and the virtual network is set to Hub_VNET, ensure you have a link to both the hub and also the spoke, the link status should be set to completed.
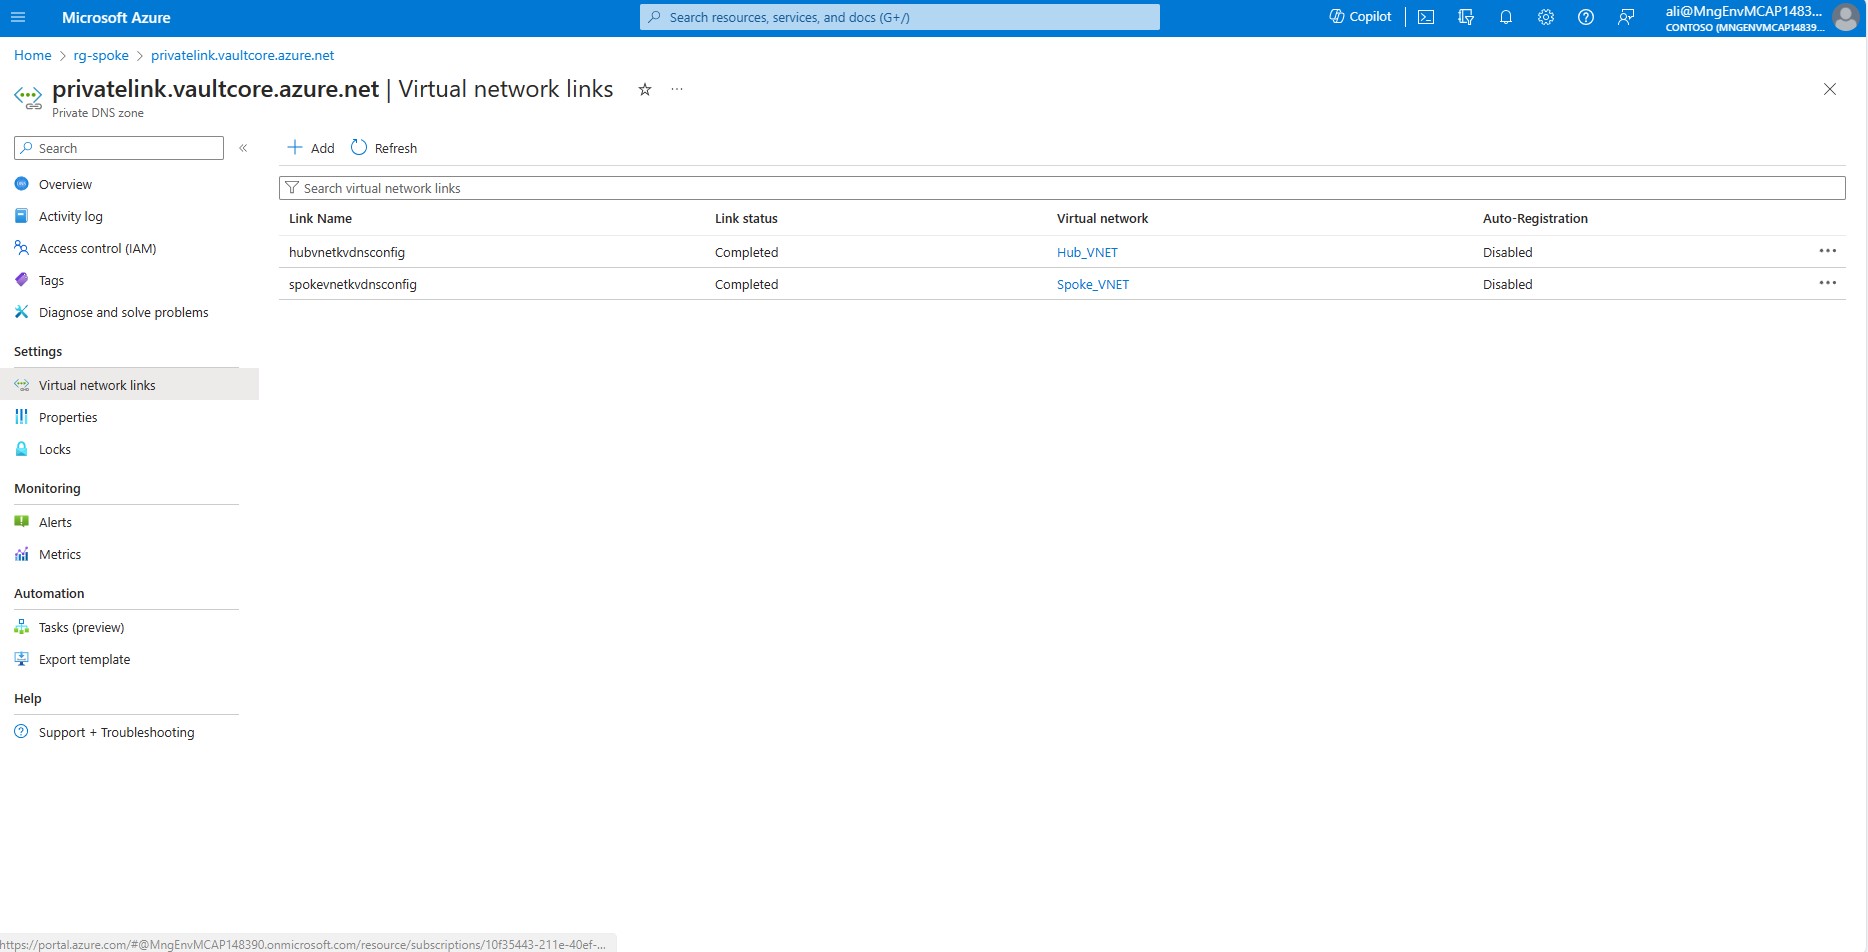
-
On the top menu, click on Home. Select Resource Groups then click on the resource group called rg-hub.
-
Select Jumpbox VM called Jumpbox-VM.
-
In the left-hand side menu, under the Connect section, select ‘Bastion’. Enter the credentials for the Jumpbox VM and verify that you can log in successfully.
In the Jumpbox VM command line type the following command and ensure it returns the private ip address of the private endpoint.
dig <KEYVAULT NAME>.vault.azure.net
Example output:
azureuser@Jumpbox-VM:~$ dig alibengtssonkeyvault.vault.azure.net

; <<>> DiG 9.18.12-0ubuntu0.22.04.3-Ubuntu <<>> alibengtssonkeyvault.vault.azure.net
;; global options: +cmd
;; Got answer:
;; ->>HEADER<<- opcode: QUERY, status: NOERROR, id: 22014
;; flags: qr rd ra; QUERY: 1, ANSWER: 2, AUTHORITY: 0, ADDITIONAL: 1

;; OPT PSEUDOSECTION:
; EDNS: version: 0, flags:; udp: 65494
;; QUESTION SECTION:
;alibengtssonkeyvault.vault.azure.net. IN A

;; ANSWER SECTION:
alibengtssonkeyvault.vault.azure.net. 60 IN CNAME alibengtssonkeyvault.privatelink.vaultcore.azure.net.
alibengtssonkeyvault.privatelink.vaultcore.azure.net. 1800 IN A10.1.2.6

;; Query time: 12 msec
;; SERVER: 127.0.0.53#53(127.0.0.53) (UDP)
;; WHEN: Sun Oct 08 16:41:05 UTC 2023
;; MSG SIZE  rcvd: 138
Now, you should have an infrastructure that looks like this:
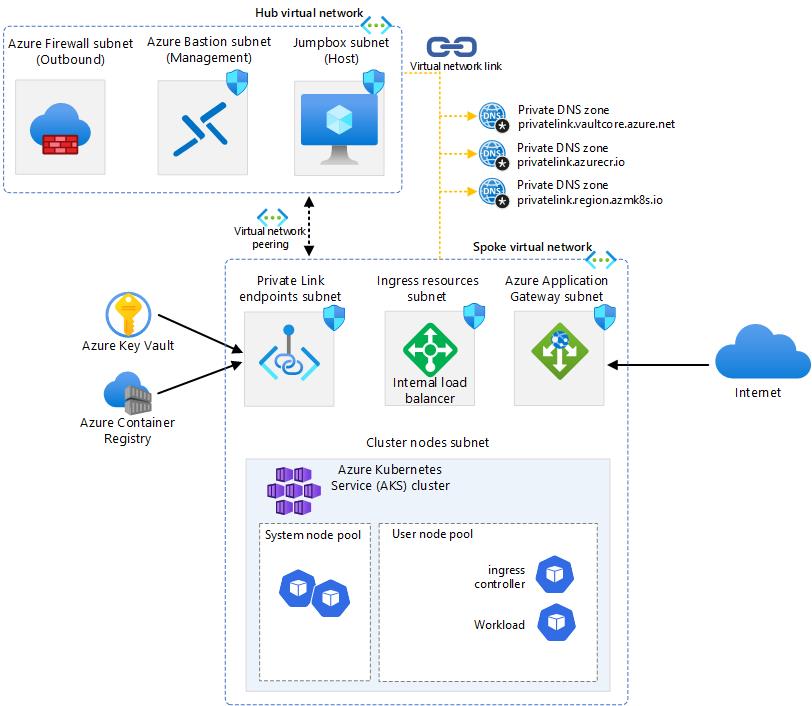
1.1.4 Add a Secret to Azure KeyVault
We have successfully created an instance of Azure KeyVault with a private endpoint and set up a private DNS zone to resolve the Azure KeyVault instance from the hub and spoke using Virtual Network links. Additionally, we have updated our AKS cluster to support OIDC, enabling workload identity.
The next step is to add a secret to Azure KeyVault instance.
[!IMPORTANT] Because the Azure KeyVault is isolated in a VNET, you need to access it from the Jumpbox VM. Please log in to the Jumpbox VM, and set a few environment variables (or load all environment variables you stored in a file):
SPOKE_RG=rg-spoke
LOCATION=eastus
FRONTEND_NAMESPACE="frontend"
BACKEND_NAMESPACE="backend"
SERVICE_ACCOUNT_NAME="workload-identity-sa"
SUBSCRIPTION="$(az account show --query id --output tsv)"
USER_ASSIGNED_IDENTITY_NAME="keyvaultreader"
FEDERATED_IDENTITY_CREDENTIAL_NAME="keyvaultfederated"
KEYVAULT_SECRET_NAME="redissecret"
AKS_CLUSTER_NAME=private-aks
KEYVAULT_NAME=<WRITE YOUR KEYVAULT NAME HERE>
STUDENT_NAME=<WRITE YOUR STUDENT NAME HERE>
ACR_NAME=<NAME OF THE AZURE CONTAINER REGISTRY>
From the Jumpbox VM create a secret in the Azure KeyVault. This is the secret that will be used by the frontend application to connect to the (redis) backend.
az keyvault secret set --vault-name $KEYVAULT_NAME --name $KEYVAULT_SECRET_NAME --value 'redispassword'
1.1.5 Add the KeyVault URL to the Environment Variable KEYVAULT_URL
export KEYVAULT_URL="$(az keyvault show -g $SPOKE_RG -n $KEYVAULT_NAME --query properties.vaultUri -o tsv)"
1.1.6 Create a managed identity and grant permissions to access the secret
Create a User Managed Identity. We will give this identity GET access to the keyvault, and later associate it with a Kubernetes service account.
az account set --subscription $SUBSCRIPTION
az identity create --name $USER_ASSIGNED_IDENTITY_NAME  --resource-group $SPOKE_RG  --location $LOCATION  --subscription $SUBSCRIPTION
Set an access policy for the managed identity to access the Key Vault.
export USER_ASSIGNED_CLIENT_ID="$(az identity show --resource-group $SPOKE_RG  --name $USER_ASSIGNED_IDENTITY_NAME  --query 'clientId' -otsv)"

az keyvault set-policy --name $KEYVAULT_NAME  --secret-permissions get --spn $USER_ASSIGNED_CLIENT_ID
1.1.7 Connect to the Cluster
First, connect to the cluster if not already connected
az aks get-credentials -n $AKS_CLUSTER_NAME-${STUDENT_NAME} -g $SPOKE_RG
1.1.8 Create Service Account
The service account should exist in the frontend namespace, because it's the frontend service that will use that service account to get the credentials to connect to the (redis) backend service.
[!Note] Instead of creating kubenetes manifest files, we will create them on the command line like below. In a real life case, you would create manifest files and store them in a version control system, like git.
First create the frontend namespace
cat <<EOF | kubectl apply -f -
apiVersion: v1
kind: Namespace
metadata:
  name: $FRONTEND_NAMESPACE
  labels:
    name: $FRONTEND_NAMESPACE
EOF
Verify that the namespace called frontend has been created.
kubectl get ns
Then create a service account in that namespace. Notice the annotation for workload identity
cat <<EOF | kubectl apply -f -
apiVersion: v1
kind: ServiceAccount
metadata:
  namespace: $FRONTEND_NAMESPACE
  annotations:
    azure.workload.identity/client-id: $USER_ASSIGNED_CLIENT_ID
  name: $SERVICE_ACCOUNT_NAME
EOF
1.1.9 Establish Federated Identity Credential
In this step we connect the Kubernetes service account with the user defined managed identity in Azure, using a federated credential.
az identity federated-credential create --name $FEDERATED_IDENTITY_CREDENTIAL_NAME --identity-name $USER_ASSIGNED_IDENTITY_NAME --resource-group $SPOKE_RG --issuer $AKS_OIDC_ISSUER --subject system:serviceaccount:$FRONTEND_NAMESPACE:$SERVICE_ACCOUNT_NAME
1.1.10 Build the Application
Now its time to build the application. In order to do so, first clone the applications repository:
git clone https://github.com/pelithne/az-vote-with-workload-identity.git
In order to push images, you may have to login to the registry first using your Azure AD identity:
az acr login --name $ACR_NAME
Then run the following commands to build, tag and push your container image to the Azure Container Registry
cd az-vote-with-workload-identity
cd azure-vote
docker build -t azure-vote-front:v1 .
docker tag azure-vote-front:v1 $ACR_NAME.azurecr.io/azure-vote-front:v1
docker push $ACR_NAME.azurecr.io/azure-vote-front:v1
The string after : is the image tag. This can be used to manage versions of your app, but in this case we will only have one version.
1.1.11 Deploy the Application
We want to create some separation between the frontend and backend, by deploying them into different namespaces. Later we will add more separation by introducing network policies in the cluster to allow/disallow traffic between specific namespaces.
First, create the backend namespace
[!Note] Instead of creating kubernetes manifest, we put them inline for convenience. Feel free to create yaml-manifests instead if you like.
cat <<EOF | kubectl apply -f -
apiVersion: v1
kind: Namespace
metadata:
  name: backend
  labels:
    name: backend
EOF
Verify that the namespace called backend has been created.
kubectl get ns
Then create the Backend application, which is a Redis store which we will use as a "database". Notice how we inject a password to Redis using an environment variable (not best practice obviously, but for simplicity).
cat <<EOF | kubectl apply -f -
apiVersion: apps/v1
kind: Deployment
metadata:
  name: azure-vote-back
  namespace: $BACKEND_NAMESPACE
spec:
  replicas: 1
  selector:
    matchLabels:
      app: azure-vote-back
  template:
    metadata:
      labels:
        app: azure-vote-back
    spec:
      nodeSelector:
        "kubernetes.io/os": linux
      containers:
      - name: azure-vote-back
        image: mcr.microsoft.com/oss/bitnami/redis:6.0.8
        ports:
        - containerPort: 6379
          name: redis
        env:
        - name: REDIS_PASSWORD
          value: "redispassword"
---
apiVersion: v1
kind: Service
metadata:
  name: azure-vote-back
  namespace: $BACKEND_NAMESPACE
spec:
  ports:
  - port: 6379
  selector:
    app: azure-vote-back
EOF
Then create the frontend. We already created the frontend namespace in an earlier step, so ju go ahead and create the frontend app in the frontend namespace.
[!Note] A few things worh noting:
azure.workload.identity/use: "true"- This is a label that tells AKS that workload identity should be usedserviceAccountName: $SERVICE_ACCOUNT_NAME- Specifies that this resource is connected to the service account created earlierimage: $ACR_NAME.azurecr.io/azure-vote:v1- The image with the application built in a previous step.service.beta.kubernetes.io/azure-load-balancer-ipv4: $ILB_EXT_IP- This "hard codes" the IP address of the internal LB to match what was previously configured in App GW as backend.
cat <<EOF | kubectl apply -f -
apiVersion: apps/v1
kind: Deployment
metadata:
  name: azure-vote-front
  namespace: $FRONTEND_NAMESPACE
  labels:
    azure.workload.identity/use: "true"
spec:
  replicas: 1
  selector:
    matchLabels:
      app: azure-vote-front
  strategy:
    rollingUpdate:
      maxSurge: 1
      maxUnavailable: 1
  minReadySeconds: 5
  template:
    metadata:
      labels:
        app: azure-vote-front
        azure.workload.identity/use: "true"
    spec:
      serviceAccountName: $SERVICE_ACCOUNT_NAME
      nodeSelector:
        "kubernetes.io/os": linux
      containers:
      - name: azure-vote-front
        image: $ACR_NAME.azurecr.io/azure-vote-front:v1
        ports:
        - containerPort: 80
        resources:
          requests:
            cpu: 250m
          limits:
            cpu: 500m
        env:
        - name: REDIS
          value: "azure-vote-back.backend"
        - name: KEYVAULT_URL
          value: $KEYVAULT_URL
        - name: SECRET_NAME
          value: $KEYVAULT_SECRET_NAME
---
apiVersion: v1
kind: Service
metadata:
  name: azure-vote-front
  namespace: $FRONTEND_NAMESPACE
  annotations:
    service.beta.kubernetes.io/azure-load-balancer-internal: "true"
    service.beta.kubernetes.io/azure-load-balancer-internal-subnet: "loadbalancer-subnet"
spec:
  type: LoadBalancer
  ports:
  - port: 80
  selector:
    app: azure-vote-front
EOF
1.1.12 Validate the Application
To test if the application is working, you can navigate to the URL used before to reach the nginx test application. This time the request will be redirected to the Azure Vote frontend instead. If that works, it means that the Azure Vote frontend pod was able to fetch the secret from Azure KeyVault, and use it when connecting to the backend (Redis) service/pod.
You can also verify in the application logs that the frontend was able to connect to the backend.
To do that, you need to find the name of the pod:
kubectl get pods --namespace frontend
This should give a result timilar to this
NAME                                READY   STATUS    RESTARTS        AGE
azure-vote-front-85d6c66c4d-pgtw9   1/1     Running   29 (7m3s ago)   3h13m
Now you can read the logs of the application by running this command (but with YOUR pod name)
kubectl logs azure-vote-front-85d6c66c4d-pgtw9 --namespace frontend
You should be able to find a line like this:
Connecting to Redis... azure-vote-back.backend
And then a little later:
Connected to Redis!
1.1.13 Workload Network Policy
The cluster is deployed with Azure network policies. The Network policies can be used to control traffic between resources in Kubernetes.
This first policy will prevent all traffic to the backend namespace.
cat <<EOF | kubectl apply -f -
apiVersion: networking.k8s.io/v1
kind: NetworkPolicy
metadata:
  name: deny-ingress-to-backend
  namespace: backend
spec:
  podSelector: {}
  ingress:
  - from:
    - podSelector:
        matchLabels: {}
EOF
Network policies are applied on new TCP connections, and because the frontend application has already created a persistent TCP connection with the backend it might have to be redeployed for the policy to hit. One way to do that is to simply delete the pod and let it recreate itself:
First find the pod name
kubectl get pods --namespace frontend
This should give a result timilar to this
NAME                                READY   STATUS    RESTARTS        AGE
azure-vote-front-85d6c66c4d-pgtw9   1/1     Running   29 (7m3s ago)   3h13m
Now delete the pod with the following command (but with YOUR pod name)
kubectl delete pod --namespace frontend azure-vote-front-85d6c66c4d-pgtw9
After the deletion has finished you should be able to se that the "AGE" of the pod has been reset.
kubectl get pods --namespace frontend

NAME                                READY   STATUS    RESTARTS        AGE
azure-vote-front-85d6c66c4d-9wtgd   1/1     Running   0               25s
You should also find that the frontend can no longer communicate with the backend and that when accessing the URL of the app, it will time out.
Now apply a new policy that allows traffic into the backend namespace from pods that have the label app: azure-vote-front
cat <<EOF | kubectl apply -f -
apiVersion: networking.k8s.io/v1
kind: NetworkPolicy
metadata:
  name: allow-from-frontend
  namespace: backend # apply the policy in the backend namespace
spec:
  podSelector:
    matchLabels:
      app: azure-vote-back # select the redis pod
  ingress:
  - from:
    - namespaceSelector:
        matchLabels:
          name: frontend # allow traffic from the frontend namespace
      podSelector:
        matchLabels:
          app: azure-vote-front # allow traffic from the azure-vote-front pod
EOF
Once again you have to recreate the pod, so that it can establish a connection to the backend service. Or you can simply wait for Kubernetes to attemt to recreate the frontend pod.
First find the pod name
kubectl get pods --namespace frontend
Then delete the pod (using the name of your pod)
kubectl delete pod --namespace frontend azure-vote-front-85d6c66c4d-pgtw9
This time, communication from azure-vote-front to azure-vote-back is allowed.
1.2 Defender for Containers
Finally lets add Defender for Containers to your deployment to harden your environment even further.
Microsoft Defender for Containers is a cloud-native solution that helps you secure your containers and their applications. It protects your Kubernetes clusters from misconfigurations, vulnerabilities, and threats, whether they are running on Azure, AWS, GCP, or on-premises. With Microsoft Defender for Containers, you can:
- Harden your environment by continuously monitoring your cluster configurations and applying best practices.
- Assess your container images for known vulnerabilities and get recommendations to fix them.
- Protect your nodes and clusters from run-time attacks and get alerts for suspicious activities.
- Discover your data plane components and get insights into your Kubernetes and environment configuration.
Microsoft Defender for Containers is part of Microsoft Defender for Cloud, a comprehensive security solution that covers your cloud workloads and hybrid environments. You can enable it easily from the Azure portal and start improving your container security today. Learn more about Microsoft Defender for Containers from this article.
During this activity you will:
- Scan container image for vulnerabilities.
- Simulate a security alert for Kubernetes workload.
- Investigate and review vulnerabilities.
Import the metasploit vulnerability emulator docker image from Docker Hub to your Azure container registry.
1.2.1 Prerequisites
Update the firewall to allow AKS to pull images from docker hub.
az network firewall application-rule create --collection-name 'aksdockerhub' --firewall-name $FW_NAME -n 'Allow_Azmon' --source-addresses '*' --protocols 'http=80' 'https=443' --target-fqdns "*.docker.io" "auth.docker.io" "registry-1.docker.io" "*.monitor.azure.com" "production.cloudflare.docker.com" --action Allow --priority 103 --resource-group $HUB_RG
Please make sure that Microsoft Defender for Containers is activated on your subscription. Here are the steps you can follow to enable it.
[!IMPORTANT] Before proceeding with this lab exercise, it is necessary to enable Microsoft Defender for Cloud.
Validate Microsoft Defender for Cloud in the Azure portal.
-
Navigate to the Azure portal at https://portal.azure.com and enter your login credentials.
-
Type in Microsoft Defender for Cloud in the search field.
-
From the drop down menu click on Microsoft Defender for Cloud.
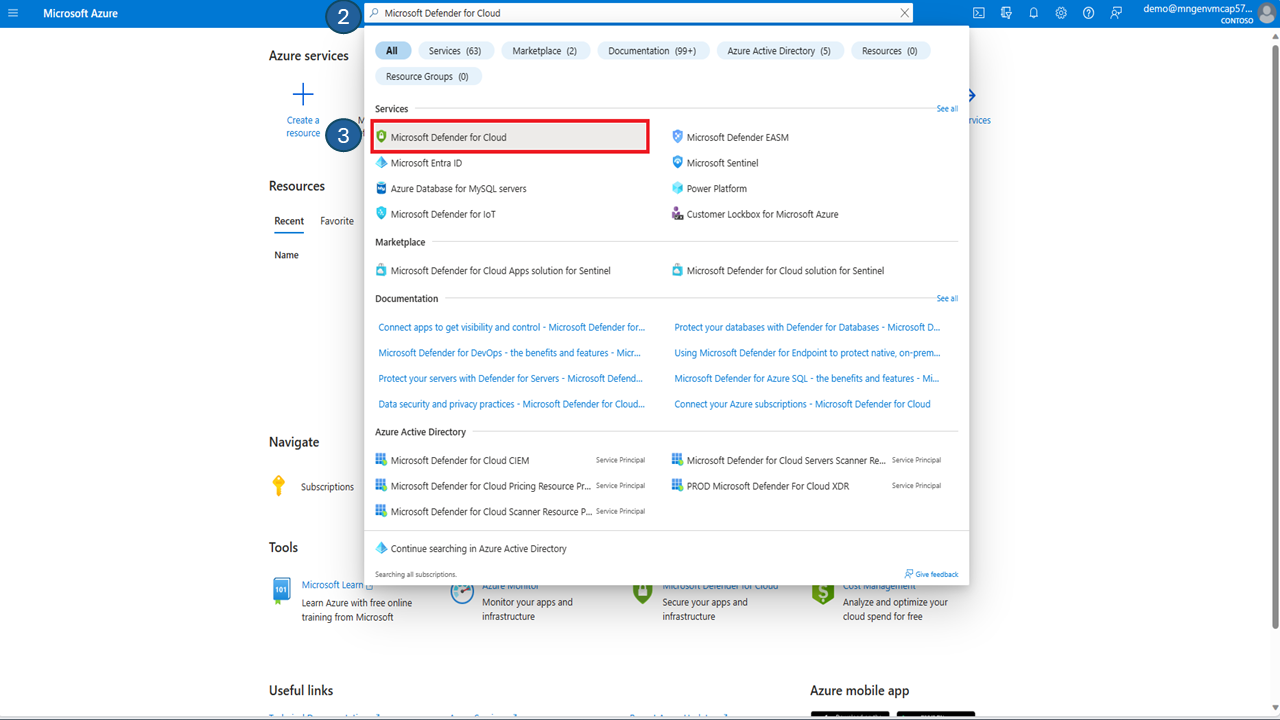
-
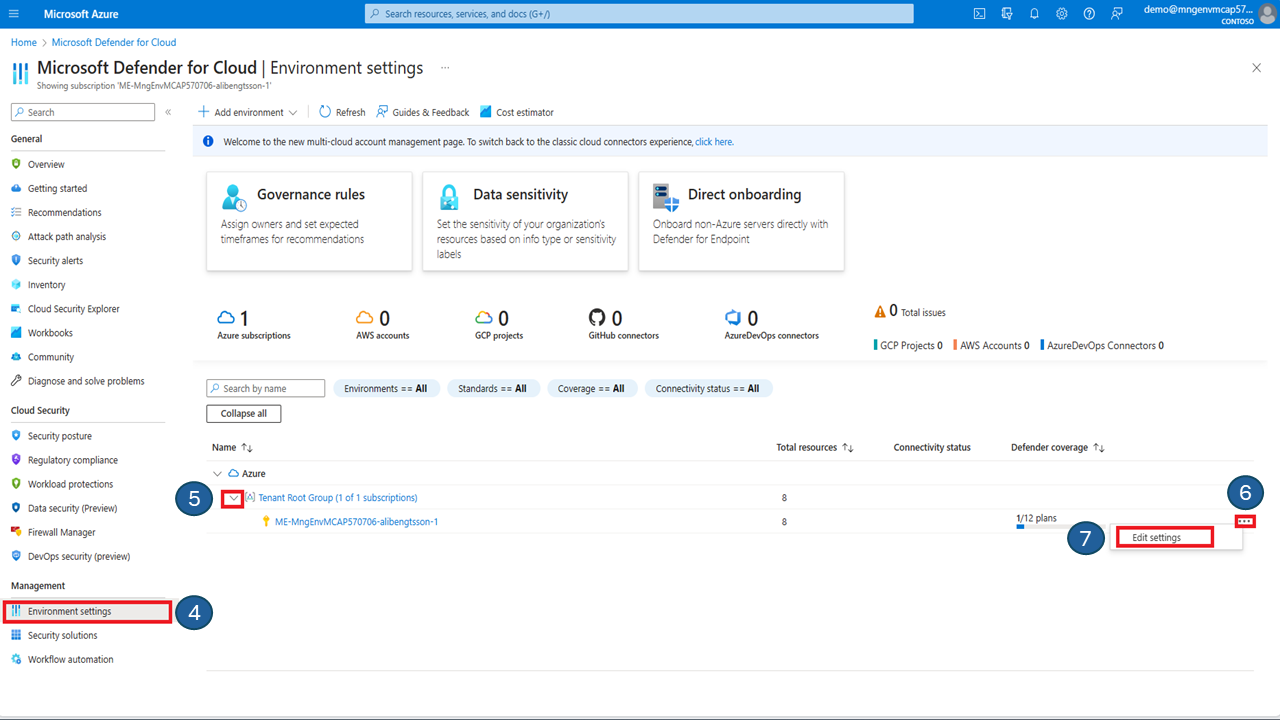
Click on Environment settings in the left hand side menu under the Management section.
-
Expand the Tenant Root Group
-
On the far right hand side of the subscription click on the three dots to open the context menu.
-
From the context menu click on Edit settings.
-
Valiate that Defender CSPM is enabled (toggle button set to On) and that monitoring coverage is set to Full.
-
Validate that the container plans is enabled (toggle button set to On) and that monitoring coverage is set to Full.
-
Login to your jumpbox, lets ensure that the Defender security profile is deployed onto your AKS cluster. run the following command:
kubectl get po -n kube-system | grep -i microsoft*
Example output:
azureuser@Jumpbox-VM:~$ kubectl get po -n kube-system | grep -i microsoft*
microsoft-defender-collector-ds-5spnc                  2/2     Running   0          79m
microsoft-defender-collector-ds-bqs96                  2/2     Running   0          79m
microsoft-defender-collector-ds-fxh7r                  2/2     Running   0          79m
microsoft-defender-collector-misc-65b968c857-nvnpk     1/1     Running   0          79m
microsoft-defender-publisher-ds-qzzl8                  1/1     Running   0          79m
microsoft-defender-publisher-ds-vk8xl                  1/1     Running   0          79m
microsoft-defender-publisher-ds-x6dxw                  1/1     Running   0          79m
azureuser@Jumpbox-VM:~$
1.2.2 Generate a Security Alert for Kubernetes Workload
Login to the jumpbox and launch a pod that executes a test command, to simulate a security alert in Microsoft Defender for cloud.
Create a blank file with the following command.
vim mdctest.yaml
In the editor that appears, paste this YAML manifest, which will launch a pod named mdc-test with ubuntu version 18.04 as container image.
apiVersion: v1
kind: Pod
metadata:
    name: mdc-test
spec:
    containers:
        - name: mdc-test
          image: ubuntu:18.04
          command: ["/bin/sh"]
          args: ["-c", "while true; do echo sleeping; sleep 9600;done"]
Save and quit.
Apply the configuration in the file mdctest.yaml. this will create a Pod in the namespace default.
kubectl apply -f mdctest.yaml
Verify that the Pod is in a running state:
kubectl get pods
Example output:
NAME       READY   STATUS    RESTARTS   AGE
mdc-test   1/1     Running   0          8s
Lets run a bash shell inside the container named mdc-test. The bash shell is a common command-line interface that allows you to run various commands and scripts. To do this, we use the following command:
kubectl exec -it mdc-test -- bash
We now whant to copy and run the echo binary, which is a program which prints its arguments to the standard output. this is useful for testing the security alert system in Microsoft Defender for Cloud.
Copy the echo binary to a file named asc_alerttest_662jfi039n in the current working directory.
cp /bin/echo ./asc_alerttest_662jfi039n
Execute the echo binary and print "testing eicar pipe" to the standard out.
./asc_alerttest_662jfi039n testing eicar pipe
Example output:
mdc@mdc-test: ./asc_alerttest_662jfi039n testing eicar pipe
testing eicar pipe
Verify that Microsoft defender has triggered a security alert in Microsoft Defender for Cloud.
-
Go to https://portal.azure.com in your browser and log in if needed.
-
Once you have successfully logged in to Azure, Type in Microsoft Defender for Cloud in the search field.
-
From the drop down menu click on Microsoft Defender for Cloud.

-
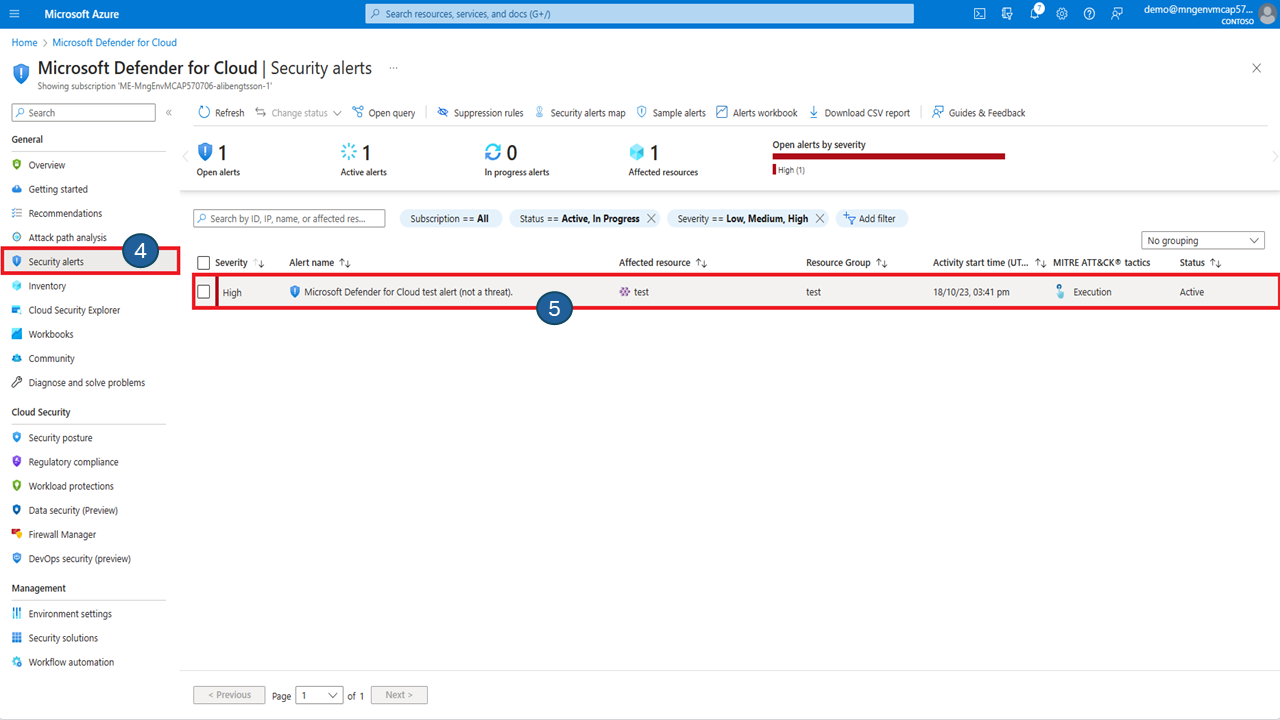
On your left hand side menu, under General section click on Security alerts.
-
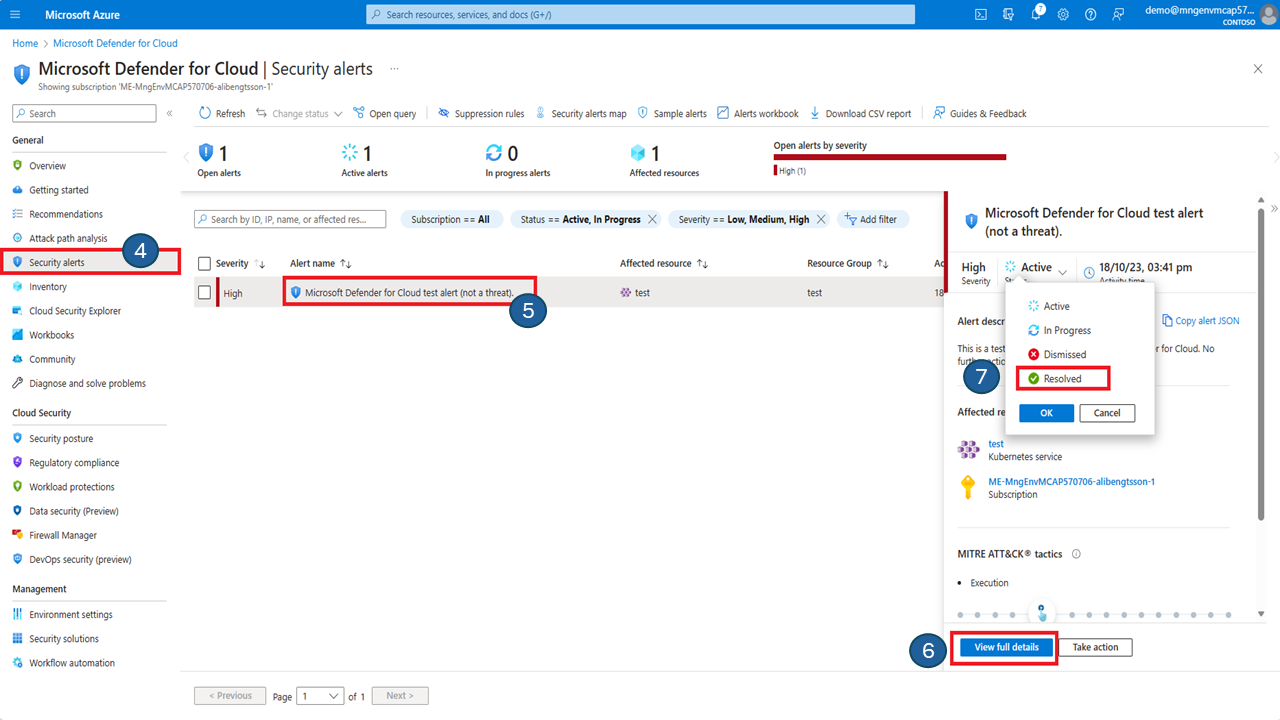
You should now see the Security alert, generated by Microsoft Cloud Defender. Click on the Alert.
-
Review the security assessment by clicking on View full details.
-
Once you have reviewed the details of the simulated security alert. Put the status of the alert from Active to Resolved. The security alert will dissapear from the security alert list.
- Delete the running pod from the AKS cluster
kubectl delete pods mdc-test
1.2.3 Import Vulnerable image to Container Registry
login to your container registry:
az acr login --name <ACR_NAME>
Download the docker image to your jumpbox VM:
docker pull docker.io/vulnerables/metasploit-vulnerability-emulator
Tag the docker image:
docker tag vulnerables/metasploit-vulnerability-emulator $ACR_NAME.azurecr.io/metasploit-vulnerability-emulator
Push the vulnerable docker image to azure container registry.
docker push $ACR_NAME.azurecr.io/metasploit-vulnerability-emulator
1.2.4 Review Microsoft Defender for Containers Recommendations
In this section, you will learn how to review the security recommendations that Defender for Containers generates for your clusters and containers. These recommendations are based on the continuous assessment of your configurations and the comparison with the initiatives applied to your subscriptions. You will also learn how to investigate and remediate the issues that are identified by Defender for Containers.
-
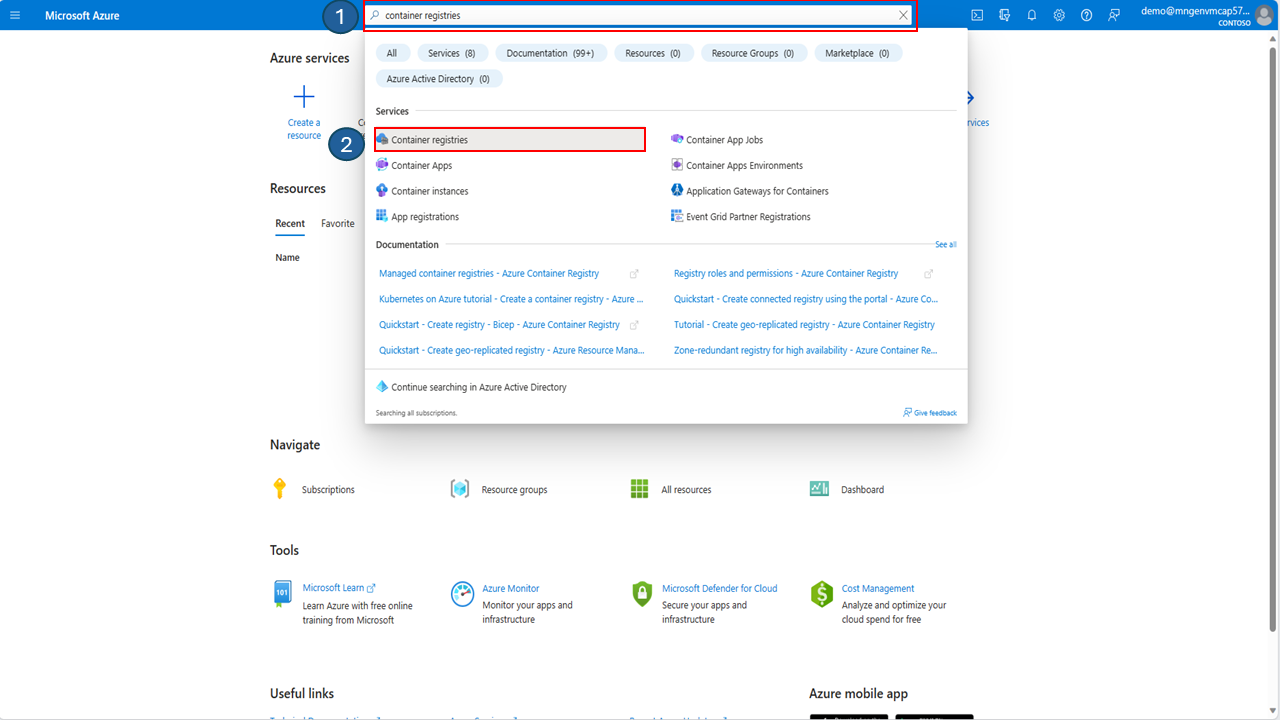
In the Azure portal, Type in Container registries in the search field.
-
From the drop down menu click on Container Registries.
- Click on your container registry from the list.
-
On the menu to the left hand side click on Microsoft Defender for Cloud to view your recommendations.
-
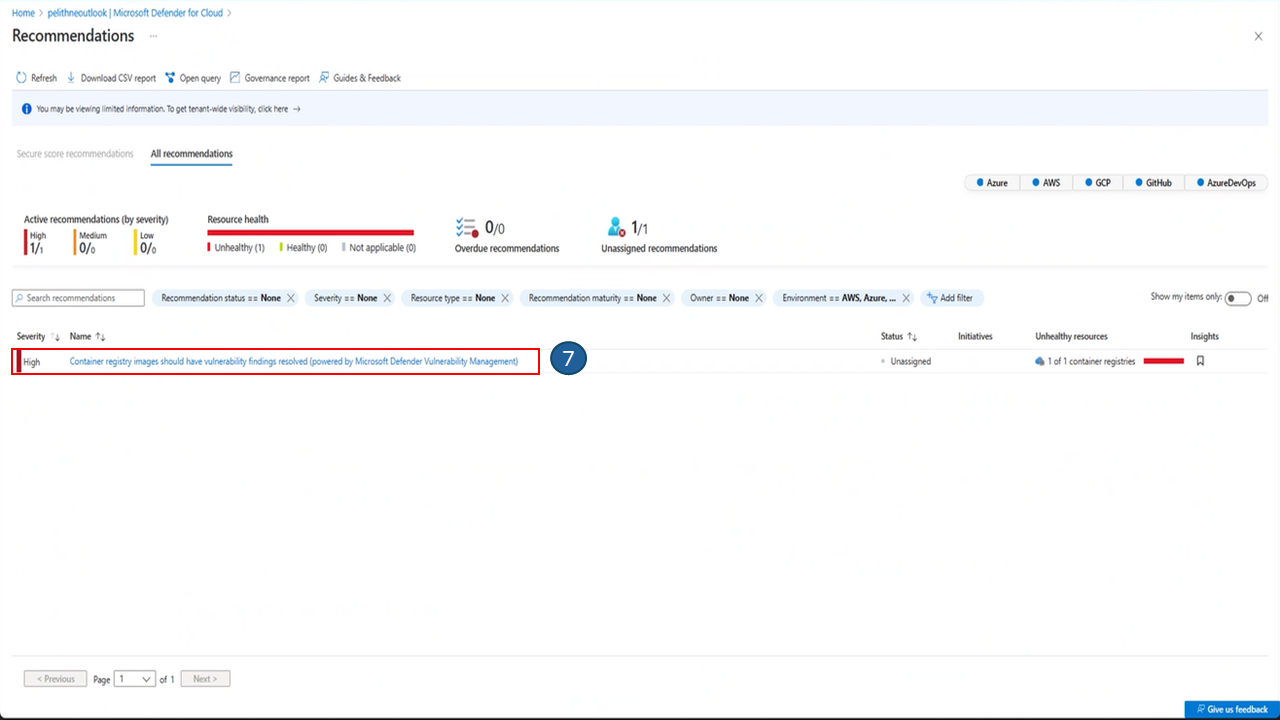
Notice that we have a new recommendation called Container registry image should have vulnerability findings resolved
-
To learn how to fix the vulnerability, click on view additonal recommendations in Defender for cloud
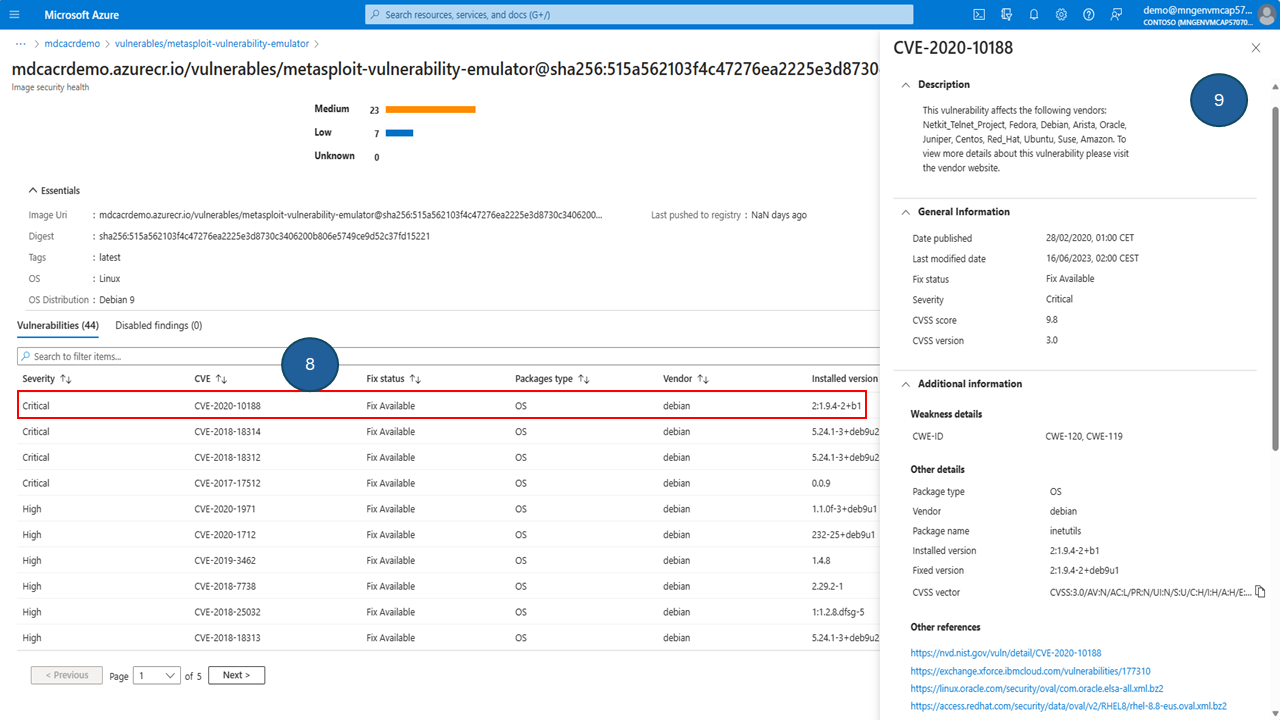
- To get more details and mitigation steps for a specific vulnerability, select it from the list. Microsoft Defender for cloud will guide you to harden your container image.
-
Select or search for a CVE under the vulnerabilities from the list.
-
Review the detailed recommendations from Microsoft Defender for Cloud.
 Microsoft