Azure Notebooks
Azure Notebooks is a free hosted service to develop and run Jupyter notebooks in the cloud with no installation. Jupyter (formerly IPython) is an open source project that lets you easily combine markdown text, executable code (Python, R, and F#), persistent data, graphics, and visualizations onto a single, sharable canvas called a notebook.
How to Share your Jupyter Notebooks?
Academics can simply share the link to their Azure Notebook using the Share Notebooks feature https://docs.microsoft.com/en-us/azure/notebooks/quickstart-clone-jupyter-notebook#share-a-notebook
Share a notebook
-
To share your copy of the cloned project, use the Share control or obtain a link, obtain HTML or Markdown code that contains the link, or create an email message with the link:

-
Because you cleared the Public option when cloning the project, the clone is private. To make your copy public, select Project Settings, set the Public project option in the popup, and then select Save.
-
Select a notebook in the project to run it. Each notebook in the Azure Cognitive Services repository, for example, is its own self-contained Quickstart. The image below shows the result of using the BingImageSearchAPI notebook, after adding a Cognitive Services API subscription key and changing the search term "puppies" to "bunnies":

-
When you're done running the notebook, select File > Close and halt to close the notebook and its browser window.
-
To share an individual notebook in the project, right-click the notebook and select Copy link (keyboard shortcut: y):

-
To edit files other than notebooks, right-click the file in the project and select Edit file (keyboard shortcut: i). The default action, Run (keyboard shortcut: r), only shows the file contents and doesn't allow editing.
Share a Jupyter notebook via email or link
Or you can simply take the URL https://notebooks.azure.com/jakevdp/projects/pythondatasciencehandbook and post this to your LMS for student to access.
Clone Jupyter Notebooks from GitHub to Azure Notebooks
-
Go to Azure Notebooks and sign in. (For details, see Quickstart - Sign in to Azure Notebooks).
-
From your public profile page, select My Projects at the top of the page:

-
On the My Projects page, select the up arrow button (keyboard shortcut: U; the button appears as Upload GitHub Repo when the browser window is wide enough):

-
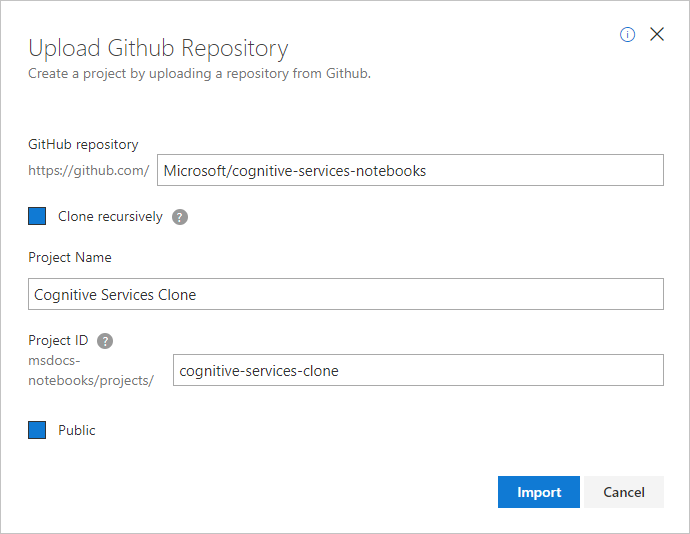
In the Upload GitHub Repository that appears, enter or set the following details, then select Import:
-
GitHub repository: Microsoft/cognitive-services-notebooks (this name clones the Jupyter notebooks for Azure Cognitive Services at https://github.com/Microsoft/cognitive-services-notebooks).
-
Clone recursively: (cleared)
-
Project name: Cognitive Services Clone
-
Project ID: cognitive-services-clone
-
Public: (cleared)

-
-
Be patient while the process completes; cloning a repository can take a few minutes.
-
Once cloning is finished, Azure Notebooks takes you to the new project where you can see the copies of all the files.
Share a Projects with Students
Projects can be thought of as a grouping of related notebooks. They can be Private or Public (default). Projects are how a group of notebooks is generally shared with others. You can also share an individual notebook directly via its URL. In a project, right click the Notebook and do a Copy URL – do not use the URL you see in your browser.
Notebooks can currently be added to a project in different ways:
- From your disk (computer)
- From a URL
- From withing Juptyer using the New and Upload buttons
When you add a notebook directly from Jupyter, it will end up in your currently active project (Default or another one you created).
What can users do with a shared project/notebook?
- If you are a teacher or giving a seminar, you can share your notebook with students to follow along. Simply share your project's link with them.
- Users will see a fully functional, copy of your notebook that they can run, edit, download, etc.
-
To Share a notebook:
- On the main home page, click on "Projects"
- Click on "+New Project" on the right hand side - this will create a project for you and give you a shareable link

- Now that you have a project, you can place one or more notebooks in there.
- Click "+Add Notebooks" and upload a local notebook that you downloaded earlier.
- Launch the project and you can create notebooks in Jupyter as well.
- You can always change the name of your project by clicking the pencil icon.
- You can share your project using the share icon to the right of the pencil.
- Every project is sharable and a user will be given the ability to clone and run a copy of the project when you share the link to them.

Launching a Jupyter Notebook with a click to launch button
You can simply add notebooks launch button to your LMS or directly to your GitHub repo or within a HTML Page or your LMS
The example below launches Jake VanderPlas book on Azure Notebooks
This works by simply using the following code.
<a href="Link to your Azure Notebook" rel="nofollow"><img src="https://notebooks.azure.com/launch.png" border="0" data-canonical-src="https://notebooks.azure.com/launch.png"></a></p>
 Microsoft