- Home
- Security, Compliance, and Identity
- Core Infrastructure and Security Blog
- Installing the Microsoft Identity Manager 2016 Service and Portal (With SSPR) - Clean Install
- Subscribe to RSS Feed
- Mark as New
- Mark as Read
- Bookmark
- Subscribe
- Printer Friendly Page
- Report Inappropriate Content
First published on MSDN on Aug 26, 2015
As you may be aware, the new version of identity – Microsoft Identity Manager 2016 – has been released. While the in-place upgrade of the service and portal from FIM 2010 R2 to MIM 2016 is covered in great detail here , I would like to take some time and step through a brand new fresh install of the MIM 2016 service and portal server. This, of course, assumes the MIM 2016 sync service has already been installed. For a post covering that installation, please see here .
The environment I’m using is Windows Server 2012 with SQL Server 2012 SP1 and SharePoint Foundation 2013. To use SharePoint Foundation 2013 some additional configuration is necessary. Luckily, The Connector Space has your back and a configuration script to do the work for you can be found here . The remaining prerequisites (.Net, SQL Native Client if SQL is off-box, etc.) remain largely unchanged from FIM 2010.
To begin, navigate to the installation media and double-click on “FIMSplash” to run it. This will open the MIM installation menu:

Under “Identity Manager Service and Portal”, select “Install Service and Portal”, then click “Run”

This will launch the “Microsoft Identity Manager 2016 – Service and Portal” installation wizard. Click “Next” to continue.

Read and accept the EULA, then click “Next”

Choose whether or not to participate in the improvement program, then click “Next” to continue.

In this scenario, we will also be installing the Password Registration and Password Reset portals. If you do not wish to install these, deselect them here. Similarly, if you would like to install MIM Reporting or Privileged Access Management (PAM) select them here. For either of the above two scenarios, check back later as we will be documenting both in the near future. Click “Next” to continue.

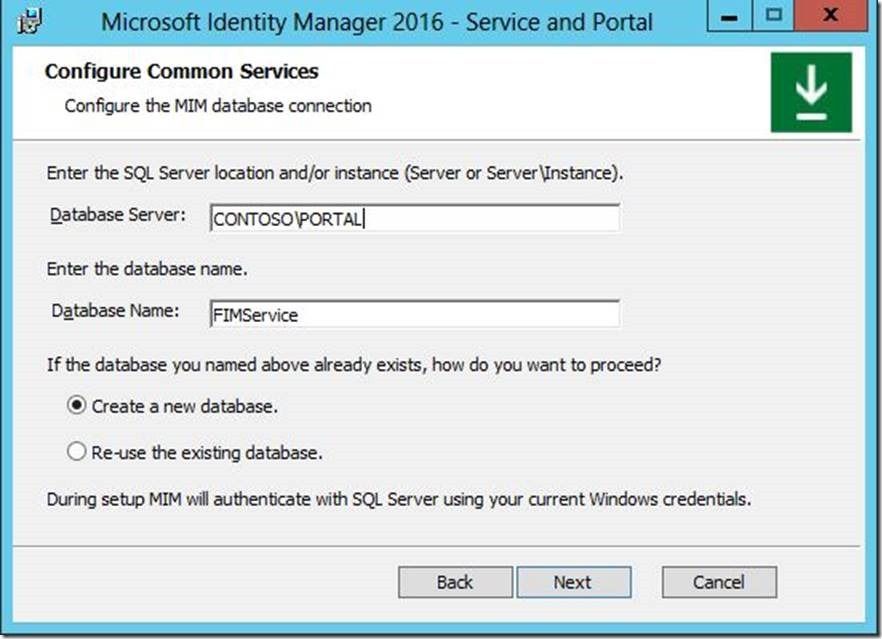
Enter the Microsoft SQL database and instance name, as well as the database name (FIMService) and select “Create a new database”. Click “Next” to continue.
Enter a mail server or relay for MIM to use for mail notification, and select any appropriate checkboxes, then click “Next” to continue.

Select “Generate a new self-issued certificate”. Alternately, you may also choose to “Select a certificate in the local certificate store” if you have a CA. Either way, click “Next” to continue.

Enter the desired “Service Account Name”, as well as the “Service Account Password”, “Service Account Domain” and “Service Email Account”, then click “Next” to continue.

As with FIM 2010, you may receive a warning message here. Click “Next” as we will address this later.

Enter the name of the “Synchronization Server” (in this case, the localhost), as well as the “MIM Management Agent Account”, then click “Next”

Enter the “MIM Service Server Address”, then click “Next” to continue.

Enter the name of the “Sharepoint site collection URL:”. Please not that in FIM 2010, we typically left this as default ( http://localhost ). However, seeing as how SharePoint 2013 requires additional configuration (such as performed by the configuration script, courtesy of The Connector Space ), we need to be sure to enter this as configured. Click “Next” to continue.

Enter a “Registration Portal URL” to be used for password self-service. *Please Note* If you did not select “Password Registration Portal” earlier, you will not see this screen. Click “Next” to continue.

Check both boxes, then click “Next”. *Please Note* If you did not select “Password Registration Portal” earlier, you will not see this screen. Click “Next” to continue.

Enter an “Account Name” under which password registration should run, along with a “Password”, the “Host Name” and “Port”. Check the box to “Open port in firewall” then click “Next” to continue. *Please Note* If you did not select “Password Registration Portal” earlier, you will not see this screen. Click “Next” to continue.

As with FIM 2010, you may receive the following message. If so, click “Next” to continue.

Enter the “MIM Service Server Address”, and select either “Portal is hosted on an IIS site which can be accessed by extranet users” or “Portal is hosted on an IIS site which can be accessed only by intranet users”, then click “Next” to continue.

Enter an “Account Name” under which password reset should run, as well as a “Password”, “Host Name” and “Port”. Check the box to “Open port in firewall”, then click “Next” to continue.

As with FIM 2010, you may receive the below message. Click “Next”.

Enter the “MIM Service Server Address” and select either “Portal is hosted on an IIS site which can be accessed by extranet users” or “Portal is hosted on an IIS site which can be accessed only by intranet users”, then click “Next” to continue.

Click “Install” to begin the installation.

Depending on your environment, this may take several minutes. During this time, you may see several windows open and close. Fear not as this is expected behavior.
Click “Finish” to complete the installation.

Here we see the newly installed Microsoft Identity Manager 2016 Service Portal.

Clicking on “About Forefront Identity Manager” at the bottom of the list on the right-hand side shows:

This allows us to verify that it is in fact the correct version number.
Questions? Comments? Love FIM so much you can’t even stand it?
>WE WANT TO HEAR FROM YOU<
You must be a registered user to add a comment. If you've already registered, sign in. Otherwise, register and sign in.