First published on TECHNET on Jun 08, 2016
Do you have a missing OWA IM and Scheduling Online Meeting button for your Online Exchange users? This article will help explain why and how to fix this.
Environment
Exchange Online and Skype for Business or Lync Server On Prem or Hybrid
Pre Recs
Power shell modules for MSOL or Windows Azure Active Directory (which ever you use for DirSync), Skype for Business Online and Skype On PREM ADMIN access.
You need to be an admin on prem (RTCUniversal server admins or CSAdmins ) and in the cloud for Skype as well as a Global Admin for your 365 portal.
Software
· "Skype for Business Server 2015, Front End Server" or "Microsoft Lync Server 2013, Front End Server"
· "Microsoft Online Services Sign-in Assistant” - http://go.microsoft.com/fwlink/?LinkID=286152
· "Skype for Business Online, Windows PowerShell Module” - https://www.microsoft.com/en-us/download/details.aspx?id=39366
· Windows Azure Active Directory Module for Windows PowerShell (64-bit version) Windows Azure Active Directory Module for Windows PowerShell (64-bit version)
Find the OAuthCert
To find your Oauth cert run the Skype for Business or Lync Server 2013 Deployment wizard.
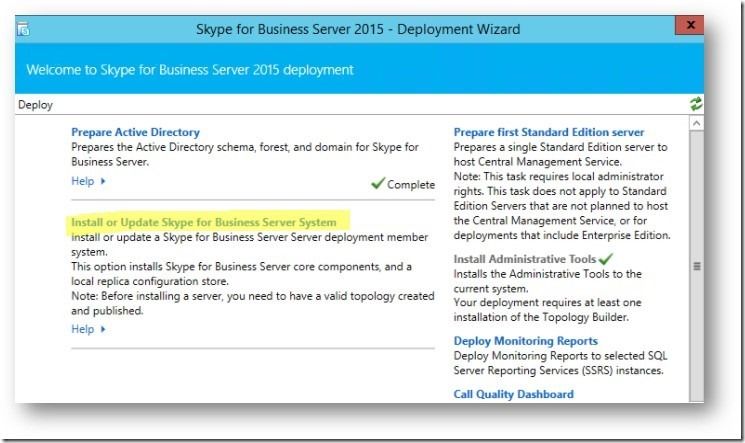
Choose Install or Update Skype for Business Server
Choose Step 3 to Request, Install, Assign Certs .
In the pop up choose the OAuthTokenIssuer and the View
You can then see the cert details by click View Certificate Details in the Next pop up.
It should look like below but with your specific Cert Info.
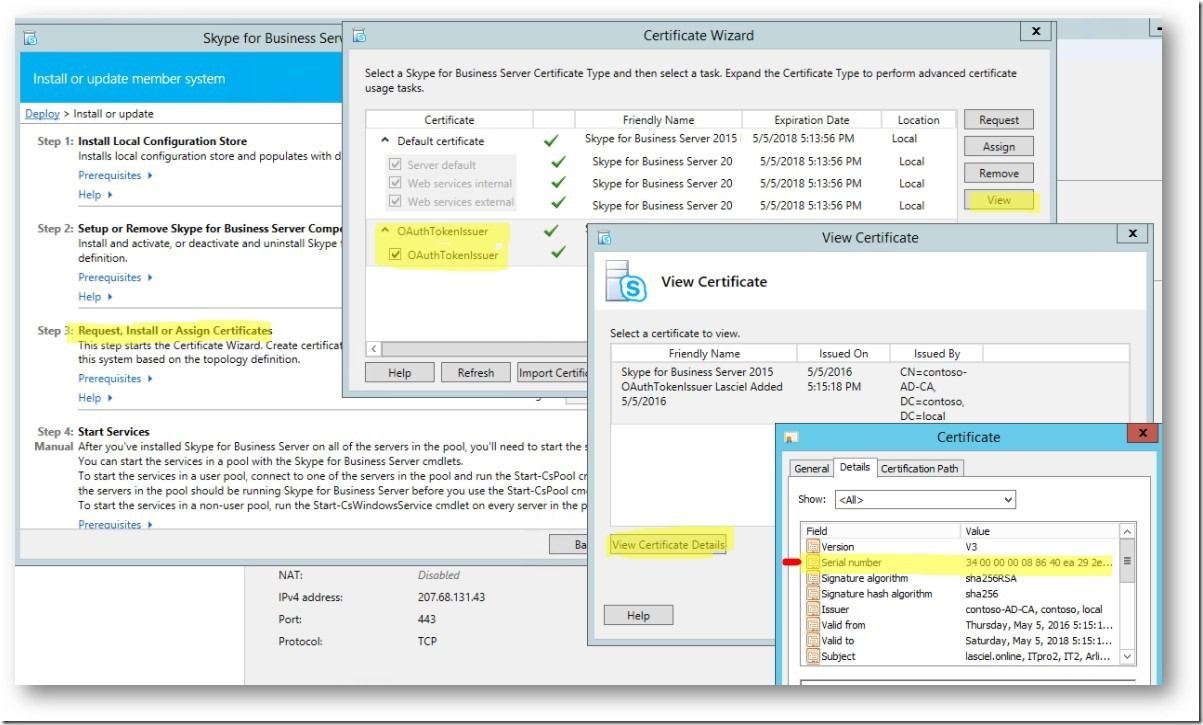
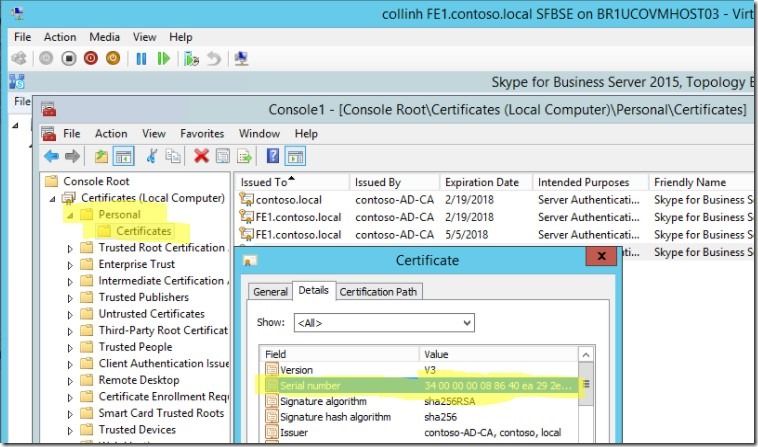
Once you are viewing the certificates please go under details and get the serial number in case you have multiple certs.
Alternatively, you can find your OAuthwith the following:
Get-CsCertificate -Type OAuthTokenIssuer
Next we will export OAuth cert.
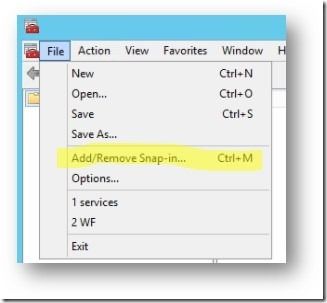
Open up an MMC and chose File > Add/Remove Snap-in
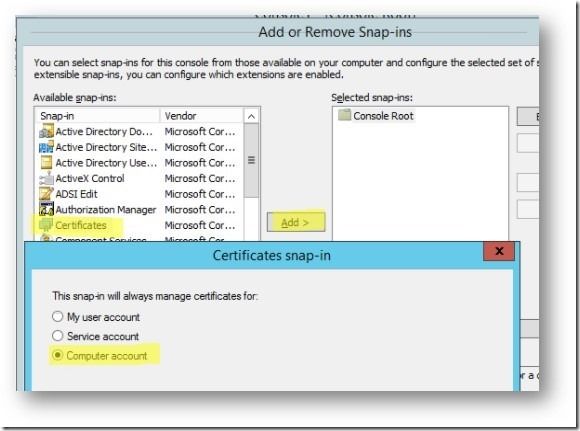
In the pop up you will Choose Certificates in the left pane, then click Add in the pop up choose Computer Account
From Here we need to Open Personal > Certificates to find the correct cert. You remembered to get the serial number didn’t you? Open the cert and click on Details and verify the correct cert to export.
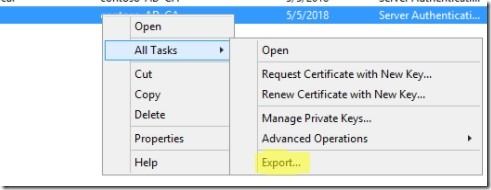
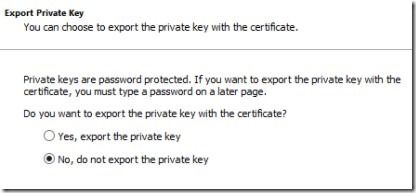
Do not export the private key when asked.
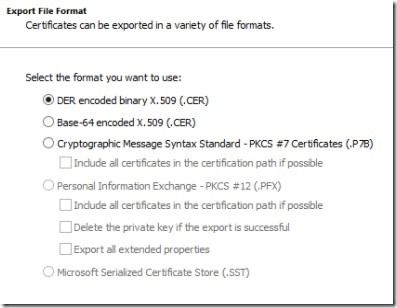
Der encoded one is the one we want to export.
Save the export to some place handy.
Importing Modules and Session Connection
NOTE: Please see the Script Center for a script that contains most of these script examples
Open up Windows PowerShell and Run as Administrator and import the following:
· Import-Module msonline
· Import-Module SkypeOnlineConnector
· Import-Module SkypeForBusiness
· Get-Module
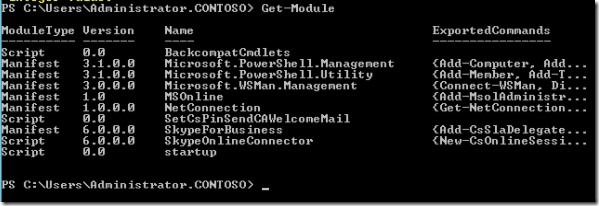
For getting the session connected we will need creds.
$cred = Get-Credential
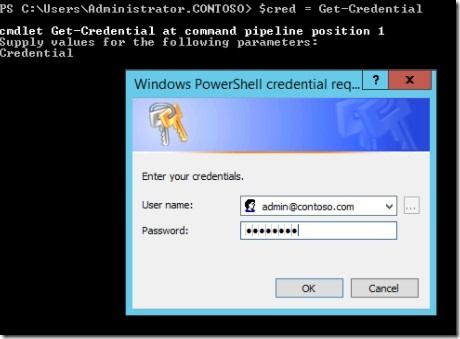
And to connect the session:
$SkypeSession = New-CsOnlineSession -Credential $cred

It is important that you see the name tmp_ and the commands for CsOnline like the above screen shot or you have not a session to Online.
To test we will get your TenantID and make sure to save it off.
Get-CsTenant |FL TenantID

Checking the OAuthServer and PartnerApplication settings
You might not have any old data if this is your first time setting this up. So if these cmdlets come back with nothing, you are good to continue. We will need to check though to remove stale data.
Check for older entries with the following Cmdlet
Get-CsOAuthServer
If it comes back with something we will remove it or if it is black, we can continue.
Remove-CsOAuthServer -Identity <Old OAuthServer identity>
Next we verify if there is already Partner Application setup. If black, we continue, or we will need to remove the old Exchange Partner App.
Get-CsPartnerApplication
Remove-CsPartnerApplication – Identity <Old Exchange Partner App identity>
Creating a new OAuthServer
You need your Tenant ID from above to continue with these next few stesp.
Create a new OAuthServer with the following cmdlet. This is setting up the security token server so applications can talk with one another securely.
New-CsOAuthServer -Identity microsoft.sts -metadataurl "https://accounts.accesscontrol.windows.net/ 2ce7b4b7-YOUR-IDxx-HERE-acc14128eb43/ metadata/json/1"
Replace the highlighted with your Tenant ID.
Non truncated Result:

You know this is correct when you see the Realm match your TenantID
Creating a new Partner Application
We will be creating a partner application to Exchange Online for Skype for Business to exchange security tokens, without having to exchange those tokens by using a 3 rd party token server (i.e. Exchange and Skype for business will trust each other.)
New-CsPartnerApplication -Identity Microsoft.exchange -ApplicationIdentifier 00000002-0000-0ff1-ce00-000000000000 -ApplicationTrustLevel Full –UseOauthServer
Now Assign the Configuration for the application
Set-CsOAuthConfiguration -ServiceName 00000004-0000-0ff1-ce00-000000000000
Verify the Configuration
Get-CsOAuthConfiguration

Setup Online Side
Up to now we have found and exported our On Prem OAuth Cert, Created the OAuth Server On Prem, and the Partner Application on prem. The next step is to connect online and provide the cert to the Online services and connect them.
The two services we are going to allow to talk to each other
These are the Lync/Skype and the Exchange Service principles we need talking to each other to get this working.
Get-MsolServicePrincipal -AppPrincipalId 00000004-0000-0ff1-ce00-000000000000
Get-MsolServicePrincipal -AppPrincipalId 00000002-0000-0ff1-ce00-000000000000
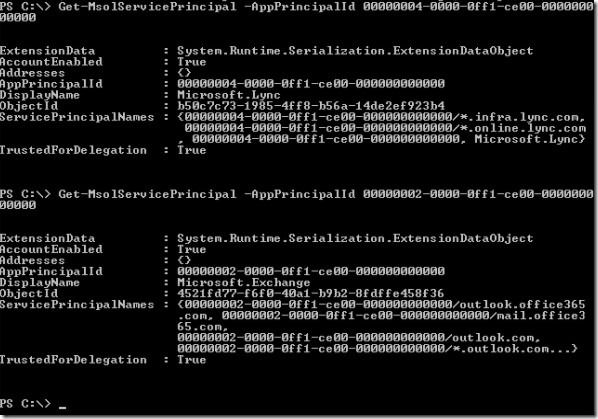
In order to do this, we need to get the OAuthCert applied and set.
Create certificate variable and assign it.
$certificate = New-Object System.Security.Cryptography.X509Certificates.X509Certificate
$certificate.Import("C:\LyncTemp\xlync_oauth.cer")
$binaryValue = $certificate.GetRawCertData()
$credentialsValue = [System.Convert]::ToBase64String($binaryValue)
Result should be:

New-MsolServicePrincipalCredential -AppPrincipalId 00000004-0000-0ff1-ce00-000000000000 -Type Asymmetric -Usage Verify -Value $credentialsValue
Set-MSOLServicePrincipal -AppPrincipalID 00000002-0000-0ff1-ce00-000000000000 -AccountEnabled $true
Next we are going to add the tenant’s on premises web services URL(s) to the ServicePrincipal endpoint:
$WebExt = (get-CsService).ExternalFqdn
$SkypeSP = Get-MSOLServicePrincipal -AppPrincipalID 00000004-0000-0ff1-ce00-000000000000
ForEach ($Fqdn in $WebExt){
$SkypeSP.ServicePrincipalNames.Add(“00000004-0000-0ff1-ce00-000000000000/$Fqdn“)
}
Set-MSOLServicePrincipal -AppPrincipalID 00000004-0000-0ff1-ce00-000000000000 -ServicePrincipalNames $SkypeSP.ServicePrincipalNames
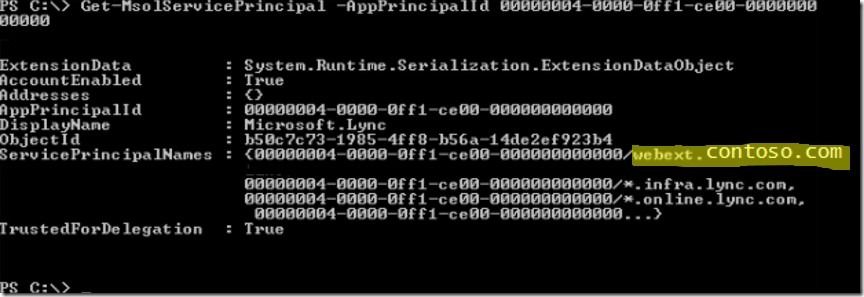
Final Result:
You should see your on prem external web services listed.
Get-MSOLServicePrincipal -AppPrincipalID 00000004-0000-0ff1-ce00-000000000000
Authors: Colin Hoag, Tony Quintanilla and Kory Olson
This blog was based in part on Christian Burke's post on the same topic, located here . Thanks Christian! There is also a Script Center post that can help with this issue located here .
Thanks!
Do you have a missing OWA IM and Scheduling Online Meeting button for your Online Exchange users? This article will help explain why and how to fix this.
Environment
Exchange Online and Skype for Business or Lync Server On Prem or Hybrid
Pre Recs
Power shell modules for MSOL or Windows Azure Active Directory (which ever you use for DirSync), Skype for Business Online and Skype On PREM ADMIN access.
You need to be an admin on prem (RTCUniversal server admins or CSAdmins ) and in the cloud for Skype as well as a Global Admin for your 365 portal.
Software
· "Skype for Business Server 2015, Front End Server" or "Microsoft Lync Server 2013, Front End Server"
· "Microsoft Online Services Sign-in Assistant” - http://go.microsoft.com/fwlink/?LinkID=286152
· "Skype for Business Online, Windows PowerShell Module” - https://www.microsoft.com/en-us/download/details.aspx?id=39366
· Windows Azure Active Directory Module for Windows PowerShell (64-bit version) Windows Azure Active Directory Module for Windows PowerShell (64-bit version)
Find the OAuthCert
To find your Oauth cert run the Skype for Business or Lync Server 2013 Deployment wizard.

Choose Install or Update Skype for Business Server
Choose Step 3 to Request, Install, Assign Certs .
In the pop up choose the OAuthTokenIssuer and the View
You can then see the cert details by click View Certificate Details in the Next pop up.
It should look like below but with your specific Cert Info.

Once you are viewing the certificates please go under details and get the serial number in case you have multiple certs.
Alternatively, you can find your OAuthwith the following:
Get-CsCertificate -Type OAuthTokenIssuer
Next we will export OAuth cert.
Open up an MMC and chose File > Add/Remove Snap-in

In the pop up you will Choose Certificates in the left pane, then click Add in the pop up choose Computer Account

From Here we need to Open Personal > Certificates to find the correct cert. You remembered to get the serial number didn’t you? Open the cert and click on Details and verify the correct cert to export.


Do not export the private key when asked.

Der encoded one is the one we want to export.

Save the export to some place handy.
Importing Modules and Session Connection
NOTE: Please see the Script Center for a script that contains most of these script examples
Open up Windows PowerShell and Run as Administrator and import the following:
· Import-Module msonline
· Import-Module SkypeOnlineConnector
· Import-Module SkypeForBusiness
· Get-Module

For getting the session connected we will need creds.
$cred = Get-Credential

And to connect the session:
$SkypeSession = New-CsOnlineSession -Credential $cred

It is important that you see the name tmp_ and the commands for CsOnline like the above screen shot or you have not a session to Online.
To test we will get your TenantID and make sure to save it off.
Get-CsTenant |FL TenantID

Checking the OAuthServer and PartnerApplication settings
You might not have any old data if this is your first time setting this up. So if these cmdlets come back with nothing, you are good to continue. We will need to check though to remove stale data.
Check for older entries with the following Cmdlet
Get-CsOAuthServer
If it comes back with something we will remove it or if it is black, we can continue.
Remove-CsOAuthServer -Identity <Old OAuthServer identity>
Next we verify if there is already Partner Application setup. If black, we continue, or we will need to remove the old Exchange Partner App.
Get-CsPartnerApplication
Remove-CsPartnerApplication – Identity <Old Exchange Partner App identity>
Creating a new OAuthServer
You need your Tenant ID from above to continue with these next few stesp.
Create a new OAuthServer with the following cmdlet. This is setting up the security token server so applications can talk with one another securely.
New-CsOAuthServer -Identity microsoft.sts -metadataurl "https://accounts.accesscontrol.windows.net/ 2ce7b4b7-YOUR-IDxx-HERE-acc14128eb43/ metadata/json/1"
Replace the highlighted with your Tenant ID.
Non truncated Result:

You know this is correct when you see the Realm match your TenantID
Creating a new Partner Application
We will be creating a partner application to Exchange Online for Skype for Business to exchange security tokens, without having to exchange those tokens by using a 3 rd party token server (i.e. Exchange and Skype for business will trust each other.)
New-CsPartnerApplication -Identity Microsoft.exchange -ApplicationIdentifier 00000002-0000-0ff1-ce00-000000000000 -ApplicationTrustLevel Full –UseOauthServer
Now Assign the Configuration for the application
Set-CsOAuthConfiguration -ServiceName 00000004-0000-0ff1-ce00-000000000000
Verify the Configuration
Get-CsOAuthConfiguration

Setup Online Side
Up to now we have found and exported our On Prem OAuth Cert, Created the OAuth Server On Prem, and the Partner Application on prem. The next step is to connect online and provide the cert to the Online services and connect them.
The two services we are going to allow to talk to each other
These are the Lync/Skype and the Exchange Service principles we need talking to each other to get this working.
Get-MsolServicePrincipal -AppPrincipalId 00000004-0000-0ff1-ce00-000000000000
Get-MsolServicePrincipal -AppPrincipalId 00000002-0000-0ff1-ce00-000000000000

In order to do this, we need to get the OAuthCert applied and set.
Create certificate variable and assign it.
$certificate = New-Object System.Security.Cryptography.X509Certificates.X509Certificate
$certificate.Import("C:\LyncTemp\xlync_oauth.cer")
$binaryValue = $certificate.GetRawCertData()
$credentialsValue = [System.Convert]::ToBase64String($binaryValue)
Result should be:

New-MsolServicePrincipalCredential -AppPrincipalId 00000004-0000-0ff1-ce00-000000000000 -Type Asymmetric -Usage Verify -Value $credentialsValue
Set-MSOLServicePrincipal -AppPrincipalID 00000002-0000-0ff1-ce00-000000000000 -AccountEnabled $true
Next we are going to add the tenant’s on premises web services URL(s) to the ServicePrincipal endpoint:
$WebExt = (get-CsService).ExternalFqdn
$SkypeSP = Get-MSOLServicePrincipal -AppPrincipalID 00000004-0000-0ff1-ce00-000000000000
ForEach ($Fqdn in $WebExt){
$SkypeSP.ServicePrincipalNames.Add(“00000004-0000-0ff1-ce00-000000000000/$Fqdn“)
}
Set-MSOLServicePrincipal -AppPrincipalID 00000004-0000-0ff1-ce00-000000000000 -ServicePrincipalNames $SkypeSP.ServicePrincipalNames
Final Result:
You should see your on prem external web services listed.
Get-MSOLServicePrincipal -AppPrincipalID 00000004-0000-0ff1-ce00-000000000000

Authors: Colin Hoag, Tony Quintanilla and Kory Olson
This blog was based in part on Christian Burke's post on the same topic, located here . Thanks Christian! There is also a Script Center post that can help with this issue located here .
Thanks!
Updated May 20, 2019
Version 2.0NextHop_Team
Brass Contributor
Joined May 16, 2019
Skype for Business Blog
Follow this blog board to get notified when there's new activity
