This is part three of a four-part article that explains how to configure AudioCodes Enhanced Gateway components for branch office locations. Correct gateway configuration ensures that your Lync Server 2010 environment will continue to function even if a Survivable Branch Server or Survivable Branch Appliance is not available. Part one explains the need for failover routing and how to add a Survivable Branch Server to a Lync Server topology . Part two explains how to configure basic settings on an AudioCodes Media Gateway . Part three details how to define Proxy Sets and IP groups. Part four delineates how to configure PSTN trunk settings .
Author : Ryan Gates
Publication date : October 26, 2011
Product version : AudioCodes Firmware v6.2
Define Proxy Sets
After the general SIP parameters are configured; you are ready to begin routing configuration. To configure the primary and failover routing described in part one , use the Proxy Sets and IP Groups within the AudioCodes gateway.
A Mediant 1000 MSBG Proxy Set represents a grouping of similar voice endpoints. This configuration defines two Proxy Sets. The two Proxy Sets are:
1. A Lync Server 2010 Survivable Branch Appliance or Survivable Branch Server used as the primary route for all calls at a branch office. This is Proxy Set 0 (default Proxy Set).
2. A Lync Server 2010 Mediation Server pool used as a secondary route in the event that the primary route becomes unavailable. This is Proxy Set 1.
Defining the primary and secondary route targets in different Proxy Sets makes it possible to send calls to a Mediation Server pool in a round robin fashion. To configure the general proxy settings:
1. Click the Configuration navigation tab.
2. Select VoIP –> SIP Definitions –> Proxy & Registration .
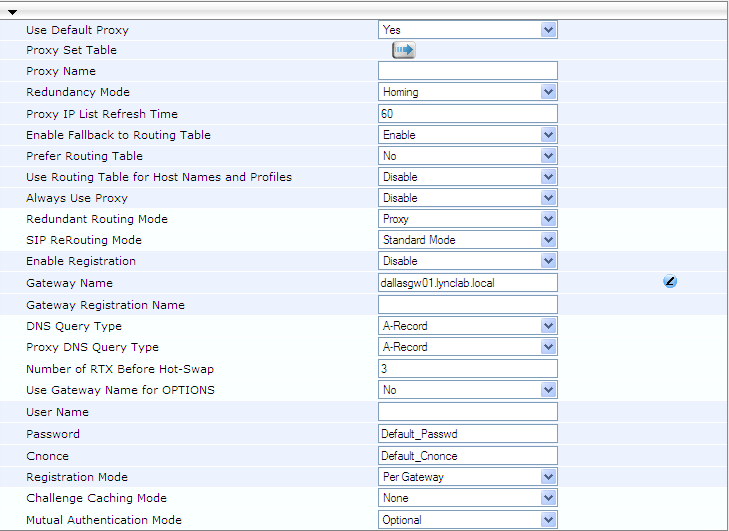
3. Set Use Default Proxy to Yes (see Figure 1).
4. Set Enable Fallback to Routing Table to Enable .
5. Type in a Gateway Name (in our scenario the gateway name is dallasgw01.lynclab.local).
6. Click Submit to save your changes.
Figure 1. Proxy and Registration Configuration

After the general proxy and registration options have been adjusted, the two Proxy Sets can be defined. To configure the primary Proxy Set:
1. Click the Configuration navigation tab.
2. Select VoIP –> Control Network –> Proxy Sets Table .
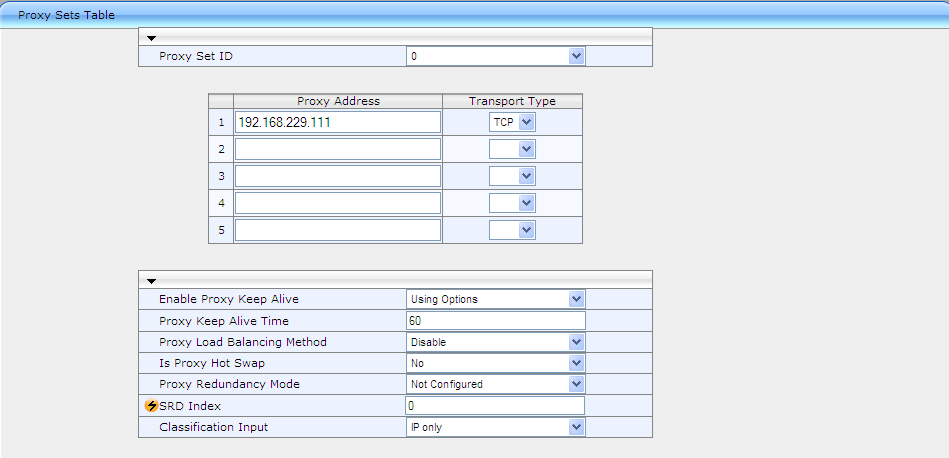
3. From the Proxy Set ID drop down menu select 0 (Figure 2).
The Proxy Set ID value of 0 is considered the default proxy. All calls are sent to this Proxy Set unless all servers defined in the default proxy group are unreachable. In this branch office scenario, the default proxy group consists of one Survivable Branch Server.
4. Type in the Proxy Address using either an IP address or DNS name (see Figure 2).
5. Select a Transport Type of TCP or TLS to match your enviornment.
6. Click Submit to save changes made to Proxy Set ID 0.
Because only one Survivable Branch Server exists at the branch office, configuration of Proxy Load Balancing , Is Proxy Hot Swap , and Proxy Redundancy Mode in the Default Proxy group is not necessary.
Figure 2. Define Default Proxy Set

Next, define the secondary Proxy Set used to send calls to the Mediation Server pool located in the regional data center during a failure scenario (see Figure 3).
1. In the Proxy Set ID drop down select 1 .
2. Type in the Proxy Address or DNS names of all servers in the Mediation Server pool.
3. Define the Transport Type as either TCP or TLS depending on your enviornment.
Because we have defined multiple endpoints in Proxy Set 1 , the Proxy Load Balancing Method and Is Proxy Hot Swap settings need to be configured.
4. From the Proxy Load Balancing Method drop down select Round Robin to distribute calls evenly across all members of the Proxy Set.
5. Change the Is Proxy Hot Swap option to Yes .
6. Click Submit to save settings.
Figure 3. Define Mediation Server Pool Proxy Set

Define IP Groups
After the Proxy Sets are defined, define the IP Group that references Proxy Group 1 (the Lync Server Mediation pool). Routes use IP Groups to route calls to the appropriate Proxy Set (see Figure 4).
1. Click the Configuration navigation tab.
2. Select VoIP –> Control Network –> IP Group Table .
3. Use the Index drop down menu to select 1 .
4. Type a name into the Description text field to identify the IP Group.
5. Use the Proxy Set ID drop down menu to select a value of 1 . This configures the IP Group to use Proxy Set 1.
6. Click Submit to save.
Figure 4. Define IP Group 1

Summary
Part three details how to define Proxy Sets and IP groups. In part four we explain how to configure PSTN trunk settings.
Additional Resources
- Configure Failover Routing with AudioCodes Media Gateways: Part 1
- Configure Failover Routing with AudioCodes Media Gateways: Part 2
- Configure Failover Routing with AudioCodes Media Gateways: Part 4
Lync Server Resources
- Lync Server 2010 documentation in the TechNet Library
- DrRez blog
- Lync Server and Communications Server resources
We Want to Hear from You
Keywords : AudioCodes, Failover, Routing