First published on CloudBlogs on May, 11 2009
As the developer that handles RDP’s audio features, I thought I’d take a few minutes to introduce some of the new audio features in Windows 7 and Windows Server 2008 R2. We’ve been busy introducing a lot of features over the last year, and I’m happy to say the upcoming release will include the most significant improvements in remote audio since the feature was first introduced in Windows XP [Fixed from Windows 2000. Thanks, Nik]. Among the new audio features are the ability to record audio to a remote session, and more control over the way RDP adjusts the audio quality.
Audio Capture
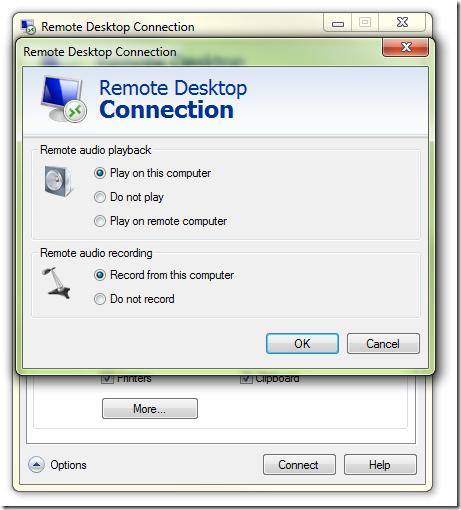
If you take a look at the “Local Resources” tab in the Remote Desktop Connection options, you’ll see the remote audio drop down box has been replaced with a button that says “Settings…” Clicking this button reveals the following:
Now not only do you have the option to “Play on this computer,” but you can also “Record from this computer.” This feature allows you to use voice recognition, voice chat, and other software that requires a microphone.
Please keep in mind that audio capture must be enabled in the Remote Desktop Session Host Configuration on the server before it can be used.
Audio Quality Modes
Remote audio playback has always tried to automatically adjust its bandwidth usage based on the current network conditions. This allows audio to work pretty well on anything from a 56k modem up through 10 gigabit Ethernet connection, but this flexibility comes at a cost. Adjusting the bandwidth on the fly requires the server to delay audio a little longer for processing before sending it to the client, which can cause the audio to be out of sync with the images on the screen.
Sometimes, you know you are on a network that’s fast enough to handle the best quality audio always. For these cases, you can now change the audio quality mode. This tells the server to assume the network can handle the best quality audio, and to send it as soon as it’s ready. Since the server processing doesn’t delay the audio, the synchronization between audio and video are much improved, and the audio sounds better too.
Enabling this feature requires changes to both the server- and client-side configuration. On the server, the easiest way to enable this feature is from the Group Policy editor. Go to Computer Configuration:Administrative Templates:Windows Components: Remote Desktop Session Host:Device and Resource Redirection. The policy in question is “Limit audio playback quality.” Set this to “Enabled,” and then set the “Audio Quality” option to either Medium or High.
On the client side, you need to add the audioqualitymode setting to the RDP file. The three possibilities for this setting are:
- audioqualitymode:i:0 -> Dynamic quality
- audioqualitymode:i:1 -> Medium quality
- audioqualitymode:i:2 -> High quality
Dynamic quality uses the old behavior and attempts to provide the best quality with the available bandwidth. Medium uses a single audio format, which allows reasonable quality, low latency, and doesn’t use too much bandwidth. On the other hand, high quality uses uncompressed audio for the best sound quality while also having low latency.
This provides just a brief introduction to some of the new features in Windows 7 Remote Desktop Services. Stay tuned for posts with more in-depth information about managing and using these new features.
Published Sep 08, 2018
Version 1.0MicrosoftSecurityandComplianceTeam
Iron Contributor
Joined September 05, 2018
Microsoft Security Blog
Follow this blog board to get notified when there's new activity
