We’re excited to announce the public preview of Microsoft Message Queuing (MSMQ) built-in connector for Azure Logic Apps Standard, making it easier to modernize applications that continue to depend on MSMQ while moving integration workloads to Azure Logic Apps.
MSMQ remains an important messaging technology in many long-running enterprise environments, particularly solutions built on BizTalk Server and other Windows-based middleware. Modernizing these environments can be challenging when existing applications still depend on MSMQ queues and changing the underlying messaging technology is not feasible as part of the initial migration.
The new MSMQ built-in connector helps bridge this gap. It enables Logic Apps Standard workflows to interact with existing MSMQ environments, allowing organizations to modernize integration workloads incrementally rather than requiring MSMQ dependencies to be replaced at the same time.
Refer Connect to MSMQ from Standard Workflows - Azure Logic Apps | Microsoft Learn for detailed information.
What does the MSMQ connector enable?
The connector provides two primary operations:
- Send message to MSMQ, allowing a Logic Apps workflow to enqueue a message into an MSMQ queue.
- When a message is available in an MSMQ queue, allowing MSMQ messages to trigger Logic Apps workflows.
The connector supports scenarios such as transactional queues and dead-letter handling. For receive scenarios, delivery is at least once, so workflows should be designed to be idempotent and handle possible duplicate delivery.
The connector is particularly useful for BizTalk Server modernization, where organizations want to migrate orchestration and integration logic to Logic Apps while temporarily retaining MSMQ-based applications.
How it works
MSMQ is a Windows technology and can't run directly inside the Logic Apps runtime.
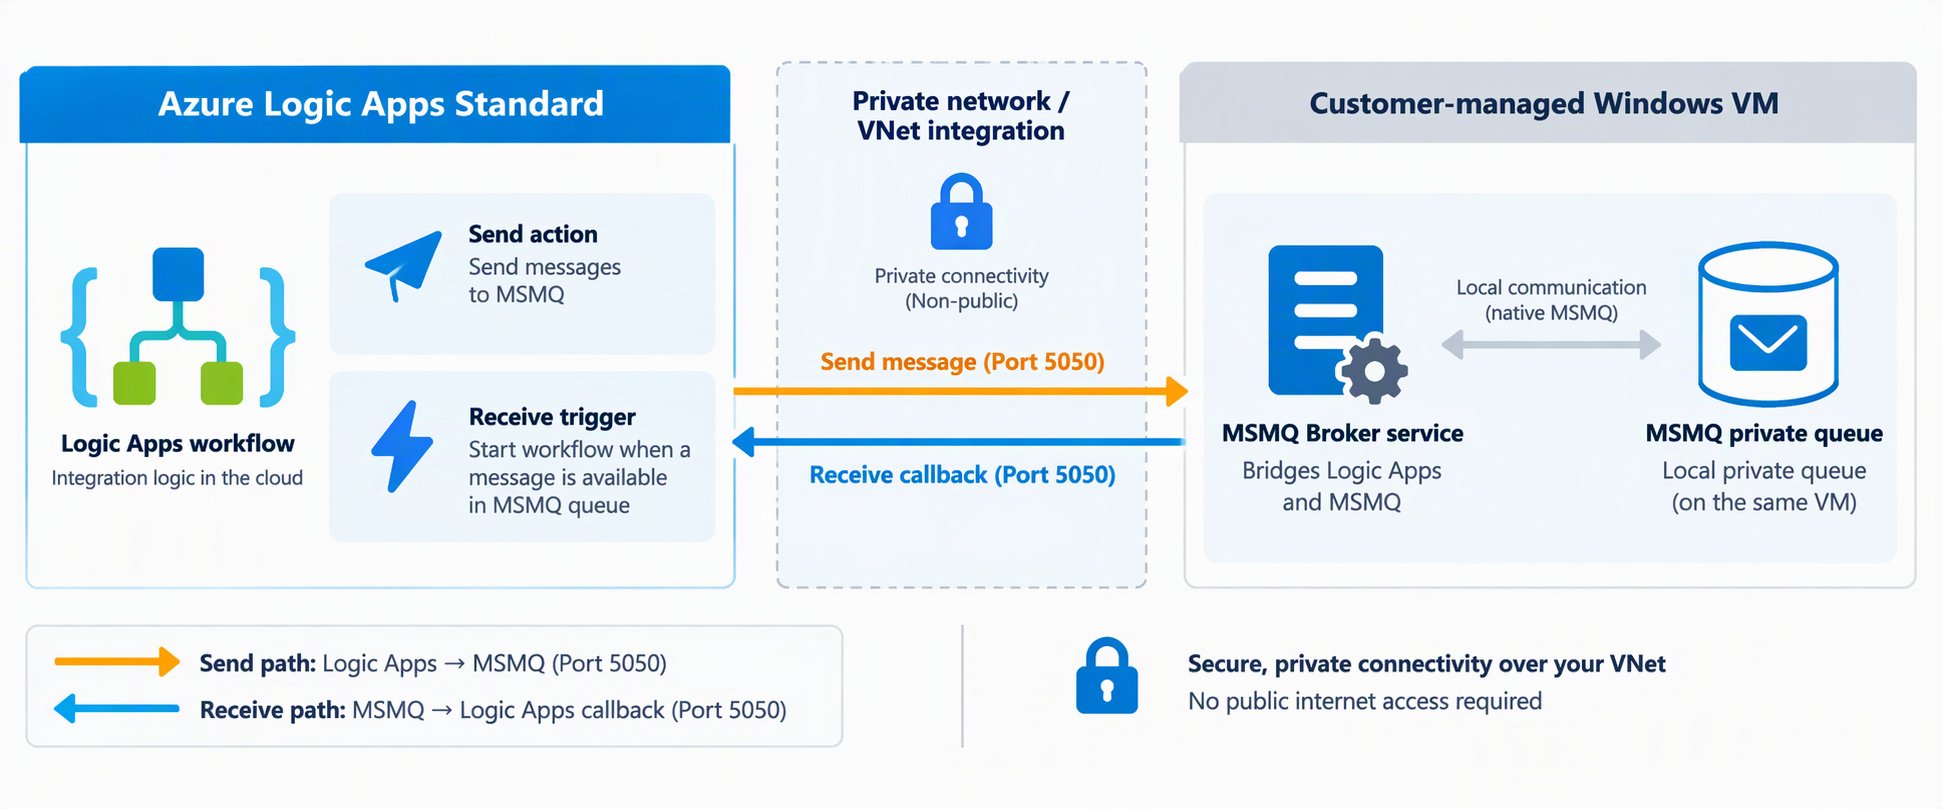
To bridge the two environments, the connector uses a lightweight MSMQ Broker service that runs on a customer-managed Windows environment alongside MSMQ.
The communication path is:
Logic Apps Standard → private network → MSMQ Broker → MSMQ queue
For receive scenarios, the reverse notification path is used:
MSMQ queue → MSMQ Broker → Logic Apps callback → workflow
The broker exposes the operations required by the connector and interacts locally with MSMQ. This architecture allows the Logic Apps runtime to communicate with Windows-based MSMQ environments without requiring MSMQ itself to run inside Logic Apps.
The Windows environment hosting the broker remains customer managed, including Windows maintenance, MSMQ configuration, queue management, networking and security.
Prerequisites and configuration
Before configuring the MSMQ connector, prepare the Windows messaging environment, networking and Logic Apps Standard resource.
Prerequisites
- An Azure subscription.
- An Azure Logic Apps Standard resource.
- A supported Windows environment capable of running MSMQ and the MSMQ Broker service.
- Microsoft Message Queuing enabled on the Windows environment.
- One or more MSMQ queues created for your application.
- Private network connectivity between Logic Apps and the MSMQ Broker.
- A subnet dedicated to Logic Apps VNet integration.
- Network Security Group, routing, DNS and Windows Firewall rules that allow the required traffic.
- Administrative access to the Windows environment for installing the MSMQ Broker.
For an Azure-hosted deployment, we recommend using a private Windows VM without publicly exposed administrative ports. Use Azure Bastion, VPN or another private management path instead of exposing RDP directly to the internet.
Step 1: Prepare the Windows environment
Create or identify the Windows machine that will host MSMQ and the MSMQ Broker.
For an Azure deployment:
- In the Azure portal, create a Windows VM.
- Place the VM in the VNet that will provide connectivity to the Logic Apps Standard application.
- Under Networking, set Public inbound ports to None where possible.
- Create or select the VNet and subnet for the VM.
- After the VM is created, note its private IP address or ensure that it has a privately resolvable hostname.
- Connect to the VM through Azure Bastion, VPN or your organization's private management network.
Windows Server 2019 or later can be used for the broker environment.
Step 2: Install the MSMQ Broker
The MSMQ Broker installation is automated through the provided PowerShell installation script.
Copy Install-MsmqEnvironmentService.ps1 to the Windows machine and launch PowerShell as Administrator.
Run:
.\Install-MsmqEnvironmentService.ps1
The installer performs the prerequisite and environment configuration required by the broker, including:
- Checking the MSMQ prerequisites.
- Installing the required MSMQ Windows features when needed.
- Installing the required runtime components for the broker.
- Installing the MSMQ Broker package.
- Registering the broker as a Windows service.
- Configuring the required Windows Firewall rule.
- Starting the broker service.
- Running a health check to verify that the service is available.
The default broker service port is 5050.
At the end of a successful installation, verify that the health endpoint reports the service as healthy.
You can also verify the Windows services directly and confirm that both MSMQ and the MSMQ Broker service are running.
Step 3: Create the MSMQ queue
Next, create the queue that your Logic Apps workflow will use.
On the Windows machine:
- Open Computer Management.
- Go to Services and Applications.
- Expand Message Queuing.
- Expand Private Queues.
- Right-click Private Queues and select New → Private Queue.
- Enter the queue name.
- If your scenario requires transactions, create the queue as transactional.
The queue should be created before configuring the Logic Apps workflow.
For receive-trigger scenarios, the subscribed queue must currently be a local private queue on the machine running the MSMQ Broker.
Step 4: Configure private networking
The Logic Apps Standard resource must be able to reach the MSMQ Broker through the private network.
Create a separate subnet for Logic Apps VNet integration. Don't use the same subnet that contains the broker VM.
Then:
- Open your Logic Apps Standard resource in the Azure portal.
- Go to Settings → Networking.
- Select VNet integration.
- Select Add VNet integration.
- Select the VNet containing or connected to the MSMQ Broker environment.
- Select the subnet dedicated to Logic Apps.
- Save the configuration.
The network path must permit traffic from the Logic Apps integration subnet to the broker on the configured broker port, 5050 by default.
NSGs, route tables, DNS, Windows Firewall and any corporate firewalls in the network path must allow this communication.
Validate connectivity
Before creating the connector connection, validate that the Logic App can reach the broker.
From the Logic App's Kudu console, test:
tcpping BROKER-PRIVATE-IP 5050
If the connection fails, check:
- Logic Apps VNet integration.
- NSG rules.
- User-defined routes.
- Windows Firewall.
- DNS resolution if you are using a hostname.
- Broker service status.
- Whether the service is listening on the expected port.
Resolving the network path first avoids many connector-configuration failures later.
Step 5: Secure the broker endpoint
The MSMQ Broker is intended to be accessed over a private network.
Do not expose the broker endpoint directly to the public internet.
Restrict access through:
- VNet and subnet boundaries.
- NSGs.
- Windows Firewall.
- Private routing.
- Enterprise firewall controls where applicable.
Inbound connectivity to port 5050 should be limited to the network ranges that require access, primarily the Logic Apps integration subnet.
This is particularly important because the current public-preview security model relies on private network isolation for access to the broker endpoint.
Step 6: Create the MSMQ connection
Open the workflow designer in your Logic Apps Standard application.
Add an action or trigger and search for MSMQ.
Create a connection using the broker information.
Typical connection settings include:
Server Name: Enter the private IP address or privately resolvable hostname of the machine running the MSMQ Broker.
Port: Enter the port used by the MSMQ Broker. Default:5050
Step 7: Send a message to MSMQ
To send messages:
- Add the Send message to MSMQ action.
- Select the MSMQ connection.
- Provide the message body.
- Optionally provide a message label.
- Configure transactional and dead-letter options when required by your scenario.
The Is Transactional value must match the target MSMQ queue configuration.
If the target queue is transactional, enable the transactional option. If the queue is non-transactional, leave it disabled.
You can also configure dead-letter behavior for messages that can't be delivered successfully. Save the workflow and run it.
After the workflow completes:
- Open Run history and verify that the MSMQ action succeeded.
- Open the MSMQ queue on the Windows machine.
- Confirm that the message has arrived.
Step 8: Receive messages from MSMQ
To start a Logic Apps workflow when a message arrives:
- Create a workflow.
- Add the When a message is available in an MSMQ queue trigger.
- Select the MSMQ connection.
- Configure the local private queue.
- Configure processing and failure behavior.
- Save the workflow.
When the workflow starts, the trigger creates a subscription with the MSMQ Broker.
The broker monitors the queue and invokes the Logic Apps callback when messages become available.
The receive trigger currently processes messages individually rather than as batches.
The broker waits for the current workflow execution to return a successful response before processing the next message.
Step 9: Design for at-least-once delivery
Receive scenarios provide at-least-once delivery.
This means that under some failure and retry conditions, a message can be delivered more than once.
For business processes where duplicate processing could create undesirable side effects, consider using the MSMQ message ID or a business transaction identifier as an idempotency key.
For example:
- Receive the MSMQ message.
- Extract its unique identifier.
- Check whether the transaction has already been processed.
- If it has, safely ignore the duplicate.
- Otherwise, process the transaction and persist the identifier.
This is especially important for workflows that create orders, post financial transactions, modify inventory or invoke downstream systems that aren't idempotent.
Step 10: Test the complete configuration
Before moving the integration forward, validate the complete connection path.
Broker validation
Confirm:
- The MSMQ service is running.
- The MSMQ Broker Windows service is running.
- The broker health endpoint responds successfully.
- The required queue exists.
- The transactional setting matches your workflow configuration.
Network validation
Confirm:
- Logic Apps VNet integration is configured.
- The Logic App can reach the broker over port 5050.
- No NSG or firewall rule blocks the connection.
- DNS resolves correctly if you are using a hostname.
Send validation
Run a workflow using Send message to MSMQ and confirm that the message appears in the expected queue.
Receive validation
Place a test message into the queue and verify that:
- The broker receives the message.
- The Logic Apps workflow is triggered.
- The workflow completes successfully.
- The message is settled according to the configured processing policy.
Public-preview considerations:
When planning your deployment, keep the following considerations in mind.
Receive queues must be local
For trigger scenarios, the subscribed private queue must reside on the same Windows environment as the MSMQ Broker.
One workflow should own a receive queue
Avoid configuring multiple workflows against the same MSMQ trigger queue.
A second workflow attempting to subscribe to a queue that is already owned by another workflow can be rejected.
Avoid running other competing MSMQ consumers against a queue owned by the Logic Apps trigger because another consumer could remove a message before the broker completes processing.
Message size
The current MSMQ path is subject to the underlying MSMQ message-size constraint, approximately 4 MB including messaging overhead. Applications using larger MSMQ payloads should evaluate the scenario before migration.
Ordered delivery
Ordered delivery isn’t supported during public preview. Support is planned for the next release.
Clustered MSMQ environments
The MSMQ Broker service isn’t cluster-aware in the current release, so failover scenarios aren’t fully supported. Cluster support is planned for the next release.
Get started and share your feedback
We encourage you to configure the MSMQ built-in connector in your Logic Apps Standard environment and validate it against your MSMQ scenarios. Should you require additional features or capabilities, such as support for specific queue types, deployment patterns or enhancements to the receive experience, please let us know.

 Microsoft