Introduction
As a Tenant Admin of an Office 365 Exchange Online organization, have you ever needed to monitor who, what, and where someone is connecting to your Exchange Online resources, like accessing mailboxes on mobile devices? I ran into this request a few weeks ago, from one of my customers. After hours of research, and testing I became a believer in the power of Microsoft Graph (Graph). By now you’re probably thinking, what is an Exchange engineer working with a graphing tool for? Well last month, that is exactly what I would have thought too. Surprising (to me) Graph is an extremely powerful tool that can interface with a large set of Microsoft services and technologies to pull data and perform tasks within the service/technology. Pulling sign-in data from Azure Active Directory (AAD) is a breeze with Graph. After the data is extracted, using Power BI for visualization brings your reporting capabilities to a new level! Let’s walk thru a scenario setup where as a Tenant Admin you can find out who is accessing mailboxes in your Exchange Online tenant on mobile devices, using Exchange ActiveSync protocol (which is used by default mail apps on Apple & Android devices) from anywhere in the world.Note: For this procedure to work for you, you need to have two subscriptions: Exchange Online (like E1 or E3) and Azure Active Directory Premium (like P1 or P2).
Allowing Graph Access to AAD Audit Log Data
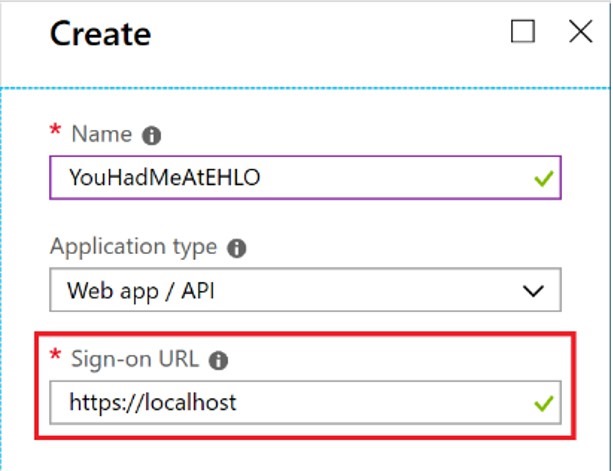
AAD allows application access through the App Registration feature. To allow Microsoft Graph to query audit log data from AAD you must first create a new app registration. You can do this by logging into https://portal.azure.com and going to Azure Active Directory > App registrations (you may also see one option as ‘App registrations (Preview)’, we will not use that one).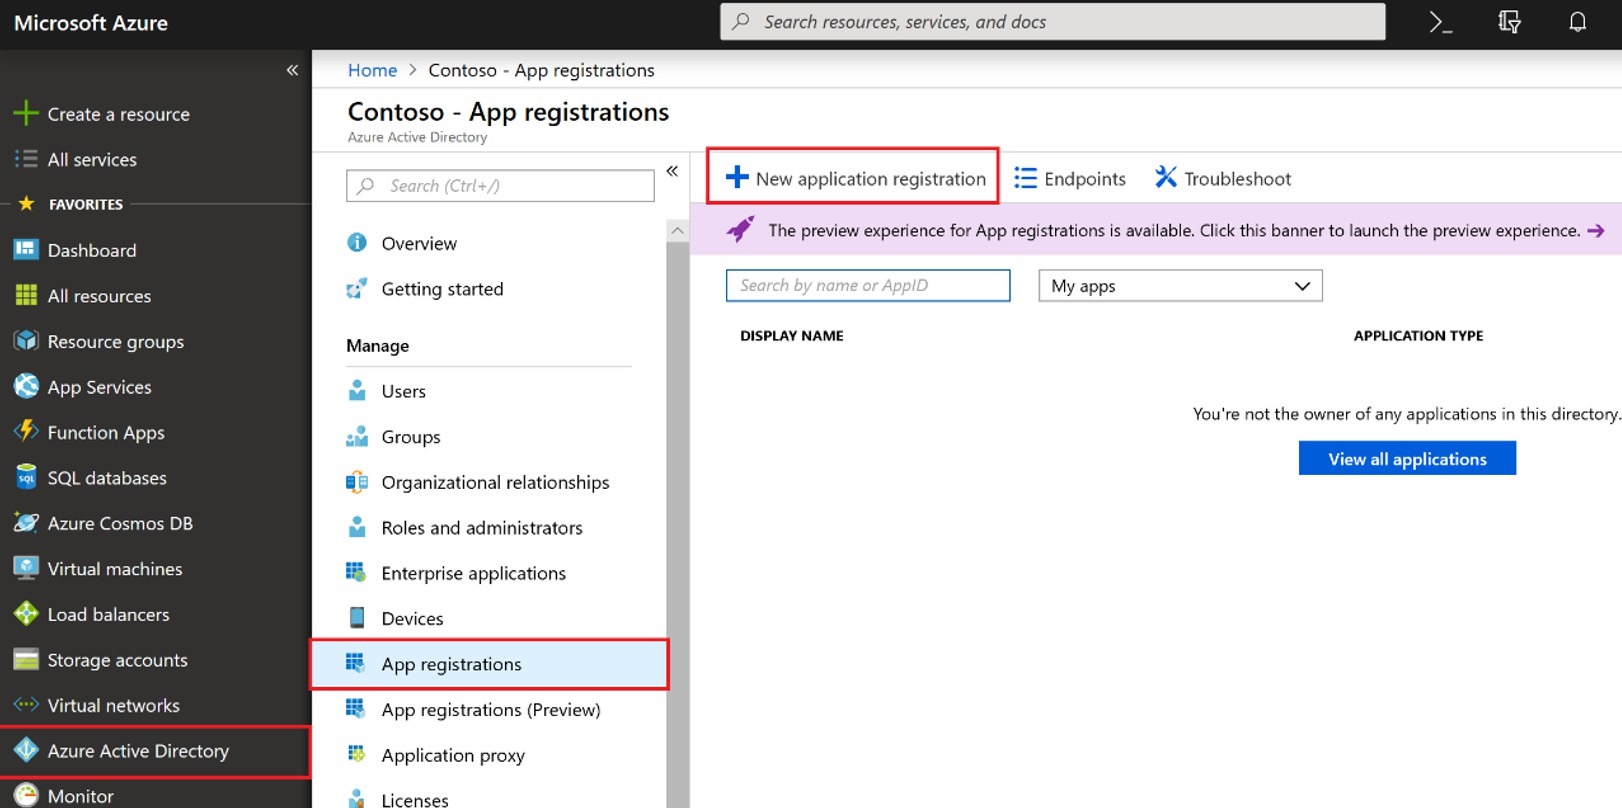 From here simply create a New app registration provide a Name and enter https://localhost as the Sign-on URL.
 After you have created the app registration you can now grant the required permissions by going to Settings > API Access > Required permissions.
 Now Add ‘Microsoft Graph’ (under ‘Select an API’) and grant Read all audit log data permission (under ‘Select permissions’). Click ‘Done’ to complete this step.
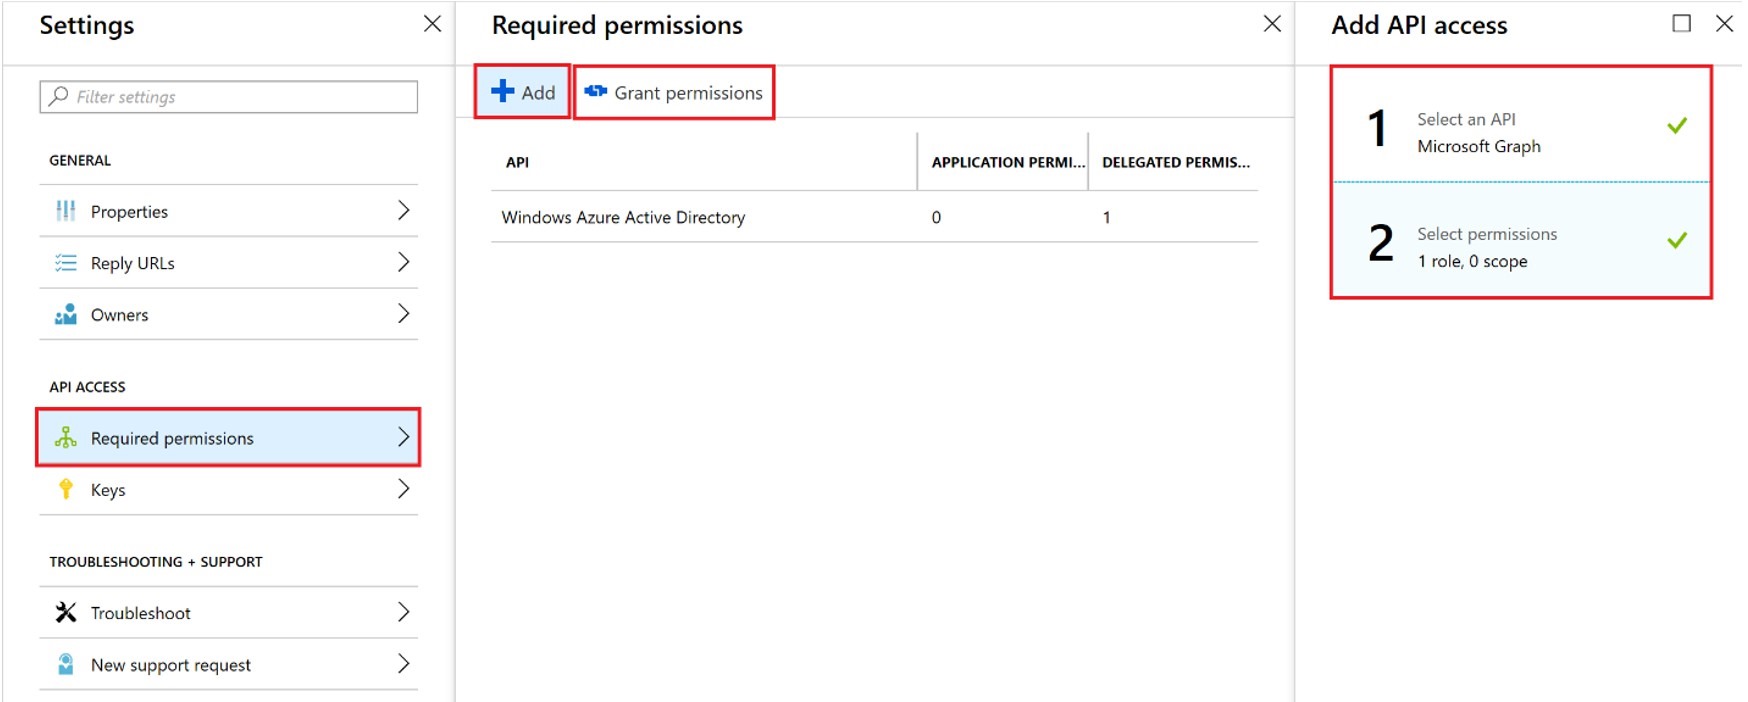 It will look like this after the above steps.
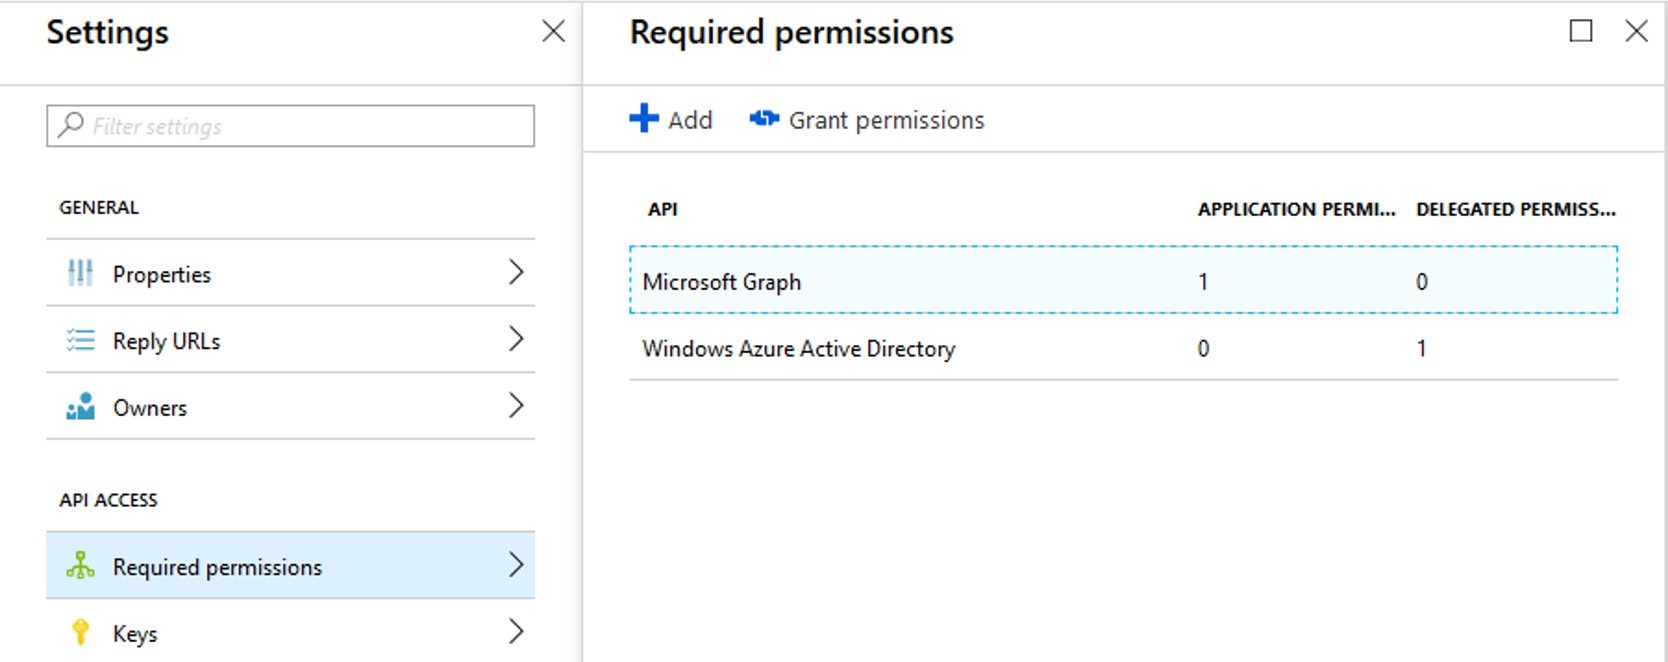 Next, you will need to commit the change via the Grant permissions button by clicking on Yes, as in the screenshot below.
 You’ll see this confirmation message on top right hand corner in the Azure Admin Portal.
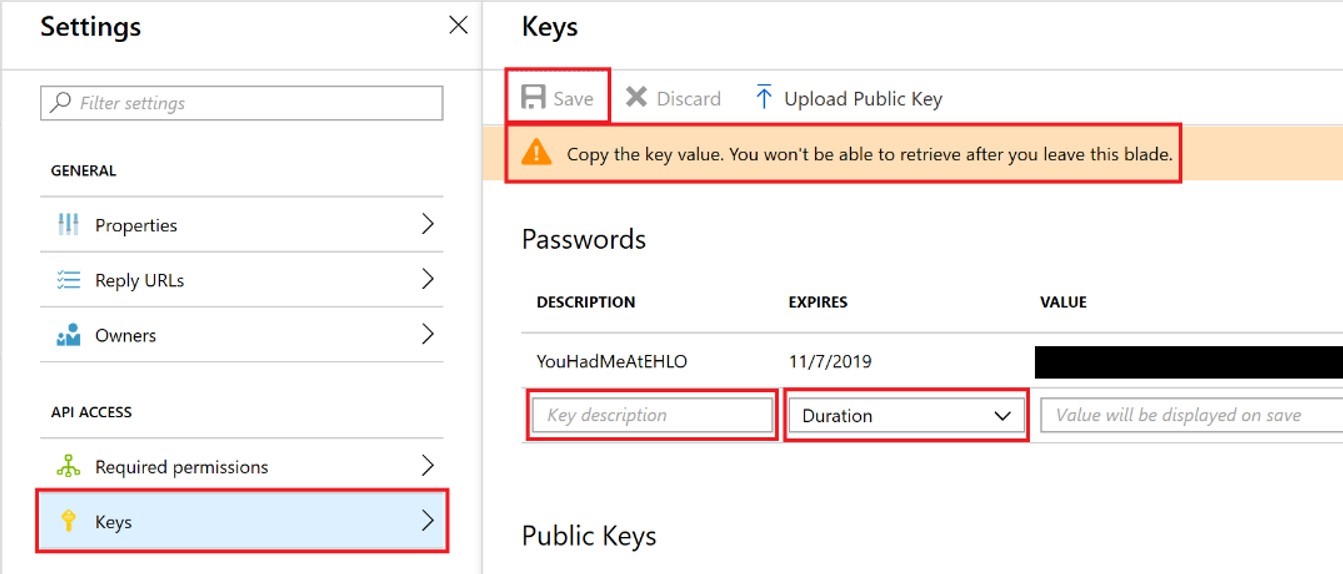
 Next, we need to create the key secret. This can be done under Settings > API Access > Keys (keep in mind that your key secret will only be displayed once & you need to copy it for later use).
Under Passwords section, give the key a short description & set an expiration time, and then click on Save button, which would result in a warning message (as in the screenshot below) asking you to copy the key value, please do so to use it later in the script below.
Pulling the data with PowerShell
To connect to Graph with PowerShell you first need to obtain an OAuth token from logon.microsoft.com. For authentication, your application ID and key secret is used. This is done using the code below: You will need the following parameters for the PS script below. Application ID: Key Secret: The value that you copied earlier, it would look something like this (example): 6vNGGm5rAB4Zn32rOW9RT+4zEaqcx3l92qyGwb+vT2c=
Tenant Domain: The tenant domain that’s registered for your tenant in Office 365, like contoso.com, for example (Admin Portal | Setup | Domains)
Directory Path: The path on the local machine to save the output CSV file from this script, where this PS script is being executed by you as Tenant Admin
$ClientID = "[INSERT APPLICATION ID]"
$ClientSecret = "[INSERT KEY SECRET]"
$TenantDomain = "[INSERT TENANT DOMAIN]"
$OutputDirectory = "[INSERT DIRECTORY PATH]"
$loginURL = 'https://login.microsoft.com'
$resource = 'https://graph.microsoft.com'
$body = @{grant_type="client_credentials";resource=$resource;client_id=$ClientID;client_secret=$ClientSecret}
$oauth = Invoke-RestMethod -Method Post -Uri $loginURL/$TenantDomain/oauth2/token?api-version=1.0 -Body $body
$headerParams = @{Authorization="$($oauth.token_type) $($oauth.access_token)"}
$url = 'https://graph.microsoft.com/beta/auditLogs/signIns'
$resultSet = (Invoke-WebRequest -UseBasicParsing -Headers $headerParams -Uri $url)
$output = @()
ForEach($event in ($resultSet.Content | ConvertFrom-Json).value) {
If($event.clientAppUsed -eq "Exchange ActiveSync")
{
$output += $event
}
}
$output | Export-CSV "$OutputDirectory\EXOClientAccessUsageReport.csv" -NoTypeInformation
<###############Disclaimer#####################################################
The sample scripts are not supported under any Microsoft standard support
program or service. The sample scripts are provided AS IS without warranty
of any kind. Microsoft further disclaims all implied warranties including,
without limitation, any implied warranties of merchantability or of fitness for
a particular purpose. The entire risk arising out of the use or performance of
the sample scripts and documentation remains with you. In no event shall
Microsoft, its authors, or anyone else involved in the creation, production, or
delivery of the scripts be liable for any damages whatsoever (including,
without limitation, damages for loss of business profits, business interruption,
loss of business information, or other pecuniary loss) arising out of the use
of or inability to use the sample scripts or documentation, even if Microsoft
has been advised of the possibility of such damages.
###############Disclaimer#####################################################>
#Declare unique instance variables
$ClientID = "[INSERT APPLICATION ID]"
$ClientSecret = "[INSERT KEY SECRET]"
$TenantDomain = "[INSERT TENANT URL]"
$OutputDirectory = "[INSERT DIRECTORY PATH]"
#Declare static variables
$loginURL = 'https://login.microsoft.com'
$resource = 'https://graph.microsoft.com'
#Build OAuth tequest
$body = @{grant_type="client_credentials";resource=$resource;client_id=$ClientID;client_secret=$ClientSecret}
#Request OAuth token
$oauth = Invoke-RestMethod -Method Post -Uri $loginURL/$TenantDomain/oauth2/token?api-version=1.0 -Body $body
#If OAuth was successful request data from Microsoft Graph
If($null -ne $oauth.access_token)
{
#Build Microsoft Graph web request
$headerParams = @{Authorization="$($oauth.token_type) $($oauth.access_token)"}
$url = 'https://graph.microsoft.com/beta/auditLogs/signIns'
#Request data via web request to Microsoft Graph
$resultSet = (Invoke-WebRequest -UseBasicParsing -Headers $headerParams -Uri $url)
#Place all events related to EXO into an array
$output = @()
ForEach($event in ($resultSet.Content | ConvertFrom-Json).value) {
If($event.appDisplayName -like "*Exchange *")
{
$output += $event
}
}
#Export all EXO events to a CSV
$output | Export-CSV "$OutputDirectory\EXOAccessReport.csv" -NoTypeInformation
}
Else
{
Write-Error "Failed to authenticate to OAuth, no token obtained."
}
Visualizing Data with Power BI
The geniuses that developed Power BI (download the Power BI desktop app from here) have made this next step so easy even I can do it! Launch Power BI desktop app and simply import the data using Get Data > Text/CSV, select your report (if you used the defaults it will be named EXOAccessReport.csv), and click Load.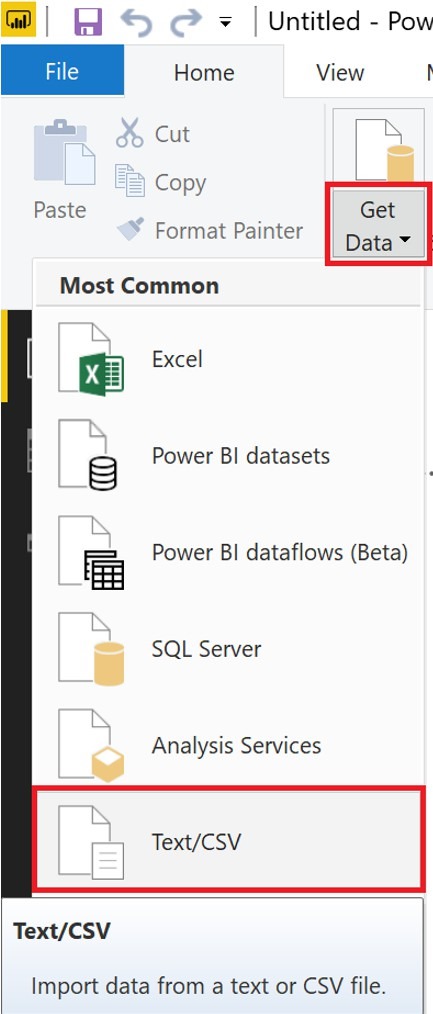 Once this is complete you can now select your visualization (I recommend ArcGIS Maps, or Maps), and drag and drop the data fields to the visualization fields. Drag location to Location and Size, userDisplayName to Legend, and clientAppUsed and createdDateTime to Tooltips. Note by selecting First (Default) for clientAppUsed this will select the latest login being as the CSV generated by the script is in descending order from most recent to least recent.
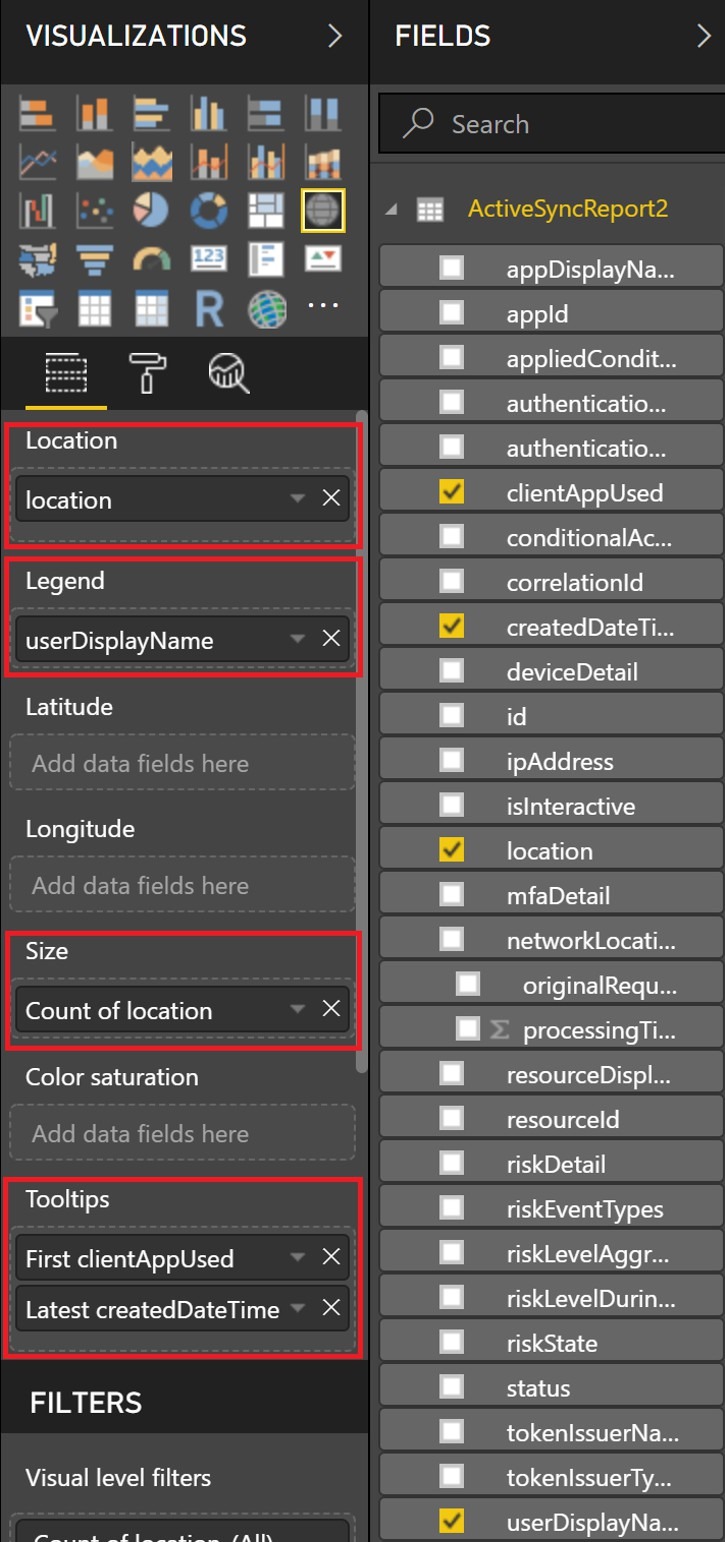 Further down the settings pane, you will find Filters the add clientAppUsed, userDisplayName, location, and createdDateTime to Report level filters.
 Finally you can review your report and publish it to your workspace in Power BI.
 Remember that in order for Power BI to access the data from the cloud your Power BI Gateway must have access to the CSV file generated by the PowerShell script. See On-premises data gateway for information and instructions on how to setup a Power BI gateway.
Keeping it fresh
To ensure that the report is always up to date with the latest data, I recommend you configure the PowerShell script to run at an interval that meets your needs. This task could be easily accomplished by Task Scheduler, System Center Orchestrator, and many other task scheduling solutions. For the purposes of this post we will use Task Scheduler since it is readily available on most versions of Windows. On the machine the script will be running from, launch Task Scheduler by pressing Windows + R then typing taskschd.msc and clicking OK. Click Create Task in the Actions pane on the right hand side of the window. Name your task, select Run whether user is logged on or not and check Run with highest privileges.
 Select the Triggers tab and click New…
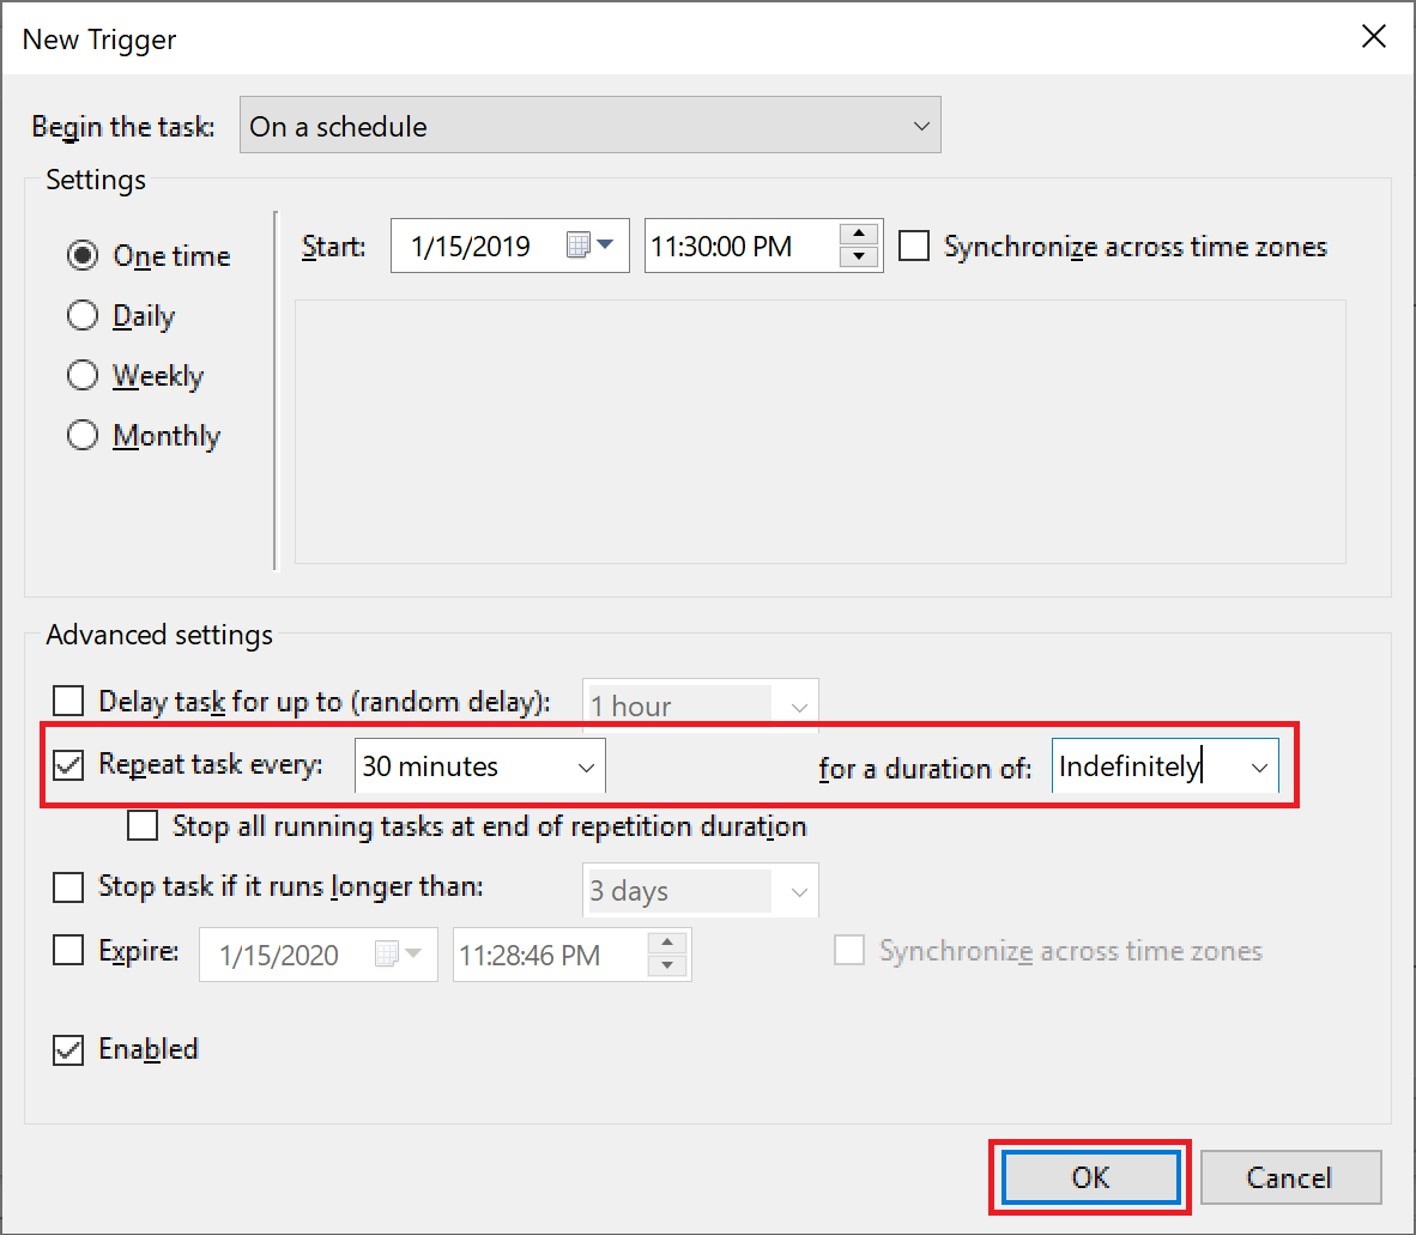
Check Repeat task every, select 30 minutes for the interval, and Indefinitely for the duration then click OK.
 Select the Actions tab, then click New…
Type powershell.exe into Program/script and enter the full path to your script into Add arguments (optional) then click OK.
Note: If there is a space in the full path to your script you must put a “ at the beginning and end of the path.
 Click OK then provide your credentials or the credentials you are running the task as into the prompt.
Reading the Report
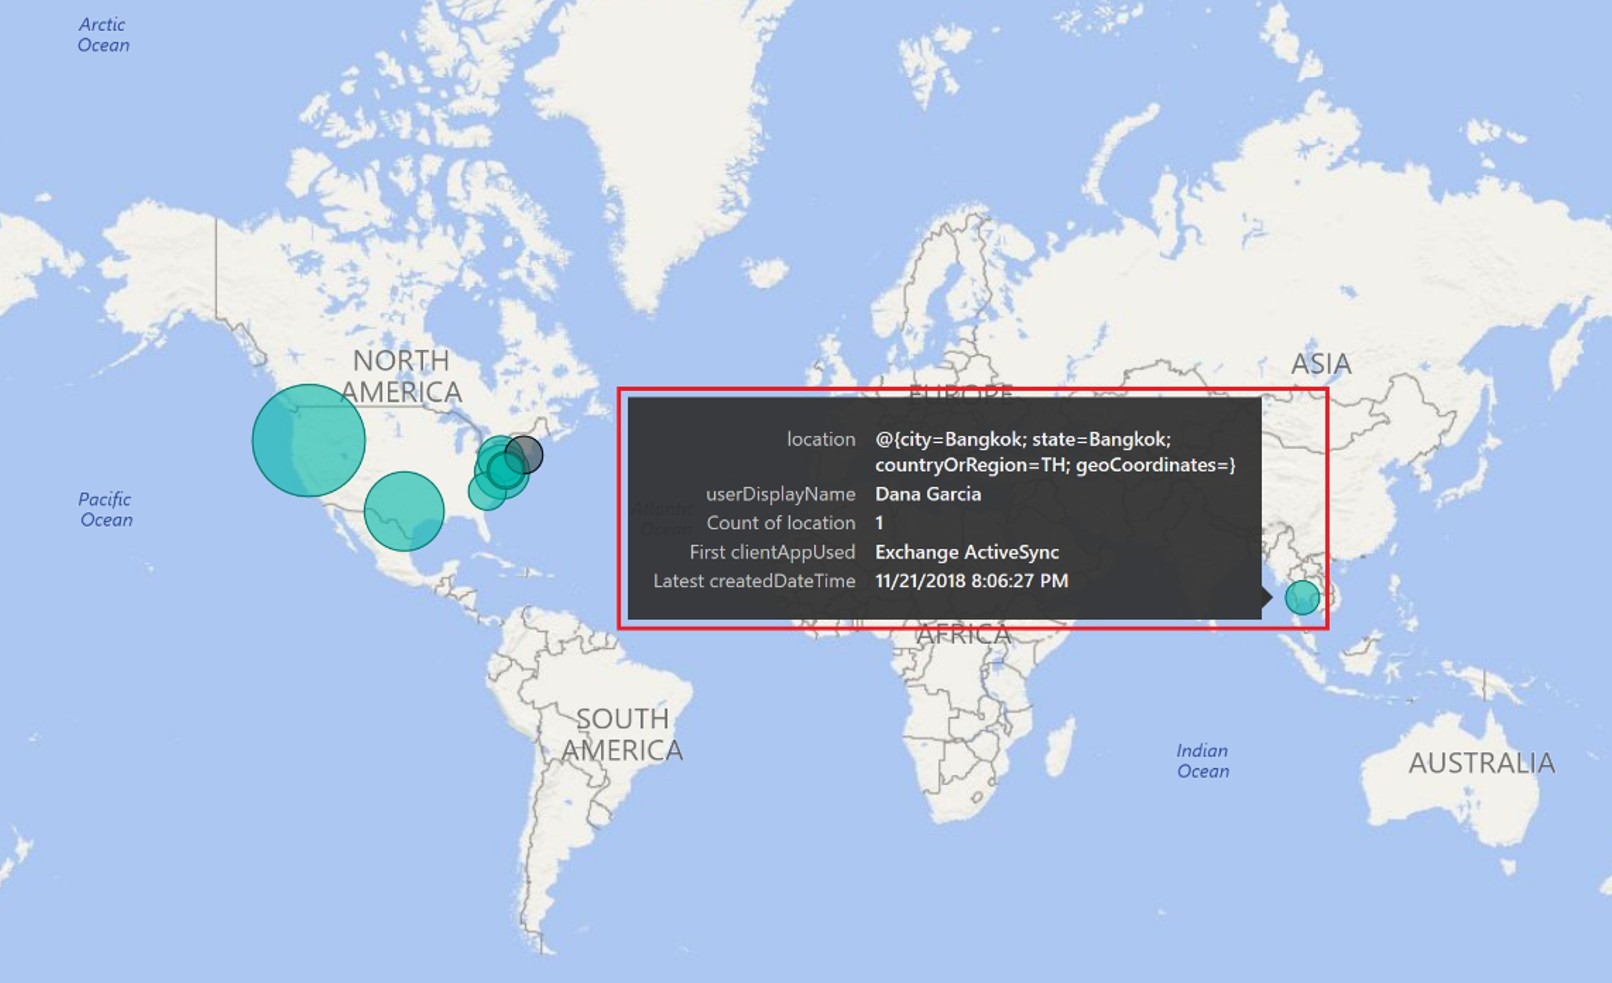
Now that we have created an amazing Power BI visualization how do we view it? Navigate to https://app.powerbi.com/groups/me/list/reports then click on the report we just created. Once the report launches and populates with the latest data you can see all user logins plotted on the map with circles. The circle gets larger when more users login from the same location. In the report below we can see an anomaly with one users login location. By hovering over the circle we can see the location (where), display name (who), number of times the user logged in, what technology/method (what) was used to login during the most recent sign-in, and the date and time of the latest login.
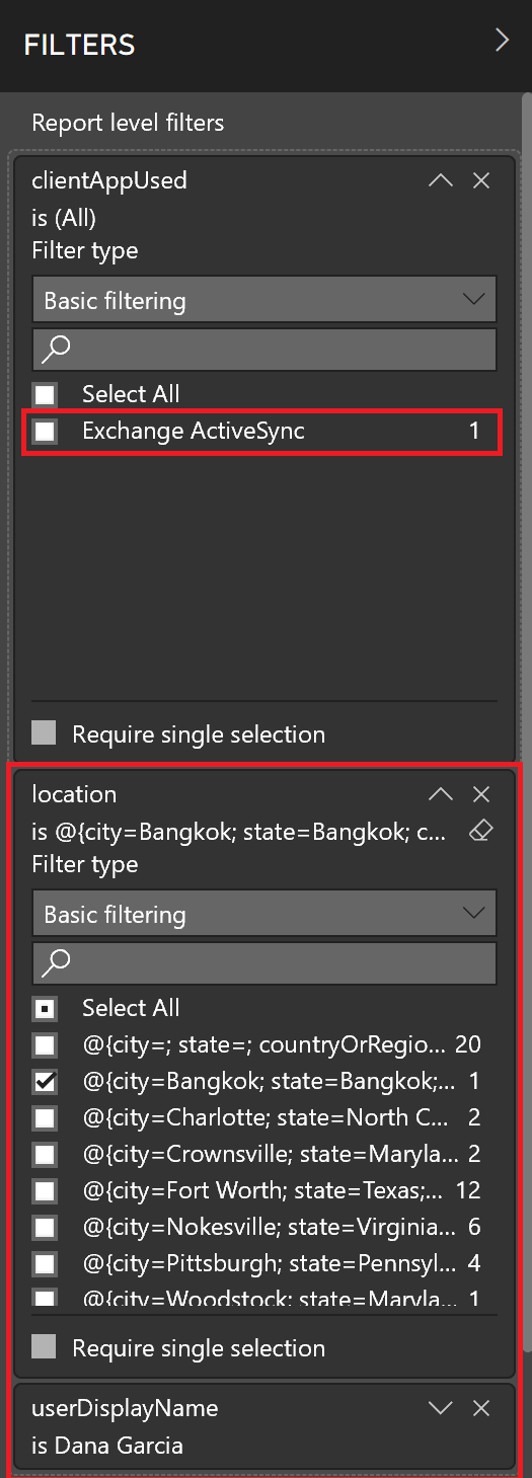
 If there are multiple logins from this location, there could be multiple methods used to login. To determine which methods were used we can use the Filters pane and apply a location and userDisplayName filter. Once this is complete when we expand clientAppUsed only the technology/method of login is left, in this case Exchange ActiveSync.
Conclusion
Using Microsoft Graph, PowerShell, Task Scheduler, and Power BI we created an auto updating report to track Exchange Online user logins.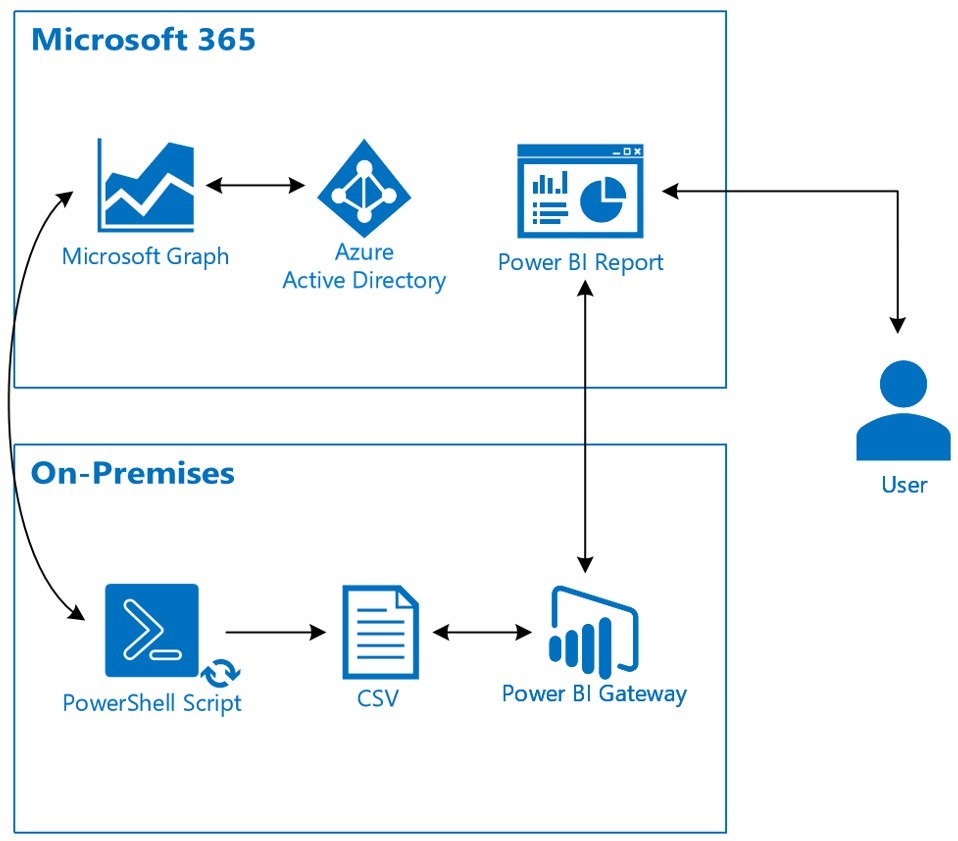 With our new skills Exchange Online doesn’t mark the end of custom reporting for organizations. With Microsoft Graph and Power BI our ability to generate custom reports is stronger than ever! Happy Graphing!
Dana Garcia