Within the support organization at Microsoft we definitely see cases where customers are trying to recover deleted mailboxes. Typically, by the time a customer has contacted us they have tried everything they know as well as suggestions found online to recover the mailbox. It is often a completely avoidable and honest mistake that led to the deletion of the user’s Active Directory account in the first place.
If you ever find yourself having a similarly bad day, then this article is meant to be your guide to not only getting through it, but to also come out of it as a superhero who is able to recover user accounts and mailboxes to a fully functional state without data loss.
What you will learn from this article
The main objective of this article is to help you recover a cloud mailbox after the corresponding on-premises user account has been deleted. If you do not have Directory Synchronization in place, then this article is not for you. With no Directory Synchronization in place you should view this article instead.
Scenario that are covered
There are many different mailbox recovery scenarios you may find yourself in. We will cover the most common scenarios throughout the course of this article to assist you in identifying the best recovery option for your own situation.
- Recover a mailbox that was deleted due to Directory Synchronization filtering changes resulting in filtering out the on-premises Active Directory user account associated with the cloud mailbox
- Recover a mailbox when the on-premises Active Directory user account associated with the cloud mailbox was accidentally or purposely deleted
- Recover a mailbox when the on-premises Active Directory user account associated with the cloud mailbox was accidentally or purposely deleted and the mailbox is on litigation hold
All of the above scenarios have the same result. The associated user account in Office 365 becomes deleted due to one of the scenarios above and causes the mailbox to go into a soft-deleted state. Mailboxes in a soft-deleted state are recoverable for a period of 30 days before they are permanently removed from Office 365 and become unrecoverable.
It is extremely important to attempt a proper user account recovery before blindly creating a new user account and merging the mailbox data. If you are able to restore the user account properly you will likely not lose any of the user data from the other services such as OneDrive and SharePoint. In addition, the user impact is pretty much non-existent when the original account is restored. There would be no need to create new profiles, no need to reset passwords, the user could simply log in and resume working from where they left off before.
Recovery Process
One of the challenges in restoring a mailbox is knowing which recovery option to use. If you know the recovery option you need, then can jump to it using the hyperlinks below. Otherwise we invite you to follow along with the article and we will guide you to the proper place.
- Restore a user account that was removed due to Directory Synchronization scope changes
- Restore a user account that was removed from on-premises AD with the recycle bin enabled
- Restore a user account that was removed from on-premises AD with no recycle bin enabled
- Restore a deleted user’s mailbox data to a new or alternate mailbox
- Restore an inactive user mailbox
Restore a user that was removed due to Directory Synchronization Scope changes
In some of the more complex customer environments it is sometimes beneficial to synchronize only certain Active Directory groups or Organizational Units (OUs) into Office 365. While this is not a common practice for most of our customers the process to configure filtering (if you are not familiar) is documented here. When configured, if a user is moved from an OU that is being synchronized to an OU that is not being synchronized, then Office 365 will see this action as a user account deletion. This causes the user account to be deleted within Office 365 and as a result the user’s mailbox also ends up in the previously mentioned soft-deleted state.
The good news is the recovery for this scenario is quite simple. All you need to do is move the user back into the OU they were originally in. Assuming that the OU the user was previously in is still being synchronized, the next time Directory Synchronization complete the user and all associated data will be restored. By default, directory synchronizations occur every three hours and after you move the user back to the proper OU you will have to wait for the next sync cycle to take place. However, if you are like me and cannot wait, then you can force the synchronization. This article contains the necessary information to force a synchronization to take place immediately.
Restore a user account that was removed from on-premises AD with the recycle bin enabled
This scenario is a bit more common than the previous one. Many of our customers have realized the benefits that come with having the Active Directory recycle bin enabled. If you are not familiar with this feature and you are interested in learning more, then you can check it out here. The Active Directory recycle bin works as it sounds, when an object is deleted you can essentially undo the deletion without the kind of complex AD authoritative restoration process we all used and loved in the past.
The good news is if you have the Active Directory recycle bin feature, it is a valid option to recover the deleted user. However, if you deleted the user prior to enabling this feature in your environment, then it will be of no help.
Recovery steps:
- Follow this guidance to restore the user account using LDP or PowerShell
Note: While less common, if you are using Directory Synchronization filtering (explained here), you need to be sure you restore the user to an OU that is within the Directory Synchronization scope.
- In an environment where more than one domain controller exists, ensure that the restored object has replicated before you proceed.
- Wait until your next Directory Synchronization cycle has complete or follow this article to force an immediate synchronization if you are using AAD Connect
It is that easy and you will end up with the mailbox and all of the rest of the user data intact.
Restore a user account that was removed from on-premises AD with no recycle bin enabled
If you made it this far in the document, you likely are thinking “darn it I should have enabled the recycle bin for Active Directory”. While I agree with that sentiment, all is not lost. You can still recover your user account and mailbox data. In addition, you can still recover the data associated with other services, you just have a more difficult process to follow.
The reason we try so har d to restore the original user account is so all of the data associated with the user is also restored. If you were to recreate a new user account on-premises (even with the same name as the deleted user), when the user syncs to Office 365 it will have a new object GUID. This means that any SharePoint, OneDrive, Exchange, and any other data or permissions associated with the user will be lost.
The last good way to restore a user and all of their associated data may seem a bit backward, but it works and the user will back up and running with their data in no time.
- Before continuing make sure Directory Synchronization is up to date. You can force a sync with AAD Connect rather than waiting for the normal sync window to complete its next cycle.
- In the Office 365 portal (http://portal.office.com), expand the Users pane on the left. Then select the Deleted Users container and identify the user you would like to have restored. Select the object and hit restore on the right hand side of the screen (see image 1). This will restore the cloud user and the associated mailbox, SharePoint, and other service data.

Image 1: Restoring a deleted office 365 user
- Ensure that the restored user has a license assigned. For details on how to license a user go here.
- Return to Users pane on the left once again. Then from the Active Users container, find the restored cloud user. Double-click the user to view the properties and change the UserPrincipalName namespace to the contoso.onmicrosoft.com address of your tenant and then save the changes (see image 2).
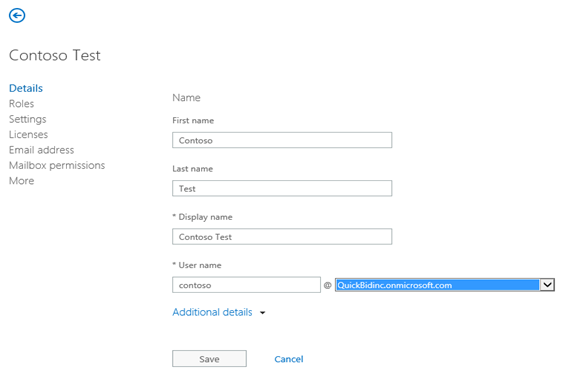
Image 2: Modifying the UPN namespace
- Using the Azure AD PowerShell module, clear the immutableID of the restored Msoluser object by running the cmdlet below. We need to clear the immutableID to allow for a softmatch as the restored Msoluser has the immutableID of the deleted AD user.
Set-Msoluser -UserPrincipalName user@contoso.onmicrosoft.com -ImmutableID “ “
For details on how to install and connect to the Azure AD PowerShell, go here.
- Next, create a new remote mailbox from either the Exchange Admin Center or Exchange Management Console on-premises (see images 3 and 4). It is important to ensure the SMTP address of the new remote mailbox is the same as the SMTP address of the user account that was restored. Meaning if the SMTP address of the user you are restoring is Ted@contoso.com, then the new remote mailbox you should create on-premises should have the same SMTP address. Following this step accurately will ensure a process called soft matching is performed. Soft matching links the new on-premises user account that was created behind the scenes as part of creating a new remote mailbox to the restored cloud mailbox based on the SMTP address.
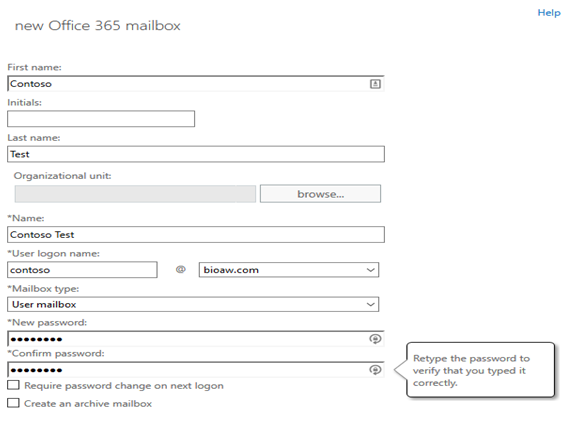
Image 3: Creating a new remote mailbox in Exchange 2013 Admin Center
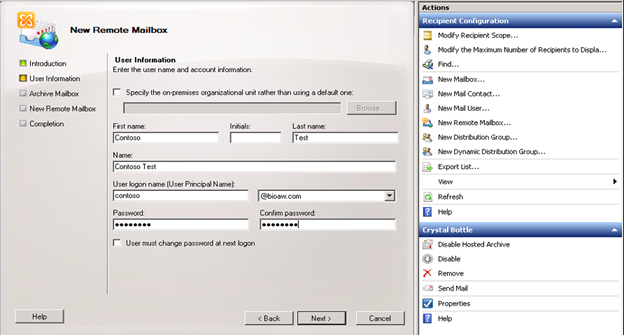
Image 4: Creating a new remote mailbox in Exchange 2010 Management Console
- Again, force a Directory Synchronization. To do that force a sync with AAD Connect. Then back in the portal expand the Users pane on the left again. Then from the Active Users container, find the restored cloud user and double-click on the user to view the properties. Check the UPN to see if it is the same as the newly created on-premises user.
Restore a deleted user’s mailbox data to a new or alternate mailbox
If none of the above recovery options are able to work for your situation, then you can still recover the mailbox data. While this process works and is a great way to recover mailbox data that would otherwise be lost, you still lose data associated with other services such and OneDrive and SharePoint. I would treat option as a last resort after all other options have failed.
The steps outlined in this article will take you through a recovery process that involves creating a new user on-premises, synchronizing that user to Office 365, and merging the data from the soft deleted mailbox.
Restore an inactive user mailbox
The last scenario we are covering is the inactive mailbox scenario. For those that may not know, an Inactive Mailbox is a mailbox associate with a user that was placed on Litigation Hold then deleted. In order to preserve the data and keep it searchable we retain the mailbox contents and allow you to reuse the license that was previously assigned to the deleted user. More information on Inactive Mailboxes can be found here.
If you accidentally deleted a user that was on Litigation Hold and you needed to restore the user, you can follow the steps below.
- Connect to the exchange online PowerShell using your tenant admin credentials, for details go here.
- Run the cmdlet: Get-Mailbox "<UPN of inactive mailbox>" -InactiveMailboxOnly | Select Name, DisplayName, MicrosoftOnlineServicesID, ExchangeGuid
- Run the cmdlet: New-Mailbox -Name "<Name from Step 2>" -InactiveMailbox " <ExchangeGuid from Step 2>" -MicrosoftOnlineServicesID "<MicrosoftOnlineServicesID from Step 2>" -Password (ConvertTo-SecureString -String 'Pa##w0rd goes here' -AsPlainText -Force)
- After the cmdlet in Step 3 completes successfully, wait at least 5 minutes for replication between the exchange online forest and the Azure AD forest. Once the Azure AD object for the new mailbox is visible, apply an exchange online license.
- Then create a new remote mailbox from either Exchange Admin Center or Exchange Management Console on-premises (see image 5 and 6). It is important to make sure that the SMTP address of the new remote mailbox is the same as the SMTP address of the user that was restored. Meaning if the SMTP address of the user you are restoring is Ted@contoso.com, then the new remote mailbox you should create on-premises should have the same SMTP address. This will ensure that we do a process called soft matching that links the on-premises user that was just created to the restored cloud mailbox based on the SMTP address.
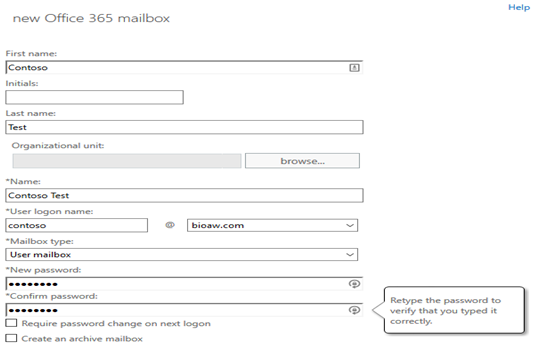
Image 5: Creating a new remote mailbox in Exchange 2013 Admin Center
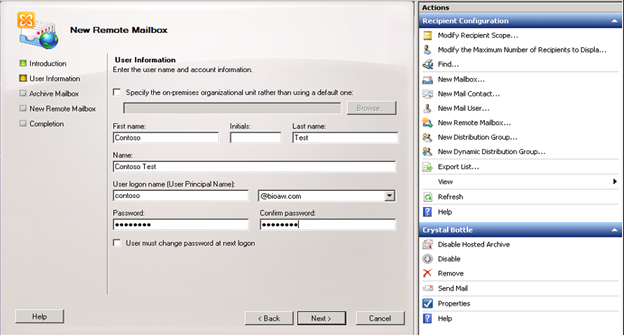
Image 6: Creating a new remote mailbox in Exchange 2010 Management Console
- Again, force a Directory Synchronization, to do that just force a sync with AAD Connect.
- Then back in the portal expand the Users pane on the left again. Then from the Active Users container, find the restored cloud user and double-click on the user to view the properties. Check the UPN to see if it is the same as the newly created on-premises user.
In Summary
It is best to set yourself and your organization up for the easiest possible mailbox and user recovery scenarios. When possible, try to do things like enabling the Active Directory Recycle Bin and educate all of your IT staff on the ramification of deleting users. Also know that in the end there are a lot of ways to recover a user and the associated data, make sure you use the option that fits your needs.
I wanted to thank Timothy Heeney for a lot of help and discussion during the creation of this article.
Bio Awojobi