- Home
- Azure
- Apps on Azure Blog
- Azure Kubernetes Service Baseline - The Hard Way
- Subscribe to RSS Feed
- Mark as New
- Mark as Read
- Bookmark
- Subscribe
- Printer Friendly Page
- Report Inappropriate Content
Azure Kubernetes Service Baseline - The Hard Way
Welcome to "Azure Kubernetes Service - The Hard Way". From this blog, you will learn how to deploy a scalable and resilient Kubernetes cluster on Azure using Azure Kubernetes Service (AKS) and a number of adjacent Azure services. You will also learn how to apply best practices from the AKS baseline reference architecture, which provides a recommended starting point for a general purpose AKS cluster infrastructure.
The target audience of these instructions is intermediate to advanced Kubernetes users who want to improve their skills and knowledge about AKS and Azure. You will need to have some familiarity with Kubernetes concepts and tools such as pods, services, deployments, and kubectl. You will also need to have an Azure subscription with contributor permission and access to a bash shell. We recommend using Azure Cloud Shell for this, as it has all the necessary tools already installed.
To access the cloud shell, you can type shell.azure.com in your web browser. Bear in mind that Cloud Shell times out after around 20 minutes of inactivity. Make sure to copy all the environment variables you will be creating, to a file so that you don't loose them.
Upon finishing, you will have a deeper understanding of how to use AKS to deploy and manage a scalable and resilient Kubernetes cluster on Azure. You will also have a working AKS cluster that follows the AKS baseline reference architecture. Expect the entire exercise to take up to eight hours.
Overview
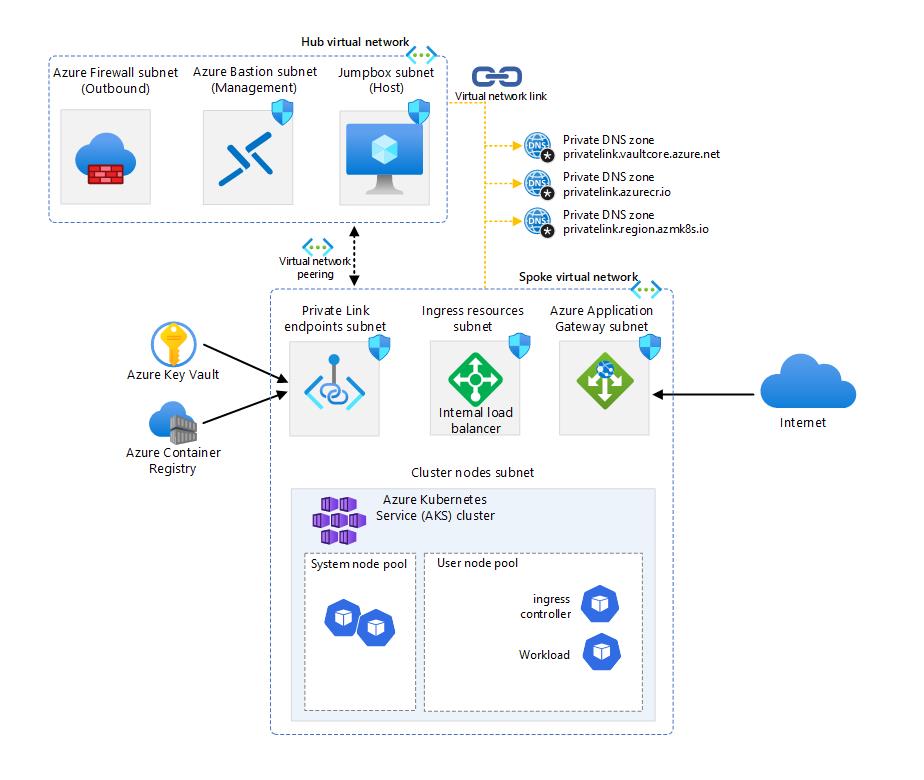
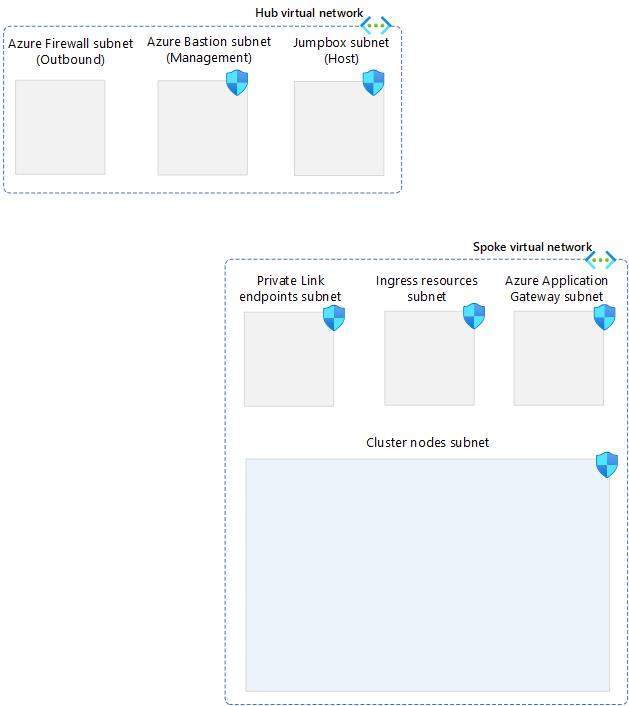
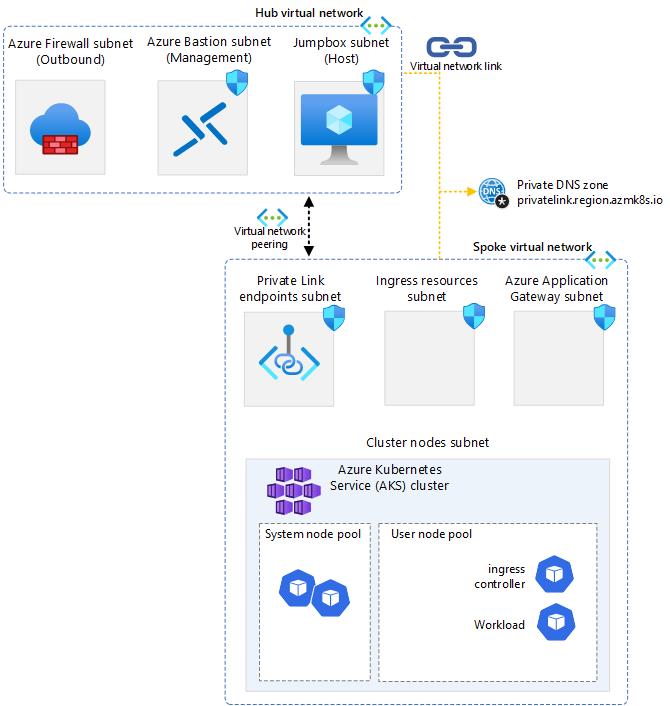
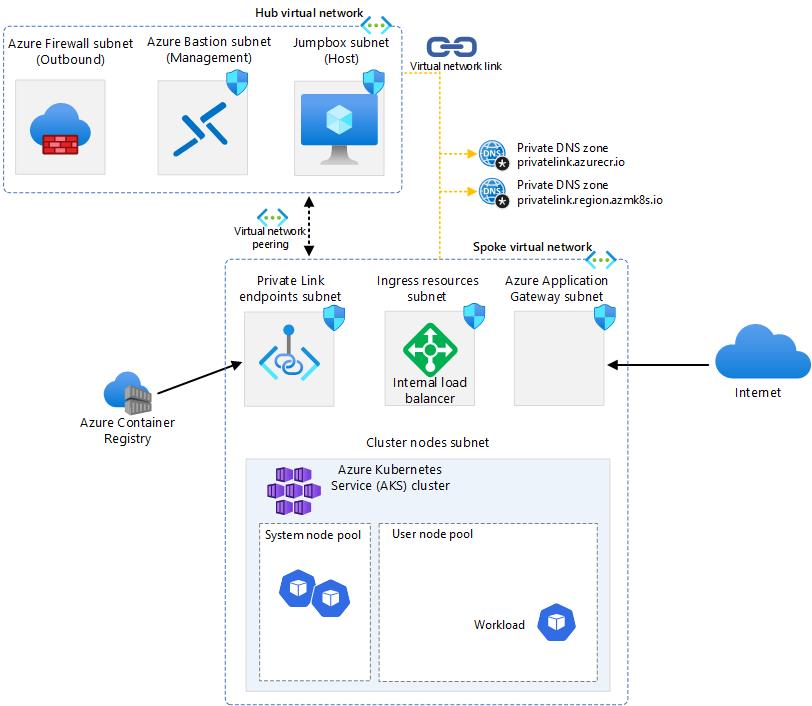
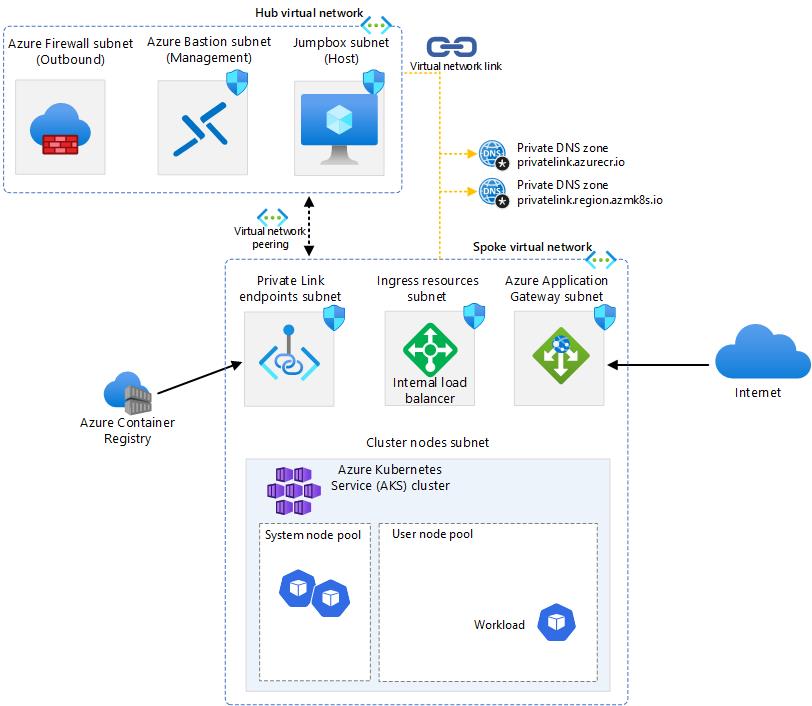
The AKS baseline is a reference architecture that provides a set of best practices and recommendations for deploying a scalable and resilient Azure Kubernetes Service (AKS) cluster. One of the key components of the AKS baseline is the network design, which is divided into several subnets and virtual networks (VNets) to isolate and protect the cluster resources from external and internal threats. In this article, we will describe the purpose and configuration of each subnet and VNet in the AKS baseline, and how they work together to provide a robust network infrastructure for your AKS cluster.
IP Plan
IP planning is an important aspect of deploying an AKS cluster and Azure services in general, as it affects the scalability, performance, security, and availability of the cluster and its workloads. IP planning involves choosing the right network topology, IP address ranges, subnet sizes, and network policies for the cluster and its nodes, pods, and services. For more information on IP planning for an AKS cluster, see Plan IP addressing for your cluster and Best practices for network resources in AKS.
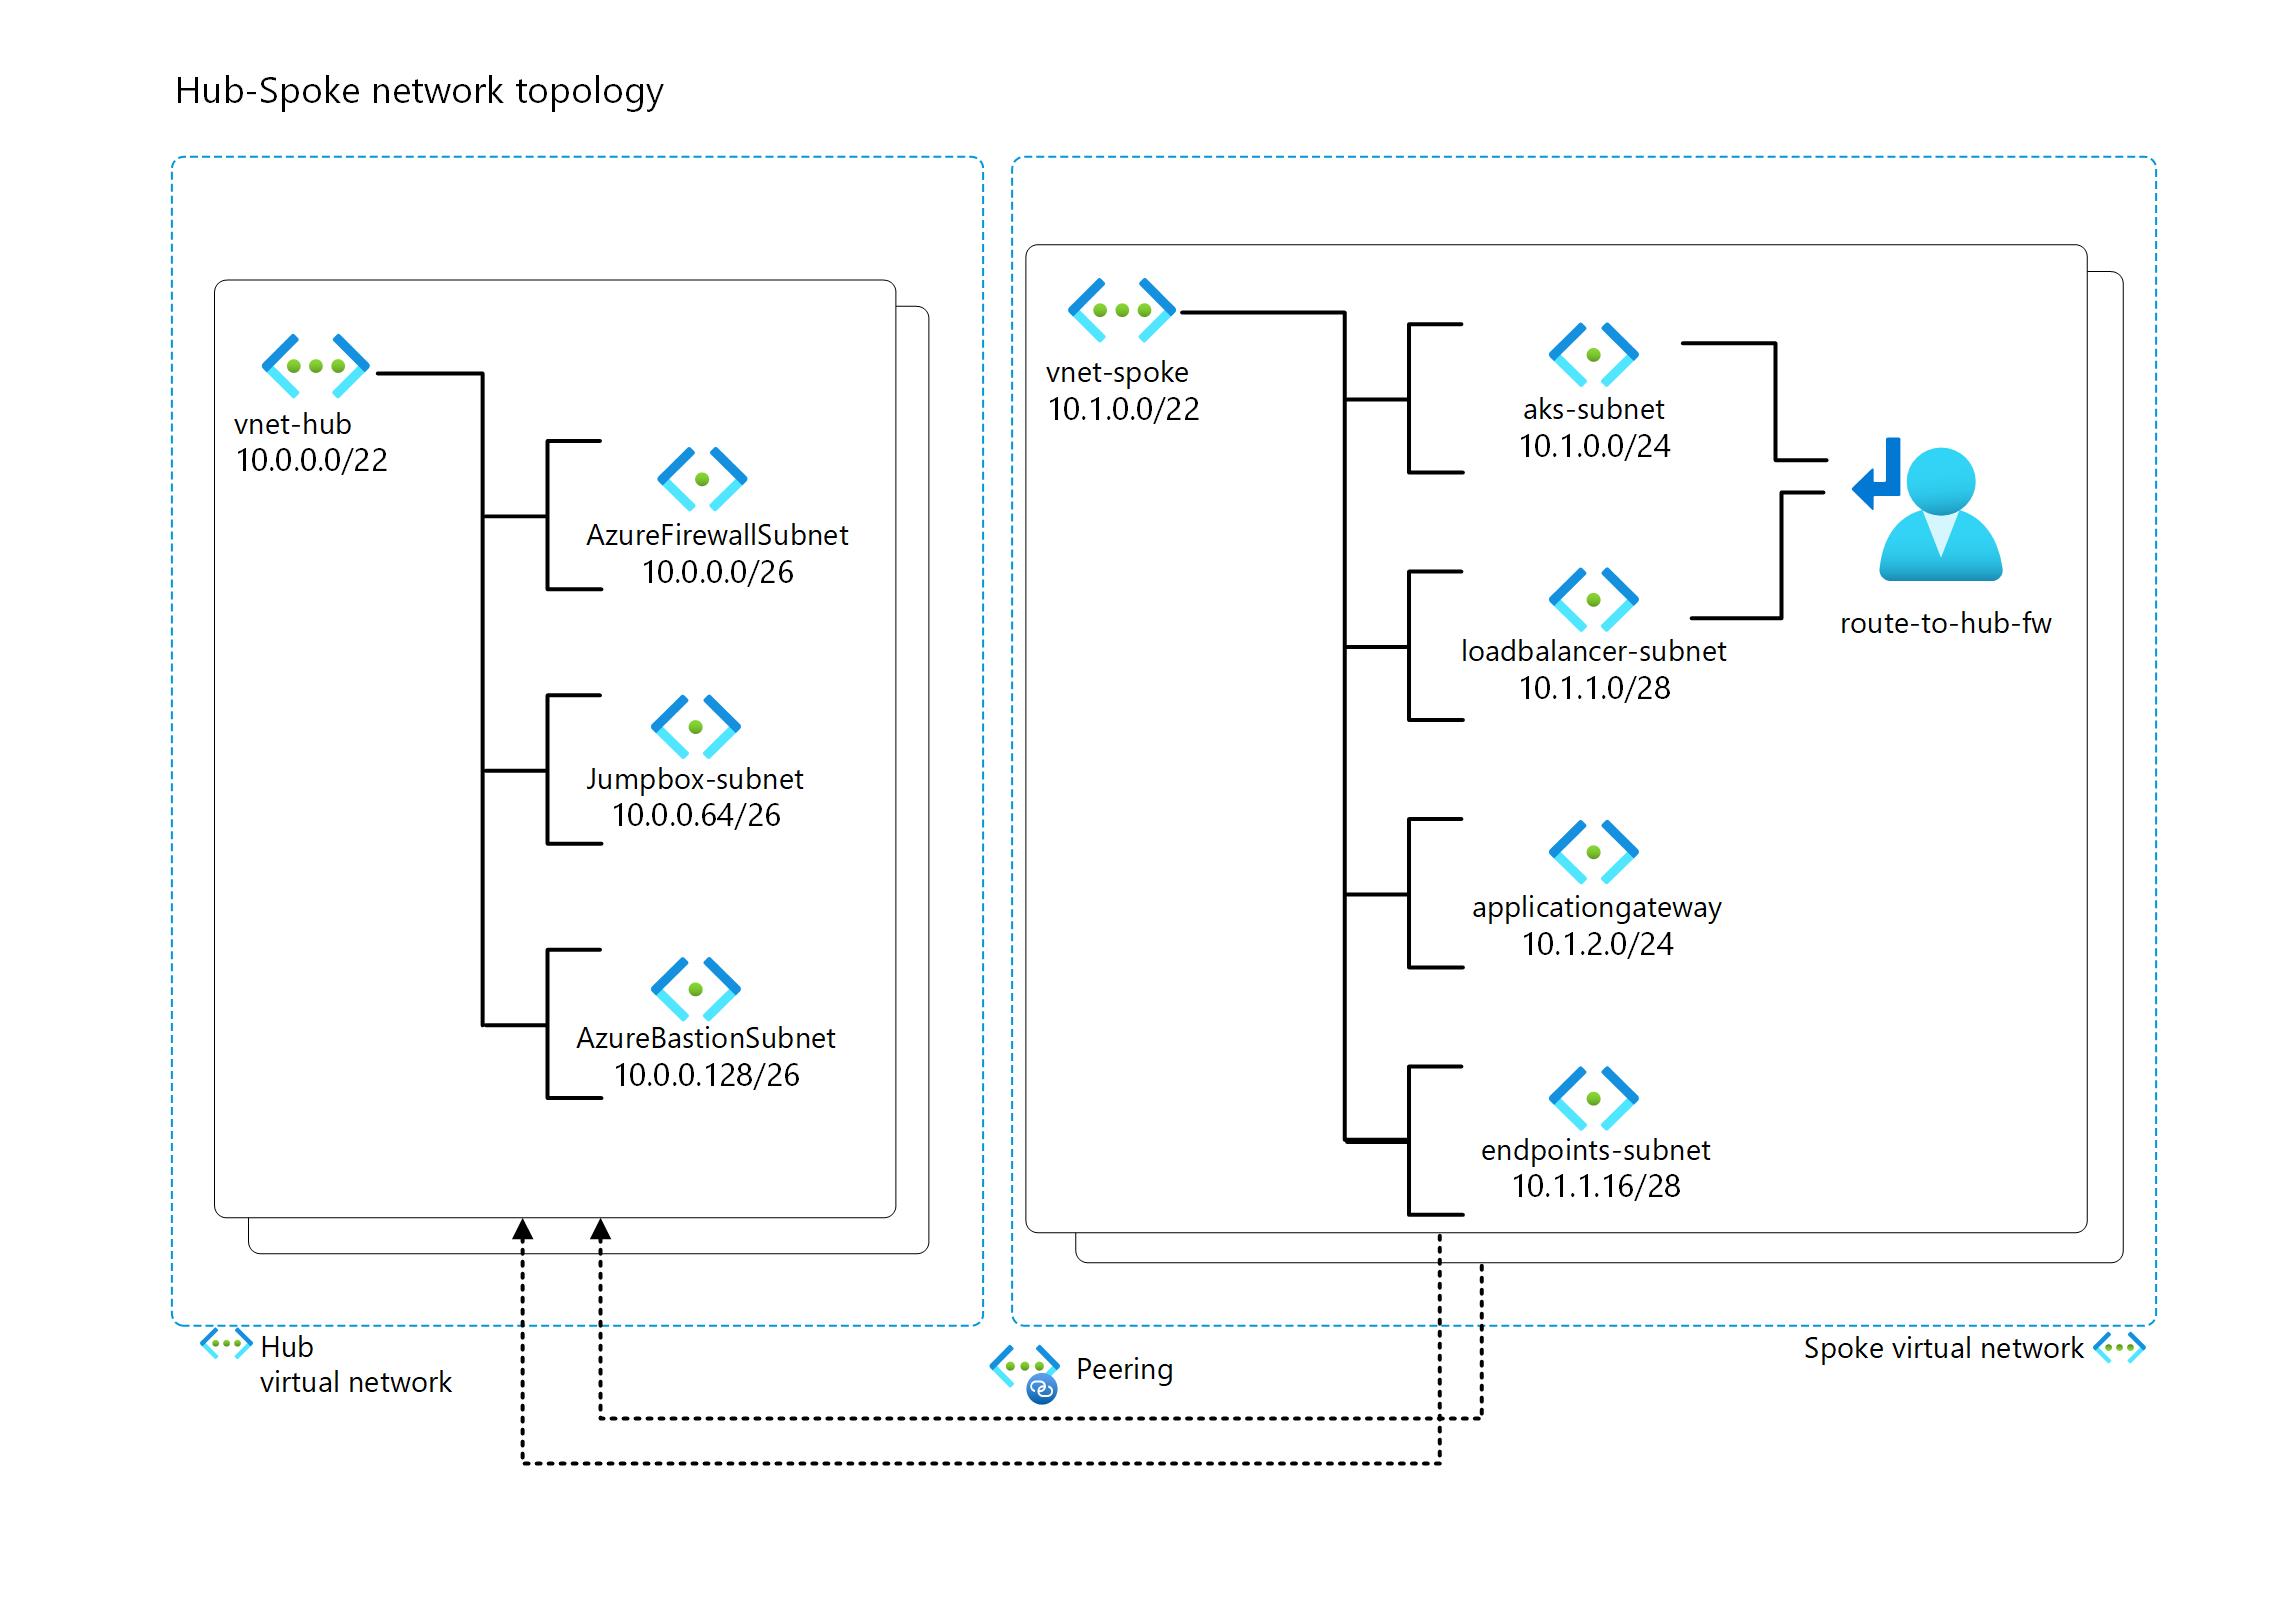
This is the proposed IP design that we will adhere to throughout the documentation.
Note: IP planning is a crucial step that requires careful consideration of the number and size of subnets for your current solution, as well as the potential for future expansion. You should avoid using excessively large IP ranges, and instead be economical with IP and allocate only what you need for the present and the future.
Each subnet in AKS baseline has a specific purpose and configuration, further information can be found below.
Hub VNET
-
Azure Firewall Subnet: This subnet is where the Azure Firewall is deployed. The firewall acts as an egress controller for the AKS cluster, filtering and logging the outbound traffic from the cluster to external resources or services. It also provides network address translation (NAT) functionality, which allows the cluster to access resources that are not reachable by private IP addresses. The subnet size can be small for this particular case, as it only needs to accommodate one firewall instance.
-
Azure Bastion Subnet: This subnet is where the Azure Bastion service is deployed. Azure Bastion is a fully managed service that provides secure and seamless Remote Desktop Protocol (RDP) and Secure Shell (SSH) access to your virtual machines directly through the Azure portal⁴. This subnet is used for management and operations only, and it does not expose any resources to the internet. The subnet name must be AzureBastionSubnet, and the subnet size must be /16 or larger.
-
Jump Box Subnet: This subnet is where the jump server resides, where operation teams can login and access services in the spoke, to perform operations and maintenance.
Spoke VNET
-
Endpoints Subnet: This subnet is where the private endpoints for Azure services are deployed. Private endpoints are a network interface that connects you privately and securely to a service powered by Azure Private Link. Private endpoints allow you to access Azure services, such as Azure Container Registry, Azure Key Vault, or Azure Storage, without exposing them to the internet or requiring a public IP address. The subnet name can be any valid name, and the subnet size depends on the number of private endpoints you need to create.
-
AKS Subnet: This subnet is where the AKS cluster nodes are deployed. It uses Azure CNI networking, which assigns IP addresses from the subnet to each node and pod. The subnet size depends on the number of nodes and pods per node, and it should be large enough to accommodate the expected growth. The subnet also has a Network Security Group (NSG) that controls the inbound and outbound traffic to and from the nodes.
-
Azure Application Gateway Subnet: This subnet is where the Azure Application Gateway is deployed. The application gateway acts as an ingress controller for the AKS cluster, routing external traffic to the appropriate services or pods inside the cluster. It also provides web application firewall (WAF) functionality, which helps protect the applications from common web attacks. The subnet size can be small, as it only needs to accommodate one or more application gateway instances. The subnet also has a NSG that allows inbound traffic on ports 80 and 443, and outbound traffic to the AKS cluster.
-
Azure Loadbalancer Subnet: The load balancer subnet is a part of the network topology that supports the AKS cluster. It is where the internal load balancer (ILB) resides and assigns IP addresses to the services that are exposed within the cluster.
Prepare Environment Variables for HUB VNET and SPOKE VNET
Let’s use the IP plan to set up some environment variables for the Hub VNet and adjust its configuration accordingly to the IP Plan above. Make sure to also save your environment variables to a text file, so that you can restore them later.
Configure the hub according to the IP Plan (see image above).
HUB_VNET_NAME=Hub_VNET
FW_SUBNET_NAME=AzureFirewallSubnet
BASTION_SUBNET_NAME=AzureBastionSubnet
HUB_VNET_PREFIX=10.0.0.0/22 # IP address range of the Virtual network (VNet).
BASTION_SUBNET_PREFIX=10.0.0.128/26 # IP address range of the Bastion subnet
FW_SUBNET_PREFIX=10.0.0.0/26 # IP address range of the Firewall subnet
JUMPBOX_SUBNET_PREFIX=10.0.0.64/26 # IP address range of the Jumpbox subnet
Configure the spoke according to the IP Plan (see image above).
SPOKE_VNET_NAME=Spoke_VNET
JUMPBOX_SUBNET_NAME=JumpboxSubnet
ENDPOINTS_SUBNET_NAME=endpoints-subnet
APPGW_SUBNET_NAME=app-gw-subnet
AKS_SUBNET_NAME=aks-subnet
LOADBALANCER_SUBNET_NAME=loadbalancer-subnet
SPOKE_VNET_PREFIX=10.1.0.0/22 # IP address range of the Virtual network (VNet).
AKS_SUBNET_PREFIX=10.1.0.0/24 # IP address range of the AKS subnet
LOADBALANCER_SUBNET_PREFIX=10.1.1.0/28 # IP address range of the Loadbalancer subnet
APPGW_SUBNET_PREFIX=10.1.2.0/24 # IP address range of the Application Gateway subnet
ENDPOINTS_SUBNET_PREFIX=10.1.1.16/28 # IP address range of the Endpoints subnet
Infrastructure Deployment
The objective of this part is to guide you through the process of deploying the AKS baseline infrastructure. The infrastructure consists of the essential components and configurations that are required for running a secure and scalable AKS cluster.
Prepare Environment Variables for infrastructure
This configuration sets up environment variables for the names and locations of various network and security resources, such as resource groups, virtual networks, subnets, network security groups, firewall, application gateway, route table, identity, virtual machines, AKS cluster, and ACR registry.
Note: Since the Azure container registry has a globally unique FQDN name, you need to assign a distinct value to the ACR_NAME environment variable, else the ACR deployment will fail. Also, the ACR name can only container lowercase letters and numbers.
HUB_RG=rg-hub
SPOKE_RG=rg-spoke
LOCATION=eastus
BASTION_NSG_NAME=Bastion_NSG
JUMPBOX_NSG_NAME=Jumpbox_NSG
AKS_NSG_NAME=Aks_NSG
ENDPOINTS_NSG_NAME=Endpoints_NSG
LOADBALANCER_NSG_NAME=Loadbalancer_NSG
APPGW_NSG=Appgw_NSG
FW_NAME=azure-firewall
APPGW_NAME=AppGateway
ROUTE_TABLE_NAME=spoke-rt
AKS_IDENTITY_NAME=aks-msi
JUMPBOX_VM_NAME=Jumpbox-VM
AKS_CLUSTER_NAME=private-aks
ACR_NAME=<Globally unique name of the azure container registry>
STUDENT_NAME=<e.g. your first name> # don't use spaces
Create the Resource Groups for the Hub and Spoke.
az group create --name $HUB_RG --location $LOCATION
az group create --name $SPOKE_RG --location $LOCATION
Create Network Security Groups (NSG) and Virtual Network (VNET) for the Hub.
In this step, we will begin by establishing Network Security Groups (NSGs) that will subsequently be associated with their respective subnet. It is crucial to note that there are specific prerequisites concerning security rules for certain subnets that must be met before a service can be deployed. Azure Bastion is one of them.
For Azure Bastion, we are establishing security rules to permit both the control and data plane access to the AzureBastion. For a more detailed understanding of these rules, please refer to the following resource: More Information.
- Create the NSG for AzureBastionSubnet.
az network nsg create \
    --resource-group $HUB_RG \
    --name $BASTION_NSG_NAME \
    --location $LOCATION
- Associate the required inbound security rules to the NSG.
    az network nsg rule create --name AllowHttpsInbound \
    --nsg-name $BASTION_NSG_NAME --priority 120 --resource-group $HUB_RG\
    --access Allow --protocol TCP --direction Inbound \
    --source-address-prefixes "Internet" \
    --source-port-ranges "*" \
    --destination-address-prefixes "*" \
    --destination-port-ranges "443"

   	az network nsg rule create --name AllowGatewayManagerInbound \
    --nsg-name $BASTION_NSG_NAME --priority 130 --resource-group $HUB_RG\
    --access Allow --protocol TCP --direction Inbound \
    --source-address-prefixes "GatewayManager" \
    --source-port-ranges "*" \
    --destination-address-prefixes "*" \
    --destination-port-ranges "443"

	az network nsg rule create --name AllowAzureLoadBalancerInbound \
    --nsg-name $BASTION_NSG_NAME --priority 140 --resource-group $HUB_RG\
    --access Allow --protocol TCP --direction Inbound \
    --source-address-prefixes "AzureLoadBalancer" \
    --source-port-ranges "*" \
    --destination-address-prefixes "*" \
    --destination-port-ranges "443"


	az network nsg rule create --name AllowBastionHostCommunication \
    --nsg-name $BASTION_NSG_NAME --priority 150 --resource-group $HUB_RG\
    --access Allow --protocol TCP --direction Inbound \
    --source-address-prefixes "VirtualNetwork" \
    --source-port-ranges "*" \
    --destination-address-prefixes "VirtualNetwork" \
    --destination-port-ranges 8080 5701
- Associate the required outbound security rules to the NSG.
    az network nsg rule create --name AllowSshRdpOutbound \
    --nsg-name $BASTION_NSG_NAME --priority 100 --resource-group $HUB_RG\
    --access Allow --protocol "*" --direction outbound \
    --source-address-prefixes "*" \
    --source-port-ranges "*" \
    --destination-address-prefixes "VirtualNetwork" \
    --destination-port-ranges 22 3389

    az network nsg rule create --name AllowAzureCloudOutbound \
    --nsg-name $BASTION_NSG_NAME --priority 110 --resource-group $HUB_RG\
    --access Allow --protocol Tcp --direction outbound \
    --source-address-prefixes "*" \
    --source-port-ranges "*" \
    --destination-address-prefixes "AzureCloud" \
    --destination-port-ranges 443

	az network nsg rule create --name AllowBastionCommunication \
    --nsg-name $BASTION_NSG_NAME --priority 120 --resource-group $HUB_RG\
    --access Allow --protocol "*" --direction outbound \
    --source-address-prefixes "VirtualNetwork" \
    --source-port-ranges "*" \
    --destination-address-prefixes "VirtualNetwork" \
    --destination-port-ranges 8080 5701

	az network nsg rule create --name AllowHttpOutbound \
    --nsg-name $BASTION_NSG_NAME --priority 130 --resource-group $HUB_RG\
    --access Allow --protocol "*" --direction outbound \
    --source-address-prefixes "*" \
    --source-port-ranges "*" \
    --destination-address-prefixes "Internet" \
    --destination-port-ranges 80
- Create an NSG for the JumpBox subnet.
az network nsg create \
    --resource-group $HUB_RG \
    --name $JUMPBOX_NSG_NAME \
    --location $LOCATION
- Create the HUB VNET with one subnet for Azure Bastion Subnet and associate it to the bastion NSG.
az network vnet create \
    --resource-group $HUB_RG  \
    --name $HUB_VNET_NAME \
    --address-prefixes $HUB_VNET_PREFIX \
    --subnet-name $BASTION_SUBNET_NAME \
    --subnet-prefixes $BASTION_SUBNET_PREFIX \
    --network-security-group $BASTION_NSG_NAME
- Create a subnet for the Azure Firewall.
az network vnet subnet create \
    --resource-group $HUB_RG  \
    --vnet-name $HUB_VNET_NAME \
    --name $FW_SUBNET_NAME \
    --address-prefixes $FW_SUBNET_PREFIX
- Create a subnet for the Virtual Machine that will be used as "jumpbox".
az network vnet subnet create \
    --resource-group $HUB_RG  \
    --vnet-name $HUB_VNET_NAME \
    --name $JUMPBOX_SUBNET_NAME \
    --address-prefixes $JUMPBOX_SUBNET_PREFIX \
    --network-security-group $JUMPBOX_NSG_NAME
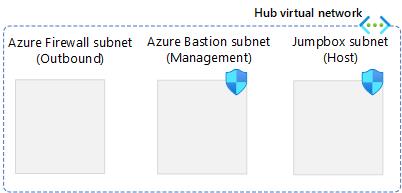
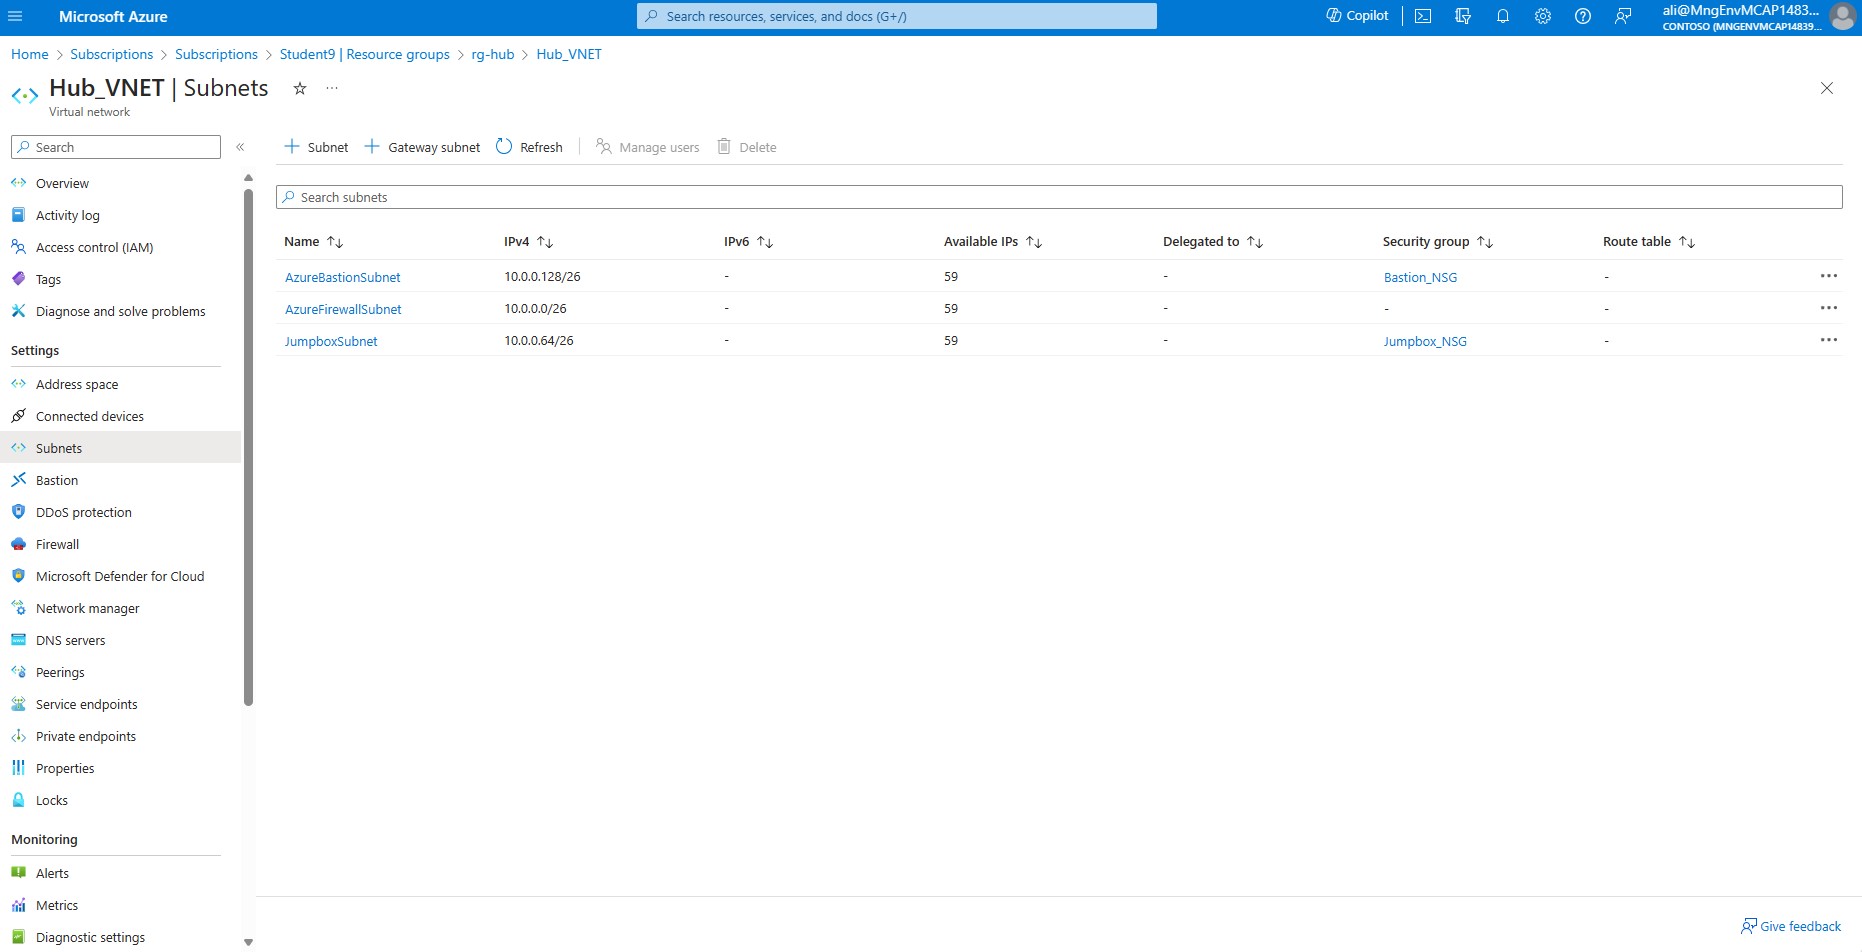
You have successfully configured the network for your hub virtual network.You have established three subnets and two NSGs, as depicted on the image:
-
To Validate your deployment, navigate to the Azure portal at https://portal.azure.com and enter your login credentials.
-
Once logged in, locate and select your resource group called rg-hub where the hub vnet is deployed.
-
Select your vnet called HUB_VNET.
-
In the left-hand side menu, under the Settings section, select Subnets.
-
Make sure that your subnets have the appropriate IP range and that Network Security Groups (NSGs) are correctly associated with their respective subnets as depicted below.
Create Network Security Groups and Virtual Network for the Spoke.
We will now start to setup the spoke vnet, subnets and their respective NSGs.
- Create the NSG for AKS subnet.
az network nsg create \
    --resource-group $SPOKE_RG \
    --name $AKS_NSG_NAME \
    --location $LOCATION
- Create the NSG for endpoints subnet, were the endpoints will reside.
az network nsg create \
    --resource-group $SPOKE_RG \
    --name $ENDPOINTS_NSG_NAME \
    --location $LOCATION
- Create the NSG for load balancer subnet, were the internal load balancer will reside.
az network nsg create \
    --resource-group $SPOKE_RG \
    --name $LOADBALANCER_NSG_NAME \
    --location $LOCATION
- To use an NSG with your application gateway, you need to open these port ranges:
Inbound rules: The Internet service tag needs access to port 65200-65535 for the backend health API. Your application traffic needs access to TCP port 80 and/or 443. for futher information refer to Required security rules for Application Gateway for more information.
az network nsg create \
    --resource-group $SPOKE_RG \
    --name $APPGW_NSG \
    --location $LOCATION
- Create the NSG rule to allow application traffic, on port 443 and 80.
# Allow Internet Client request on Port 443 and 80
az network nsg rule create \
    --resource-group $SPOKE_RG \
    --nsg-name $APPGW_NSG \
    --name Allow-Internet-Inbound-HTTP-HTTPS \
    --priority 100 \
    --source-address-prefixes Internet \
    --destination-port-ranges 80 443 \
    --access Allow \
    --protocol Tcp \
    --description "Allow inbound traffic to port 80 and 443 to Application Gateway from client requests originating from the Internet"
- Create the NSG rule to allow application traffic, on port range 65200-65535.
# Infrastructure ports
az network nsg rule create \
    --resource-group $SPOKE_RG \
    --nsg-name $APPGW_NSG \
    --name Allow-GatewayManager-Inbound \
    --priority 110 \
    --source-address-prefixes "GatewayManager" \
    --destination-port-ranges 65200-65535 \
    --access Allow \
    --protocol Tcp \
    --description "Allow inbound traffic to ports 65200-65535 from GatewayManager service tag"
- Create the spoke VNET with one subnet for AKS Subnet and associate it to the AKS NSG.
az network vnet create \
    --resource-group $SPOKE_RG  \
    --name $SPOKE_VNET_NAME \
    --address-prefixes $SPOKE_VNET_PREFIX \
    --subnet-name $AKS_SUBNET_NAME \
    --subnet-prefixes $AKS_SUBNET_PREFIX \
	--network-security-group $AKS_NSG_NAME
- Create the subnet for Endpoints and associate it to the endpoints NSG.
az network vnet subnet create \
    --resource-group $SPOKE_RG  \
    --vnet-name $SPOKE_VNET_NAME  \
    --name $ENDPOINTS_SUBNET_NAME \
    --address-prefixes $ENDPOINTS_SUBNET_PREFIX \
	--network-security-group $ENDPOINTS_NSG_NAME
- Create subnet for the load balancer that will be used for ingress traffic and associate it to the loadbalancer NSG.
az network vnet subnet create \
    --resource-group $SPOKE_RG  \
    --vnet-name $SPOKE_VNET_NAME \
    --name $LOADBALANCER_SUBNET_NAME \
    --address-prefixes $LOADBALANCER_SUBNET_PREFIX \
	--network-security-group $LOADBALANCER_NSG_NAME
- Create subnet for the Application Gateway and associate it to the Application Gateway NSG.
az network vnet subnet create \
    --resource-group $SPOKE_RG  \
    --vnet-name $SPOKE_VNET_NAME \
    --name $APPGW_SUBNET_NAME \
    --address-prefixes $APPGW_SUBNET_PREFIX \
	--network-security-group $APPGW_NSG
You have successfully configured the network for your spoke virtual network. You should now have established the following setup in your Azure subscription.
-
Navigate to the Azure portal at https://portal.azure.com again.
-
Locate and select your resource group called rg-spoke where the spoke vnet is deployed.
-
Select the vnet called Spoke_VNET.
-
In the left-hand side menu, under the Settings section, select Subnets.
-
Make sure that your subnets have the appropriate IP range and that Network Security Groups (NSGs) are correctly associated with their respective subnets.

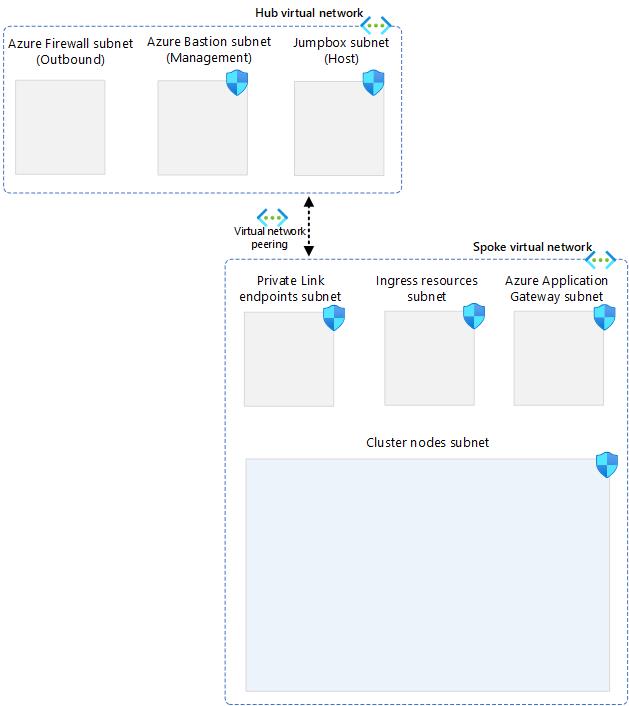
Create VNET Peering Between Hub and Spoke
The next step is to create a virtual network peering between the hub and spoke VNets. This will enable the communication between the VNETs and allow the AKS cluster to route traffic to the Firewall.
- Before we can do a VNET peering we need to obtain the full resource id of the Spoke_VNET and Hub_VNET as they resides in different resource groups.
SPOKE_VNET_ID=$(az network vnet show --resource-group $SPOKE_RG --name $SPOKE_VNET_NAME --query id --output tsv)
HUB_VNET_ID=$(az network vnet show --resource-group $HUB_RG --name $HUB_VNET_NAME --query id --output tsv)
- Now, create a peering connection from the hub to the spoke virtual network.
az network vnet peering create \
    --resource-group $HUB_RG  \
    --name hub-to-spoke \
    --vnet-name $HUB_VNET_NAME \
    --remote-vnet $SPOKE_VNET_ID \
    --allow-vnet-access
- Then create a peering connection from the spoke to hub virtual network.
az network vnet peering create \
    --resource-group $SPOKE_RG  \
    --name spoke-to-hub \
    --vnet-name $SPOKE_VNET_NAME \
    --remote-vnet $HUB_VNET_ID \
    --allow-vnet-access
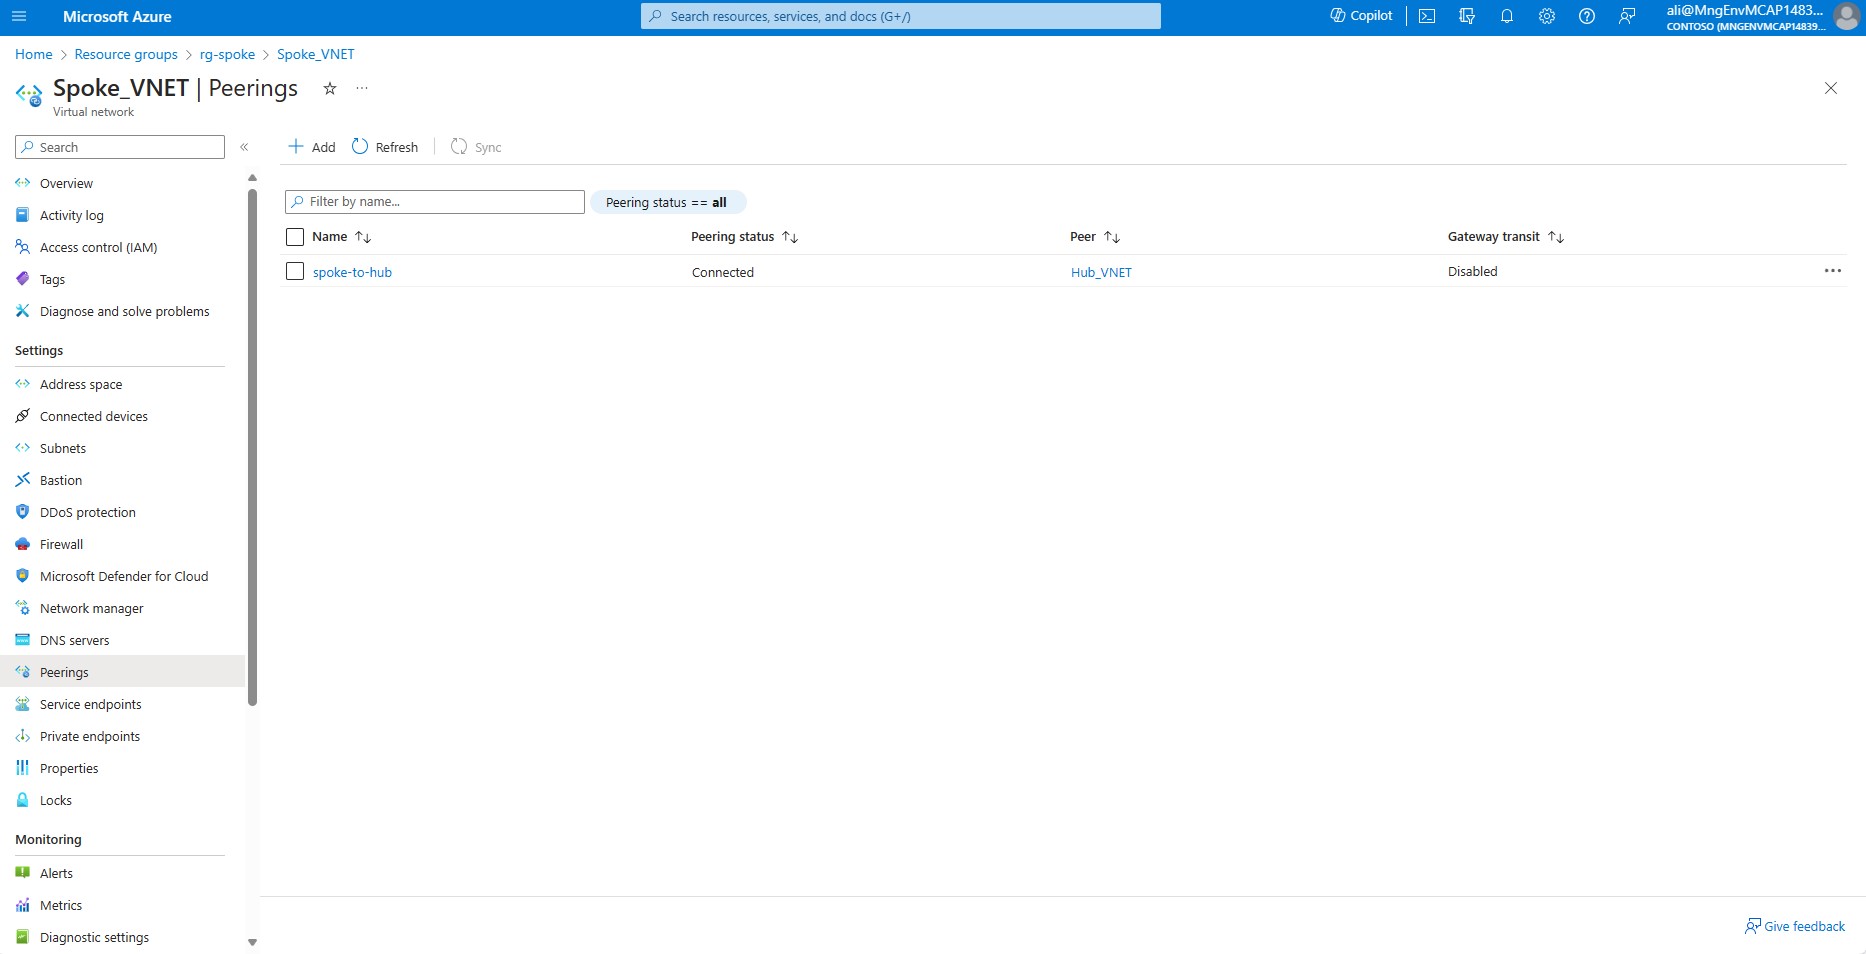
Peering should be established and the high level design should now look like this:
-
Navigate to the Azure portal at https://portal.azure.com
-
Locate and select the resource group called rg-spoke where the spoke vnet is deployed.
-
Select the vnet called Spoke_VNET.
-
In the left-hand side menu, under the Settings section, select peerings.
-
Ensure that the peering status is set to Connected.
-
Repeat step 4 - 7 but for Hub_VNET.
Create Azure Bastion and Jumpbox VM
- The Bastion Host needs a Public IP. Create the Public IP address.
az network public-ip create \
    --resource-group $HUB_RG  \
    --name Bastion-PIP \
    --sku Standard \
    --allocation-method Static
- Create JumpBox Virtual Machine.
Note: Ensure you specify a password for the admin user called azureuser. The password length must be between 12 and 72. Password must have 3 of the following: 1 lower case character, 1 upper case character, 1 number and 1 special character.
az vm create \
    --resource-group $HUB_RG \
    --name $JUMPBOX_VM_NAME \
    --image Ubuntu2204 \
    --admin-username azureuser \
    --admin-password <SPECIFY A PASSWORD HERE> \
    --vnet-name $HUB_VNET_NAME \
    --subnet $JUMPBOX_SUBNET_NAME \
    --size Standard_B2s \
    --storage-sku Standard_LRS \
    --os-disk-name $JUMPBOX_VM_NAME-VM-osdisk \
    --os-disk-size-gb 128 \
    --public-ip-address "" \
    --nsg ""
- Create the bastion host in hub vnet and associate it to the public IP.
Note: Azure Bastion service requires a dedicated subnet named AzureBastionSubnet to provide secure and seamless RDP/SSH connectivity to your virtual machines. When you deploy Azure Bastion service, it will automatically create this subnet for you, if it does not exist in the target virtual network. However, if the subnet already exists, it must meet the minimum size of /26 or larger, otherwise the deployment will fail.
az network bastion create \
    --resource-group $HUB_RG \
    --name bastionhost \
    --public-ip-address Bastion-PIP \
    --vnet-name $HUB_VNET_NAME \
    --location $LOCATION
-
Upon successful installation of the Jumpbox Virtual Machine (VM). Navigate to the Azure portal at https://portal.azure.com
-
Locate and select your rg-hub where the Jumpbox has been deployed.
-
Within your resource group, find and click on the Jumpbox VM.
-
In the left-hand side menu, under the Connect section, select ‘Bastion’.
-
Enter the credentials for the Jumpbox VM and verify that you can log in successfully.
For additional information on accessing VMs through Bastion, please refer to this Microsoft Azure Bastion tutorial
After completing these steps, The high-level targeted architecture now matches the following diagram:
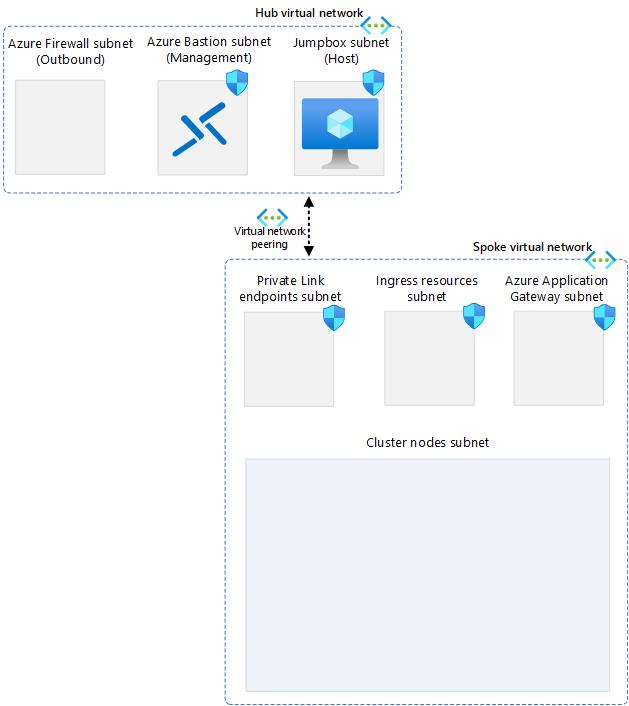
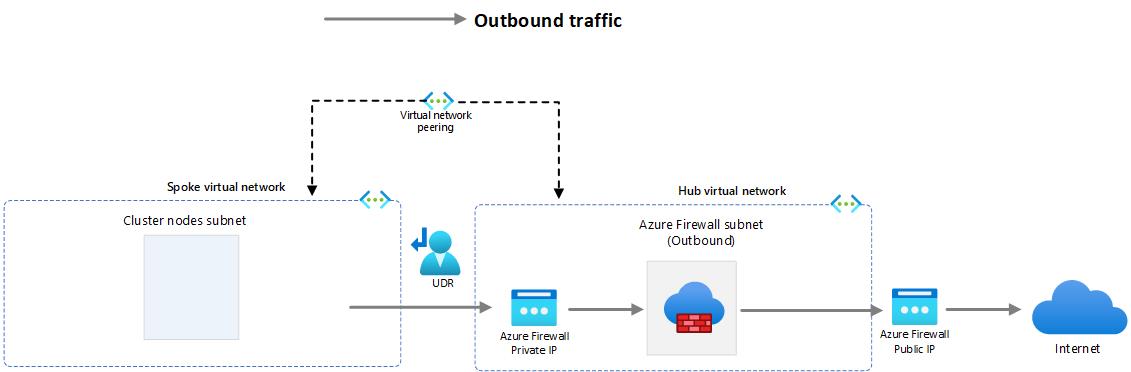
Create an Azure Firewall and Setup a User Defined Route (UDR)
To secure your outbound traffic, you can use an Azure Firewall. The following steps will help you restrict the outbound access and to certain FQDNs that are needed by the cluster. further information can be found here: Control egress traffic using Azure Firewall in Azure Kubernetes Service (AKS)
- Create Azure Firewall, and deploy it to it to firewall subnet in hub vnet.
az network firewall create \
    --resource-group $HUB_RG \
    --name $FW_NAME \
    --location $LOCATION \
    --vnet-name $HUB_VNET_NAME \
    --enable-dns-proxy true
- The firewall needs a Public IP address. Create the Public IP.
az network public-ip create \
    --name fw-pip \
    --resource-group $HUB_RG \
    --location $LOCATION \
    --allocation-method static \
    --sku standard
- Associate the public IP address with the Firewall.
az network firewall ip-config create \
    --firewall-name $FW_NAME \
    --name FW-config \
    --public-ip-address fw-pip \
    --resource-group $HUB_RG \
    --vnet-name $HUB_VNET_NAME
- Update the existing Azure Firewall configuration.
az network firewall update \
    --name $FW_NAME \
    --resource-group $HUB_RG
- Create Network rules in Azure Firewall.
The following network rules allows outbound traffic from any source address to certain destinations and ports. If the required destination is not specified the AKS cluster will fail to deploy.
Please note that these transactions are slow. Expect each rule to require around 5 minutes to complete.
az network firewall network-rule create -g $HUB_RG -f $FW_NAME --collection-name 'aksfwnr' -n 'apiudp' --protocols 'UDP' --source-addresses '*' --destination-addresses "AzureCloud.$LOCATION" --destination-ports 1194 --action allow --priority 100


az network firewall network-rule create -g $HUB_RG -f $FW_NAME --collection-name 'aksfwnr' -n 'apitcp' --protocols 'TCP' --source-addresses '*' --destination-addresses "AzureCloud.$LOCATION" --destination-ports 9000


az network firewall network-rule create -g $HUB_RG -f $FW_NAME --collection-name 'aksfwnr' -n 'time' --protocols 'UDP' --source-addresses '*' --destination-fqdns 'ntp.ubuntu.com' --destination-ports 123
- Create Azure Firewall application rule.
This rule specifies the FQDN's which are required by AKS, AzureKubernetesService tag which include all the FQDNs listed in Outbound network and FQDN rules for AKS clusters.
For more information about required egress destinations, see Outbound network and FQDN rules for Azure Kubernetes Service (AKS) clusters
az network firewall application-rule create -g $HUB_RG -f $FW_NAME --collection-name 'aksfwar' -n 'fqdn' --source-addresses '*' --protocols 'http=80' 'https=443' --fqdn-tags "AzureKubernetesService" --action allow --priority 100
- Create a route table in the spoke.
az network route-table create \
    --resource-group $SPOKE_RG  \
    --name $ROUTE_TABLE_NAME
- Create a route to the internet via the Azure Firewall.
In order to create the route we need to obtain the private IP address of the Firewall.To get the private IP address of the Firewall, you need to run the following command:
az network firewall show --resource-group $HUB_RG --name $FW_NAME |grep privateIPAddress
Then store the output (the ip address) in an environment variable:
FW_PRIVATE_IP=<IP Address from previous command>
Create the route table to route egress traffic to the firewall in the hub VNET:
az network route-table route create \
    --resource-group $SPOKE_RG  \
    --name default-route \
    --route-table-name $ROUTE_TABLE_NAME \
    --address-prefix 0.0.0.0/0 \
    --next-hop-type VirtualAppliance \
    --next-hop-ip-address $FW_PRIVATE_IP
Note: The route will direct all traffic (0.0.0.0/0) to the next hop type of VirtualAppliance, which is the firewall instance. The next hop IP address is the private IP address of the firewall, which is stored in the environment variable $FW_PRIVATE_IP. This way, the traffic from the AKS subnet will be routed to the firewall instance on its private endpoint. This will allow you to perform inspection on outbound traffic.
- Associate the route table with the AKS subnet.
az network vnet subnet update \
    --resource-group $SPOKE_RG  \
    --vnet-name $SPOKE_VNET_NAME \
    --name $AKS_SUBNET_NAME \
    --route-table $ROUTE_TABLE_NAME
You have successfully configured the firewall in the hub VNet, set up network and application rules, and created a route table associated with the AKS subnet to direct all internet-bound traffic through the Azure Firewall.

-
To validate your deployment, navigate to the Azure portal at https://portal.azure.com
-
Locate and select your resource group called rg-hub where the hub vnet is deployed.
-
Select your firewall called azure-firewall.
-
In the left-hand side menu, under the Settings section, select Rules.
-
Click on Network rule collection
-
Verify that you have a network rule collection called aksfwnr which should contain 3 rules. Inspect the rules.

-
Click on Application rule collection.
-
Verify that you have an application rule collection called aksfwar which should contain 1 rule. Inspect the rule.

-
Lets validate the routing between AKS subnet and Azure Firewall, in the Azure portal, in the top menu select Resource Groups.
-
Select resource group rg-spoke.
-
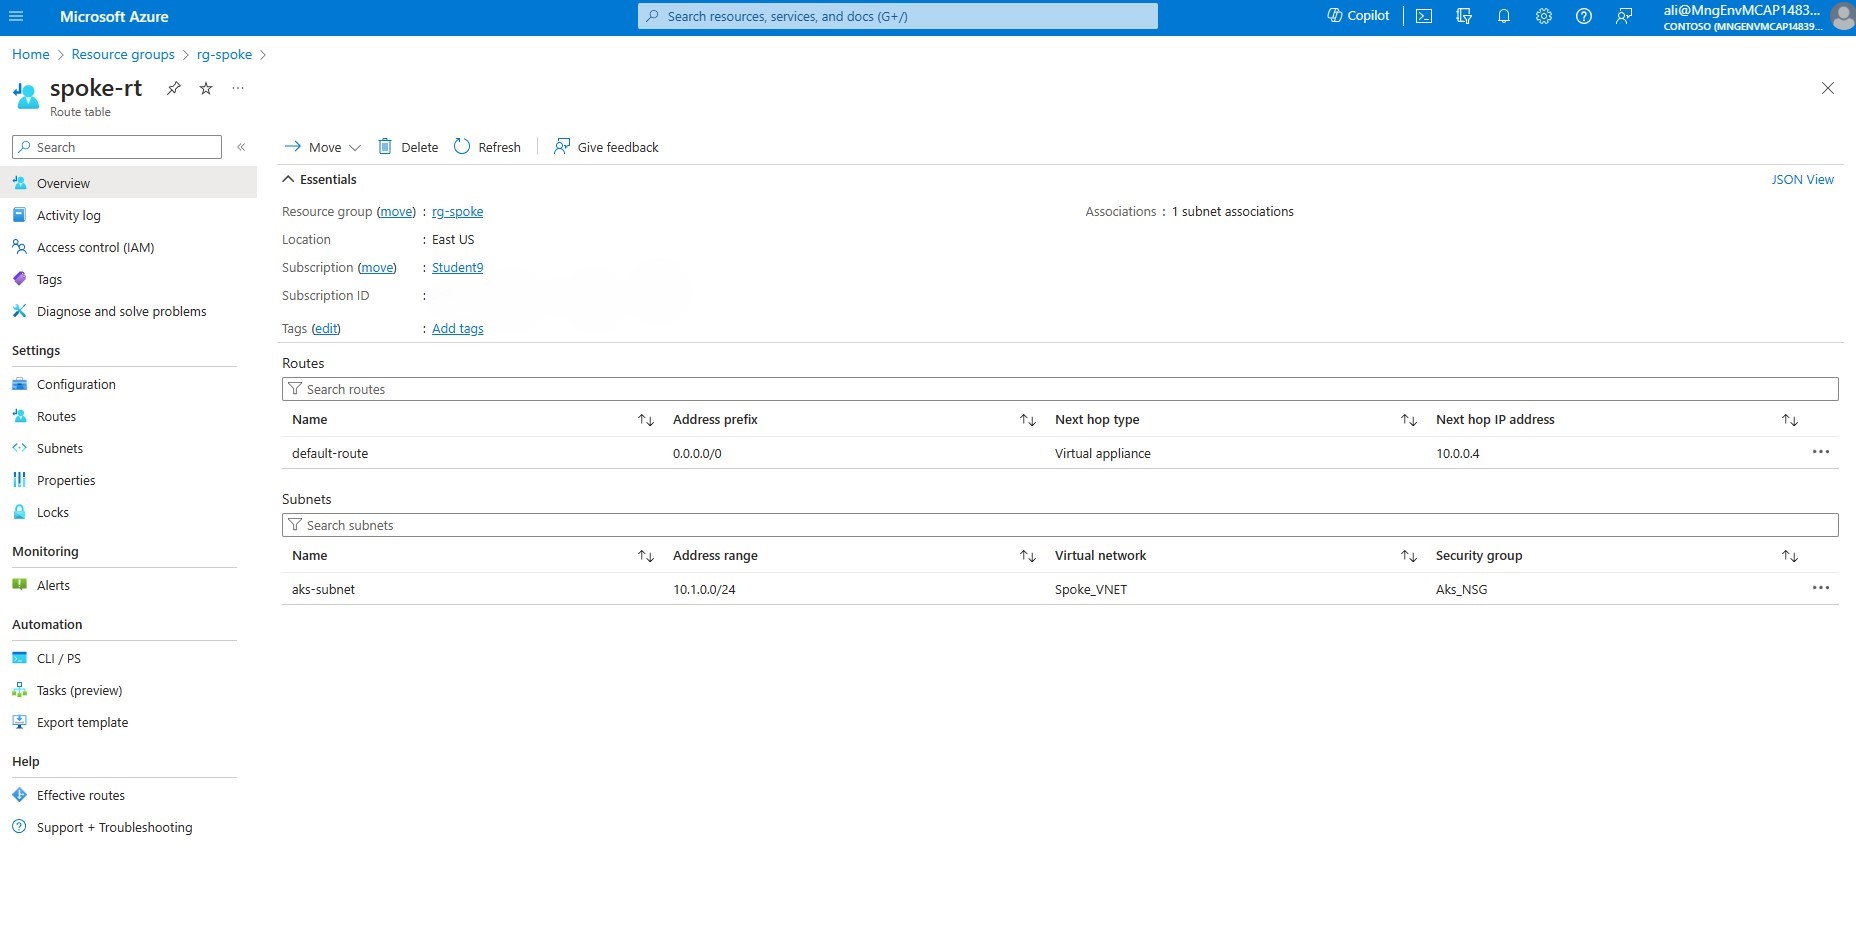
Select routing table called spoke-rt.
-
Ensure that the default route has a prefix of 0.0.0.0/0 and the next hop is set to the virtual appliance with the IP address of the Azure Firewall. Also, make sure that the routing table is associated with the AKS subnet called aks-subnet.
Deploy Azure Kubernetes Service
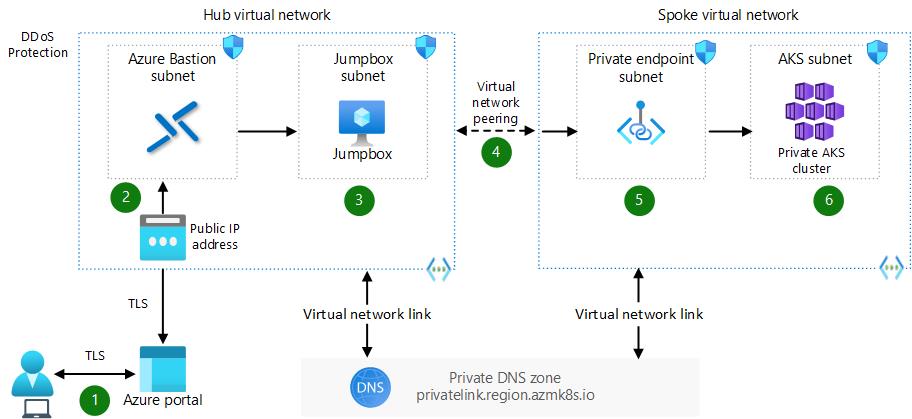
This part covers deploying AKS with outbound traffic configured to use a user-defined routing table, ensuring traffic passes through the Azure Firewall. A private DNS zone is also created when deploying a private AKS cluster. A user-assigned identity with necessary permissions is assigned to the cluster and load balancer subnet. This identity is a type of managed identity in Azure.
- Create a user-assigned managed identity.
az identity create \
    --resource-group $SPOKE_RG \
    --name $AKS_IDENTITY_NAME-${STUDENT_NAME}
- Get the id of the user managed identity.
 IDENTITY_ID=$(az identity show \
    --resource-group $SPOKE_RG \
    --name $AKS_IDENTITY_NAME-${STUDENT_NAME} \
    --query id \
    --output tsv)
- Get the principal id of the user managed identity.
PRINCIPAL_ID=$(az identity show \
    --resource-group $SPOKE_RG \
    --name $AKS_IDENTITY_NAME-${STUDENT_NAME} \
    --query principalId \
    --output tsv)
- Get the scope of the routing table.
RT_SCOPE=$(az network route-table show \
    --resource-group $SPOKE_RG \
    --name $ROUTE_TABLE_NAME  \
    --query id \
    --output tsv)
- Assign permissions for the AKS user defined managed identity to the routing table.
az role assignment create \
    --assignee $PRINCIPAL_ID\
    --scope $RT_SCOPE \
    --role "Network Contributor"
- Assign permission for the AKS user defined managed identity to the load balancer subnet.
LB_SUBNET_SCOPE=$(az network vnet subnet list \
    --resource-group $SPOKE_RG \
    --vnet-name $SPOKE_VNET_NAME \
    --query "[?name=='$LOADBALANCER_SUBNET_NAME'].id" \
    --output tsv)
az role assignment create \
    --assignee $PRINCIPAL_ID \
    --scope $LB_SUBNET_SCOPE \
    --role "Network Contributor"
Note: Granting the Network Contributor role to the load balancer subnet in AKS could result in over-privileged access. To minimize security risks, it is recommended to only provide AKS with the necessary permissions to function effectively, adhering to the principle of least privilege access. For more information refer to Creating Azure custom role.
- Retrieve the scope of AKS subnet, were AKS shall be deployed.
AKS_SUBNET_SCOPE=$(az network vnet subnet list \
    --resource-group $SPOKE_RG \
    --vnet-name $SPOKE_VNET_NAME \
    --query "[?name=='$AKS_SUBNET_NAME'].id" \
    --output tsv)
- Deploy a Highly Available Private AKS Cluster.
To deploy a highly available private AKS cluster, you can use the following command:
This command creates an AKS cluster with two system nodes, using the specified VNet subnet ID and cluster name. It is configured as a private cluster with user-defined routing and OIDC issuer and workload identity enabled. The network plugin and policy are set to Azure, and the public FQDN is disabled. The cluster is deployed across availability zones 1, 2, and 3.
For more information about OIDC and Workload Identity refer to Use Microsoft Entra Workload ID with Azure Kubernetes Service (AKS)
az aks create --resource-group $SPOKE_RG --node-count 2 --vnet-subnet-id $AKS_SUBNET_SCOPE --name $AKS_CLUSTER_NAME-${STUDENT_NAME} --enable-private-cluster --outbound-type userDefinedRouting --enable-oidc-issuer --enable-workload-identity --generate-ssh-keys --assign-identity $IDENTITY_ID --network-plugin azure --network-policy azure --disable-public-fqdn --zones 1 2 3
Note: A private AKS cluster has its Kubernetes API endpoint isolated from public access, allowing access only within the same virtual network. To communicate with the private AKS cluster from a jumpbox in a different virtual network, a virtual network link must be created between the two networks for DNS resolution. This will be covered in a later section.
- An additional nodepool will be created to host user workloads. Auto-scaling is enabled to allow for automatic scaling out and scaling in based on demand. The worker nodes will be distributed across three different zones to ensure higher availability.
az aks nodepool add --resource-group $SPOKE_RG --cluster-name $AKS_CLUSTER_NAME-${STUDENT_NAME} --name userpool --node-count 3 --mode user --zones 1 2 3 --enable-cluster-autoscaler --min-count 1 --max-count 5
- Create a virtual network link to resolve AKS private endpoint from HUB vnet.
Fetch the node group of the AKS cluster, and save it in an environment variable.
NODE_GROUP=$(az aks show --resource-group $SPOKE_RG --name $AKS_CLUSTER_NAME-${STUDENT_NAME} --query nodeResourceGroup -o tsv)
Fetch the AKS DNS zone name.
DNS_ZONE_NAME=$(az network private-dns zone list --resource-group $NODE_GROUP --query "[0].name" -o tsv)
Fetch the ID of the HUB virtual network.
HUB_VNET_ID=$(az network vnet show -g $HUB_RG -n $HUB_VNET_NAME --query id --output tsv)
Create a virtual network link between the hub virtual network and the AKS private DNS zone, that was created for the AKS cluster.
az network private-dns link vnet create --name "hubnetdnsconfig" --registration-enabled false --resource-group $NODE_GROUP --virtual-network $HUB_VNET_ID --zone-name $DNS_ZONE_NAME
Validate your deployment in the Azure portal.
-
Navigate to the Azure portal at https://portal.azure.com.
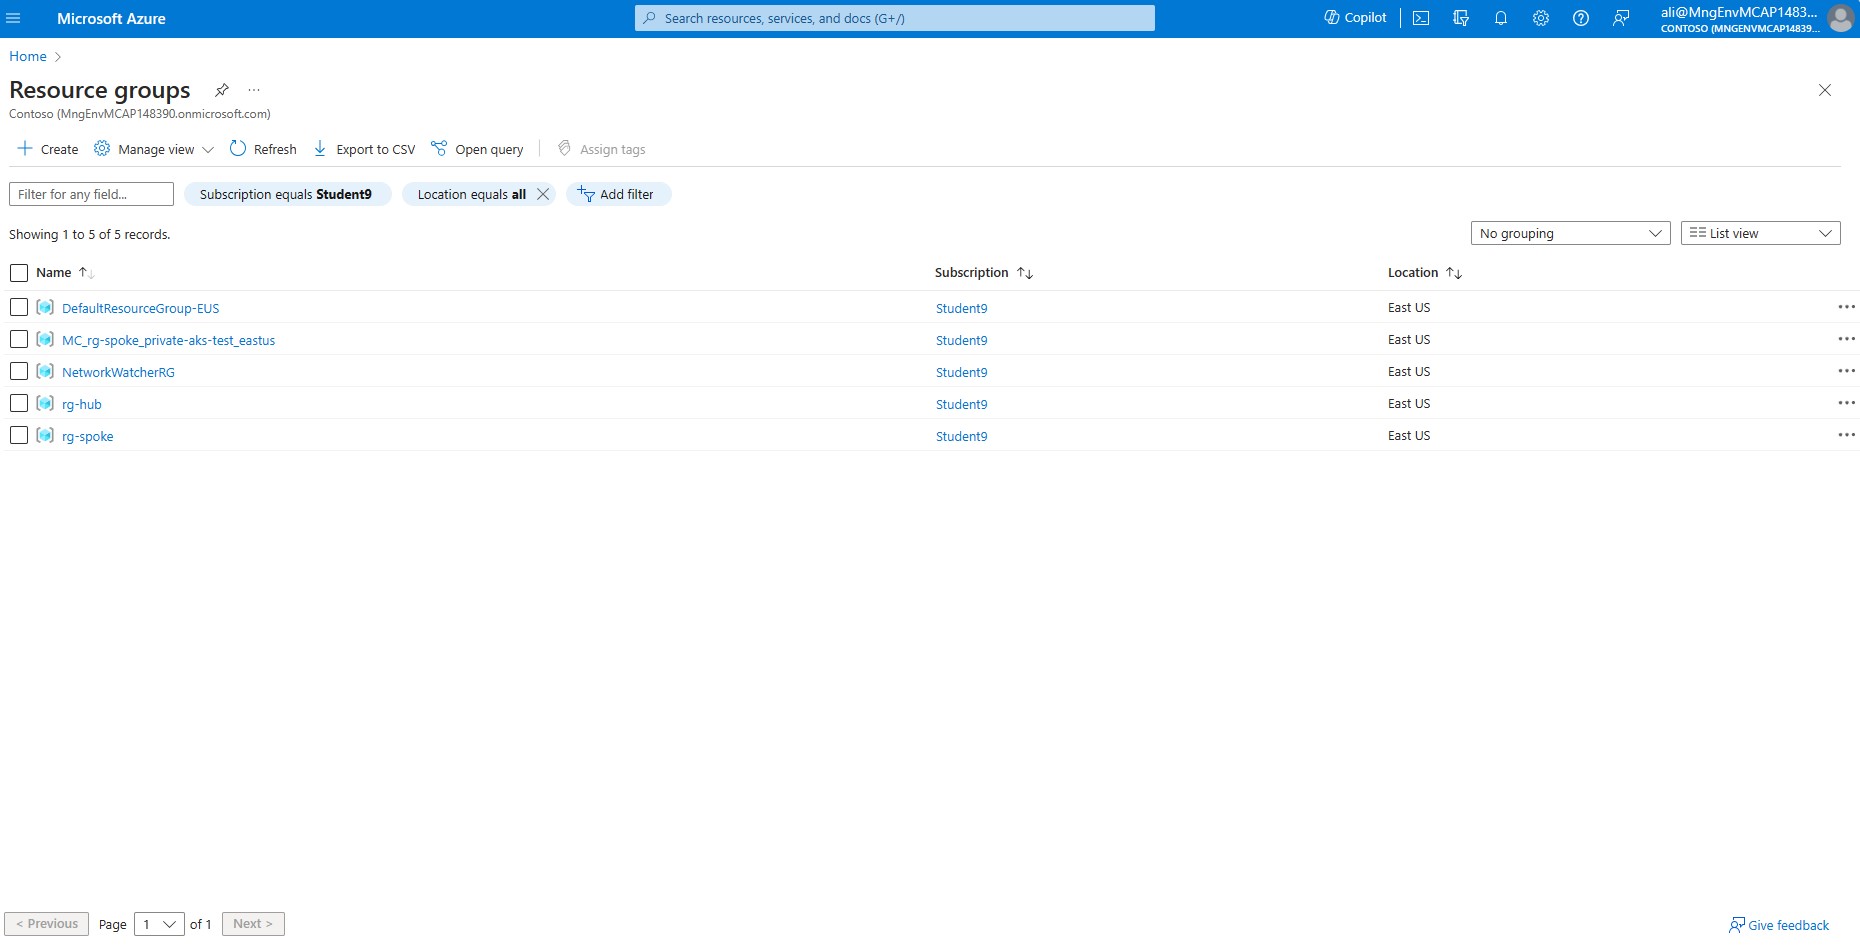
-
Click on Resource groups to view all of your resource groups in your subscription. You should have 3 RGs which you have created,MC_rg-spoke_private-aks-xxxx_eastus, rg-hub and rg-spoke
Note: MC_rg-spoke_private-aks-xxxx_eastus is a resource group automatically created when deploying an AKS cluster. It is used by Azure to manage resources for the cluster, this particular resource group is also known as Node group.
-
Verify that a virtual network link exists between the Hub and spoke to enable the jumpbox to resolve the AKS domain name and access the cluster. Select the node group called MC_rg-spoke_private-aks-xxxxx_eastus.
-
Select the Private DNS zone.
-
On your left hand side menu, under Settings click on Virtual network links.
-
Validate that there is a link name called hubnetdnsconfig and the link status is set to Completed and the virtual network is set to Hub_VNET.

-
On the top menu click Resource groups and choose rg-spoke from the resource group list.
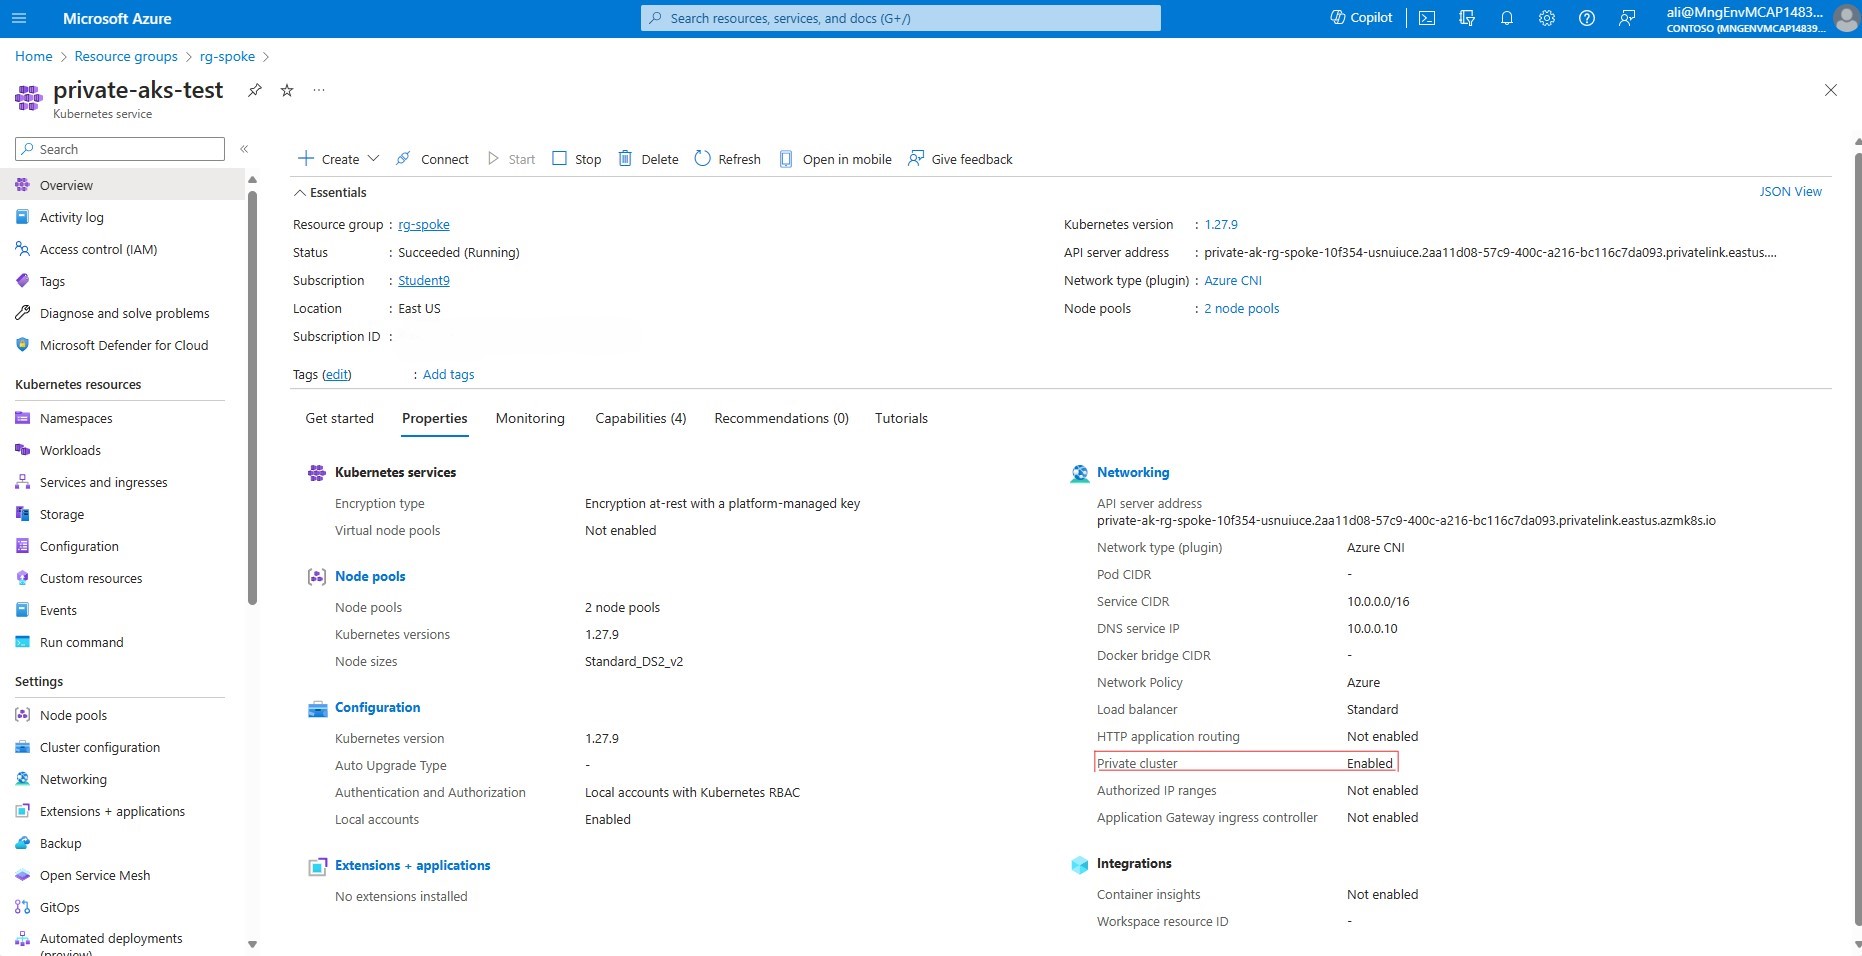
-
Click on the AKS resource called private-aks-. Verify that the Private cluster is set to Enabled.
- Verify AKS control plane connectivity.
In this section we will verify that we are able to connect to the AKS cluster from the jumpbox, firstly we need to connect to the cluster successfully and secondly we need to verify that the kubernetes client is able to communicate with the AKS control plane from the jumpbox.
-
Select resource group rg-hub where the Jumpbox has been deployed.
-
Within your resource group, find and click on the virtual machine called Jumpbox VM.
-
In the left-hand side menu, under Connect section, select Bastion.
-
Enter the credentials for the Jumpbox VM and verify that you can log in successfully.
-
Once successfully logged in to the jumpbox you need to install a few tools. Run the commands one by one, or create a bash script.
# Update apt repo
sudo apt update
# Install Docker
sudo apt install docker.io -y
# Install azure CLI
curl -sL https://aka.ms/InstallAzureCLIDeb | sudo bash
# Install AKS CLI (kubectl)
sudo az aks install-cli
# Add user to Docker group
sudo usermod -aG docker $USER
- Now, login to Azure in order to obtain AKS credentials.
az login
az account set --subscription <SUBSCRIPTION ID>
Note: To check the current subscription, run the command: az account show To change the subscription, run the command: az account set --subscription , where the ID of the desired subscription. You can find the subscription ID by running the command: az account list --output table
- Add your Environment variables to the jumpbox bash shell.
SPOKE_RG=rg-spoke
AKS_CLUSTER_NAME=private-aks
STUDENT_NAME=<WRITE YOUR STUDENT NAME HERE>
- Download the AKS credentials onto the jumpbox.
az aks get-credentials --resource-group $SPOKE_RG --name $AKS_CLUSTER_NAME-${STUDENT_NAME}
- Ensure you can list resources in AKS.
kubectl get nodes
The following output shows the result of running the command kubectl get nodes on with kubectl CLI.
azureuser@Jumpbox-VM:~$ kubectl get nodes
NAME                                STATUS   ROLES   AGE   VERSION
aks-nodepool1-12240482-vmss000000   Ready    agent   89m   v1.27.9
aks-nodepool1-12240482-vmss000001   Ready    agent   89m   v1.27.9
aks-userpool-16991029-vmss000000    Ready    agent   78m   v1.27.9
- Log out from the Jumpbox host.
Congratulations! You have completed the steps to deploy a private AKS cluster and configure its network settings. You have assigned a user assigned identity to the cluster that has the required permissions to modify the user-defined routing table and load balancer subnet. You have also created a virtual network link between the hub virtual network and the private DNS zone of the cluster. This enables the jumpbox to resolve the private API server of the cluster and access it for management and maintenance purposes.
Deploy Azure Container Registry
In this section, we will learn how to deploy a private Azure Container Registry that will store our container images. A private container registry is a type of container registry that is not accessible from the public internet. To enable access to the private container registry from the jumpbox, we need to create some networking resources that will allow us to resolve the container registry name and connect to it securely. These resources are: a private endpoint, a private link, and a virtual network link. We will see how to create and configure these resources in the following steps. We will also test the connection to the private container registry by pushing some images to it from the jumpbox.
- Create the Azure Container Registry, and disable public access to the registry.
az acr create \
    --resource-group $SPOKE_RG \
    --name $ACR_NAME \
    --sku Premium \
    --admin-enabled false \
    --location $LOCATION \
    --allow-trusted-services false \
    --public-network-enabled false
IMPORTANT: Ensure you have a globally unique name for your ACR, or else the deployment will fail.
- Configure the private DNS zone for ACR.
az network private-dns zone create \
  --resource-group $SPOKE_RG \
  --name "privatelink.azurecr.io"
- Create a virtual network link to the spoke network.
az network private-dns link vnet create \
  --resource-group $SPOKE_RG \
  --zone-name "privatelink.azurecr.io" \
  --name ACRDNSSpokeLink \
  --virtual-network $SPOKE_VNET_NAME \
  --registration-enabled false
- Create a virtual network link to the hub network.
Note: The $HUB_VNET_ID variable specifies the full path to the virtual network in another resource group, allowing the command to correctly link to it. Make sure the environment variable $HUB_VNET_ID is populated before running the command below. If it is empty, just rerun the command:
HUB_VNET_ID=$(az network vnet show --resource-group $HUB_RG --name $HUB_VNET_NAME --query id --output tsv)
az network private-dns link vnet create \
  --resource-group $SPOKE_RG \
  --zone-name "privatelink.azurecr.io" \
  --name ACRDNSHubLink \
  --virtual-network $HUB_VNET_ID \
  --registration-enabled false
- Create ACR private endpoint.
To create a private endpoint for an Azure Container Registry (ACR), you need to obtain the resource ID of the container registry. This resource ID is used to specify the target resource when creating the private endpoint.
REGISTRY_ID=$(az acr show --name $ACR_NAME \
  --query 'id' --output tsv)
az network private-endpoint create \
    --name ACRPrivateEndpoint \
    --resource-group $SPOKE_RG \
    --vnet-name $SPOKE_VNET_NAME \
    --subnet $ENDPOINTS_SUBNET_NAME \
    --private-connection-resource-id $REGISTRY_ID \
    --group-ids registry \
    --connection-name PrivateACRConnection
- Configure DNS record for ACR.
In this section we will configure DNS records for an Azure Container Registry (ACR) using Azure Private Link.This is to ensure that the ACR can be accessed over a private network connection, enhancing security by eliminating exposure to the public internet.
Before we can configure the DNS record we need to obtain the private IP address of the ACR, both the control and data plane.
Get endpoint IP configuration:
NETWORK_INTERFACE_ID=$(az network private-endpoint show \
  --name ACRPrivateEndpoint \
  --resource-group $SPOKE_RG \
  --query 'networkInterfaces[0].id' \
  --output tsv)
Fetch the private IP address associated with the ACR. These IP addresses are used for data and control of the container registry.
az network nic show --ids $NETWORK_INTERFACE_ID |grep azurecr.io -B 7
In the output you should see two IP addresses, and their associated FQDNS. It should look similar to this:
      "name": "privateEndpointIpConfig.9c4c0ee4-c187-4094-aede-fc0dabb70236",
      "primary": true,
      "privateIPAddress": "10.1.1.20",
      "privateIPAddressVersion": "IPv4",
      "privateIPAllocationMethod": "Dynamic",
      "privateLinkConnectionProperties": {
        "fqdns": [
          "acrforakssecurity.westus2.data.azurecr.io"
--
      "name": "privateEndpointIpConfig.7ffb814c-aacc-4199-a07d-35f61df0ea1f",
      "primary": false,
      "privateIPAddress": "10.1.1.21",
      "privateIPAddressVersion": "IPv4",
      "privateIPAllocationMethod": "Dynamic",
      "privateLinkConnectionProperties": {
        "fqdns": [
          "acrforakssecurity.azurecr.io"
Note down the privateIPAddress and fqdns as it will be used in a later step (when creating DNS zones).
- Create a new 'A' record set for control in the private DNZ zone.
az network private-dns record-set a create \
  --name $ACR_NAME \
  --zone-name privatelink.azurecr.io \
  --resource-group $SPOKE_RG
- Create a new 'A' record set for data in the private DNZ zone.
az network private-dns record-set a create \
  --name $ACR_NAME.$LOCATION.data \
  --zone-name privatelink.azurecr.io \
  --resource-group $SPOKE_RG
- Update the 'A' record to contain the data IP address of the ACR.
az network private-dns record-set a add-record \
  --record-set-name $ACR_NAME.$LOCATION.data \
  --zone-name privatelink.azurecr.io \
  --resource-group $SPOKE_RG \
  --ipv4-address <IP address assicoated with FQDN "$ACR_NAME.$LOCATION.data.azurecr.io">
- Update the 'A' record to contain the control IP address of the ACR.
az network private-dns record-set a add-record \
  --record-set-name $ACR_NAME \
  --zone-name privatelink.azurecr.io \
  --resource-group $SPOKE_RG \
  --ipv4-address <IP address associated with FQDN "$ACR_NAME.azurecr.io">
Validate your deployment in the Azure portal.
-
Navigate to the Azure portal at https://portal.azure.com and enter your login credentials.
-
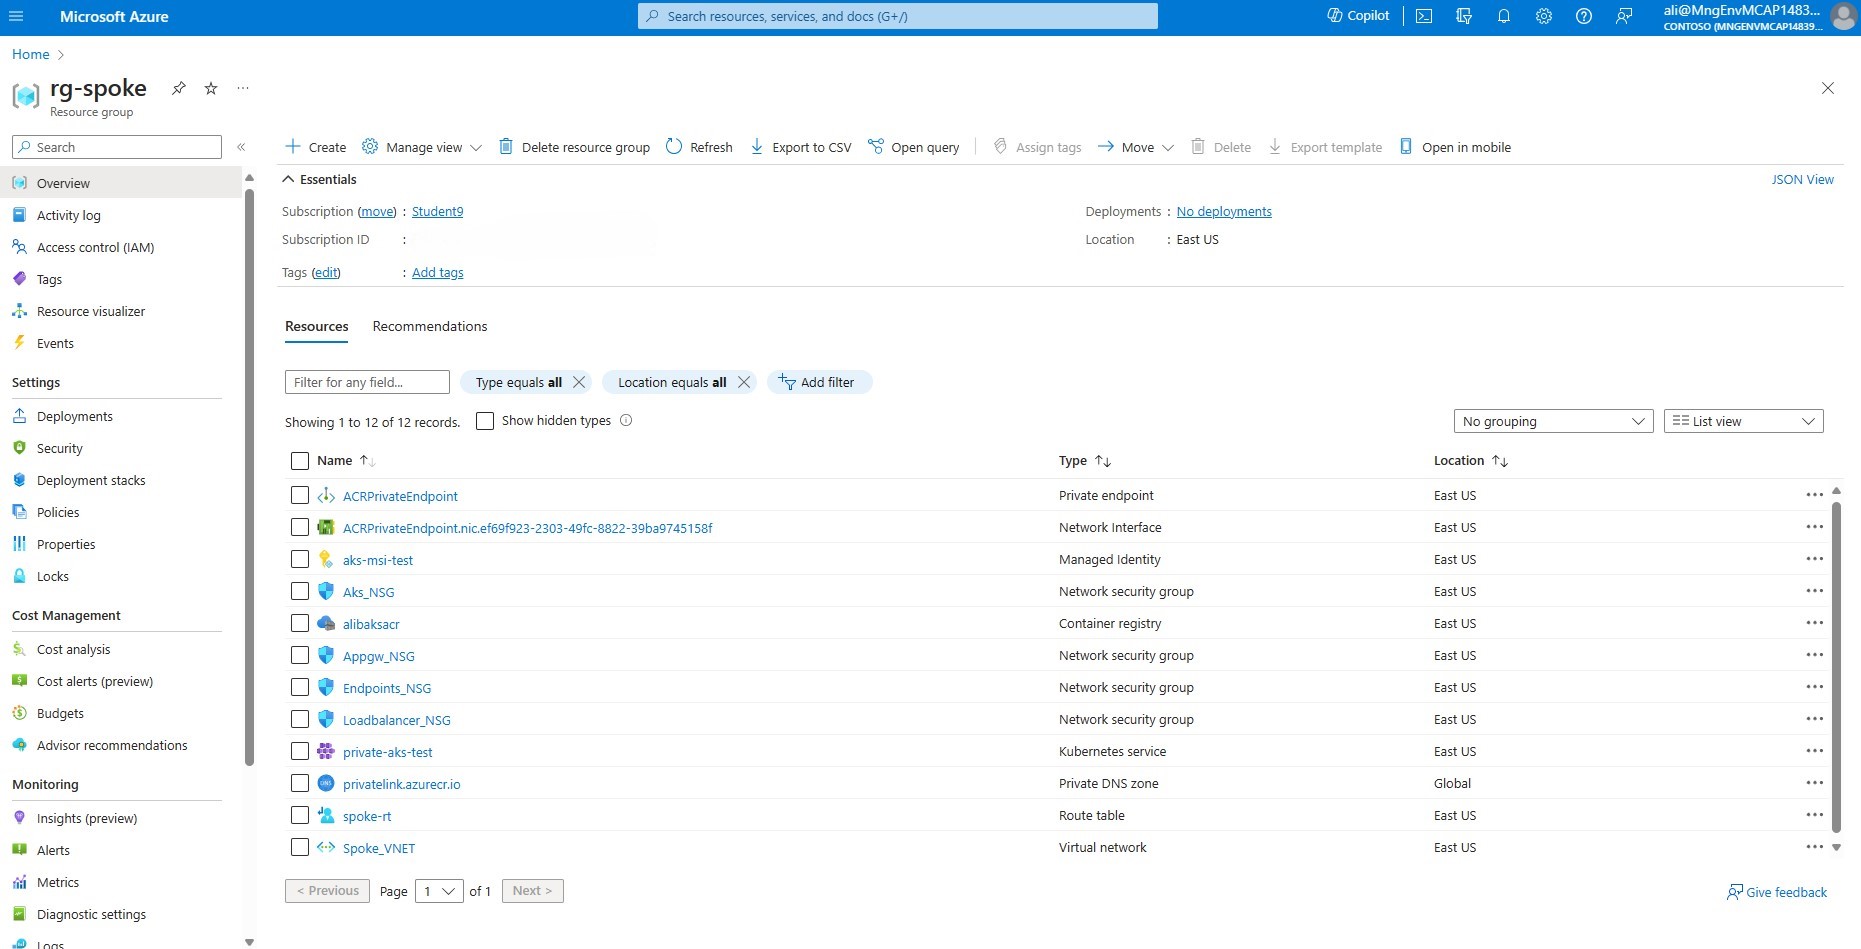
log in and select the rg-spoke resource group. Verify that you have a container registry and a private endpoint named ACRPrivateEndpoint deployed in your resource group, as well as a network card named ACRPrivateEndpoint.nic.xxxxx.
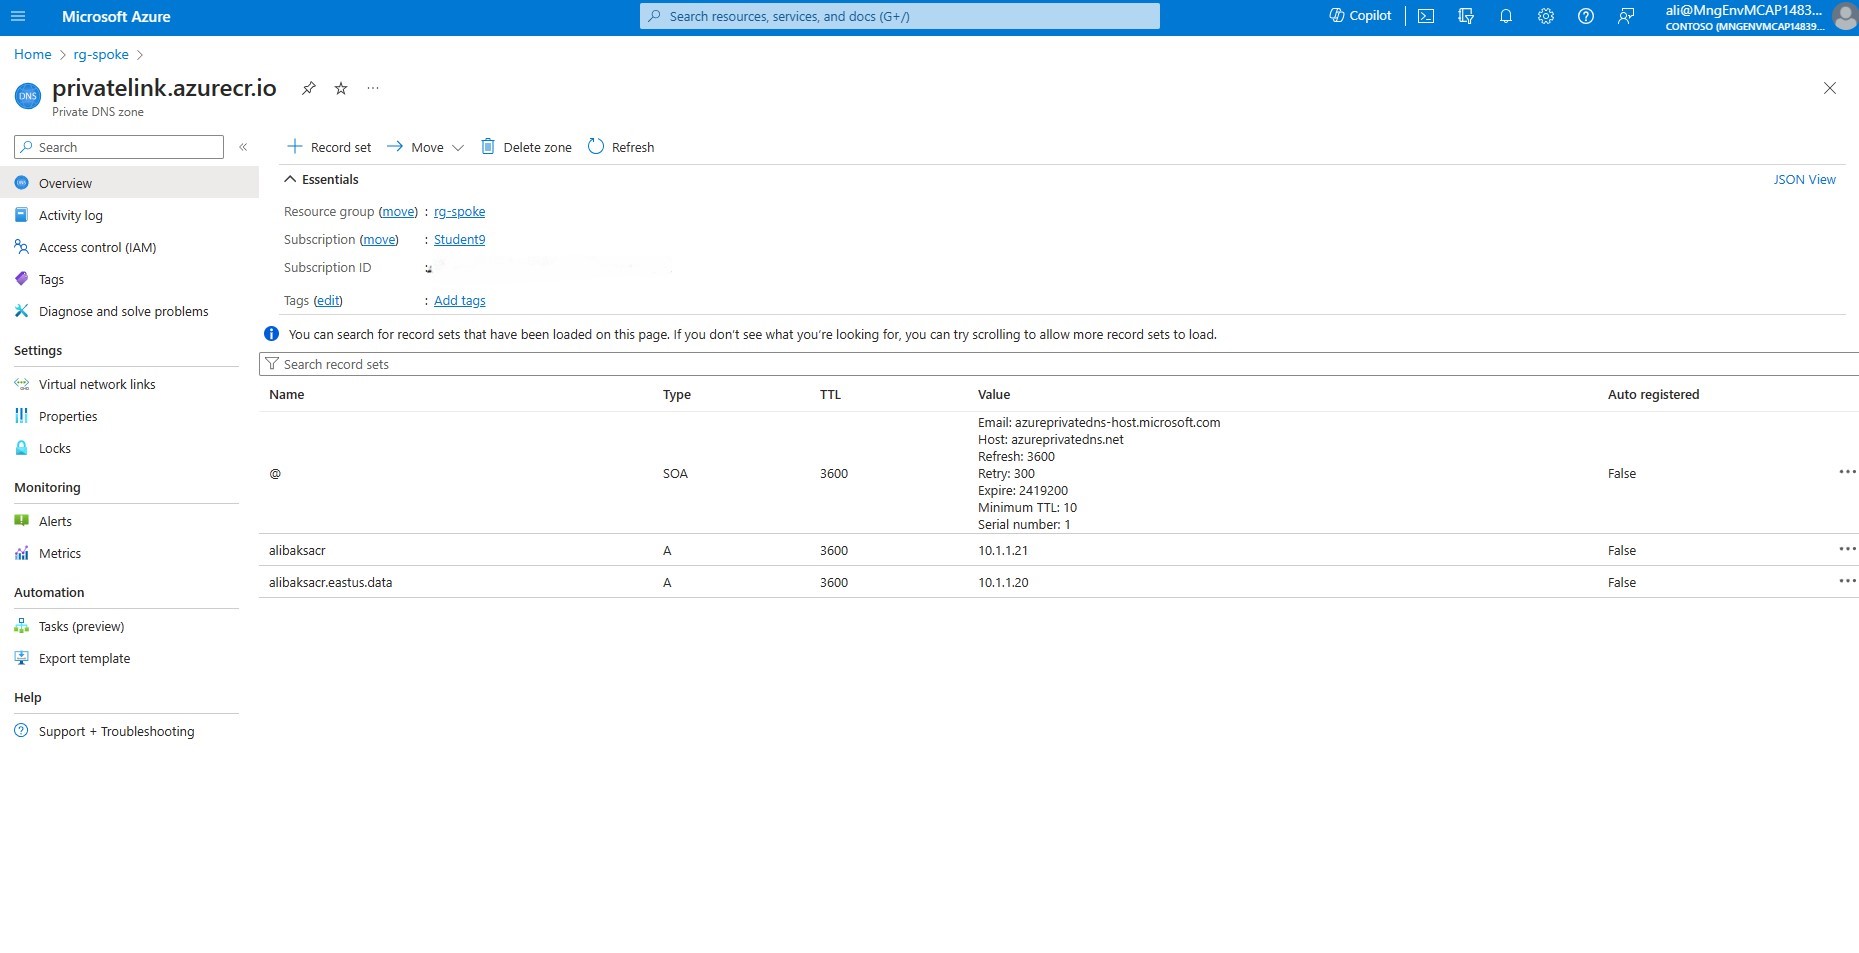
- Select the private DNS zone named privatelink.azurecr.io. Ensure that you have two ‘A’ records, one for control and one for data, and that the correct IP addresses are configured.
- In the left-hand side menu, under Settings section, select Virtual Network links. Ensure you have the link status set to completed for both hub and spoke.

- Test the connection to ACR from the Jumpbox.
In this section, you will learn how to check if you can access your private Azure Container Registry (ACR) and push Docker images to it. You will need to have the Azure CLI installed and logged in to your Azure account. You will also need to have Docker installed and running on your Jumpbox. Here are the steps to follow:
-
Select resource group rg-hub where the Jumpbox has been deployed.
-
Within your resource group, find and click on the Jumpbox VM.
-
In the left-hand side menu, under the Connect section, select ‘Bastion’.
-
Enter the credentials for the Jumpbox VM and verify that you can log in successfully.
-
Once successfully logged in to the jumpbox login to Azure if you have not already done so in previous steps.
az login
Identify your subscription id from the list, if you have several subscriptions.
az account list -o table
Set your subscription id to be the default subscription.
az account set --subscription <SUBSCRIPTION ID>
- Validate private link connection.
List your ACR in your subscription and note down the ACR name.
az acr list -o table
Example output:
azureuser@Jumpbox-VM:~$ az acr list -o table
NAME        RESOURCE GROUP    LOCATION    SKU      LOGIN SERVER           CREATION DATE         ADMIN ENABLED
----------  ----------------  ----------  -------  ---------------------  --------------------  ---------------
alibaksacr  rg-spoke          eastus      Premium  alibaksacr.azurecr.io  2024-03-03T07:56:00Z  False
dig <REGISTRY NAME>.azurecr.io
Example output shows the registry's private IP address in the address space of the subnet:
azureuser@Jumpbox-VM:~$ dig alibaksacr.azurecr.io

; <<>> DiG 9.18.18-0ubuntu0.22.04.2-Ubuntu <<>> alibaksacr.azurecr.io
;; global options: +cmd
;; Got answer:
;; ->>HEADER<<- opcode: QUERY, status: NOERROR, id: 3738
;; flags: qr rd ra; QUERY: 1, ANSWER: 2, AUTHORITY: 0, ADDITIONAL: 1

;; OPT PSEUDOSECTION:
; EDNS: version: 0, flags:; udp: 65494
;; QUESTION SECTION:
;alibaksacr.azurecr.io.         IN      A

;; ANSWER SECTION:
alibaksacr.azurecr.io.  60      IN      CNAME   alibaksacr.privatelink.azurecr.io.
alibaksacr.privatelink.azurecr.io. 1800 IN A    10.1.1.21

;; Query time: 8 msec
;; SERVER: 127.0.0.53#53(127.0.0.53) (UDP)
;; WHEN: Sun Mar 03 09:04:31 UTC 2024
;; MSG SIZE  rcvd: 103
- Test the connection to the container registry, you will push a container to it. You will need to create a Dockerfile, build the docker image, authenticate towards ACR and push the image to the container registry.
vim Dockerfile
Add the following content to the Dockerfile.
FROM nginx
EXPOSE 80
Build the Docker image.
docker build --tag nginx .
Example output:
azureuser@Jumpbox-VM:~$  docker build --tag nginx .

Sending build context to Docker daemon  222.7kB
Step 1/3 : FROM nginx
latest: Pulling from library/nginx
a803e7c4b030: Pull complete
8b625c47d697: Pull complete
4d3239651a63: Pull complete
0f816efa513d: Pull complete
01d159b8db2f: Pull complete
5fb9a81470f3: Pull complete
9b1e1e7164db: Pull complete
Digest: sha256:32da30332506740a2f7c34d5dc70467b7f14ec67d912703568daff790ab3f755
Status: Downloaded newer image for nginx:latest
 ---> 61395b4c586d
Step 2/3 : EXPOSE 80
 ---> Running in d7267ee641b6
Removing intermediate container d7267ee641b6
 ---> 06a5ac2e4ba6
Step 3/3 : CMD [“nginx”, “-g”, “daemon off;”]
 ---> Running in c02c94dc283c
Removing intermediate container c02c94dc283c
 ---> 49a47448ba86
Successfully built 49a47448ba86
Successfully tagged nginx:latest
Create an alias of the image.
docker tag nginx <CONTAINER REGISTRY NAME>.azurecr.io/nginx
Authenticate to ACR with your AD user.
az acr login --name <CONTAINER REGISTRY NAME>
Upload the docker image to the ACR repository.
docker push <CONTAINER REGISTRY NAME>.azurecr.io/nginx
Example output:
azureuser@Jumpbox-VM:~$ docker push acraksbl.azurecr.io/nginx
Using default tag: latest
The push refers to repository [acraksbl.azurecr.io/nginx]
d26d4f0eb474: Pushed
a7e2a768c198: Pushed
9c6261b5d198: Pushed
ea43d4f82a03: Pushed
1dc45c680d0f: Pushed
eb7e3384f0ab: Pushed
d310e774110a: Pushed
latest: digest: sha256:3dc6726adf74039f21eccf8f3b5de773080f8183545de5a235726132f70aba63 size: 1778
- To enable AKS to pull images from ACR, you can attach AKS to the ACR. This command updates the existing AKS cluster and attaches it to the ACR.
az aks update \
    --resource-group $SPOKE_RG \
    --name $AKS_CLUSTER_NAME-${STUDENT_NAME} \
    --attach-acr $ACR_NAME
- Validate AKS is able to pull images from ACR, by deploying a simple application to the AKS cluster. During deployment, the AKS cluster will pull the container image of the application from ACR.
On the Jumpbox VM create a yaml file.
vim test-pod.yaml
Pro-tip: when you copy to vim, prevent vim from auto-indenting the text you paste.
:set paste
Press enter.
Paste in the following manifest file which creates a pod named internal-test-app which fetches the docker images from our internal container registry, created in previous step.
apiVersion: v1
kind: Pod
metadata:
  name: internal-test-app
  labels:
    app: internal-test-app
spec:
  containers:
  - name: nginx
    image: <ACR NAME>.azurecr.io/nginx
    ports:
    - containerPort: 80
Create the pod.
kubectl apply -f test-pod.yaml
Verify that the pod is in running state.
kubectl get po --show-labels
Example output:
azureuser@Jumpbox-VM:~$ kubectl get po
NAME                READY   STATUS    RESTARTS   AGE
internal-test-app   1/1     Running   0          8s
The next step is to set up an internal load balancer that will direct the traffic to our internal pod. The internal load balancer will be deployed in the load balancer subnet of the spoke-vnet.
vim internal-app-service.yaml
:set paste
Press enter.
Copy the following manifest to expose the pod to the internet. Replace with your subnet name stored in your local shell environment variable $LOADBALANCER_SUBNET_NAME.
apiVersion: v1
kind: Service
metadata:
  name: internal-test-app-service
  annotations:
    service.beta.kubernetes.io/azure-load-balancer-internal: "true"
    service.beta.kubernetes.io/azure-load-balancer-internal-subnet: "<LOADBALANCER SUBNET NAME>"
spec:
  type: LoadBalancer
  ports:
  - port: 80
  selector:
    app: internal-test-app
Deploy the service object in AKS.
kubectl create -f internal-app-service.yaml
Verify that your service object is created and associated with the pod that you have created, also ensure that you have recieved an external IP, which should be a private IP address range from the load balancer subnet.
kubectl get svc -o wide
Example output:
azureuser@Jumpbox-VM:~$ kubectl get svc -o wide
NAME                        TYPE           CLUSTER-IP   EXTERNAL-IP   PORT(S)        AGE    SELECTOR
internal-test-app-service   LoadBalancer   10.0.22.55   10.1.1.4      80:31644/TCP   112s   app=internal-test-app
kubernetes                  ClusterIP      10.0.0.1     <none>        443/TCP        13h    <none>
Note: Note down the EXTERNAL-IP (Private IP of the load balancer), as this will be used for creating the application gateway.
Verify that you are able to access the exposed Nginx pod from your jumpbox VM.
azureuser@Jumpbox-VM:~$ curl <EXTERNAL-IP>
Example output:
azureuser@Jumpbox-VM:~$ curl 10.1.1.4
<!DOCTYPE html>
<html>
<head>
<title>Welcome to nginx!</title>
<style>
html { color-scheme: light dark; }
body { width: 35em; margin: 0 auto;
font-family: Tahoma, Verdana, Arial, sans-serif; }
</style>
</head>
<body>
<h1>Welcome to nginx!</h1>
<p>If you see this page, the nginx web server is successfully installed and
working. Further configuration is required.</p>

<p>For online documentation and support please refer to
<a href="http://nginx.org/">nginx.org</a>.<br/>
Commercial support is available at
<a href="http://nginx.com/">nginx.com</a>.</p>

<p><em>Thank you for using nginx.</em></p>
</body>
</html>
You have successfully deployed a private Azure Container Registry that is accessible from the jumpbox host. You also built and deployed the nginx image, which is only exposed over the private network.
Deploy Azure Application Gateway.
In this section, you will set up an application gateway that will terminate TLS connections at its ingress. You will also learn how to perform these tasks: upload a certificate to Application Gateway, configure AKS as a backend pool by routing traffic to its internal load balancer, create a health probe to check the health of the AKS backend pool, and set up a WAF (Web Application Firewall) to defend against common web attacks.
- Create public IP address with a domain name associated to the public IP resource.
The public IP address will be associated with a fully qualified domain name (FQDN) based on the location of your IP address and a unique name that you provide. For example, if you create an IP address in westeurope, the FQDN would look similar to this:
myveryuniquename.westeurope.cloudapp.azure.com
Lets make an environment variable of the uniqe name, and call it $DNS_NAME.
DNS_NAME=<your unique name>
az network public-ip create -g $SPOKE_RG -n AGPublicIPAddress --dns-name $DNS_NAME --allocation-method Static --sku Standard --location $LOCATION
- Create WAF policy.
az network application-gateway waf-policy create --name ApplicationGatewayWAFPolicy --resource-group $SPOKE_RG
- Create self signed certificate.
In order to expose your services to internet using HTTPs, you need to add a certificate to Application Gateway. In a production setting, this would be a trusted certificate from a certificate authority such as letsencrypt. In the interest of simplicity, you will instead create a self signed certificate, and upload to Application Gateway.
Following are short instructions on how to create the self signed certificate. If you want to understand the details, or need more information, please review this page: https://learn.microsoft.com/en-us/azure/application-gateway/self-signed-certificates
Step one is to create a Root CA Certificate. During the creation, you will need to provide an FQDN. This FQDN will be the one associated with the Public IP address created above.
To get the FQDN you can run the following command:
az network public-ip show -g $SPOKE_RG -n AGPublicIPAddress --query dnsSettings.fqdn
After this, use the following commands to create a key and sign the key (self signed).
openssl genrsa -out my.key 2048
openssl req -new -x509 -sha256 -key my.key -out my.crt -days 365
When prompted, type the password for the root key (and note it down), and the organizational information for the custom CA such as Country/Region, State, Org, OU, and the fully qualified domain name from the step above. Here is an example of how it might look:
peter [ ~ ]$ openssl req -new -x509 -sha256 -key my.key -out my.crt -days 365
You are about to be asked to enter information that will be incorporated
into your certificate request.
What you are about to enter is what is called a Distinguished Name or a DN.
There are quite a few fields but you can leave some blank
For some fields there will be a default value,
If you enter '.', the field will be left blank.
-----
Country Name (2 letter code) [AU]:SE
State or Province Name (full name) [Some-State]:
Locality Name (eg, city) []:
Organization Name (eg, company) [Internet Widgits Pty Ltd]:
Organizational Unit Name (eg, section) []:
Common Name (e.g. server FQDN or YOUR name) []:uniqueappgwname.eastus.cloudapp.azure.com
Email Address []:johndoe@contoso.com
Now, combine the private key and the certificate into a single .pfx file. Choose a good certificate password and make a note of it, as it will be used when creating the Application Gateway.
openssl pkcs12 -export -out my.pfx -inkey my.key -in my.crt -password pass:<CERTIFICATE PASSWORD>
- Create Application Gateway.
Note: Before executing the command below, make sure the certificate is located in your working directory. Replace with the password you used when creating the certificate and with the private IP of the load balancer.
az network application-gateway create \
  --name AppGateway \
  --location $LOCATION \
  --resource-group $SPOKE_RG \
  --vnet-name $SPOKE_VNET_NAME \
  --subnet $APPGW_SUBNET_NAME \
  --capacity 1 \
  --sku WAF_v2 \
  --http-settings-cookie-based-affinity Disabled \
  --frontend-port 443 \
  --http-settings-port 80 \
  --http-settings-protocol Http \
  --priority "1" \
  --public-ip-address AGPublicIPAddress \
  --cert-file my.pfx \
  --cert-password "<CERTIFICATE PASSWORD>" \
  --waf-policy ApplicationGatewayWAFPolicy \
  --servers <LOAD BALANCER PRIVATE IP>
- Create a custom probe for the application gateway that will monitor the health of the AKS backend pool.
 az network application-gateway probe create \
    --gateway-name $APPGW_NAME \
    --resource-group $SPOKE_RG \
    --name health-probe \
    --protocol Http \
    --path / \
    --interval 30 \
    --timeout 120 \
    --threshold 3 \
    --host 127.0.0.1
- Associate the health probe to the backend pool.
az network application-gateway http-settings update -g $SPOKE_RG --gateway-name $APPGW_NAME -n appGatewayBackendHttpSettings --probe health-probe
Validate your deployment in the Azure portal.
-
Select the resource group called rg-spoke where the application gateway is deployed.
-
Select your Azure Application Gateway called AppGateway. Ensure you have a Public IP address and Tier set to WAF v2.

-
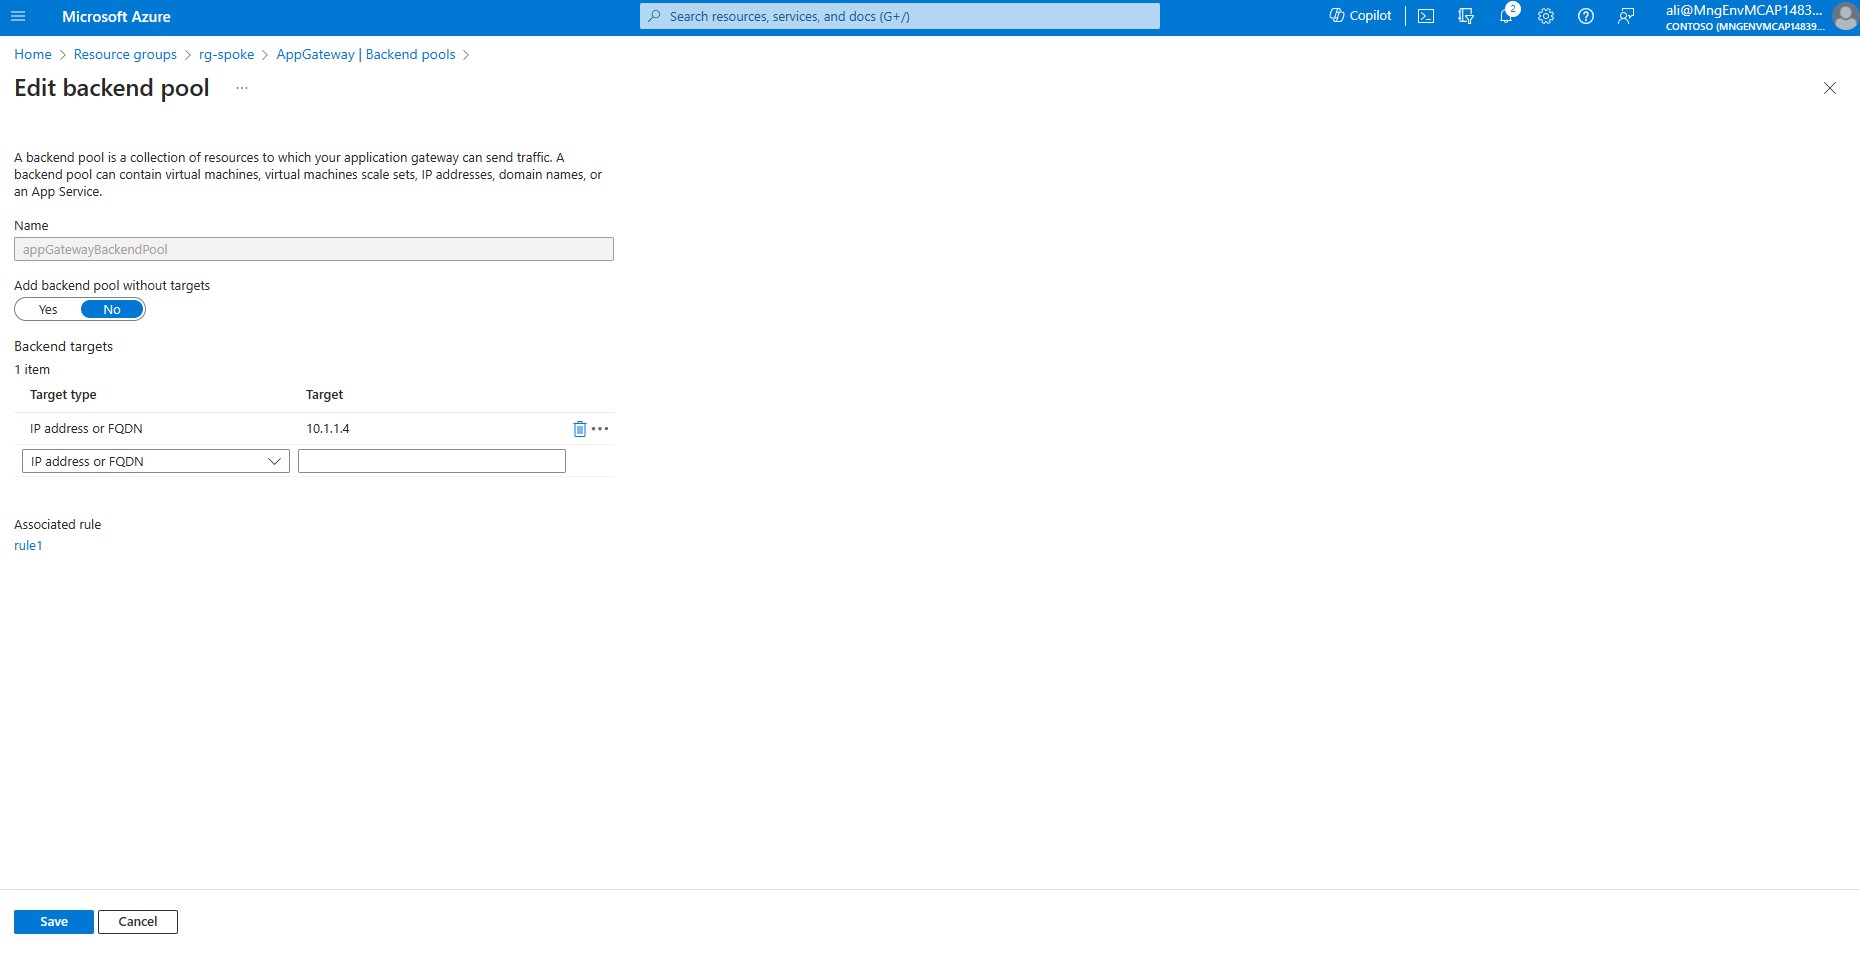
In the left-hand side menu, under the Settings section, select Backend pools and choose from the list appGatewayBackendPool.
-
Ensure the target type is set to IP address or FQDN and target is set to the IP address of your internal load balancer.
-
On the top menu click on AppGateway | Backend pools.
-
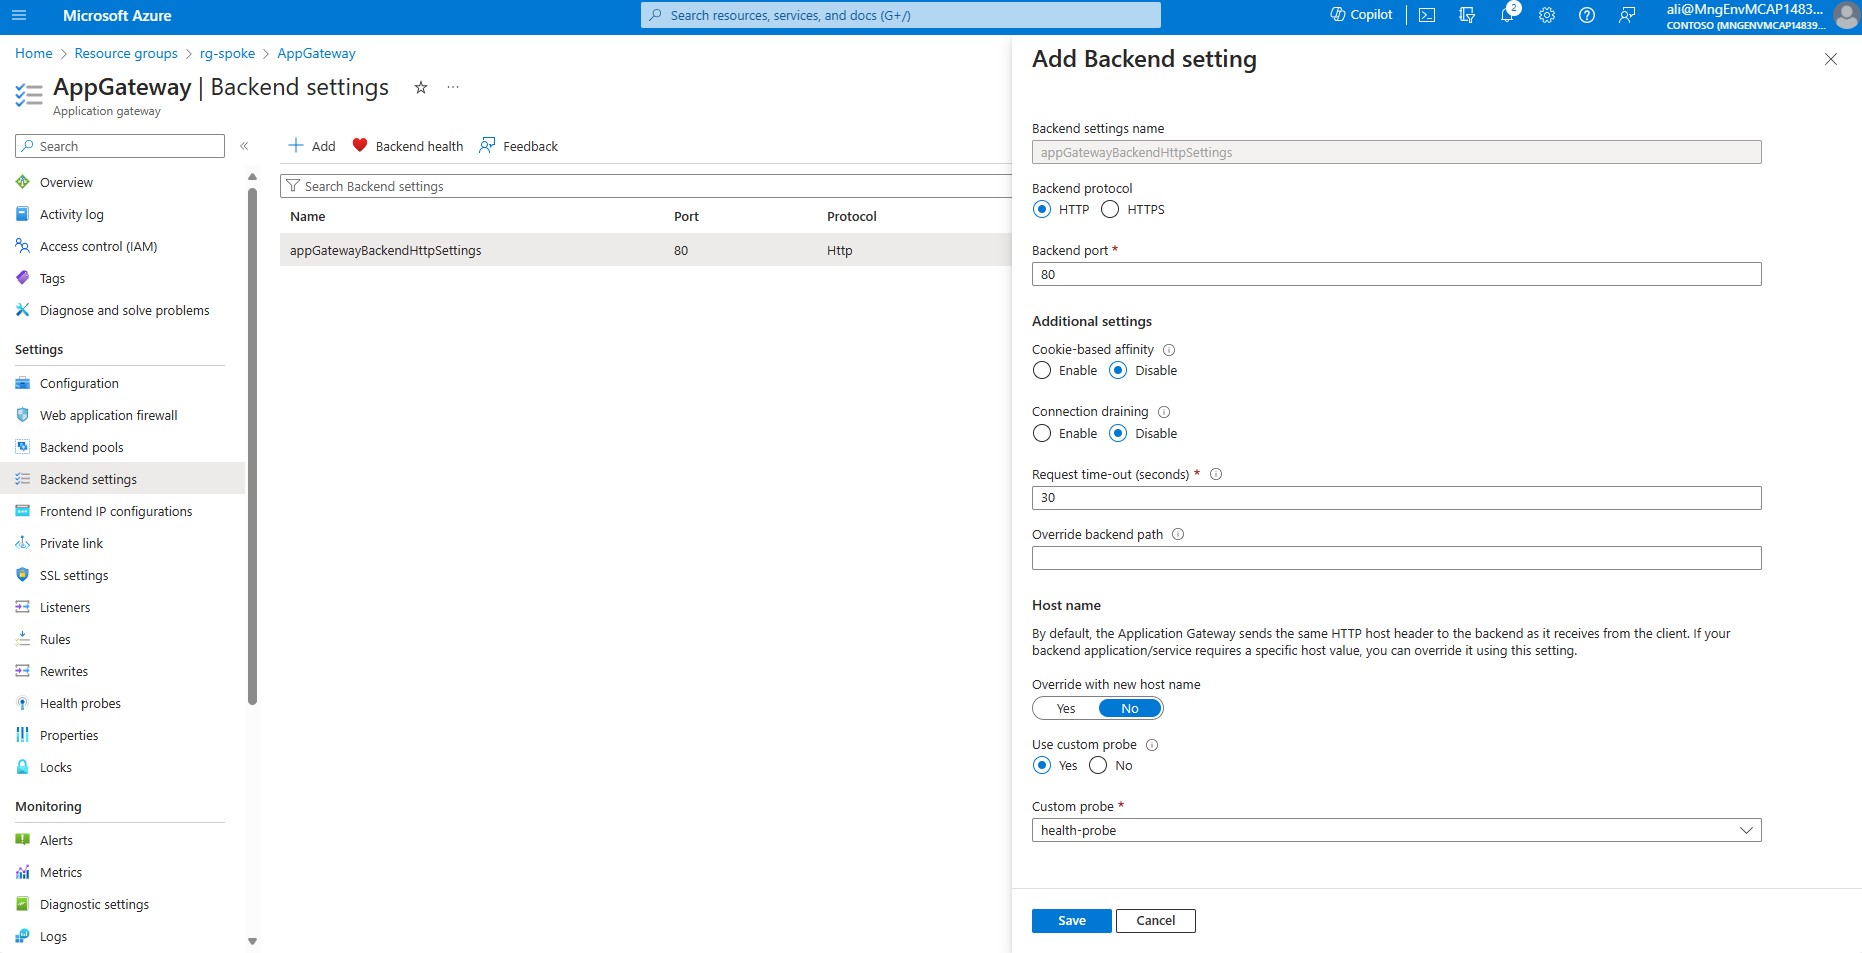
Lets verify the backend settings of Application Gateway, in the left-hand side menu choose *Backend settings.
-
From the list click on appGatewayBackendHttpSettings validate that the backend port is configured for port 80, and that health probe called health-probe is associated to the backend.
-
Press Cancel
-
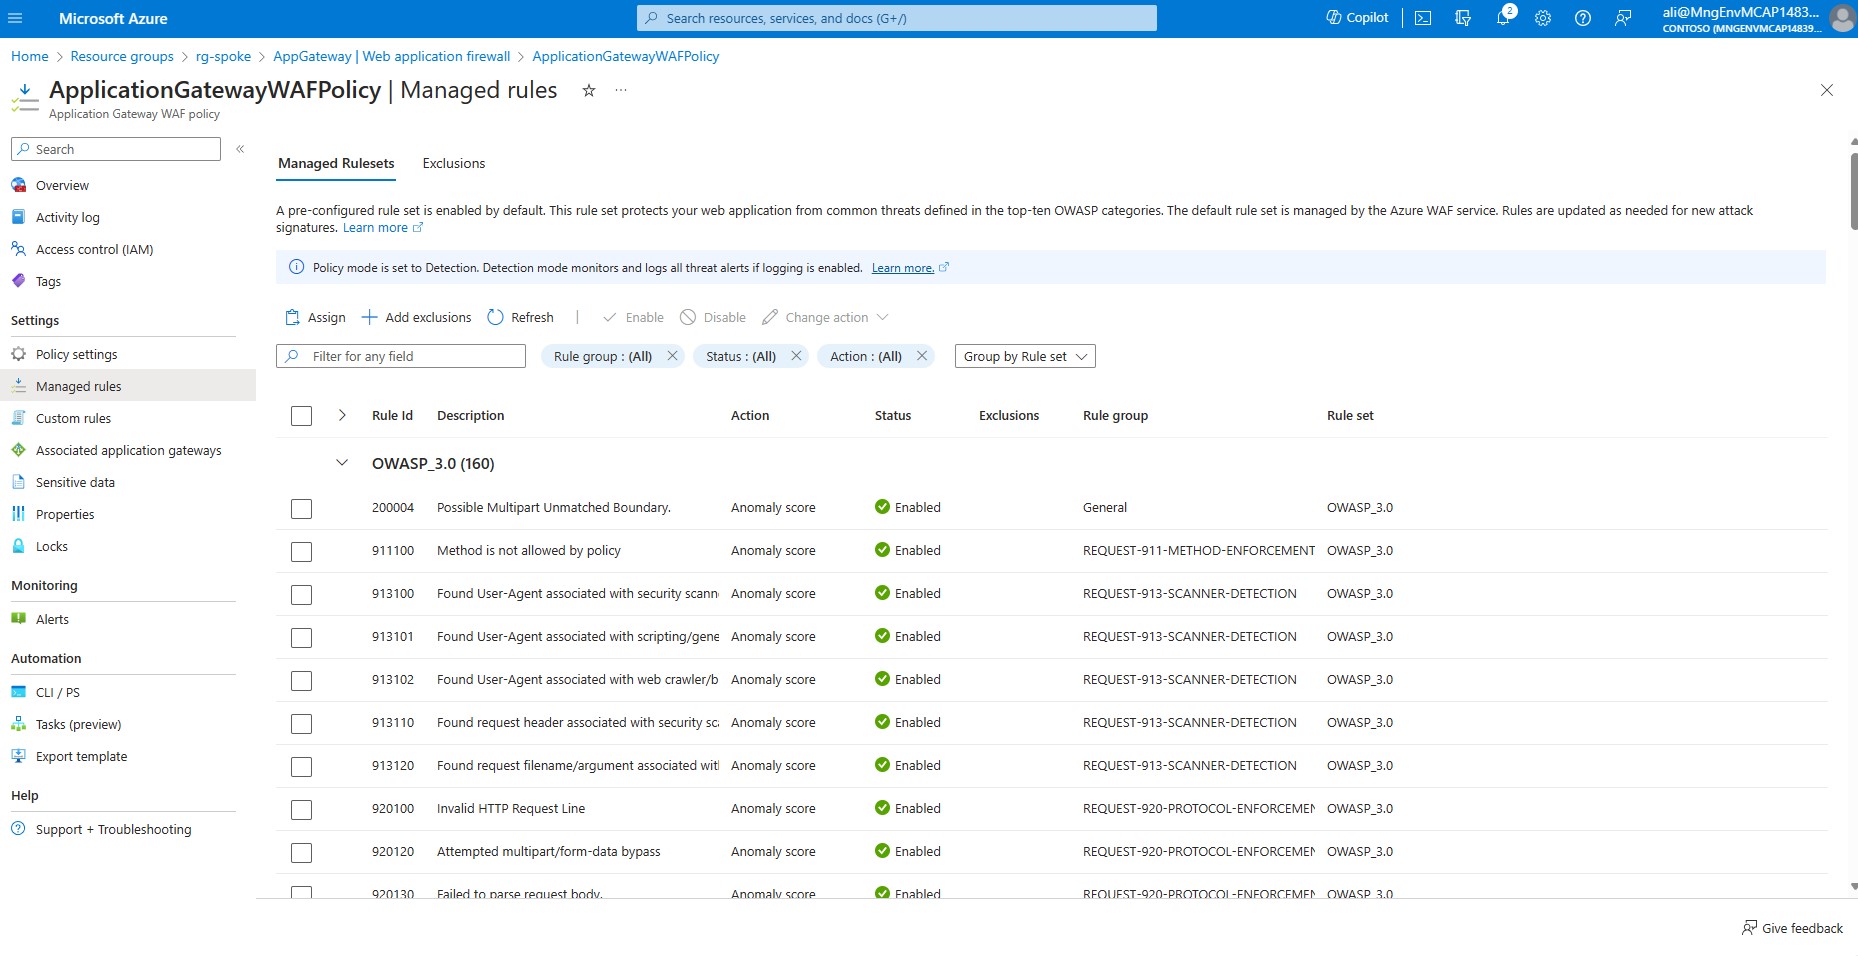
Verify that we have Web application rules configured. In the left-hand side menu choose *Web Application Firewall.
-
Click on ApplicationGatewayWAFPolicy In the left-hand side menu choose *Managed rules.
We have successfully completed the deployment and configuration of the network and cluster resources. The following diagram shows the high-level architecture of the solution. As you can see, there is a test pod running in AKS that can receive traffic from the internet through the Azure Application Gateway and the Azure Internal Load Balancer. We can also access the private API server of the AKS cluster and the private container registry from the jumpbox using the private endpoints and links. We have also enabled outbound traffic from the AKS subnet to go through the Azure Firewall for inspection and filtering. In the next section, we will validate if we can access our test pod securely from the Internet.
Validate Ingress Connection.
Open your web browser and access the domain created above: https://<application gateway FQDN>
Note: The certificate used was self-signed, so the browser will issue a warning that the content is potentially unsafe. In a production setting, a certificate from a well known certificate authority should be used, but this is beyond the scope of this tutorial.
If you discard the warning, you should see a similar output as to the one below.
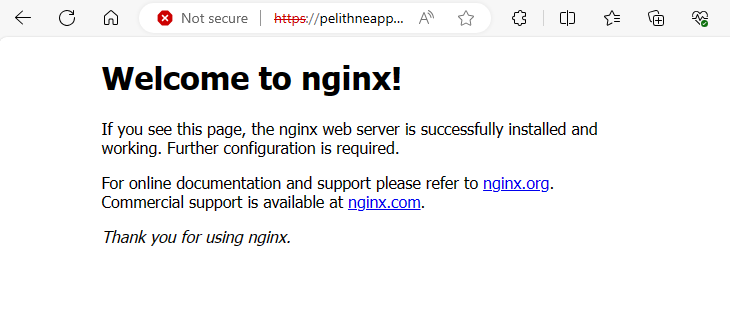
You have now verified connectivity from the public IP address, through the Application Gateway to the nginx pod running in your private AKS cluster. Well done!
Clean Up Resources in Azure
Once you have verified that everything works as depicted earlier you can issue the following commands to delete all of the Azure resources that you have created while working with these instructions. The easiest way is to delete the resource groups which you have created your resources in.
az group delete -n $HUB_RG
az group delete -n $SPOKE_RG
You must be a registered user to add a comment. If you've already registered, sign in. Otherwise, register and sign in.