- Home
- Startups at Microsoft
- Startups at Microsoft
- How To Get from AI Prototype to Production with Minimal Effort
- Subscribe to RSS Feed
- Mark as New
- Mark as Read
- Bookmark
- Subscribe
- Printer Friendly Page
- Report Inappropriate Content
Introduction
In this blog post, guest blogger Martin Bald, Senior Manager Developer Community from one of our startup partners, Wallaroo AI, will discuss the challenges that AI Teams face in bridging the gap from AI Model Development to Production.
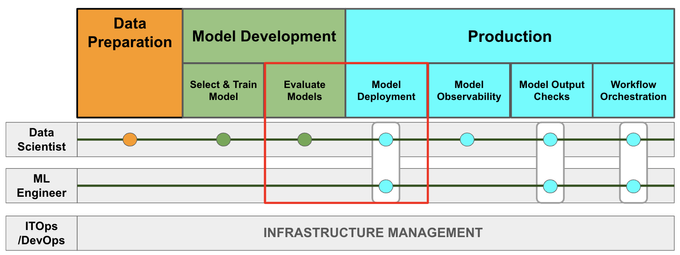
We will focus on taking trained and validated models to production and serving them as shown in Fig 1 below:
Developing an AI model and getting the model into production are two different tasks that require different skills, resources, and processes. The challenges of developing an AI model include defining the problem, collecting and cleaning the data, choosing the right algorithm, training and testing the model, and evaluating the performance and accuracy. The challenges of getting the model into production include deploying the model to a scalable and secure environment, integrating the model with other systems and applications, monitoring and updating the model, and ensuring the reliability and robustness of the model.
Data Scientists (DS) are expected to be full stack engineers, compounding the challenges businesses face. The DS needs to learn and use various tools and software that can help them with different aspects of the AI production lifecycle from model development to production. Essentially the DS needs to have expertise in both DevOps frameworks such as Docker, Kubernetes, Kubeflow, Airflow, Flask, as well as model frameworks such as PYTorch, Tensorflow, SKLearn, XGBoost, ONNX and many others. Learning all these technologies takes time away from productivity bandwidth.
There is also a dependency on the ITOps/DevOps team for the infrastructure and production environment for the AI models which can lead to further delays as requests go into the large task list that the Ops team deal with on a daily basis.
With all this going on it’s no surprise that the steps for taking an AI model from the development stage into production can take weeks, months.
The question is how we alleviate these dependencies and delays to production AI and help Data Scientists get AI models into production quickly, easily and efficiently. By doing this the business can realize the value of the models in production.
In a typical scenario, we would have a bunch of different models trained and validated. Deploying each of them would require a separate docker file and a separate container.
An ideal scenario would be to provide Data Scientists with the capabilities for them to be more self-sufficient without the need to learn all the tools and technologies that we mentioned above. This would give Data Scientists the capability to not only self-serve model deployments but would also give them the power to scale many models in production while requiring minimal coding, infrastructure effort or complexity.
An ideal scenario would also provide flexibility to use common model frameworks (PyTorch, TensorFlow, YOLO, Hugging Face, XGBoost, SKLearn, ONNX etc.) without having to go through cumbersome, time-consuming conversions. Less IT/DevOps dependency and production overhead = more bandwidth for working with models and getting value from them.
Auto Packaging Models for Production
In the following example we will see the process of auto packaging a model for production. Here we have a saved a TensorFlow model and an XGBoost model trained on the popular Seattle House Price Prediction dataset
The first step after we have loaded our Python libraries is to connect to the Wallaroo client:
wl = wallaroo.Client()
Alternatively in your Python environment of choice, you can pass your cluster's URLs to the Client's constructor using the code below:
import wallaroo

wallaroo_client = wallaroo.Client(api_endpoint="https://<DOMAIN>.wallaroo.community", auth_endpoint="https://<DOMAIN>.keycloak.wallaroo.community")
Next we create a workspace and set it as your working environment.
workspace = utils.get_workspace(wl, "house-price-prediction-azure-ml")
_ = wl.set_current_workspace(workspace)
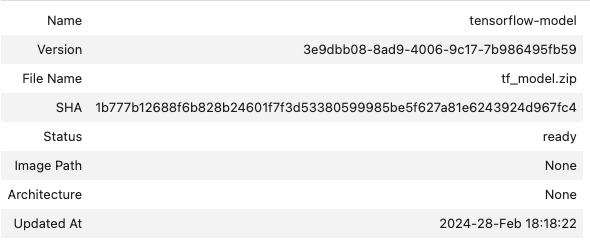
Next we specify our TensorFlow saved model file and the framework TENSORFLOW and the upload_model function takes care of uploading the model and making it available and ready for deployment in our workspace:
tensorflow_model = wl.upload_model(
    "tensorflow-model",
    "models/tf_model.zip",
    framework=Framework.TENSORFLOW
    )

tensorflow_model
Fig 1.
We set any metadata around our pipeline, determine how much hardware we want each deployed instance to have and how many replicas we want deployed. In this example, we deploy 1 but we can deploy more to handle concurrent requests as necessary. Following that, we're ready to build our pipeline and deploy to production.
pipeline_name = "tensorflow-houseprice-prediction"

deployment_config = DeploymentConfigBuilder() \
    .replica_count(1) \
    .cpus(1).memory('2Gi') \
    .build()

pipeline = wl.build_pipeline(pipeline_name) \
    .add_model_step(tensorflow_model) \
    .deploy(deployment_config=deployment_config)

pipeline.status()
This will give us the following output:
{'status': 'Running',
 'details': [],
 'engines': [{'ip': '10.28.1.251',
   'name': 'engine-bdccb8c7-4sr6z',
   'status': 'Running',
   'reason': None,
   'details': [],
   'pipeline_statuses': {'pipelines': [{'id': 'tensorflow-houseprice-prediction',
      'status': 'Running'}]},
   'model_statuses': {'models': [{'name': 'tensorflow-model',
      'version': '81a18cda-4bc0-41e2-8aa9-c05e618de6b7',
      'sha': '1b777b12688f6b828b24601f7f3d53380599985be5f627a81e6243924d967fc4',
      'status': 'Running'}]}}],
 'engine_lbs': [{'ip': '10.28.3.198',
   'name': 'engine-lb-5df9b487cf-xlfc2',
   'status': 'Running',
   'reason': None,
   'details': []}],
 'sidekicks': []}
With that complete, we can test our deployment with an input dataset. We use a helper function to grab one datapoint to send an inference request
sample_data_point = utils.get_sample_data()
sample_data_point
Output:
[3.0,
 2.25,
 5000.0,
 7242.0,
 2.0,
 0.0,
 0.0,
 3.0,
 20.0,
 2170.0,
 400.0,
 47.721,
 -122.319,
 1690.0,
 7639.0,
 73.0,
 1.0,
 40.0]
We can then put this into the DataFrame format Wallaroo expects:
input_df = pd.DataFrame({"dense_4_input": [sample_data_point]})
input_df
Fig 2
Next, we’ll run an inference through our pipeline and see the resulting output.
results = pipeline.infer(input_df)
results
pipeline.url()
Output:
'https://api.demo.pov.wallaroo.io/v1/api/pipelines/infer/tensorflow-houseprice-prediction-436/tensorflow-houseprice-prediction'
At this point, we have a fully functioning API endpoint that our application can send inference requests to.
Upload Custom Inference Pipelines
Another scenario that Data Scientists face is deploying and running custom Python code for custom inference pipelines for machine learning production. This is a challenging task that requires careful planning, testing, and monitoring. Customer inference pipelines can be any python code such as pre or post processing code or another esoteric framework that is not one of the common frameworks we talked about earlier.
In the example below:
input_schema = pa.schema([
    pa.field('inputs', pa.list_(pa.float64(), list_size=18))
])

output_schema = pa.schema([
    pa.field('output', pa.int32())
])


custom_model = wl.upload_model(
    "custom-model",
    "custom-pipeline.zip",
    input_schema=input_schema,
    output_schema=output_schema,
    framework=Framework.CUSTOM
)
Output:
Waiting for model loading - this will take up to 10.0min.
Model is pending loading to a container runtime.
Model is attempting loading to a container runtime...............successful

Ready
pipeline_name = "pipeline-custom"
pipeline = wl.build_pipeline(pipeline_name)
pipeline.add_model_step(custom_model)

deployment_config = DeploymentConfigBuilder() \
    .cpus(0.25).memory('1Gi') \
    .build()

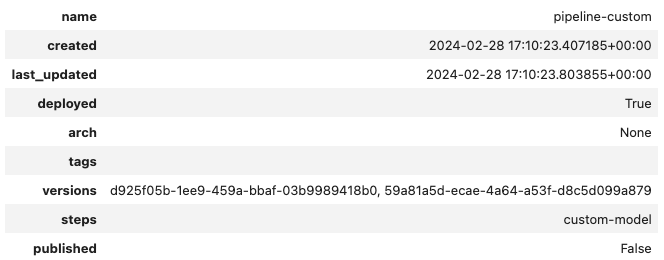
pipeline.deploy(deployment_config=deployment_config)
Fig 4
input_df = pd.DataFrame({"inputs": [sample_data_point]})

results = pipeline.infer(input_df)
results
Fig 5.
Notice, we did everything in Python here where needed, and we didn’t need to create a Dockerfile and worry about dependencies.
Now that we know our models can be automatically converted to be used, this can free up the Data Scientists and ML Engineers to focus on other tasks in the AI production lifecycle.
Conclusion
Data Scientists have a lot on their plate when it comes to developing, testing and deploying models to production. They are expected to have expertise in both DevOps frameworks such as Docker, Kubernetes, Kubeflow, Airflow, Flask, as well as model frameworks such as PYTorch, Tensorflow, SKLearn, XGBoost, ONNX and many others. Learning all these technologies takes time away from productivity bandwidth.
Through auto packaging and uploading custom model inference pipelines Data Scientists can quickly and easily take any model framework and get it into a production ready state by removing the typical dependencies and delays for production AI. This gives Data Scientists the capability to not only self-serve model deployments, but would also give them the power to scale many models in production while requiring minimal coding, engineering effort or complexity.
If you want to try the steps in these blog posts yourself, you can access the tutorials at this link and use the free inference servers available on the Azure Marketplace. Or you can download a free Wallaroo.AI Community Edition you can use with GitHub Codespaces.
Wallaroo.AI is an easy to use, flexible and efficient AI product, for AI teams to deploy models faster, at scale, with centralized workflow and model performance insights all with less overall cost - in the cloud, multi-cloud and at the edge.
You must be a registered user to add a comment. If you've already registered, sign in. Otherwise, register and sign in.


