Howdy folks,
Those of you who follow our blog know that last month we turned on a preview of a new set of enhancements to Windows Azure AD which greatly simplify the job of managing access to a set of popular SaaS applications.
This month we've turned on 4 new improvements in the preview:
- Improvements to our app gallery including application categories and improved graphics
- The ability for admins to assign password based SSO applications to specific users
- The ability for admins to specify the credentials for users on password SSO applications (so users don't have to know/remember them)
-
The ability to bulk enable & disable multi-factor authentication for all users
We hope you'll like this new additions! We are also working on adding a ton of new apps – we'll have more news for you here in the next week or so.
This preview has been really popular and over 1000 organizations have already opted in, making it our most popular ever! With this volume of interest, we're getting a lot of questions about how to best get up and running. To help answer those questions, Eran Dvir, a Lead PM here in the AD team, offered to write a "Getting Started" blog post which gives a great step by step guide to configuring and using the app access preview.
As always we really appreciate your feedback, this survey offers a convenient way to connect with our engineering team and let us know what you think, if anything is missing, or if something didn't work as expected. Or you can just email us .
And if you haven't signed up for the app access preview yet, please do! We love getting all feedback and the usage data we're collecting is already helping us to improve the service!
Regards,
Alex Simons (twitter: Alex_A_Simons)
Director of Program Management
Active Directory Team.
--------------
Greetings!
My name is Eran Dvir. I'm a Lead PM in the Active Directory team and spend most of my time working on the Application Access enhancements to Azure AD. I thought it might be useful to publish a step-by-step guide to getting started with the preview of these features.
As you probably already know, we announced a new set of features for Windows Azure Active Directory just over a month ago. These enhancements enable you to easily provide single sign on and access management for your company's cloud-based applications . These features include both updates to the Windows Azure Active Directory management portal and a new end user Access Panel . You make sure to give them both a try!
The focus of this guide is to help you get up and running with the preview, including being able to try out the end user application access panel for Windows Azure Active Directory. The Access Panel is the end user's landing page where they can discover which applications they have access to, log into their applications, and when needed manage their credentials.

There are multiple paths you can take to evaluate application access enhancements for Windows Azure Active Directory with new and existing Windows Azure or Office 365 subscriptions. This post describes one easy way to access them.
To get started all you need is a trial subscription for Windows Azure and your favorite cloud-based application.
- The functionality described in this posting is a free preview and its use will not incur any charges. Following these instructions you will be creating a 30 day trial subscription in Windows Azure. (you will need a credit card to sign up but there will be no cost for usage of this service)
- In this example I use the consumer application Skype but you can choose from our numerous supported enterprise and consumer applications.
Steps:
- Create a Windows Azure trial subscription
- Activate the application access enhancements preview features
- Use the Windows Azure application gallery to add and configure a supported application
- Access the application using the access panel
Once you have completed these steps you can continue exploring by evaluating the account provisioning and federation features. The detailed instructions and videos walk you through these capabilities.
As always we highly appreciate your feedback, this survey offers a convenient way to connect with our engineering team and let us know what you think, if anything is missing, or if something didn't work as expected, otherwise please email us .
Quick access links
Windows Azure Management Portal – http://manage.windowsazure.com
Access Panel - https://account.activedirectory.windowsazure.com/applications
Application access enhancements for Windows Azure Active Directory technical reference - http://technet.microsoft.com/en-us/library/dn308590.aspx
Windows Azure preview features - http://www.windowsazure.com/en-us/services/preview/
Quick start steps
-
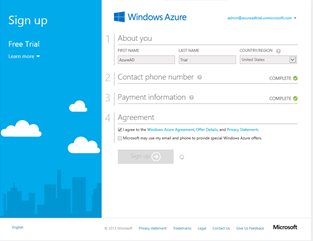
The simplest way to create a Windows Azure trial subscription is to start at the organizational sign-up page . On this page you can enter your trial subscription information and select an available domain name. After that you'll be prompted to enter your contact information. Your mobile phone number will only be used as additional authentication in case you forget how to access this trial subscription (or if you want to use it with the Windows Azure Active Authentication Preview.)
Note: If you are already logged in to Windows Azure, a Microsoft Account (Live ID), or your local AD, you might want to use an InPrivate browsing session to perform the following steps.
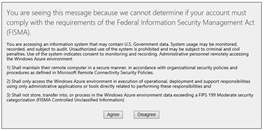
Once you complete your account setup you may be prompted to confirm that your trial account does not have any FISMA regulatory requirements.
You will then be prompted to enter your credit card information
Welcome to Windows Azure! You have completed your trial tenant signup and can proceed to the Windows Azure management portal by clicking on the " Portal " button at the top right corner of your screen.
- Once through the welcome screens you can navigate to Windows Azure Preview Feature page and enable the Application Access Enhancement feature by clicking " try it now ".
-
Now, browse back to the
Windows Azure Management Portal
, you will see the directory in the "all items" list and can browse to it by clicking on the arrow
next to it. From here you will need to click on the on the Windows Azure Active Directory
Quick Start page and select "Add an application" from the Explore section.
This will bring up the Windows Azure application gallery, the list has quite a few applications and will continue to expand every few weeks. In this example we will select the application "Skype". This can be done by selecting the "Telecommunications" category on the left hand pane, selecting the "Skype" application in the middle pane and confirming by clicking the checkmark on the bottom right.
Once an application is added to your directory you can assign the application to specific users through the users tab under the application. Here you can select the right users and use the "Enable Access" button at the bottom to grant access. If the application is configured with password single sign-on, as is the case in this example, you can also configure the user's credential (username and password) for this application. This can be done by ticking the checkbox "I want to enter the Skype credentials on behalf of the user" while enabling access or though the "edit account" button after the access has been enabled. If you choose not to do this the user will be able to enter their own credential through the Access Panel . It is important to note that users can only see in the Access Panel those applications the administrator has granted them access.
Note : Office 365 applications will appear in the user's Access Panel if they have assigned licenses to these services.


- Now that you've got an application configured, the next step is to click over to the Application Access Panel. This is the page where your users can single sign-on to applications, discover which applications they have, and in some cases manage their application credentials.

When clicking on the Skype application tile for the first time you may be prompted to download and install a browser extension. The extension is needed to support the password single sign-on functionality. If this is the case please follow the browser specific instructions.


Once the browser extension is installed the user can configure their Skype credentials (username and password) by clicking on the Skype tile or by using the


From now on the user can access their Skype account using Windows Azure Active Directory by selecting the Skype tile on the Access Panel.


Following these instructions you have just created your Windows Azure trial subscription, taken your first steps in managing your Windows Azure Active Directory, and assigned an application to your trial directory users. You also got a first view of the end user experience through the Access Panel and used Windows Azure Active Directory to access this application.
You can continue exploring the administrator and end user functionality, adding more applications through the application gallery, configure user provisioning, assign applications to specific users, connect your Windows Azure subscription to your Windows Server Active Directory, or explore other Windows Azure features.
I hope you'll find these instructions helpful! I'm looking forward to seeing even more of you using the Application Access enhancements for Windows Azure AD!
Regards,
Eran
 Microsoft