- Home
- Education Sector
- Educator Developer Blog
- Step-by-Step: Building an Automated ID Card Generation System using Microsoft Power Virtual Agent
- Subscribe to RSS Feed
- Mark as New
- Mark as Read
- Bookmark
- Subscribe
- Printer Friendly Page
- Report Inappropriate Content
The Problem
Universities, student clubs and organizations are currently facing challenges in efficiently managing the process of issuing identification cards (ID Card) to their members. For example, in some institutions in Africa, students have to stand in long queues for several hours from one unit of the processing center to another before they can receive or collect their ID cards from the institution. The current process is manual, time-consuming, and requires physical presence, which can be inconvenient for both the institution and its members.
Another issue pertains to students engaging in corrupt practices. They now possess various methods of creating counterfeit identity cards or slips. These cunning and unethical students manage to enter the examination hall using forged identity documents due to their failure to process the genuine ones on time. As a result, institutions are looking for a solution that can automate the process of issuing Identification cards and make it more seamless for their members.
Our Solution
We want to help make things better. Our team of 4 (Chino Ikwuegbu from Nigeria, Priyanshu Srivastav from India, Stephen Praise Agboola from Nigeria and Esther Wanjiru from Kenya) decided to work on a solution. Our solution aims to address this challenge by automating the entire process of issuing identity cards to students. This would eliminate the need for physical presence and make the process more seamless and convenient for members. This solution utilizes Microsoft's Power Platform.
In this solution, we used a bot built with Power Virtual Agents to collect required details for creating the ID cards from each student and had the data uploaded in real-time on SharePoint. Using Power Automate, we would automate the creation of the ID card within minutes once the flow has verified that the correct details were submitted by the student. For this sample we would be using the name “Student Solution” to identify our solution.
Prerequisites
Before we start building our solution, there are some prerequisites that we need to follow in order to set things up.
Creating a OneDrive Folder
We would need to create a folder in OneDrive to store the template for our ID card as well as a copy of the ID card that would be generated.
1. Let's name our folder "StudentSolutions",
2. Inside the folder, we upload Microsoft Word template for our ID card and save it as "template.docx",
3. Next, let's create another folder called "Pictures". This would be where the student would upload his/her photo for the ID Card,
4. Finally, let's create another folder called "ID Cards". This folder is created to store all the ID cards that are automatically generated.
Creating a SharePoint List
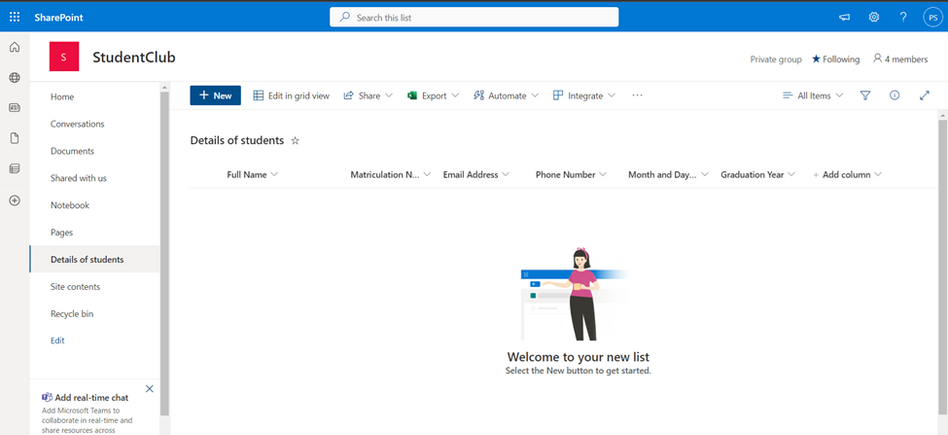
The next task for us would be to create a SharePoint list. The list would be used to store the details of the students. Let's name our SharePoint list "Details of Students" and create 7 columns within the list.
1. Full Name
2. Matriculation Number
3. Email Address
4. Phone number
5. Month and Day of birth
6. Year of graduation
7. PhotoUploaded
Done with prerequisites? NOW LET'S BEGIN BUILDING!
This blog is divided into 3 parts -
- In the first part, we demonstrate how to build a Power Virtual Agent chatbot for collecting details of the students.
- In the second part, we will be discussing how to store the details to the SharePoint list.
- In the last part, we will demonstrate how to generate an ID card for the registered student.
Collecting Student Details with Our Power Virtual Agent Bot
Microsoft's Power Virtual Agent allows you to create AI Chatbots that can ask and answer questions in seconds without the help of a human. You can decide to create your bot and integrate as a standalone web application, share on Microsoft Teams, on your website, on Cortana, Telegram or even Slack. Would you love to see how to make this happen? Let's begin!
- First, head over to http://aka.ms/TryPVA and sign in with your Microsoft account.
- Next, click on 'Create a bot' and give your bot a name, we named ours Student Solution.
- Then select the language your bot will speak and click on create.
- On the right navigation bar, click on 'Topics'. The next page you are directed to has 12 existing topics.
- Delete the first 4 topics or toggle it off. To delete, go to the topic, select the three horizontal which shows more actions and select delete. After deleting the topics, you would be left with 8 existing topics.
We are going to create two new topics for this solution, one for Student Registration and the other Student Complaint, then redirect these newly created topics from the Greeting Topic. A topic defines a how a bot conversation plays out. In this sample, we would create new topics from scratch. Topics have trigger phrases — these could be phrases, keywords, or questions that a user is likely to type. We also have conversation nodes — these are what you use to define how a bot should respond and what it should do. Now let’s create our first topic.
- On that same page, click on '+ New topic' at the top. Give your topic a name. We would name ours "Student Registration".
- In the section 'Trigger Phrases', let's input 3 phrases that the student may likely use to start the conversation. Save every change you make by clicking on the folder icon at the top right hand of the page.
Now we are done creating a new topic, let’s go ahead and edit the Greeting topic.
- Go to Topics, select Greeting, leave the trigger phrases.
- Edit the message node to your welcome message. We can delete the other message node, by clicking on the 3 horizontal dots and select delete.
- We have edited the message node to show this message when someone interacts with the bot for the first time.
Hi, I’m Esther. I can help with membership registration and answer your questions.
- Next, add another node by clicking the '+' icon and select “Ask a question”. We need to ask the students if they want to either register or make a complaint. Fill in the details correctly.
- Ask a question: The question we need to ask, “What can I help you with?’
- Identity: Since we have 2 options, select Multiple Choice Option
- Option for user: We add the first option, “Student Registration” and click on the “+” “new option” to add the second option “Make a Complaint”.
- Save response as: It is important we rename our bot variable for each question, so it's easy to reuse. Click on the pencil icon and in the column that pops out by the side, change the bot’s variable name for this question to Helpdesk. Bot variables are global variables as they are used to store information that do not change from topic to topic.
Notice that beneath the question block, condition blocks have been added. A separate condition block was created for each option as shown in the image below.
- Set the conditions to the option.
- Click on the “+” icon and select 'Redirect to another topic'.
- Next, select the topic which the Helpdesk is equal to.
- Now we have are done with the 'Greeting topic', go ahead and save it.
If the student selects either “Student Registration” or “Make a Complaint” it redirects to that topic. Our focus for now will be on Student Registration.
- Let’s head over to Topics, click on Student Registration and let’s build our bot.
- Click on the “+” node and select ask the question, fill in the details correctly.
- Click on the “+” node and select "Ask a question". Here are the questions we want the user of our bot to respond to:
- What is your full name?
- What is your matriculation number?
- What is your email address?
- Input your phone number
- Upload your photograph online and add the link here
- What month were you born?
- What day were you born?
- What year are you graduating?
- Allow student to see the details of his/her submission: (These are the details you submitted: - Full name, - Matriculation number, - Email address, - Phone number, - Month of birth, - Day of birth, - Year of graduation)
- Allow the student to confirm the submission: Yes/No (If yes, Power Automate pick responses and store them on SharePoint) (If no, the bot restarts from step 3)
- Then go on and ask the second and third question, fill in the details correctly and save.
- Do the same for the fourth, fifth and sixth question.
- Fill in the details correctly and save.
After collecting all the responses, we want our bot to show the response collected, to the student for errors or correction before submission.
- Click on the “+” node and select show a message.
- Then input the details below.
- To get the exact response for each question, select the “{x}”, a dropdown menu will be show, select the variable name you saved the response as. Do the same for other response.
These are the details you submitted:
Full name – {x}fullNameText
Matriculation Number - {x}matNum
Email Address - {x}emailAdd
Phone Number - {x}phoneNum
Month & Day of Birth - {x}birthYear
Graduation Year - {x}gradYear
After showing the response, we want to ask the student if she/he wants to submit. Click on the “+” node and select "Ask a question". Fill in the details correctly.
- Ask a question: The question we need to ask, “Do you want to submit now?’
- Identity: Since this is a No/yes question, choose Boolean, notice the nested three blocks that follows next. Go ahead and set the value of the first block to “true” and the second block set to “false”.
- Save response as: It is important we rename our bot variable for each question, so it's easy to reuse. Click on the pencil icon and in the column that pops out by the side, change the bot’s variable name for this question to Helpdesk. Bot variables are global variables as they are used to store information that do not change from topic to topic.
If the student selects yes, the automate is triggered and the information is saved. Else if the student selects no, it takes the student back to the third step, which is “What is your name?”. Now we need to connect the second condition block to the first question. We do this so that whenever the response to the submit details question is No, it goes back to the first question. To do this,
- Click on the '+' sign
- Instead of adding a node, click on the small circle, draw, and connect to the first question block. Your flow should look like the image below.
You can test your bot to make sure it's working well by clicking 'Test your bot' on the left side of the page.
CONGRATULATIONS ON SUCCESSFULLY BUILDING YOUR BOT! Now let's connect our bot to our SharePoint using Power Automate.
Collecting Student Responses and Updating on SharePoint with Power Automate
We start off by adding a new node to our bot after the first condition block which is equal to true. Remember how to add a node?
- Just click on the '+' sign.
- This time we would pick 'Call an action'.
- Then click 'Create a flow'.
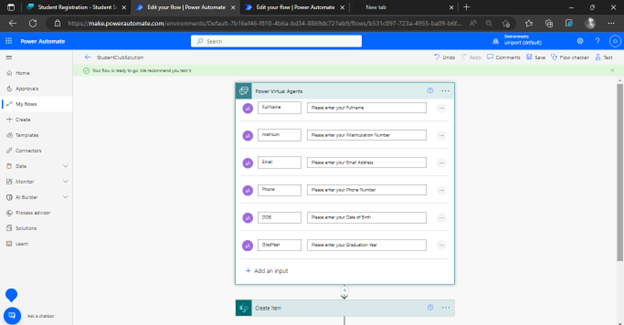
- Clicking 'Create a flow' would open Power Automate in a new window as shown below.
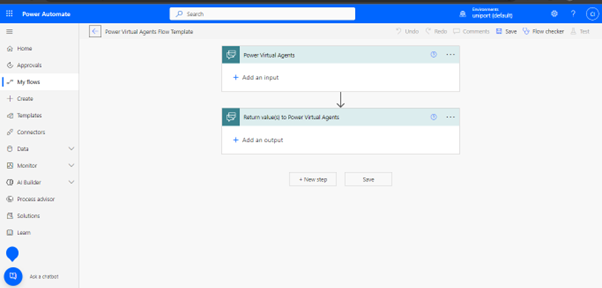
Notice that two actions have been automatically added to our Power Automate flow.
In the first action, Power Automate is establishing a connection with our Power Virtual Agent bot. We need to add each question the bot would ask or we would need response to as an input. To add the questions as inputs,
- Click on '+ Add an input',
- Then 'Text'.
Notice that when you do, a new input box is added. Repeat this step for all the questions and fill in the details correctly.
- Input: Use the same variable name you assigned to each question in the bot as the name of the input. For example, FullName for the question to identify which department in your organization the employee works with, Question1 for the first question, Question2 for the second question, Question3 for the third question, and Question4 for the fourth question.
- Please enter your input: Enter each question as input. Ensure you input the questions as arranged on SharePoint and in your Power Virtual Agent bot.
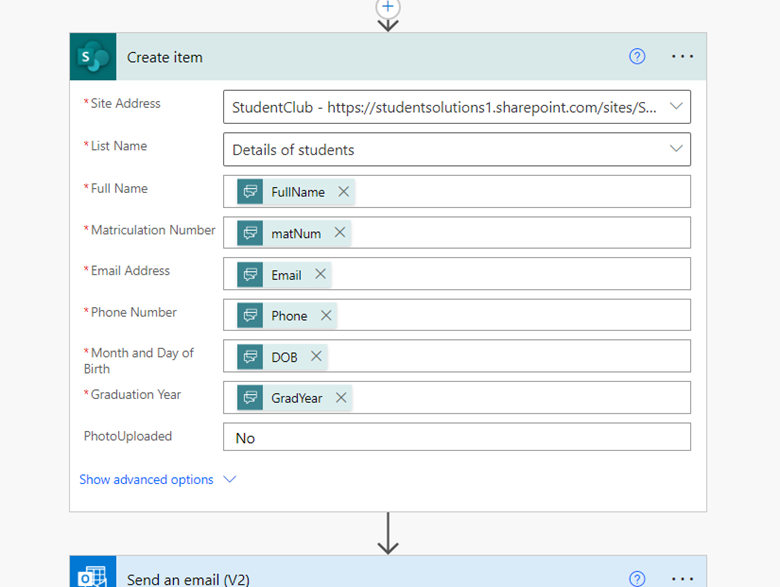
- In order to store the details on the SharePoint site, we use 'Create item' action from SharePoint.
- In the site address and list, we select the SharePoint list we created at the beginning. Thereafter, all the columns of the site are populated and for each field, we use the respective data collected from PVA (from dynamic content).
- For 'PhotoUploaded' field, we set the default value to 'No'.
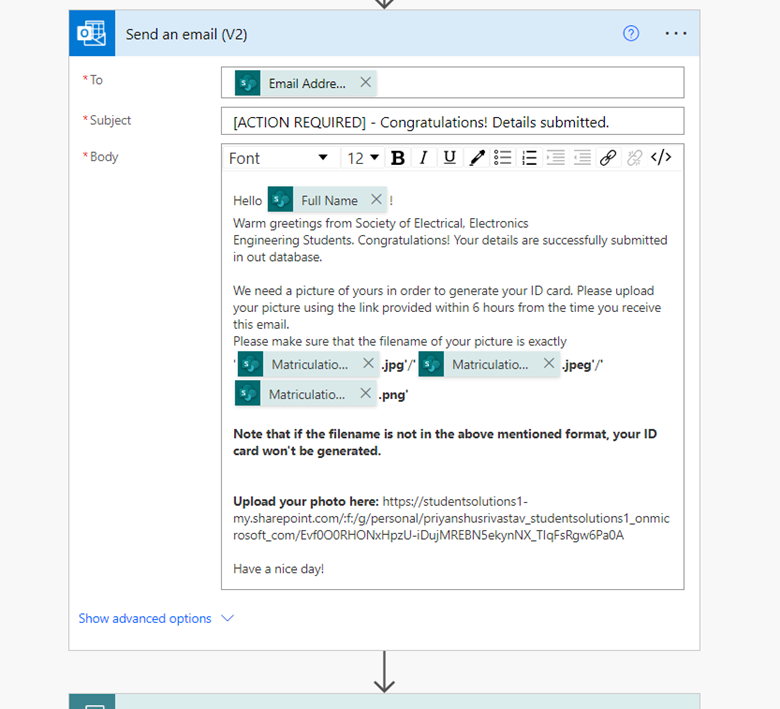
After the details are submitted in the SharePoint list, we use 'Send an Email' action from Outlook to send the email to the student asking him to upload his/her picture for the generation of ID card. We are providing the time range of 6 hours within which the picture needs to be uploaded else the entry of the student will be deleted from the SharePoint list.
After the details have been successfully submitted in the SharePoint list, the next step is to obtain the picture of the student to generate the ID card.
In some cases, student submit their details using the chatbot but forget to submit their picture. To handle this, we have defined a time limit of 6 hours in which the student should upload his/her picture or else his/her entry will be deemed void and discarded. We also set a delay of 3 hours and then check if the student has uploaded his picture or not.
- Add a new column to the SharePoint list with the name - “PhotoUploaded”
- Assign value “Yes” if photo is uploaded. When not uploaded, it would hold the value “No”.
- If after 3 hours, the field contains the value “No”, a reminder email is sent to the student asking for his/her picture.
- The process is again repeated after 6 hours to check if photo is uploaded or not.
- If it is not uploaded, a final email is sent to the student that his/her entry is deleted from the database.
- Then, his/her details are deleted from the SharePoint list.
Now let's head back to our Power Virtual Agent and connect the responses to our SharePoint list. To do this, we would need to assign each SharePoint column to the corresponding variable on Power Virtual Agent.
Now let's test our solution. Once the details are successfully submitted to the SharePoint, a message is displayed in the chatbot, and all boxes are ticked green.
Generation of ID Card
After getting the picture of the student, we need to use that picture to generate an ID card for the student. The convention to be used here is that the file name of the picture uploaded by the student should be exactly equal to the matriculation number of the student.
- We would be using the trigger “When a file is created” in the OneDrive connector. The trigger asks for the location of the folder in the OneDrive where the file is to be uploaded. In our case, the file gets uploaded in the folder we created earlier "StudentSolutions" under "Pictures". To select the folder, click on the ‘Show Picker’ icon on the right side of the field and choose the folder needed.
- The next step is to get the file name of the picture that is uploaded. We would be initializing 2 variables to get the matriculation number from the file name:
-
fname - stores the file name of the picture that is uploaded. It contains extension as well. It is a string variable.
For example, fname contains ‘20637.jpg’.
-
matNum - This variable stores the actual matriculation number of the student. Matriculation number is extracted from the filename by removing the extension from fname. This is done by using the expression below. In our case, matNum contains ‘20637’.
substring(variables(‘fname’),0,lastindexof(variables(‘fname’),’.’))
If the student uploads his/her picture using the link provided, without being signed into the OneDrive account, then, he/she would be asked the first name and the last name. The uploaded file is saved in the OneDrive folder in the format <FirstName>_<LastName>_<FileName> where FileName is the actual name of the file.
In order to get correct filename (which is equal to the matriculation number), the following actions are used:
- Check if the filename contains ‘_’ symbol or not. If it contains, the actual file name is obtained by removing all the characters before the last ‘_’ symbol. The updated filename is stored back in the variable matNum.
- If no underscore (‘_’) symbol is present, then no changes are required.
In the next step, we are fetching the details for all the students from the SharePoint list and comparing the matriculation number of each record with the matNum variable. Since matriculation number of a student in an institution is always unique, therefore, we can safely conclude that the below flock of action returns only one record. The steps 5 to 10 generate the ID card for the student whose matriculation number matches with the filename of the picture provided and sends the generated id card as pdf to that student via email.
For every record matching with the filename, we perform the following steps in sequential order to generate and send the ID card over email.
Since the picture is uploaded, the first step is to update the "PhotoUploaded" column of SharePoint List to 'Yes'
Populating our Microsoft Word Template
Our Microsoft Word template is a word document with image and text placeholders which gives the layout of the ID card to be generated. To populate our word document, we need a Word (Online) connector. Search for the connector and select the action “Populate a Microsoft Word template”.
The Action requires 3 mandatory questions:
1. Location - The location where the word template is stored (OneDrive for Business in our case)
2. Document Library - OneDrive
3. File - Browse and select the Microsoft Word template we created earlier.
After selecting the file, 2 new fields will be populated – the image and text control we added. For the image, we need to select the image that should be put in there. For this purpose, we can use the dynamic content from the “When a file is Created” trigger and select “File Content”.
For the text control, we need to provide the name of the student. The name of the student is taken from the matching record of the “Get Items” action of SharePoint. So, the name is added dynamically.
Next, after we have provided the values for the image control and the text control, we need to create a new file to store the content of the id card. To do this,
- Create a new OneDrive Action "Create File".
- Provide the path to the folder where this file will be stored.
- Provide name of the file. Since this is just a temporary word document file, we will name it as “temp.docx”. [Note that this file will be deleted later after converting to pdf]
- For file content, add the dynamic content from the previous Microsoft Word template we created
Add a new action called “Convert File” to convert our temporary file generated to pdf. The action takes values of 2 arguments as input:
1. File - The unique identifier to the file which is to be converted. We will use dynamic content “id” of previous "Create file" action.
2. Target type - The target file type (pdf in our case)
So far, we have created a word document of the ID card, converted the word document to pdf format. Now, its time to store the pdf in OneDrive. For this we will be using the action of OneDrive Connector called “Create File”. We would need to provide the destination folder path, file name and file content.
The file content will be dynamic content called “File Content” of the previous action (Convert file action).
The last step is to send an email to the student with the ID card added to it as attachment. For this purpose, we are using “Send an email” action of OneDrive. The target email address is obtained from the matching record we got using the ‘Get items’ action. In order to add the pdf file of the id card as attachment, use the dynamic content ‘Body’ of ‘Convert File’ action.
Additional Resources
You must be a registered user to add a comment. If you've already registered, sign in. Otherwise, register and sign in.

