Forum Discussion
Christiaan Brinkhoff
Aug 01, 2019Copper Contributor
Learn here how to Manage your Windows Virtual Desktop host pools with Azure Bastion
Learn here how to Manage your Windows Virtual Desktop host pools with Azure Bastion
We all remember stepping stone, or also called jump management servers to manage and maintain your Remote Desktop, or infrastructure server environment internally (and externally) through a Remote Desktop Connection with the most common reason; it’s just easy?
Azure Bastion is a relatively new Azure service that can simplify as well as improve remote connectivity - as a secure better alternative for stepping stone servers to your Windows Virtual Desktop - and infrastructure Virtual Machines on Microsoft Azure. Azure Bastion is completely web-based and works via SSL. In some simple configuration clicks - and most importantly without exposing any RDP (or SSH) ports to the outside internet - you can access your Windows Virtual Desktop Virtual Machines in Azure.“From an security perspective this is the most worst you can do, because once hackers are in - you’ve got access to almost everything!”
What is Azure Bastion?
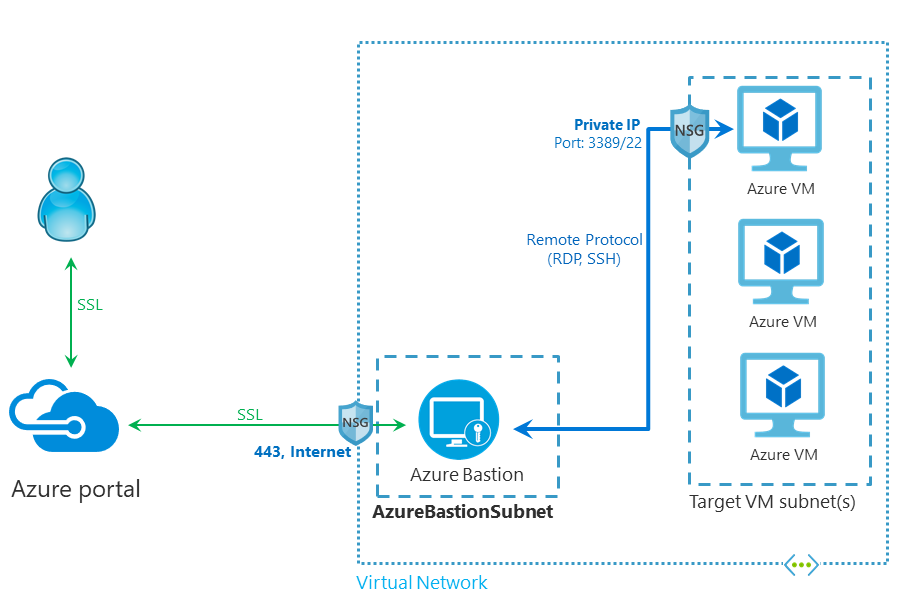
Azure Bastion is a new Azure Platform service you could leverage to enable external access to your resources in Azure Infrastructure-as-a-Service (IaaS). The service is completely HTML5 based and works from every modern web browser. The service automatically streaming to your local device via an RDP/SSH session over SSL on port 443. This makes it easy and secure to go over corporate firewalls without any adjustments. Also, it doesn’t require you to expose any Public IP or Remote Desktop Services port on your Network Security Group (NSG) for the internet. Azure Bastion works over port 443, this is the only port you need to open from the outside to the inside over the Network Security Group (NSG). After that, the connection proceeds to the subnet in the Azure Virtual Network where the Bastion Service persists and connect via the NSG of the VMs you want to leverage internally over the Remote Desktop (3389) or SSH (22) ports. A secure way to access your Windows Virtual Desktop as well as infrastructure servers in your Azure Infrastructure-as-a-Service environment.See below how it works from an architecture perspective…
Did you know?
- The service operation from inside your Azure ARM portal.
- Use this specific Preview - https://aka.ms/BastionHost - URL to get access to the service.
- There are two ways that you can create a Bastion host resource:
- Create a Bastion resource using the Azure portal.
- Create a Bastion resource in the Azure portal by using existing VM settings.
- The Bastion Service is currently available for the following Azure DC regions.
- West US
- East US
- West Europe
- South Central US
- Australia East
- Japan East
- Bastion can also be used for secure SSH connections to for example Linux resources in your Azure IaaS environment
- If you create a bastion host in the portal by using an existing VM, various settings will automatically default corresponding to your virtual machine and/or virtual network.
- You must use a separate subnet in your virtual network to which the new Bastion host resource will be deployed. You must create a subnet using the name-value AzureBastionSubnet. This value lets Azure know which subnet to deploy the Bastion resources to.
- The Bastion PM team is adding some new futures soon, such as Azure AD and MFA integration and recording mode directly from the service.
See here how it works
I’ve recorded a short video after writing and creating my Azure Bastion Service, and to give you a sneak preview on the end result of this blog article – I’ve uploaded a video to show you the easiness and value. Check it out in the video below.Other secure alternatives...
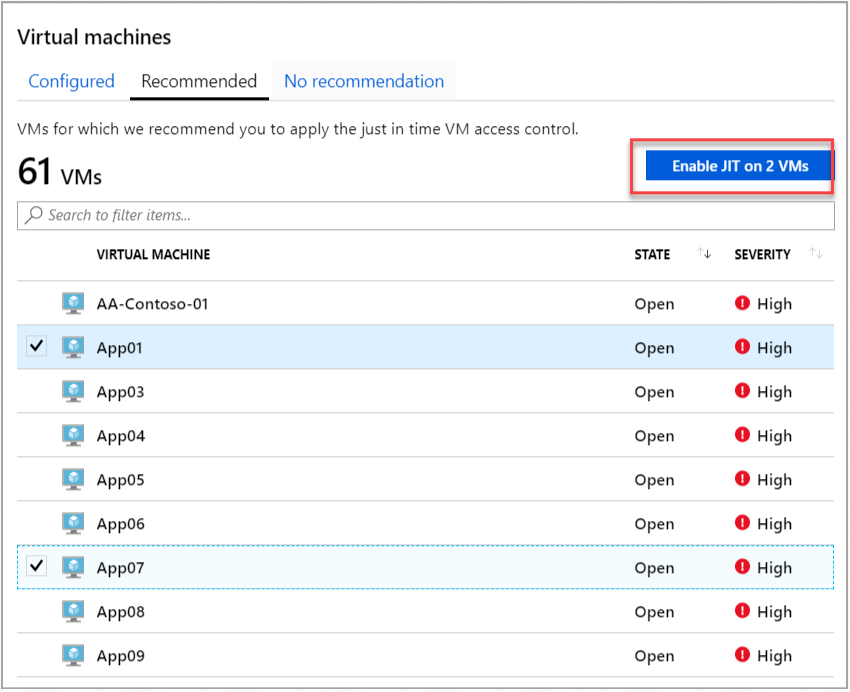
One other alternative way to reduce exposure to a brute force attack to your Windows Virtual Desktop environment is to limit (and IP whitelist - filter) the amount of time that a port is open. This is something you could achieve with the also not so old service Just-in-time VM Access, it’s an Azure Security Center feature you can leverage. In a nutshell; Just-in-time (JIT) virtual machine (VM) access can be used to lock down inbound traffic to your Azure VMs, reducing exposure to attacks while providing easy access to connect to VMs when needed.
Read more about it here:
https://docs.microsoft.com/en-us/azure/security-center/security-center-just-in-time
How to Activate the Bastion Service
Pre-step: Create a separate Azure Subnet for Bastion
This step is easier to do prior to the Azure Bastion instance on Azure. One technical network requirement is to have a separate subnet, specifically for Azure Bastion traffic. You could either create a separate Azure Virtual Network and setup vNet peerings between your networks or just create a separate subnet in your existing vNet in Azure. This is the example I’m going to use in this article.
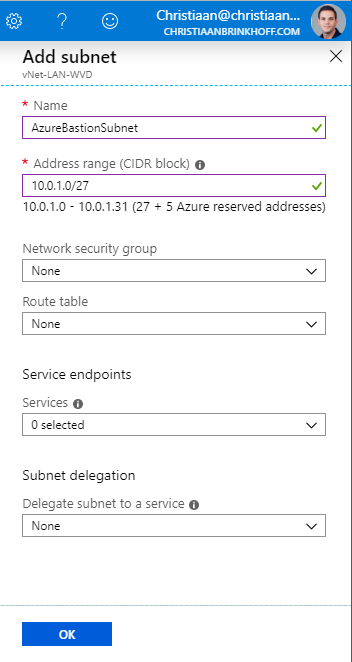
Note: To be most efficient with your network addresses at least a /27 or larger subnet (/27, /26, and so on).
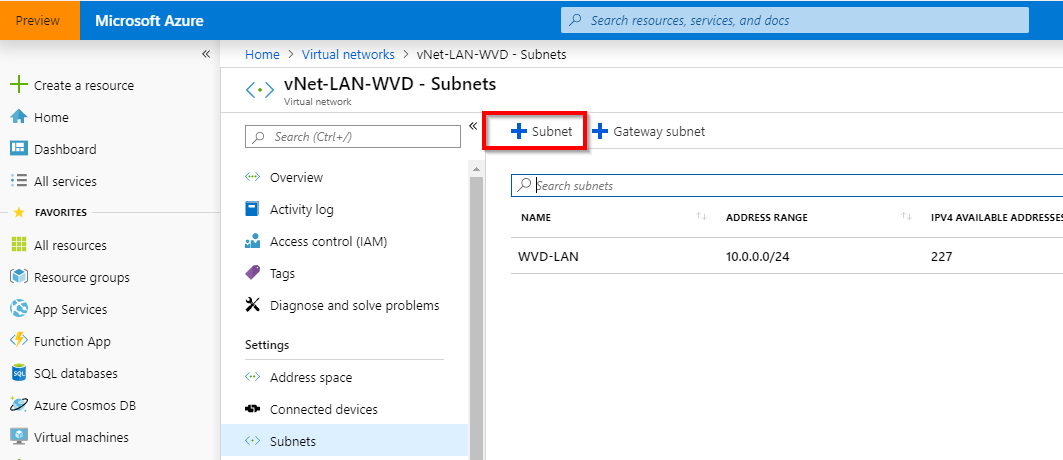
Open the Azure vNet you want to use.
Add a new Subnet
Create the AzureBastionSubnet without any Network Security Groups, route tables, or delegations.
Continue to the next step where we deploy the Bastion instance.
Deploy Azure Bastion from the Azure Marketplace
Just because Azure Bastion is still in Preview mode – you have to use this Preview Azure Marketplace URL below to get access to the service. The expectation is that this service becomes GA soon.
Click on the URL below.
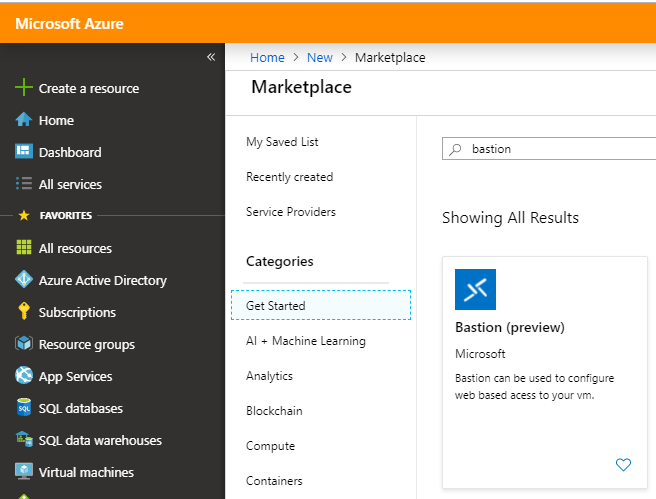
Search for Bastion (preview) in the Azure Marketplace
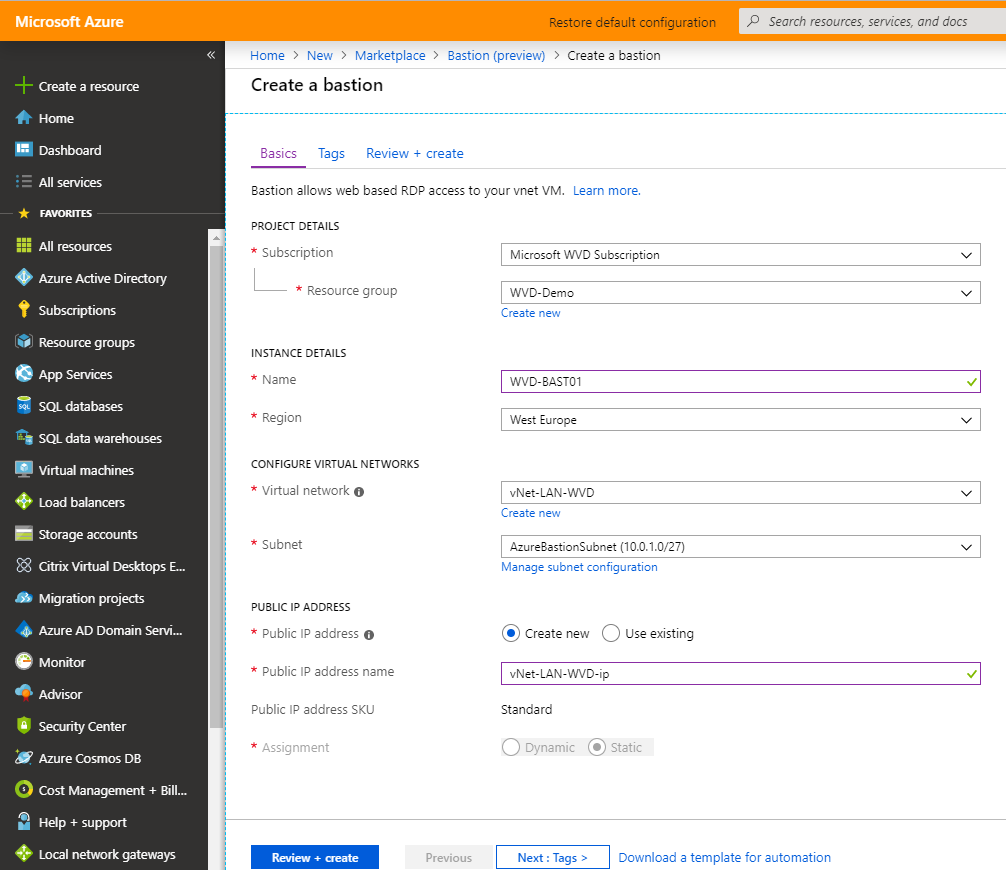
Click on create
Enter the required information for the VM deployment in your Azure IaaS environment.
Optional: Assign a Public IP for the external Access to your Bastion server.
Note: Make sure to select the correct Azure vNet we created/modified earlier.
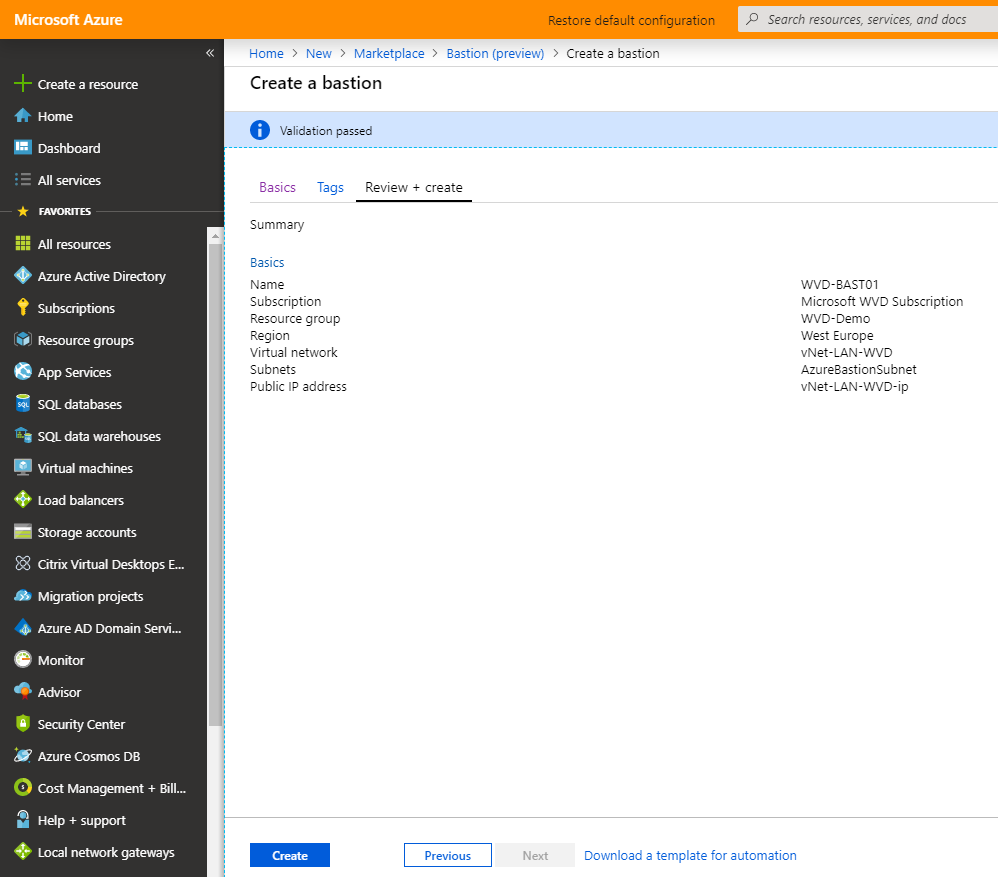
Click on the review+ create button
Click on the Create button to start the deployment
...
After a couple of minutes, the deployment is finished.
Access my Windows Virtual Desktop images
The following steps are similar to when you normally set up a Remote Desktop Connection to a Virtual Machine in Azure, although then through an MSTSC RDP file connection – we now leverage the Azure Bastion capabilities over HTML5 (clientless).
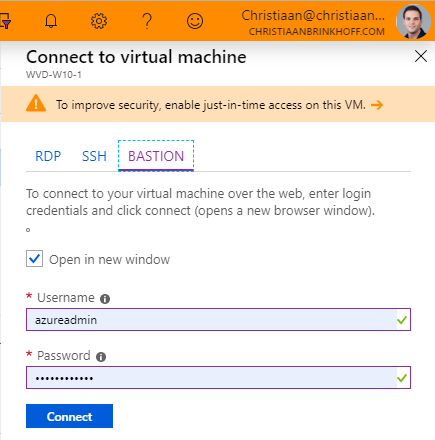
Open the Virtual Machine that you want to manage
Click on the Connect button
Choose for the new option - BASTION
Enter the Domain / Local Administrator credentials to get access to the VM
Click on Connect
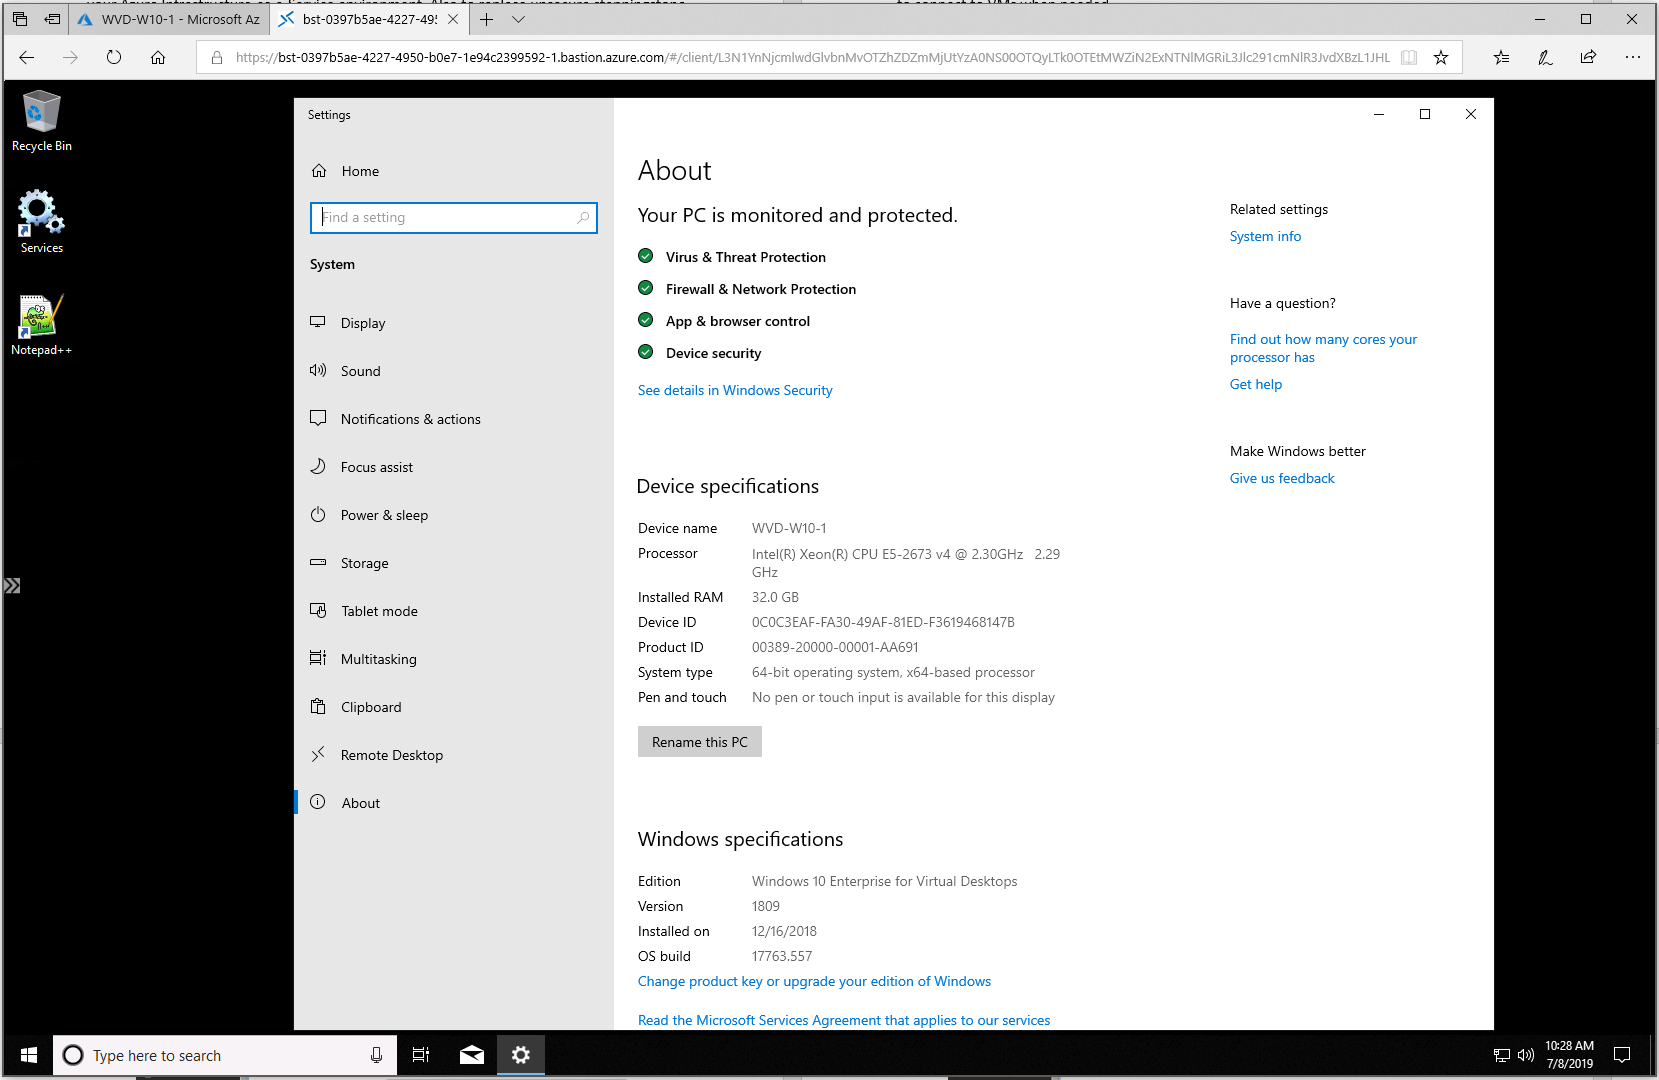
There we go – I’m connected to my Windows 10 Multi-User master image inside Microsoft
Azure via my Azure Bastion HTML5 (agentless) service!
No RepliesBe the first to reply
