
With hardware enforced DEP, all memory spaces are automatically marked as non-executable unless they are explicitly told they are being allocated for executable code. This flag is set on a per-page basis and is set via a bit in the page table entry (PTE) for that page. If something tries to execute code from a memory region that is marked as non-executable, the hardware feature passes and exception to DEP within Windows and lets it know that this is happening. DEP then causes an assert within the code stack that is executing, which causes it to fail with an access violation, which should look pretty much like the following:

In the past, this was not enforced and code could execute from basically anywhere. This allowed virus and malware writers to exploit a buffer overflow, and spew a string of executable code out into an unprotected data region. It could then execute it from that location uncontested. Those of you who remember the outbreaks of Blaster and Sasser – those are prime examples of using this sort of exploit. By combining processor NX or XD support with Windows OS support, this type of vulnerability should be largely mitigated.
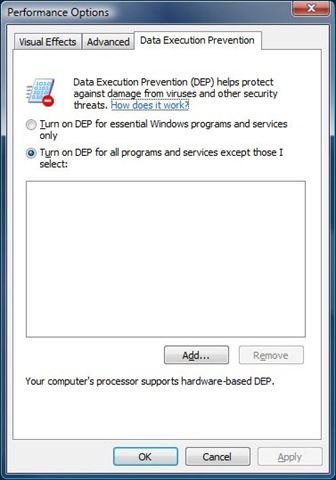
Sometimes an innocent application will trigger DEP simply due to faulty coding. We often see this on older applications or things like shareware. It is usually not intentional and never caused a problem in the old days, but now that security is paramount, inefficient (and sometimes sloppy!) memory management can cause some serious issues. The right answer of course is for the application vendor to rewrite the portion of the app that is triggering DEP, but that is of course not likely in the case of older applications or shareware applications. In this case, you can exempt the application for DEP monitoring so that DEP ignores it. As long as you trust the application in question and know it is not really doing anything malicious, exempting it from DEP should not be a problem. Here is what the GUI looks like:
You can add a program to the exemption list by simply clicking Add and browsing to the .EXE file in question. However, there are a couple of other ways to disable DEP for a specific application beyond using the GUI. The first is by changing the Application Compatibility settings for the application in the registry. To do this, browse to the following key in the registry: HKEY_LOCAL_MACHINE\SOFTWARE\Microsoft\Windows NT\CurrentVersion\AppCompatFlags\Layers . For each application for which you want to disable DEP, you create a string value where the name of the value is the full path to the executable. You would then set the value data to “DisableNXShowUI” as shown below.

If you have several applications for which you want to disable DEP across your environment, it may be worthwhile to use the Application Compatibility Toolkit to deploy a custom Compatibility Database (see the TechNet article on Resolving Application Compatibility Issues with Compatibility Administrator for more details).
Turning our attention back to the boot.ini for a second before we wrap up, you may have noticed an entry in your Boot.ini saying Optout or Optin, like this:
timeout=30
default=multi(0)disk(0)rdisk(0)partition(2)\WINDOWS
[operating systems]
multi(0)disk(0)rdisk(0)partition(2)\WINDOWS="Windows Server 2003, Standard" /fastdetect /noexecute=optout
The 'noexecute ' value dictates what state DEP operates under. There are four different entries possible:
- Optin: DEP is enabled for Windows system binaries and any application that 'opts in'. By default, only Windows binaries will be covered. This is the value set if you choose the option 'Turn on DEP for essential Windows programs and services only' listed in the screenshot above.
- Optout: DEP is enabled for all processes, not just Windows binaries. An application or process can be 'opted out' on an individual basis. The Application Compatibility Toolkit can be used to create shims to opt-out apps, then deployed on your network. This option is set if you choose 'Turn on DEP for all programs and services except those I select', like in the screenshot above.
- AlwaysOn: DEP is on for all processes, period. You cannot exempt processes from DEP monitoring, and any Application Compatibility Toolkit shims do not apply.
- AlwaysOff: Totally disables DEP regardless of hardware support. In addition, the PAE kernel will not be installed unless /PAE is put in the boot.ini.
Please note that these last two values must be set manually.
With that, we’ve come to the end of this post. Hopefully you find this information useful!
| Share this post : |

|

|

|

|

|
 Microsoft