cloud security
236 Topics
Automate SecOps to Developer Communication with DevOps Security in Defender for Cloud
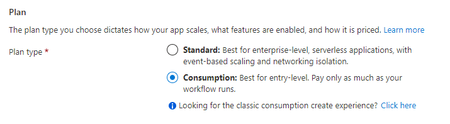
Automate SecOps to Developer Communication with DevOps Security in Defender for Cloud Logic Apps are a workflow automation feature of Microsoft Defender for Cloud (MDC) in which you can create and run automated workflows that integrate your apps, data, services, and systems. Customer feedback has been loud and clear—Security Teams need more efficient and effective ways to communicate directly with Development Teams about discovered security findings. This blog walks through creating a Logic App that Security Teams can use to automate communication of discovered security issues to Development Teams. The Logic App creates a Work Item in Azure DevOps (ADO) containing repository location, description, and remediation information from DevOps security in Defender for Cloud Recommendations that Developers can use to remediate the discovered security issue. Security Operators will find this Logic App particularly useful because they do not need to be familiar with Azure DevOps or even to login to Azure DevOps to create a Work Item for their Developers. Instead, SecOps can trigger a Logic App on an affected repository and create a Work Item for a Development Team to triage and remediate. Objectives: Create a Logic App to create an Azure DevOps work item from an MDC Recommendation Test the Logic App Prerequisite: Connector provisioned in MDC to your Source Code Management System (such as Azure DevOps or GitHub) Create a Logic App to Create an ADO Work Item Login to Azure and search for or click Logic Apps Click + Add Choose a Subscription and Resource group Enter a name for your Logic App Under Plan, choose Consumption Click Review + create Click Create Go to the Logic App you created and click Logic app designer in the left menu Click Blank Logic App In the search box, type Recommendation Choose When a Microsoft Defender for Cloud Recommendation is created or triggered Click + New step Type variable in the search box Choose Initialize variable For Name, type org_name For Type, choose String Click + New step Type variable in the search box Choose Initialize variable For Name, type project_name For Type, choose String Click + New step Type variable in the search box Choose Initialize variable For Name, type repo_name For Type, choose String Click + New step Type variable in the search box Choose Set variable For Name, choose org_name from the dropdown menu For Value, click in the empty box In the Add dynamic content flyout, click Expression and type the following: first(skip(split(triggerBody()?['properties']?['resourceDetails']?['id'],'/'),10)) and click OK Click + New step Type variable in the search box Choose Set variable For Name, choose project_name from the dropdown menu For Value, click in the empty box In the Add dynamic content flyout, click Expression and type the following: first(skip(split(triggerBody()?['properties']?['resourceDetails']?['id'],'/'),12)) and click OK Click + New step Type variable in the search box Choose Set variable For Name, choose repo_name from the dropdown menu For Value, click in the empty box In the Add dynamic content flyout, click Expression and type the following: first(skip(split(triggerBody()?['properties']?['resourceDetails']?['id'],'/'),14)) and click OK Click + New step Type azure devops in the search box Click Create a work item Click Sign in Click Accept to allow the App request for the Logic App to write to Azure DevOps For Organization Name, click in the box, click Enter custom value In the Add dynamic content flyout, click org_name For Project name, click Enter custom value In the Add dynamic content flyout, click project_name For Work Item Type, type task For Title, click in the box, type the title of the work item you want to create for your Developers, such as: A security issue needs to be remediated from the following repo: In the Add dynamic content flyout, click repo_name For Description, type Description: In the Add dynamic content flyout, click Properties Metadata Description, then hit enter twice Type Remediation steps: then hit enter In the Add dynamic content flyout, click Properties Metadata Remediation Description Your Logic App should now look like the following: Your no code Logic App is now complete and needs to be tested. Test the Logic App Navigate to Microsoft Defender for Cloud Click Recommendations Expand Remediate vulnerabilities, click Code repositories should have secret scanning findings resolved Expand Affected resources, tick an Azure DevOps repository Click Trigger logic app In the Selected subscription dropdown, choose the Subscription that contains the Logic App Tick the box next to the Logic app Click Trigger Now let’s verify that your work item has been created Login to Azure DevOps and navigate to the Project with the repository you tested Click Boards, then click Work items to see the work item that you created Your work item should look similar to the following work item: Conclusion To review, we’ve walked through creating a Logic App that creates a Work Item in Azure DevOps to communicate with Developers so they can remediate security findings discovered by Microsoft Defender for Cloud. This Logic App can be executed on any Azure DevOps repository. It injects the location, description, and remediation steps in the Work Item description body so that Developers can quickly find and fix the security issue. This helps Security Operators automate communication with Developers by creating a Work Item that the Development Team can then prioritize in their Sprint Planning sessions. Additional Resources To learn more about DevOps security in Defender for Cloud, read this documentation Download (free) a special Appendix about DevOps security in Defender for Cloud from the latest Microsoft Defender for Cloud book published by Microsoft Press To learn how to onboard your Azure DevOps Source Code Management System to Defender for Cloud, read this documentation for Azure DevOps
Microsoft Defender for Cloud - strategy and plan towards Log Analytics Agent (MMA) deprecation
Log Analytics agent (also known as MMA) is on a deprecation path and will be retired in Aug 2024. The purpose of this blogpost is to clarify how Microsoft Defender for Cloud will align with this plan and what is the impact on customers.109KViews2likes28CommentsDeploy Microsoft Defender for Cloud via Terraform
Terraform is an Infrastructure as a Code tool created by Hashicorp. It’s used to manage your infrastructure in Azure, as well as other clouds. In this article, we’ll be showing you how to deploy Microsoft Defender for Cloud (MDC) using Terraform from scratch.Managing Security Center at scale using ARM templates and Azure Policy
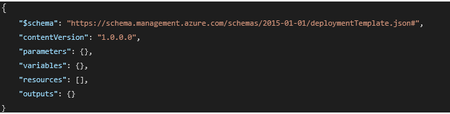
*** Update: This blogpost has been updated with a new ARM template and new Azure Policy definitions which covers the new Security Center bundle pricings. The new ARM template can be found here, the new Azure Policy definitions can be found here *** Recently we have been receiving several customer questions on how to manage Security Center at scale in a continuous integration (CI) and continuous delivery (CD) scenario, better known as CI/CD. How do you make sure that when a new subscription is instantiated, Security Center is configured correctly and is enabled to monitor new and existing resources? How do you manage hundreds of subscriptions within your organizattion? How do you enforce your security policies? This blogpost covers two scenarios: Configure Security Center using an ARM template to support a CI/CD scenario and management at scale Enforce a Security Center configuration within your organization, using Azure Policy Since both ARM templates and Azure Policy talk to the Resource Manager API in Azure, by making a JSON formatted request, you can re-use the deployment section of an ARM template to author an Azure Policy definition. If you are new to ARM templates and are looking for guidance on authoring, go here. In case you want to leverage PowerShell for configuring ASC, go here. The Security Center ARM Template Every ARM template consists of these 7 elements (not all of them have to be used): It’s the “resources” element that we are interested in since the ARM template reference for Security Center hasn’t been documented yet. We are in the process of publishing which makes it easier to find which types and values are allowed and will also provide IntelliSense. I will update this post when that becomes available. In this blogpost I will cover the two most asked questions: How can I make sure that Security Center is configured for the Standard pricing tier, which unlocks all the Security Center features How can I enable auto provisioning, which enables automatic installation of the Microsoft Management Agent (MMA) VM extension for new resources. Please refer to the pricing tier documentation for the difference between the Free and Standard tier. Set the ASC pricing tier in an ARM template The new pricing tier API is fast and efficient to use. We are using the Microsoft.Security/pricings type to set our pricing tier. How does that look in a template? The ARM template can be found here. If you want to deploy this template, please make sure you target the subscription instead of a resource group. This is a common made mistake, since ASC lives at the subscription level, not at the resource group level. A deployment would look like this (using PowerShell): New-AzDeployment -Name myAscDeploy -Location <yourLocation> -TemplateFile ‘<yourTemplateFileAndPathHere>' -Verbose Since you have probably noticed the usage of a parameter, so you can flip it from “Free” to “Standard” or the other way around, you will be prompted for this value. Please note that we are only allowing the two values specified and it is case sensitive. You can verify the deployment in the activity log: Leveraging the ARM template to create an Azure Policy Now that you have a working ARM template, you can use it to create a deployIfNotExists type of Azure policy which allows you to remediate if the policy definition is non-compliant. If you are just starting with Azure Policy, I would recommend to explore our documentation for guidance on different policy definitions. Leveraging the ARM template we just created, you can construct a deployIfNotExists Azure Policy. You first need to create the section that allows you to find the pricingTier field and value (Standard). For this to work, you need to target your Policy at the right scope (subscriptions or higher), then you define the “effect” (deployIfNotExists) and you set the type to Microsoft.Security/pricings, where the field and value lives which we are looking for. If the existenceCondition returns false and you want to remediate it, you need to define a deployment section under the resources section, where you define your target type and properties. You can find the Azure Policy shown above here. Having your ARM Policy defined, you can now create and assign your new Azure Policy. Please note that you need the appropriate permissions to create a managed identity. This ensures that the policy has the appropriate permissions to change the Security Center configuration at the subscription level. It takes around 30 minutes for the policy to take effect as mentioned in the confirmation. Your policy will remain in this state for a while: Then after around 30 minutes, you will notice a non-compliant assignment, as shown below. If you click on the assignment, you can explore which resource is non-compliant. You can click on Create Remediation Task to remediate it. Automatically create a remediation task In case you want to use automation, you can leverage the Policy Insights API to create a remediation task. One of the options you have is to invoke the API using PowerShell. The script below shows an example how to accomplish that. Please note that besides the subscriptionId, you need to pass a remediationName and policyID: You can find the script to create a remediation task here. If you have succesfully executed the script, you should see something similar in your activity log: Your ASC pricing tier should be changed to Standard and after a policy refresh cycle, your compliance state should be updated to compliant. Configure Security Center auto provisioning using a custom workspace The following ARM template enables auto provisioning so that the Microsoft Management Agent VM extension will be deployed automatically to new created virtual machines. You will also configure a custom Log Analytics workspace instead of the default Security Center one. The ARM template for enabling auto provisioning can be found here. Please note that you need to pass specific parameters values for configuring the Log Analytics workspace like workspace name, the resource group of the workspace and the Azure subscriptionID of where the workspace is created. Deployment of the ARM template is straightforward as you have seen before while deploying the pricing tier template and should look like this:Microsoft Defender for Cloud Cost Estimation Dashboard
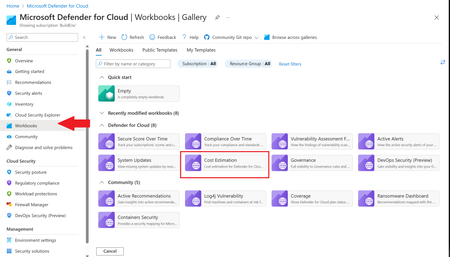
This blog was updated on April 16 th , 2023 to reflect the latest version of the Cost Estimation workbook. Microsoft Defender for Cloud provides advanced threat detection capabilities across your cloud workloads. This includes comprehensive coverage plans for compute, PaaS and data resources in your environment. Before enabling Defender for Cloud across subscriptions, customers are often interested in having a cost estimation to make sure the cost aligns with the team’s budget. We previously released the Microsoft Defender for Storage Price Estimation Workbook, which was widely and positively received by customers. Based on customer feedback, we have extended this offering by creating one comprehensive workbook that covers most Microsoft Defender for Cloud plans. This includes Defender for Containers, App Service, Servers, Storage, Cloud Security Posture Management and Databases. The Cost Estimation workbook is out-of-the box and can be found in the Defender for Cloud portal. After reading this blog and using the workbook, be sure to leave your feedback to be considered for future enhancements. Please remember these numbers are only estimated based on retail prices and do not provide actual billing data. For reference on how these prices are calculated, visit the Pricing—Microsoft Defender | Microsoft Azure. Overview The cost estimation workbook provides a consolidated price estimation for Microsoft Defender for Cloud plans based on the resource telemetry in your organization’s environment. The workbook allows you to select which subscriptions you would like to estimate the price for as well as the Defender Plans. In a single pane of glass, organizations can see the estimated cost per plan on each subscription as well as the grand total for all the selected subscriptions and plans. To see which plans are currently being used on the subscription, consider using the coverage workbook. Defender Cloud Security Posture Management (CSPM) Defender CSPM protects all resources across your subscriptions, but billing only applies to Compute, Databases and Storage accounts. Billable workloads include VMs, Storage accounts, open-source relational databases and SQL PaaS & Servers on machines. See here for more information regarding pricing. On the backend, the workbook checks to see how many billable resources were detected and if any of the above plans are enabled on the subscription. It then takes the number of billable resources and multiplies it by the Defender CSPM price. Defender for App Service The estimation for Defender for App Services is based on the retail price of $14.60 USD per App Service per month. Check out the Defender for App Service Price Estimation Dashboard for a more detailed view on estimated pricing with information such as CPU time and a list of App Services detected. Defender for Containers The estimation for Defender for Containers is calculated based on the average number of worker nodes in the cluster during the past 30 days. For a more detailed view on containers pricing such as average vCores detected and the number of image scans included, consider also viewing the stand-alone Defender for Containers Cost Estimation Workbook. Defender for Databases Pricing for Defender for Databases includes Defender for SQL Databases and Defender for open-source relational databases (OSS DBs). This includes PostgreSQL, MySQL and MariaDB. All estimations are based on the retail price of $15 USD per resource per month. On the backend, the workbook runs a query to find all SQL databases and OSS DBs in the selected subscriptions and multiplies the total amount by 15 to get the estimated monthly cost. Defender for Key Vault Defender for Key Vault cost estimation is not included in the out of the box workbook, however, a stand-alone workbook is available in the Defender for Cloud GitHub. The Defender for Key Vault dashboard considers all Key Vaults with or without Defender for Key Vault enabled on the selected subscriptions. The calculations are based on the retail price of $0.02 USD per 10k transactions. The “Estimated Cost (7 days)” column takes the total Key Vault transactions of the last 7 days, divides them by 10K and multiples them by 0.02. In “Estimated Monthly Price”, the results of “Estimated Cost (7 days)” are multiplied by 4.35 to get the monthly estimate. Defender for Servers Defender for Servers includes two plan options, Plan 1 and Plan 2. The workbook gives you the option to toggle between the two plans to see the difference in how they would effect pricing. Plan 1 is currently charged at $5 per month where as Plan 2 is currently charged at $15. Defender for Storage The Defender for Storage workbook allows you to estimate the cost of the two pricing plans: the legacy per-transaction plan and the new per-storage plan. The workbook looks at historical file and blob transaction data on supported storage types such as Blob Storage, Azure Files, and Azure Data Lake Storage Gen 2. We have released a new version of this workbook, and you can find it here: Microsoft-Defender-for-Cloud/Workbooks/Microsoft Defender for Storage Price Estimation and learn more about the storage workbook in Microsoft Defender for Storage – Price Estimation blog post. Limitations Azure Monitor Metrics data backends have limits and the number of requests to fetch data might time out. To solve this, narrow your scope by reducing the selected subscriptions and Defender plans. The workbook currently only includes Azure resources. Acknowledgements Special thanks to everyone who contributed to different versions of this workbook: Fernanda Vela, Helder Pinto, Lili Davoudian, Sarah Kriwet, Safeena Begum Lepakshi, Tom Janetscheck, Amit Biton, Ahmed Masalha, Keren Damari, Nir Sela, Mark Kendrick, Yaniv Shasha, Mauricio Zaragoza, Kafeel Tahir, Mary Lieb, Chris Tucci, Brian Roosevelt References: What is Microsoft Defender for Cloud? - Microsoft Defender for Cloud | Microsoft Learn Pricing—Microsoft Defender | Microsoft Azure Workbooks gallery in Microsoft Defender for Cloud | Microsoft Docs Pricing Calculator | Microsoft Azure Microsoft Defender for Key Vault Price Estimation Workbook Microsoft Defender for App Services Price Estimation Workbook Microsoft Defender for Containers Cost Estimation Workbook Coverage Workbook
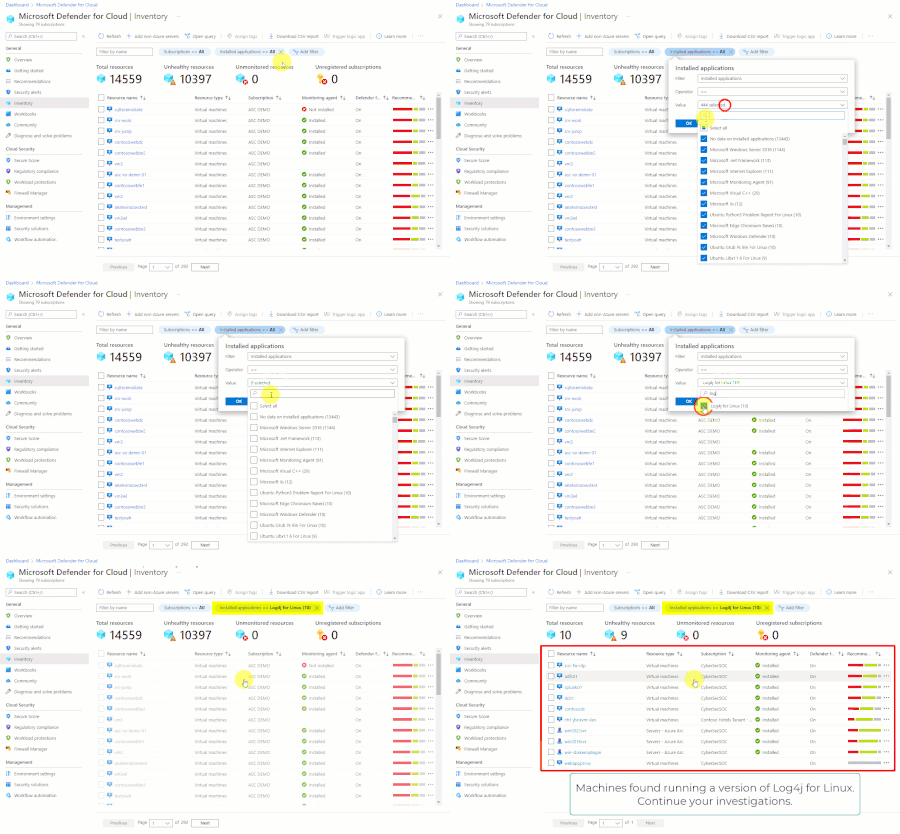
How Defender for Cloud displays machines affected by Log4j vulnerabilities
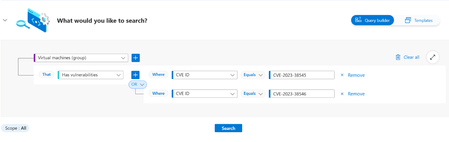
Microsoft Defender for Cloud's inventory filters can easily and quickly help you find all machines with a specific piece of software, or that are vulnerable to a specific CVE. In this case, we show how to find machines running Log4j or with the security finding CVE-2021-44228.