- Home
- Windows Server
- Windows Server Essentials and Small Business Server
- How to Automatically Import Public Folder Data in to CompanyWeb
- Subscribe to RSS Feed
- Mark as New
- Mark as Read
- Bookmark
- Subscribe
- Printer Friendly Page
- Report Inappropriate Content
[Today's post comes to us from Justin Crosby]
CompanyWeb has the ability to copy the attachments sent to a specific Exchange Public Folder and store the attachment in a document library. To enable this feature perform the following steps:
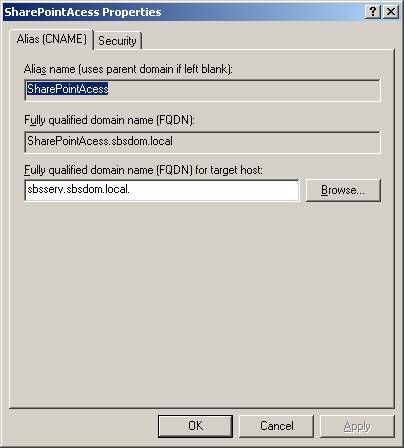
1. Create a DNS CNAME record for a second Exchange HTTP virtual server.
a. Start > Administrative Tools > DNS
b. Expand Servername > Forward Lookup Zones > domain.local
c. Right-click domain.local and choose "New Alias (CNAME)..."
d. Enter a meaningful Alias Name such as SharePointAccess.
e. Enter the server's fully qualified domain name (i.e. server01.contoso.local) and click Ok.
2. Create a second Exchange HTTP virtual server.
a. Open Exchange System Manager
b. Expand OrgName > Servers > ServerName > Protocols > HTTP
c. Right-click HTTP and choose New > HTTP Virtual Server...
d. Enter a meaningful Name such as SharePointAccess.
e. Click the advanced button, highlight the default identity and add a host header to match the CNAME you created in step 1d. Click Ok.
Note: If ISA is installed change the IP address to the internal IP address instead of All Unassigned.
f. Under Exchange Path select the Public Folder radio button and click Ok.

3. Create Public virtual directory.
a. Right-click the HTTP VS you created in step 2d and choose New > Virtual Directory...
b. Enter Public for the Name.
c. Under Exchange Path select the Public Folder radio button and click Ok.

4. Link SharePoint to your new virtual directory.
a. Click Start, select Administrative Tools, and then click SharePoint Central Administration.
b. Under Virtual Server Configuration, click Configure virtual server settings.
c. On the Virtual Server List page, select the virtual server you want to use.
d. On the Virtual Server Settings page, under Virtual Server Management, click Virtual Server General Settings.
e. In the E-Mail Enabled Document Libraries section, select Yes next to Document libraries on this virtual server can accept e-mail attachments.
f. In the Public folder server and root path: box, enter the Exchange server name that hosts the public folders. Example: http://sharepointaccess/public
g. Select one of the options in the Check for new e-mail in the public folder: section.
h. Click OK.

5. Create and link a document library to a public folder.
a. Navigate to the document library you want to use. You can either create a new document library or use an existing one.
b. Under Actions, click Modify Settings and Columns.
c. Under General Settings, click Change Advanced Settings.
d. On the Document Library Advanced Settings page, under E-Mail Settings, in the Public folder path box, enter the path to the Exchange public folder you want to link to.
Example: The portion of the URL that was specified in the virtual server general settings page will be listed. You will only need to fill in the specific public folder to. So if the folder is called HR and is directly under the path http://exchange/public, you would type HR into the box and click OK.
e. Click OK.

You must be a registered user to add a comment. If you've already registered, sign in. Otherwise, register and sign in.