Turn on suggestions
Auto-suggest helps you quickly narrow down your search results by suggesting possible matches as you type.
- Home
- Microsoft 365
- Modern Work App Consult Blog
- Using Windows Universal Runtime APIs from a standard Unity executable
Using Windows Universal Runtime APIs from a standard Unity executable
- Subscribe to RSS Feed
- Mark as New
- Mark as Read
- Bookmark
- Subscribe
- Printer Friendly Page
- Report Inappropriate Content
Published
Jan 15 2019 02:50 PM
3,482
Views
Jan 15 2019
02:50 PM
Jan 15 2019
02:50 PM
First published on MSDN on Jun 26, 2018
The playground is the following: We develop an app or a game using Unity and may be with an old version like Unity 5.6.5. You would say: "why?" :thinking_face: The answer is that, in the real world, is not always easy to follow the huge rhythm given by Software Editors. The other possible reason is, when we use third party softwares or plugins, we depend on their ability to update to new versions or or using the latest sdks.
So, let’s imagine that we build a standard EXE from a Unity project. We target Windows. The executable is packaged using Desktop Bridge for Windows 10 and we would like to use the Universal Windows Platform (UWP) APIs. Is it even possible? How can we do?
➡ Just keep calm! Read :books: and code :man_technologist:
The chosen architecture and steps are:
- A C# .NET dll using the UWP APIs.
- We use this dll as a Unity Plugin and we build the Unity project as a standard Windows executable.
- We package the executable with Desktop Bridge.
The purpose is to code in C# and expose this dll as a native Unity plugin.
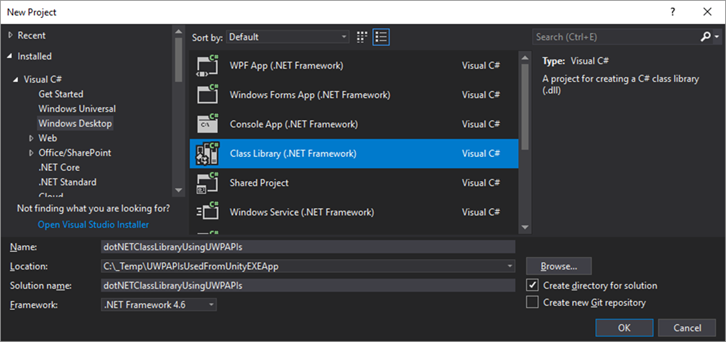
- Create a new C# Windows desktop Class Library project using the full .NET Framework. Name it “dotNETClassLibraryUsingUWPAPIs”.
- Rename the default class1.cs in NotificationHelper.cs .
- Right click on the References node in the Solution Explorer for the project and click on Add Reference…

- Click on the Browse item in the vertical menu on the left and on the Browse button at the bottom.

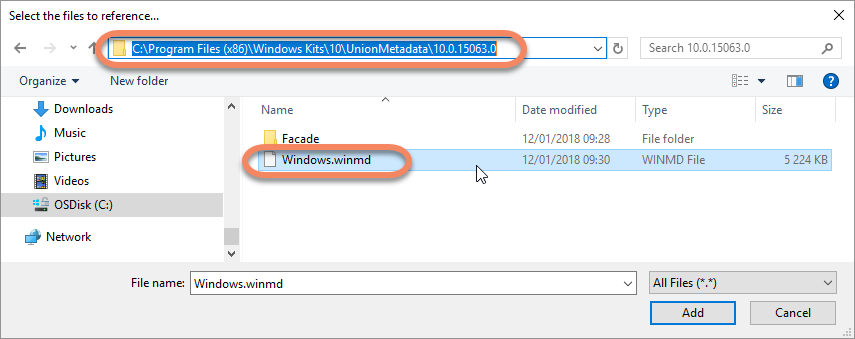
The strict minimum in order to be able to call UWP APIs are the following two references. This sample code uses Toast notifications. For using others UWP APIs, referencing other winmd files should be required.
- The first one reference is " C:\Program Files (x86)\Windows Kits\10\UnionMetadata\10.0.15063.0\Windows.winmd ". Be sure to filter to All Files (*.*) in the dialog box.
- The second one is " C:\Program Files (x86)\Reference Assemblies\Microsoft\Framework\.NETCore\v4.5\System.Runtime.WindowsRuntime.dll "

We need an extra component to make our dll visible as a native plugin for Unity:
- Right click on the project in the Solution Explorer and choose Manage NuGet Packages…

- Search for "dllexport", you will find the DllExport package by 3F. Click on the Install button.

The next steps are not usual and may change in the future: To really use the package will need to use a command line script. Here is the message we get:

- Click on " Local version from this package ". Windows Explorer will open the package’ folder with the mentioned script.

- Open a command prompt and execute the DllExport_Configure.bat file. You will get a popup. Just check “ Installed ” and click Apply .


- Going back to the Visual Studio project and the NuGet Package Manager windows, remove the DllExpert NuGet package. The project's configuration was done by the script we launched.

- To test displaying a Toast notification, use this sample code. Please note that for each method we would like to export and use in Unity, we use [DllExport(CallingConvention.StdCall)] .
using System;
using System.Runtime.InteropServices;
using Windows.Data.Xml.Dom;
using Windows.UI.Notifications;
namespace dotNETClassLibraryUsingUWPAPIs
{
class NotificationHelper
{
[DllExport(CallingConvention.StdCall)]
public static string Notify(string toastTitle, string toastContent)
{
try
{
string xml = @"<toast activationType='foreground'>
<visual>
<binding template='ToastGeneric'>
</binding>
</visual>
</toast>";
XmlDocument doc = new XmlDocument();
doc.LoadXml(xml);
var binding = doc.SelectSingleNode("//binding");
var el = doc.CreateElement("text");
el.InnerText = toastTitle;
binding.AppendChild(el);
el = doc.CreateElement("text");
el.InnerText = toastContent;
binding.AppendChild(el);
var toast = new ToastNotification(doc);
ToastNotificationManager.CreateToastNotifier().Show(toast);
}
catch (AggregateException ex)
{
return "Exception:" + ex.ToString() + "exMessage:" + ex.Message;
}
return "Ok";
}
}
}
- The last step is to build your dll using Release and x64 (not Any CPU). If the compilation does not work, try to close and reopen the project before retrying to compile.

- You can then get the dll from the bin\x64\Release folder or bin\x64\Release\x64 (keep it for later)

For testing purpose, I use an old Unity version: 5.6.5. Feel free to use the version you want.

- Create a new project named "UnityEXEApp".

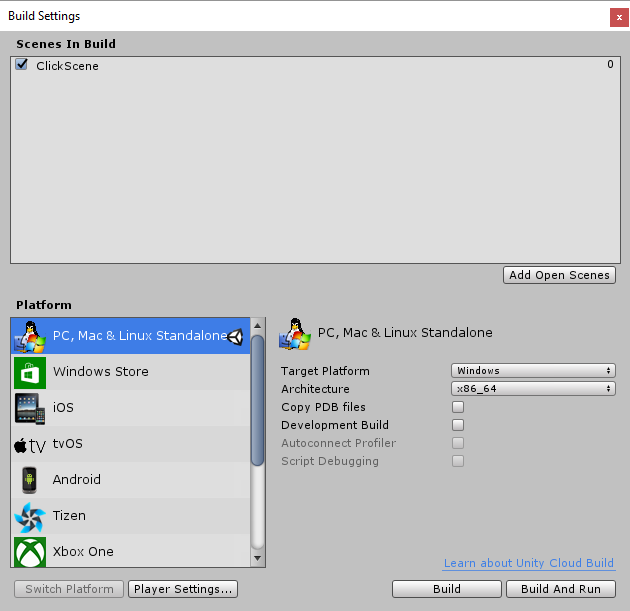
- We use the default scene as is. Save it and name it "ClickScene" for example. We will compile for Windows as " PC, Mac & Linux Standalone " and x86_x64 for Windows .


This confirms that nothing is related to UWP for this Unity App ;).
The first action is to add the previously compiled dll as a Unity native plugin:
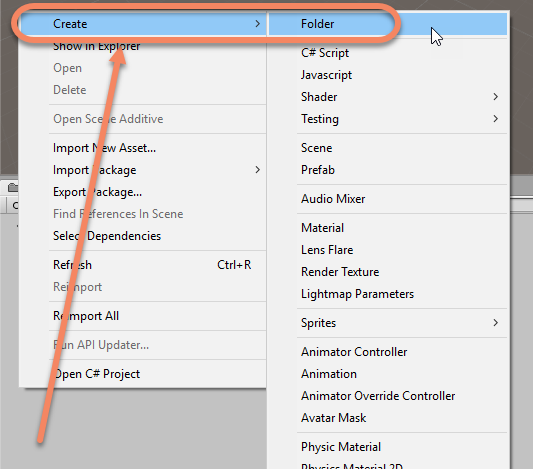
- Create a new folder inside the Project window by right clicking and use Create / New folder . Name it "Plugins" (this is the mandatory name for using dlls in Unity. The dlls are called plugins).
- Drag and drop the dotNETClassLibraryUsingUWPAPIs.dll from the project bin\Release\x64 folder to the plugins folder in the Project Unity windows.

You now have the dll inside the plugins folder.
To verify that you have chosen the good dll, the inspector should look like the following (with Native type for the dll):

Let’s add now a C# script for using this dll:
- Click on the camera in the Hierarchy window and then on Add Component in the Inspector window. Search for "script".

- Enter the name "ClickToUseDll".

- Double click on the created script. Visual Studio opens it.
In order to be able to use the functions exported by the dll, we need to declare them as external methods.
- In the ClickToUseDll class, add the following declaration which corresponds exactly to the method in the C# Dll project.
[DllImport("dotNETClassLibraryUsingUWPAPIs")]
extern static string Notify(string toastTitle, string toastContent);
- To use "DllImport", please add the System.Runtime.InteropServices namespace.
using System.Runtime.InteropServices;
- Let’s use the function in the Update method for each mouse click.
void Update()
{
if (Input.GetMouseButtonDown(0))
{
string output = Notify("Toast title",
"Unity toast sent at " + System.DateTime.Now.ToLongTimeString());
}
}
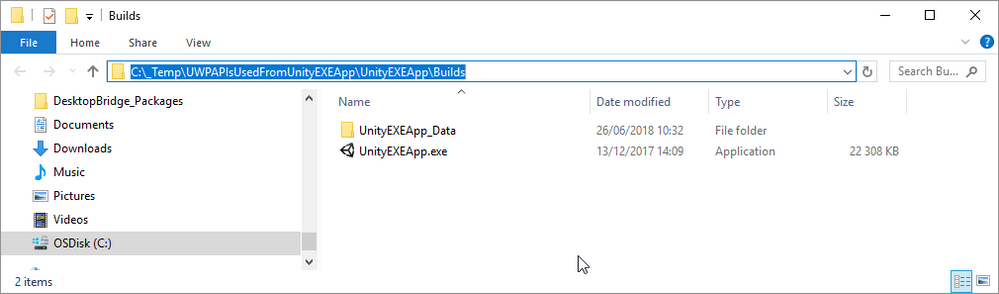
- Build the project for Windows: " PC, Mac & Linux Standalone " and x86_64 . Create a "Builds" folder and name the executable "UnityEXEApp" (If you have a compilation error, please close and reopen Unity before retrying to build the executable).

We now have the binaries inside the Builds folder.
There is one last step which is to package the UnityEXEApp.exe with Desktop Bridge.
- Launch the Desktop App Converter app in administrator mode.

- Use the following command line (please adapt the paths of your files and folders and create the Appx folder before running the command):
DesktopAppConverter.exe -Installer "C:\_Temp\UWPAPIsUsedFromUnityEXEApp\UnityEXEApp\Builds" -AppExecutable "UnityEXEApp.exe" -Destination "C:\_Temp\UWPAPIsUsedFromUnityEXEApp\UnityEXEApp\Appx" -PackageName "UnityEXEApp" -Publisher "CN=sbovo" -Version "1.0.0.0" -MakeAppx -Sign -Verbose
This command will generate a .APPX package for being able to deploy your app for the Microsoft Store.

In order to test the app, you have to first install the auto-generated.cer certificate in the Trusted People container for local machine certificates.
Lastly, you can double-click on the .APPX file to install the app and test it!

As usual, all source code is available on the following GitHub repository - https://github.com/Microsoft/Windows-AppConsult-Samples-DesktopBridge/tree/master/UWPAPIsUsedFro...
Good luck! :smirking_face:
@sbovo for the :laptop_computer: :video_game: Windows AppConsult team.
--
The playground is the following: We develop an app or a game using Unity and may be with an old version like Unity 5.6.5. You would say: "why?" :thinking_face: The answer is that, in the real world, is not always easy to follow the huge rhythm given by Software Editors. The other possible reason is, when we use third party softwares or plugins, we depend on their ability to update to new versions or or using the latest sdks.
So, let’s imagine that we build a standard EXE from a Unity project. We target Windows. The executable is packaged using Desktop Bridge for Windows 10 and we would like to use the Universal Windows Platform (UWP) APIs. Is it even possible? How can we do?
➡ Just keep calm! Read :books: and code :man_technologist:
Just a side note: This article is about a "Windows executable build from Unity". If you build directly for UWP in Unity, there is no extra work: just code on using the UWP APIs. Here are the details - https://docs.unity3d.com/Manual/windowsstore-scripts.html
The chosen architecture and steps are:
- A C# .NET dll using the UWP APIs.
- We use this dll as a Unity Plugin and we build the Unity project as a standard Windows executable.
- We package the executable with Desktop Bridge.
1. The C# .NET dll using the Windows APIs
The purpose is to code in C# and expose this dll as a native Unity plugin.
- Create a new C# Windows desktop Class Library project using the full .NET Framework. Name it “dotNETClassLibraryUsingUWPAPIs”.
- Rename the default class1.cs in NotificationHelper.cs .
- Right click on the References node in the Solution Explorer for the project and click on Add Reference…
- Click on the Browse item in the vertical menu on the left and on the Browse button at the bottom.
The strict minimum in order to be able to call UWP APIs are the following two references. This sample code uses Toast notifications. For using others UWP APIs, referencing other winmd files should be required.
- The first one reference is " C:\Program Files (x86)\Windows Kits\10\UnionMetadata\10.0.15063.0\Windows.winmd ". Be sure to filter to All Files (*.*) in the dialog box.
- The second one is " C:\Program Files (x86)\Reference Assemblies\Microsoft\Framework\.NETCore\v4.5\System.Runtime.WindowsRuntime.dll "
We need an extra component to make our dll visible as a native plugin for Unity:
- Right click on the project in the Solution Explorer and choose Manage NuGet Packages…
- Search for "dllexport", you will find the DllExport package by 3F. Click on the Install button.
The next steps are not usual and may change in the future: To really use the package will need to use a command line script. Here is the message we get:
- Click on " Local version from this package ". Windows Explorer will open the package’ folder with the mentioned script.
- Open a command prompt and execute the DllExport_Configure.bat file. You will get a popup. Just check “ Installed ” and click Apply .
- Going back to the Visual Studio project and the NuGet Package Manager windows, remove the DllExpert NuGet package. The project's configuration was done by the script we launched.
- To test displaying a Toast notification, use this sample code. Please note that for each method we would like to export and use in Unity, we use [DllExport(CallingConvention.StdCall)] .
using System;
using System.Runtime.InteropServices;
using Windows.Data.Xml.Dom;
using Windows.UI.Notifications;
namespace dotNETClassLibraryUsingUWPAPIs
{
class NotificationHelper
{
[DllExport(CallingConvention.StdCall)]
public static string Notify(string toastTitle, string toastContent)
{
try
{
string xml = @"<toast activationType='foreground'>
<visual>
<binding template='ToastGeneric'>
</binding>
</visual>
</toast>";
XmlDocument doc = new XmlDocument();
doc.LoadXml(xml);
var binding = doc.SelectSingleNode("//binding");
var el = doc.CreateElement("text");
el.InnerText = toastTitle;
binding.AppendChild(el);
el = doc.CreateElement("text");
el.InnerText = toastContent;
binding.AppendChild(el);
var toast = new ToastNotification(doc);
ToastNotificationManager.CreateToastNotifier().Show(toast);
}
catch (AggregateException ex)
{
return "Exception:" + ex.ToString() + "exMessage:" + ex.Message;
}
return "Ok";
}
}
}
- The last step is to build your dll using Release and x64 (not Any CPU). If the compilation does not work, try to close and reopen the project before retrying to compile.
- You can then get the dll from the bin\x64\Release folder or bin\x64\Release\x64 (keep it for later)
2. The Unity project using the dll
For testing purpose, I use an old Unity version: 5.6.5. Feel free to use the version you want.
- Create a new project named "UnityEXEApp".
- We use the default scene as is. Save it and name it "ClickScene" for example. We will compile for Windows as " PC, Mac & Linux Standalone " and x86_x64 for Windows .
This confirms that nothing is related to UWP for this Unity App ;).
The first action is to add the previously compiled dll as a Unity native plugin:
- Create a new folder inside the Project window by right clicking and use Create / New folder . Name it "Plugins" (this is the mandatory name for using dlls in Unity. The dlls are called plugins).
- Drag and drop the dotNETClassLibraryUsingUWPAPIs.dll from the project bin\Release\x64 folder to the plugins folder in the Project Unity windows.
You now have the dll inside the plugins folder.
To verify that you have chosen the good dll, the inspector should look like the following (with Native type for the dll):
Please note that, because the dll is using .NET 4.6, you will not able to run in Unity. Do not try play the app in Unity without compilation directives.
Let’s add now a C# script for using this dll:
- Click on the camera in the Hierarchy window and then on Add Component in the Inspector window. Search for "script".
- Enter the name "ClickToUseDll".
- Double click on the created script. Visual Studio opens it.
In order to be able to use the functions exported by the dll, we need to declare them as external methods.
- In the ClickToUseDll class, add the following declaration which corresponds exactly to the method in the C# Dll project.
[DllImport("dotNETClassLibraryUsingUWPAPIs")]
extern static string Notify(string toastTitle, string toastContent);
- To use "DllImport", please add the System.Runtime.InteropServices namespace.
using System.Runtime.InteropServices;
- Let’s use the function in the Update method for each mouse click.
void Update()
{
if (Input.GetMouseButtonDown(0))
{
string output = Notify("Toast title",
"Unity toast sent at " + System.DateTime.Now.ToLongTimeString());
}
}
- Build the project for Windows: " PC, Mac & Linux Standalone " and x86_64 . Create a "Builds" folder and name the executable "UnityEXEApp" (If you have a compilation error, please close and reopen Unity before retrying to build the executable).
We now have the binaries inside the Builds folder.
3. The Desktop Bridge packaging
There is one last step which is to package the UnityEXEApp.exe with Desktop Bridge.
- Launch the Desktop App Converter app in administrator mode.
- Use the following command line (please adapt the paths of your files and folders and create the Appx folder before running the command):
DesktopAppConverter.exe -Installer "C:\_Temp\UWPAPIsUsedFromUnityEXEApp\UnityEXEApp\Builds" -AppExecutable "UnityEXEApp.exe" -Destination "C:\_Temp\UWPAPIsUsedFromUnityEXEApp\UnityEXEApp\Appx" -PackageName "UnityEXEApp" -Publisher "CN=sbovo" -Version "1.0.0.0" -MakeAppx -Sign -Verbose
This command will generate a .APPX package for being able to deploy your app for the Microsoft Store.
In order to test the app, you have to first install the auto-generated.cer certificate in the Trusted People container for local machine certificates.
Lastly, you can double-click on the .APPX file to install the app and test it!
As usual, all source code is available on the following GitHub repository - https://github.com/Microsoft/Windows-AppConsult-Samples-DesktopBridge/tree/master/UWPAPIsUsedFro...
Good luck! :smirking_face:
@sbovo for the :laptop_computer: :video_game: Windows AppConsult team.
--
References
- Calling Windows 10 APIs From a Desktop Application - https://blogs.windows.com/buildingapps/2017/01/25/calling-windows-10-apis-desktop-application/...
- Enable In-App Product Purchases for Desktop Bridge Converted Applications - https://blogs.msdn.microsoft.com/appconsult/2017/09/12/enable-in-app-product-purchases-for-des...
0
Likes
2 Comments
You must be a registered user to add a comment. If you've already registered, sign in. Otherwise, register and sign in.
Labels