- Home
- Microsoft 365
- Modern Work App Consult Blog
- Microsoft Ignite 2019 Brazil – Windows Terminal demo
- Subscribe to RSS Feed
- Mark as New
- Mark as Read
- Bookmark
- Subscribe
- Printer Friendly Page
- Report Inappropriate Content
At Microsoft Ignite many attendees asked me more details about what is Windows Terminal and what are the main features.
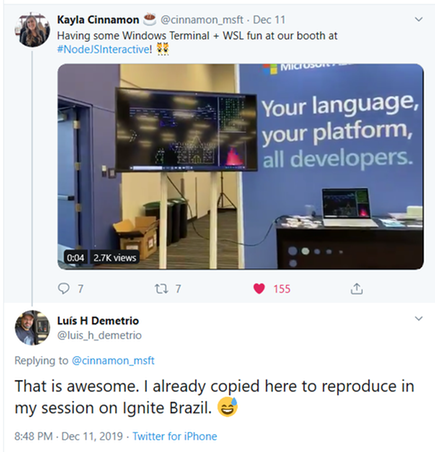
In this post I will share all the steps that I did on Ignite to achieve the following Window Terminal UI inspired on the demo that Kayla Cinnamon (@cinnamon_msft) did on her booth at Ignite:
Windows Terminal Introduction
The Windows Terminal is a new, modern, fast, efficient, powerful, and productive terminal application for users of command-line tools and shells like Command Prompt, PowerShell, and WSL. Its main features include multiple tabs, Unicode and UTF-8 character support, a GPU accelerated text rendering engine, and custom themes, styles, and configurations.
Windows Terminal is a Microsoft C++ open source project available for download and for community participation on Github:
https://github.com/microsoft/terminal
Windows Terminal is also available for download on Microsoft Store: https://www.microsoft.com/store/productId/9N0DX20HK701
We can say that Windows Terminal is like a hub of shells, as you can customize it to have all your shells on it like CMD, PowerShell, PowerShell Core, Bash, Azure CLI and others.
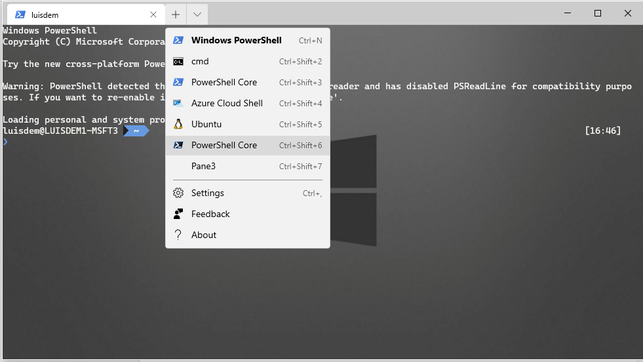
After installing Windows Terminal, you will see a UI like the following one that has 3 shells available being the PowerShell the default shell:
Windows Terminal Settings
It is possible to customize Windows Terminal throw the profile.json file that can be accessed via the Settings wheel icon available in the Tab bar or by pressing “CTRL+,”.
If you edit it on Visual Studio Code (VSCode), you will have a better user experience, as VSCode has Intellisense:
The profile.json file is available in the following address in case you what to set it to be automatically opened on VSCode:
%localappdata%\Packages\Microsoft.WindowsTerminal_8wekyb3d8bbwe\LocalState\profiles.json
This is the profile.json file content with the three profiles related to the PowerShell, CMD and Azure Cloud Shell sessions:
// To view the default settings, hold "alt" while clicking on the "Settings" button.
// For documentation on these settings, see: https://aka.ms/terminal-documentation

{
    "$schema": "https://aka.ms/terminal-profiles-schema",

    "defaultProfile": "{61c54bbd-c2c6-5271-96e7-009a87ff44bf}",

    "profiles":
    [
        {
            // Make changes here to the powershell.exe profile
            "guid": "{61c54bbd-c2c6-5271-96e7-009a87ff44bf}",
            "name": "Windows PowerShell",
            "commandline": "powershell.exe",
            "hidden": false
        },
        {
            // Make changes here to the cmd.exe profile
            "guid": "{0caa0dad-35be-5f56-a8ff-afceeeaa6101}",
            "name": "cmd",
            "commandline": "cmd.exe",
            "hidden": false
        },
        {
            "guid": "{b453ae62-4e3d-5e58-b989-0a998ec441b8}",
            "hidden": false,
            "name": "Azure Cloud Shell",
            "source": "Windows.Terminal.Azure"
        }
    ],

    // Add custom color schemes to this array
    "schemes": [],

    // Add any keybinding overrides to this array.
    // To unbind a default keybinding, set the command to "unbound"
    "keybindings": []
}
Step 1 - Adding the Acrylic effect
The first part of the demo is to add the Acrylic effect that allows us to change the Windows Terminal transparency.
To add the acrylic effect, set the "useAcrylic": true property to the profile that you want to customize.
Notice that you have Intellisent to assit you:
You can also specify the background color and have the IntelliSense assist:
It is possible to define the acrylic default opacity using the following properties:
"acrylicOpacity" : 0.8
"backgroundImageOpacity" : 0.2
Alternatively, on the Windows Terminal UI, you can use the CTRL+Shift+Scroll Down to increase the transparency:
Use CTRL+Shift+Scroll Up to increase the opacity:
Step 2 – Add Ubuntu Shell
The first step is to enable the Windows Subsystem for Linux (WSL) optional feature available for Windows 10 Fall Creators Update and later:
Once enabled the WSL, it is necessary to open Microsoft Store and choose your favorite Linux distribution.
In this demo, I am using Ubuntu distribution available at:
https://www.microsoft.com/store/productId/9NBLGGH4MSV6
Once installed, open Ubuntu from the Start menu to complete the installation.
You will be prompted to create a new user account (and its password):
Open Windows Terminal and observe that the Ubuntu Shell is now available on Windows Terminal:
It is possible to edit the profile.json to add Acrylic effect and a background image for example:
Switch back to Windows Terminal and observe that the background image is displayed:
Install PowerShell Core
PowerShell Core uses .NET Core 2.x as its runtime and it supports the Windows, macOS, and Linux platforms.
As PowerShell Core uses .NET Core, let’s install the .NET Core SDK on Window and Linux.
Step 3 – Install PowerShell Core on Windows
Download and install the .NET Core SDK installer on:
https://dotnet.microsoft.com/download/dotnet-core/thank-you/sdk-3.1.100-windows-x64-installer
After installed, run the following command on Windows Terminal to install the PowerShell Core:
dotnet tool install --global PowerShell
Since you just installed the PowerShell Core, you will need to reopen the Command Prompt window before running the tool you installed.
After reopening the Windows Terminal, you can type pwsh to launch PowerShell Core or by the profile available on Windows Terminal menu:
Step 4 – Install PowerShell Core on Ubuntu
Open a terminal and run the following commands to register Microsoft key and feed:
wget -q https://packages.microsoft.com/config/ubuntu/19.04/packages-microsoft-prod.deb -O packages-microsoft-prod.deb

sudo dpkg -i packages-microsoft-prod.deb
Update the products available for installation, then install the .NET Core SDK. In your terminal, run the following commands:
sudo apt-get update
sudo apt-get update
sudo apt install dotnet-sdk-3.1
Now that the .NET Core is installed, run the following command to install the PowerShell Core:
dotnet tool install --global PowerShell
In case you get an error, try to run the command again. Alternatively, you can use the following command to install PowerShell Core:
sudo apt-get install -y powershell-preview
Since you just installed the PowerShell Core, you will need to reopen the Command Prompt window before running the tool you installed.
After reopening the Windows Terminal, type pwsh to launch PowerShell Core:
You can also launch PowerShell Core from the shell list available in the tab menu:
PowerShell Core Profile
In the settings.json you can customize the PowerShell Core profile that was automatically created. In the statement before, I changed the name from PowerShell to "PowerShell Core" just to better differentiate that in the menu:
{
  "guid": "{574e775e-4f2a-5b96-ac1e-a2962a402336}",
  "hidden": false,
  "name": "PowerShell Core",
  "source": "Windows.Terminal.PowershellCore",
  "startingDirectory" : "%USERPROFILE%",
  "background": "#113801",
  "backgroundImage": "https://media.giphy.com/media/9E7kUhnT9eDok/giphy.gif"
}
To demonstrate that PowerShell Core is powerful, I set a GIF on the backgroundImage to achieve the following effect:
Step 6 – Install ASCIIQUARIUM, CMATRIX and CACAFIRE
This step was used in my Ignite demo to demonstrate that WSL is a real Linux edition that it can run Linux apps. The ASCIIQuarium, CMatrix and Cacafire apps will be used in the next session to demonstrate that it is possible to split the Windows Terminal in different sessions.
To install ASCIIQuarium, open a Windows Terminal and run the following two commands in the Ubuntu shell:
sudo add-apt-repository ppa:ytvwld/asciiquarium
sudo apt-get update
sudo apt-get install asciiquarium
Type asciiquarium to run the app:
Run the following command to install CMATRIX:
sudo apt-get install cmatrix
Type cmatrix to launch the app:
Finally, type the following command to install cacafire:
sudo apt-get install caca-utils
Type cacafire to launch the app:
Step 6 – How to split the session
It is possible to split tab in different panes and use on each of the panes a different shell.
Open the PowerShell Core and press Alt+Shift+plus to split the screen on vertical:
On the right pane, type wsl and press enter to switch to Linux:
Still on the right pane, type cmatrix and press Alt+Shift+Right Arrow to expand the left pane to the right:
On the right pane, type Alt+Shif+- to create a new panel horizontally. Type wsl and press enter to switch to Linux and type cacafire and press enter to launch the app:
Now, on the right pane, type Alt+Shift+- to create a new panel horizontally, type wsl to switch to Linux and type asciiquarium to start that app:
CASCADIA CODE
Observe that I am using Cascadia Code that is a Microsoft open source font available on https://github.com/microsoft/cascadia-code
You can define the Cascadia Code font to all profiles putting the information in the defaults session:
 "defaults":
        {
            // Put settings here that you want to apply to all profiles.
            "fontFace" : "Cascadia Code PL",
            "fontSize" : 10,

            "useAcrylic": true,
            "acrylicOpacity" : 0.8,
            "backgroundImageOpacity" : 0.2
        }
Done! :smiling_face_with_smiling_eyes:
In this post you learned how to recreate the demo that I did on Ignite:
I hope you liked.
This demo was inspired on the demo that Kayla Cinnamon (@cinnamon_msft) did on her booth at Ignite:
References
Windows Terminal 1.0
https://devblogs.microsoft.com/commandline/windows-terminal-1-0/
What is Windows Terminal?
https://docs.microsoft.com/en-us/windows/terminal/
Cascadia Code
https://devblogs.microsoft.com/commandline/cascadia-code/
How to make a pretty prompt in Windows Terminal with Powerline, Nerd Fonts, Cascadia Code, WSL, and oh-my-posh
50+ Windows Terminal Themes: Light, Dark, and Colorful
https://allthings.how/windows-terminal-themes-light-dark-colorful/
Custom key bindings in Windows Terminal
https://docs.microsoft.com/en-us/windows/terminal/customize-settings/key-bindings
Windows Subsystem for Linux Installation Guide for Windows 10
https://docs.microsoft.com/en-us/windows/wsl/install-win10
.NET Core 3.1 Desktop Runtime (v3.1.0) - Windows x64 Installer
Ubuntu 19.04 Package Manager - Install .NET Core
https://docs.microsoft.com/en-us/dotnet/core/install/linux-package-manager-ubuntu-1904
You must be a registered user to add a comment. If you've already registered, sign in. Otherwise, register and sign in.


