- Home
- Microsoft 365
- Modern Work App Consult Blog
- Go further on Windows Mixed Reality
- Subscribe to RSS Feed
- Mark as New
- Mark as Read
- Bookmark
- Subscribe
- Printer Friendly Page
- Report Inappropriate Content
Following the first series of articles named Create a Windows Mixed Reality App from 0 , we can go deeper especially using the Mixed Reality Toolkit. We will see what the Mixed Reality toolkit is and how it can accelerate the development of your app. For example, we will implement features like handling the controllers, interacting with objects or allowing movements with teleportation.
All the following concepts and code snippets target both HoloLens or Immersive headsets .
Follow the guide ⬇⬇⬇
________________________________________
Mixed Reality Toolkit
The MRTK ( M ixed R eality T ool K it) is an Open Source project. Its purpose is to accelerate your development on Mixed Reality either Immersive (VR) or Holographic (HoloLens). It is not mandatory but offers you scripts, objets and controls in order to help you handling controllers, spatial sound, voice commands, objects’ manipulations; The list is really long... 
Ok! How can I use this toolkit? Let’s start by downloading it from the GitHub project https://aka.ms/MRTK . Choose the Code tab and then Releases ; Choose the .unitypackage in the latest stable release. 
Let’s create a new Unity project to use the toolkit:
Launch Unity3D; Create a new project by clicking on New , name it "CreateObjectsWithMRTK"; Click on Create project . 
Target then the UWP platform by using the File menu and then Build Settings... ; Choose Universal Windows Platform and click on Switch Platform . 
Verify that we support VR and C# Scripting: Still in the Build Settings window, click on Player Settings . 
The Inspector window shows the options for the application. Click on XR Settings and check Virtual Reality Supported . 
Then in the Other Settings section, select .NET as Scripting Backend . 
Finally, Import the Mixed Reality Toolkit by using the Assets menu / Import Package / Custom Package ... 
Choose the .unitypackage file previously downloaded. 
Unity proposes you to select a part or all components in the package. By default, all is selected; click on Import . 
Save the project with the File menu / Save project .
Now, we have a Windows Mixed Reality project with the MRTK but empty :smirking_face:!
________________________________________
Camera, controllers and teleportation
Each new Unity project contains by default a camera called "Main Camera" and a "Directional Light". Let’s benefit from the toolkit to replace the default camera by the MRTK camera prefab.
A prefab is a model of 3D object for Unity. It is like a Class in Oriented Object Programing.
The prefab is MixedRealityCameraParent : it brings advanced features like detecting if we are running inside an Immersive headset (VR) or Holographic (HoloLens).
In the Project window, search for "mixed". The MixedRealityCameraParent prefab will be listed; drag and drop this prefab to the Hierarchy window. 
The MixedRealityCameraParent prefab puts a camera to the origin (0, 0, 0), provides us a script which is in charge of displaying and animating the motion controllers and another script for teleportation. 

Motion Controllers’ connexion/deconnexion, actions and interactions are handled by another prefab named InputManager . Let’s use it:
In the Project window, search for "inputmanager"; drag and drop the prefab InputManager in the Hierarchy window. 
Still in the Project window, search for "cursor"; There will be thousands of components displayed :smiling_face_with_smiling_eyes:. Spot the one with a blue cube named Cursor (We will use it right after).
The blue cube elements in the project window are prefabs
In the Hierarchy window, select the InputManager object previously added. Its properties are displayed in the Inspector window. Locate the Simple Single Pointer Selection script and the property Cursor in particular. You have to do the most complicated action of this post :grinning_face_with_sweat:: drag and drop the Cursor prefab (of the Project window) to the location of the Cursor property (in the Inspector window). 
The property is now assigned the Cursor prefab that will be used as the gaze's target visualization. 
In order to handle buttons of the motion controllers, we have to do a last configuration; here again the toolkit helps us.
Use the new menu (added by the toolkit import): Mixed Reality Toolkit / Configure / Apply Mixed Reality Project Settings . 
Select only Use Toolkit-specific InputManager axes in the window opened. 
This command modifies the player parameters file and adds the motion controllers’ buttons that can be handled by the app (For your information, this file is /ProjectSettings/InputManager.asset whom content is editable by using the Edit menu / Project Settings / Input).
Lastly, let’s add a floor in order to test the teleportation:
Create a cube with the GameObject menu / 3D Object / Cube . 
Name it "Floor" and change its dimensions to create a object that could be used as a floor x=10, z=10. 

Save the scene with the name "MainScene" ( File menu / Save Scenes ).
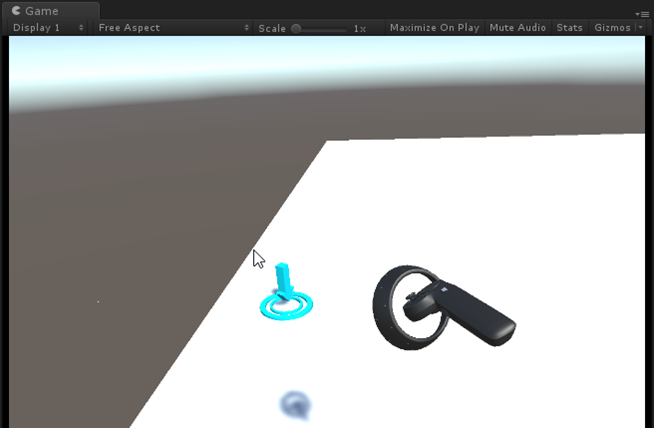
Use the PLAY 
________________________________________
Actions on objects
Let’s go a little bit further by handling the trigger button when the user targets the floor with the motion controller. Let’s take the same script explained in the previous series https://blogs.msdn.microsoft.com/appconsult/2018/06/14/create-a-windows-mixed-reality-app-from-0/ : Each time the button is pressed, a cube is created and falls onto the floor.
To achieve this, we also use the toolkit and what is powerfull is that the code runs on HoloLens. The action is not be performed using the controller but doing a simple AirTap.
In the Hierarchy window, click on the Floor object. Then click on the Add Component button in the Inspector window. 
In the search zone, enter "script" and click on New Script . 
Give the name "Tap" and click on Create and Add . 
We have now a new script associated to the Floor object. To modify it, double-click on Tap : Visual Studio opens for edition. 
Implement the IInputHandler interface brought by the Mixed Reality Toolkit (the namespace is: HoloToolkit.Unity.InputModule ). This interface allows us to simply intercept the click, tap, AirTap or the main buton of the motion controller. It is great isn’t it :beaming_face_with_smiling_eyes:
public class Tap : MonoBehaviour, IInputHandler {

void IInputHandler.OnInputDown(InputEventData eventData)
{ }

void IInputHandler.OnInputUp(InputEventData eventData)
{ }
}
Add the following lines of code in the lignes OnInputUp method:
// Create very simple gameobject which is a cube
var o = GameObject.CreatePrimitive(PrimitiveType.Cube);

// The cube is now 1m on 1m (x et z), thickness = 10cm (y)
o.transform.localScale = new Vector3(1f, 0.1f, 1f);

// Change is position: 2m in height (y=2), 4m of distance (z=4)
o.transform.position = new Vector3(0f, 2f, 4f);

// We have the gravity
o.AddComponent<Rigidbody>();
The final code is:
using HoloToolkit.Unity.InputModule;
using System.Collections;
using System.Collections.Generic;
using UnityEngine;

public class Tap : MonoBehaviour, IInputHandler
{
void IInputHandler.OnInputDown(InputEventData eventData)
{ }

void IInputHandler.OnInputUp(InputEventData eventData)
{
var o = GameObject.CreatePrimitive(PrimitiveType.Cube);
o.transform.localScale = new Vector3(1f, 0.1f, 1f);
o.transform.position = new Vector3(0f, 2f, 4f);
o.AddComponent<Rigidbody>();
}

// Use this for initialization
void Start()
{ }

// Update is called once per frame
void Update()
{ }
}
You can test the app another time (using the PLAY button in Unity): The teleportation allows us to move on the floor and each time you press the trigger button, a brick is created and falls onto the floor! 
________________________________________
The Visual Studio project and the Microsoft Store as a target
Compiling a Mixed Reality project does not give you an executable or an installer but a Visual Studio solution for "UWP Application":
Use the File menu / Build Settings ... 
Select the scene to include in the compilation with the Add Open Scenes button and click on Build . 
Create a new folder name for example "App" and click on Select Folder . 
The compilation takes some minutes. Once finished, open the generated solution in double-clicking on the CreateObjectsWithMRTK.sln which is in the App folder just created. 
It is then possible, at this step, to modify and finalize all settings regarding the app's identity, assets like tiles and splash screen, capabilities... This is done by modifying the Package.appxmanifest the same way as you do for every UWP project. 

So the purpose is to generate a package to submit to the Store certification. The prerequisite is to have a Microsoft Dev Center Account . If you do not yet have this "Developer Account", you can connect to the partner dashboard -> https://partner.microsoft.com/dashboard/ to create one. The "Developer Account" will be linked to the "Microsoft Account (MSA)" you will use to connect to the partner dashboard. More details on the creation process, validation and costs can be found at https://docs.microsoft.com/en-us/windows/uwp/publish/account-types-locations-and-fees .
So, since you have your "Dev Center Account" active, you can come back to Visual Studio: We are going to create the package and reserve a name for the App in the Microsoft Store.
Use the Project menu / Store / Create App Package . 
In the first page of the wizard, we inform that the package targets the Microsoft Store in selecting Yes . 
Login using the "Microsoft Account (MSA)" linked to your "Dev Center Account" previously created. Use an App's name your already reserved or click on Reserve to choose a new one.
The name has to be unique for the whole Microsoft Store

Choose x86 or/and x64 in MASTER mode in order to have the best performance possible and that the app can be accepted by the Store. 
To finish, click on the Create button to obtain the .appxbundle that you will upload in connecting to the partner dashboard https://partner.microsoft.com/dashboard/ .
________________________________________
Wrapping up
We went through to the steps for using the essential components of the Mixed Reality Toolkit. As usual, you will find the sample code of this article on GitHub - https://github.com/Microsoft/Windows-AppConsult-Samples-MixedReality/tree/master/CreateMixedReality...
The next step would be to connect to the MRTK's GitHub project https://aka.ms/MRTK , read the documentation and be curious about the large amount of the provided samples scenes.
The Mixed Reality world is in your hands!
@sbovo for the Windows AppConsult team.
You must be a registered user to add a comment. If you've already registered, sign in. Otherwise, register and sign in.