Turn on suggestions
Auto-suggest helps you quickly narrow down your search results by suggesting possible matches as you type.
- Home
- Microsoft 365
- Modern Work App Consult Blog
- Build your first Alexa skill with Alexa.NET and Azure Functions - The basics
Build your first Alexa skill with Alexa.NET and Azure Functions - The basics
- Subscribe to RSS Feed
- Mark as New
- Mark as Read
- Bookmark
- Subscribe
- Printer Friendly Page
- Report Inappropriate Content
Published
Jan 15 2019 03:23 PM
9,653
Views
Jan 15 2019
03:23 PM
Jan 15 2019
03:23 PM
First published on MSDN on Nov 02, 2018
Amazon has recently released the vocal assistant Alexa and its lineup of Echo devices also in Italy. I had the chance to play with some of them during my trips in the US and I was pleasantly surprised by the quality of the voice interaction. They also have a good integration with the Microsoft ecosystem. You can connect an Office 365 calendar so that Alexa can read your daily appointments or create a new one; we have recently released Cortana for Alexa , which allows to interact with Cortana directly from an Echo device; we have announced that Skype will be released for Echo devices as well.
As such, I took the chance of the Italian release to make my house "smarter" and I purchased an Echo Plus with some smart devices, like bulbs and power plugs.
I've immediately been intrigued by the concept of "skills", which are basically applications for a vocal assistant. A skill allows to bring 3rd party services to Alexa and to extend the features it can provide. You can find on the market smart home skills, which allow Alexa to control a huge number of smart devices; you can find flash briefing skills, which can deliver you daily news from the most important news sources; you can find games, unit converters, and so on.
I've decided to start exploring how to build skills for Alexa and, at the beginning, I found myself outside my comfort zone. From a technical point of view, skills are basically REST endpoints. When you invoke a skill, Alexa performs a HTTP POST connection against your endpoint which contains, as payload, a JSON with all the details about the request, like the recognized command. Nothing too complex. However, the part which scared me a bit was the technical implementation, since the Alexa Skills Kit is all around using Java or JavaScript as development languages and Amazon AWS as a cloud platform to host the skill. Not exactly the technologies I'm most familiar with =)
The good news is that Amazon doesn't impose any specific requirement regarding the platform or the technology behind a skill. The only requirement is about the communication: your endpoint must be able to understand the JSON sent by Alexa and to reply back with another JSON which Alexa can interpret. So, why not trying to build an Alexa Skill using a language (C#), an editor (Visual Studio) and a cloud platform (Azure) I know?
This is exactly what we're going to do in this series of posts!
The suggested path to deploy Alexa skills is AWS Lambda, which is the serverless platform provided by Amazon. As such, the choice of which Azure service to use for me was easy: Azure Function, which is the Microsoft approach to serverless computing.
The best development choice for Azure Function is .NET Core, which support is now official since Azure Functions 2.0 has reached GA during Ignite. From a high level point of view, our Azure Function will receive the JSON request, parse it and prepare the appropriate JSON response. However, there's a library that can save you from all the pain in having to manually serialize and deserialize every JSON response. It's called Alexa.NET and it's an open source library from Tim Heuer . If you are familiar with Windows development the name should ring a bell since Tim, before joining the Cloud Developer Advocate team in Microsoft, was responsible of the XAML client developer platform and tools.
Alexa supports multiple types of skills, each of them with a dedicated set of APIs. The type of skill you want to build is based on the kind of experience you want to offer. There are skills specific for Flash Briefings, for music, for handling lists, for smart home devices, etc.
The most flexible approach is to build a Custom Skill , which gives you the APIs to build any kind of experience, which can even go beyond voice. Alexa, in fact, supports also visual content (for devices with a screen, like the Echo Show or the Echo Dot) and cards (which are displayed within the application).
In this series of posts we're going to explore custom skills and we will start with a very basic skill. We will query the feed of this blog to get some information, like the title of the last article published or the list of articles which belong to a specificy category. We won't introduce advanced concepts for the moment, like delivering visual content, cards, supporting authentication, etc.
The goal of these posts, in fact, isn't to turn you into a guru of Alexa skills, but to understand how you can become a guru and, at the same time, keep using familiar tools and technologies. If you want to know everything around skills development, the right place is the Alexa Developer documentation , which covers all the scenarios supported by the platform.
The starting point to create a skill isn't actually the code, but the Amazon's developers dashboard. A skill, in fact, is made by two components:
Go to the Alexa Developer website and, if you don't have an account, create a new one. You'll have to link to an existing Amazon account. Then open the Skills dashboard and you will see a page like the following one:

Here you will see a list of all the skills you have created / submitted and a button, Create Skill , to create a new one. Press it to start the process.

Here you'll have to choose:
In the next step you'll be able to choose between one of the existing template, which will give you a preset list of supported voice commands. In our case we want full control over the process, so choose Start from scratch .

That's all. Now you'll have access to the Alexa Developer Console , which contains all the tools you need to build the interaction model, test and distribute your Alexa Skill.
In the Skill builder checklist you can see an overview of the steps to take, which we're going to follow:

The invocation name is the one which triggers the skills. For example, if the skill is called AppConsult , it means it can be triggered by saying Open AppConsult or Ask AppConsult followed by one of the supported commands.
By default, this field is set with the name you've chosen for the skill when you have created it. However, you can change it by clicking on Invocation and setting the Skill Invocation Name field:

An intent is a command that the user can tell to your skill to perform an action. Typically, each command is mapped with an intent. Since we're going to start with a simple skill, let's start by adding a command to tell to the user the title of the last article published on this blog. Create on the Add button near the Intents section of the Interaction Model sidebar and give it a name. This name doesn't affect the way the command will be recognized, but it's the identifier that your function will receive when it's invoked. In my case, I called it LastPosts .
Once you have created the intent, you can specify one or more Sample Utterances , which are the sentences that can trigger this command. Here are, for example, the ones I've created for my intent:
For the moment ignore the Intent Slots section. It can be used when you create an intent which accepts a parameter, like "show me the weather in Milan ". Milan , in the intent definition, is a slot because the user can pronounce the name of any city and, of course, the Alexa Developer Console doesn't expect us to create a sample utterance for each place in the world. We'll see more details on how to use it in another post.
Now press the Save Model button at the top to save it.
Every time you change the interaction model, by setting for example a new invocation name or by adding / editing / deleting an intent, you need to rebuild it. Think of this process like rebuilding a Visual Studio project once you have changed something in the code. The process will be done in the background and the portal will show you a notification once the build has been completed succesfully.
In order to do it press the Build Model button that you will find at the top of the editor.

That's all for the Invocation Model. Now we can wire it to some code! There's still one step in the checklist, called Endpoints , but we're going to complete it later.
An Azure Function (or, generally speaking, the serverless paradigm) takes the Platform-as-a-Service approach to the next level, since you don't have to care not only of maintaning the hardware platform or patching the operating system, but neither of managing the application's platform itself. A function is exactly what the name suggests: a single method that can be invoked by one or more triggers, which are different kind of events.
An Azure Function can be developed with multiple programming languages (C#, Java, JavaScript, etc.) and you can even write the code directly from the Azure portal. However, in our scenario, we need a little bit more power, since we need to leverage the Alexa.NET library mentioned in the beginning. As such, we're going to create our function with an IDE, since it offers us more flexibility. You can either use Visual Studio or Visual Studio Code. I'm choosing the first one because it's the IDE I know best, but the development / deployment experience will be the same also with Visual Studio Code.
Open Visual Studio 2017 and create a new project using the template under Cloud -> Azure Functions .
Make sure to:
Visual Studio will create a project with just one class, called Function1 , which contains the following definition:
As you can see, a function is nothing more than a method called Run() , which is invoked when the function is triggered.
Here is how we will change the default template for our purposes:
The default template contains a simple method which parses a query string parameter called name from the URL and returns it back to the caller prefixed by the world Hello . Of course we can safely ignore it, because we're going to replace it with the real code to interact with Alexa.
As first step, we need to install Alexa.NET. Right click on the project, choose Manage NuGet packages , search and install the Alexa.NET package. Since we're already using NuGet, make sure to install also the package called Microsoft.SyndicationFeed.ReaderWriter . It will make easier parsing the RSS feed of the blog. Make sure also that the NuGet package to support the Azure Functions infrastructure (called Microsoft.NET.Sdk.Functions ) is up to date to the latest version.
Now we can start writing some code. Let's start by handling the launch request, which is the default one. It's invoked when the user says Open followed by the invocation name of the skill.
As already mentioned, Alexa will send us the command through a JSON payload included in the body of the request. As such, the first step is to read the content of the body using the ReadAsStringAsync() method and then to deserialize it using JSON.NET. Alexa.NET offers a class called SkillRequest to map the content of a request, so we can simply use the DeserializeObject() method instead of manually performing the deserialization.
Once we have the request, we can manipulate it to get all the info we need. The most important one is the type of request, since Alexa supports multiple types. We can retrieve this information by calling the GetRequestType() method. In case of a launch request, the result will be the LaunchRequest type. If that's the case, we can handle it in the proper way.
Here is a simple example on how you can handle the launch request:
Alexa.net offers a class called ResponseBuilder , which you can use to build SkillResponse objects. This class maps the JSON that Alexa expects as output of a request to perform an action.
The ResponseBuilder class offer multiple methods to return different kind of responses, from the basic (like Tell() ) to the most advanced ones (like AskWithCard() ).
Since we're just exploring the basic concepts, for the moment we'll just use the Tell() method, which just returns a voice sentence which is then spoken by Alexa. The best practice, in the launch scenario, is also to set the ShouldEndSession property of the response to false . This means that Alexa won't close the session, but it will keep it open waiting for other commands to send to the same skill. This will allow our skill to support the following interaction model:
This way Alexa knows that the last command ( Tell me the last article ) must be passed again to our skill; it isn't a generic Alexa command.
Before building more complex scenarios, it would be nice to test the current code to make sure everything is working as expected. Amazon offers us two ways to test our skill:
However, before testing the skill, we need to return to the original skill checklist since we are missing one important setting: the endpoint. So far, in fact, the code of our skill lives only on our computer but, in order to work properly, we need to expose it on a web server, so that the Amazon servers can access to it.
Since we're leveraging an Azure Function, the standard approach would be to publish our function on Azure. This way it will be assigned an URL, which we can set as endpoint on the Amazon portal.
However, when we are in the testing phase, this approach has some drawbacks. Every time we make some changes to the code, we need in fact to publish a new version of the function to Azure. Additionally, Azure supports remote debugging, but it isn't as fast and reliable as local debugging
It would be great to test the skill locally using Visual Studio, but we would need the Alexa engine to run on our machine, which isn't clearly feasible. Is there an easy way to achieve the best of both worlds? Yes, thanks to ngrok !
Ngrok is an open source tool which helps developers during the testing phase of REST APIs, web hooks and, generally speaking, everything that needs to be hosted on a web server to work. Ngrok takes care of exposing your local server to Internet through a public URL with SSL support. This means that we can launch our Azure Function on our local machine and set, in the Alexa Developer Portal, the URL provided by ngrok as endpoint. This way Amazon will invoke the API like if it's running on the cloud but, in reality, all the requests will arrive on your local machine, allowing you to see detailed logs, to set breakpoints in Visual Studio, etc.
As first step, register an account on the official website and then download the tool. It's a command line tool, so unzip the file wherever you prefer. Ideally, you should add the folder as a path in Windows, so that you can invoke ngrok from any location.
Now open Visual Studio and start the debugging on the Azure Function by pressing F5. You will see a command prompt popping out: it's the Azure Function Core Tool, which allows you to run an Azure Function locally. The command prompt will act also as a logging window. Every time the Azure Function will be triggered, we will see the details of the request and the response in the prompt.
Moreover, do you remember the ILogger object included in the signature of the Run() method of the function? Whenever you're going to log a message using this object, it will be displayed in this console.
Once the function is started, you will see in the prompt a message like the following one:

Take note of the port used to expose the function, which should be 7071. Now open a command prompt on the folder where you have uncompressed ngrok and launch the following command:
Ngrok will start and it will expose the HTTP protocol through the 7071 port. In case Visual Studio has assigned to your web server a different port, replace 7071 with the right value.
While ngrok is up and running, you will see the following screen in the command prompt:

As you can see from the forwarding section, ngrok is exposing your local webserver through HTTP and HTTPS. Since we're using the free plan, we will be assigned a random subdomain of the ngrok.io domain (like xyz.ngrok.io).
Now, from the outside, any service can reach the Azure Function exposed by our local web server on the 7071 port using this address.
Now we're ready to configure our Alexa skill to use this interface. Return back to the Alexa Developer Console and, in the Build section, choose Endpoint :

By default, the skill will be set to use the AWS Lambda service provided by Amazon. However, since in our case we're going to use Azure, choose HTTPS and then set the Default region section with the following values:
As you can see, if you want to load balance your skill, you can provide different endpoints for different regions of the world. Otherwise, all the requests will be sent to the default endpoint, no matter where they're coming from.
Now press Save endpoints at the top, then click on Test in the tab menu. You will access to the Alexa Simulator. As first step, you have to turn on testing support using the following switch:

Now you have access to the simulator. On the left you have the chat window, where you can type the command you want to send to the skill. On the right, instead, you will see the last response from Alexa, followed by the JSON inputs and outputs.
Go on and type, in the chat window, the following command:
If you have done everything correctly, you should see the request coming in the Azure Function console:

The Alexa Simulator, instead, should reply with the welcome message we have included in the code and, on the right, you can see the JSON request which was submitted and the JSON response which was returned by our function:

Our first Alexa skill is working! Great job!
Take a look at the JSON. The input is the JSON representation of the SkillRequest class, while the output is representation of the SkillResponse class. To prove that we're actually testing using our local Azure Function, simply put a breakpoint in the first line of the function, than type again the open AppConsult command in the Alexa Simulator. You will see the breakpoint being hit and you will have the chance to perform step by step debugging, add watches, etc. This opportunity will be extremely useful when you're going to implement more complex scenarios. However, remember to act fast during the debugging. Alexa, in fact, will drop the session if the skill doesn't return any response in a timely fashion.
From a skill point of view, we aren't doing anything special for the moment. Let's move on and handle our first intent.
When we have created the invocation model, we have defined an intent call LastPosts . Let's see the code we need to add to our Azure Function to handle it:
We have added a new condition to the function: this time, we check if the request's type is IntentRequest . If that's the case, we can cast the request (stored inside the Request property of the SkillRequest class) to get all the information we need.
The most important one can be found in the Name property of the Intent class: it's the unique identifier of the intent that we have configured in the invocation model. This means that, whenever Alexa will understand one of the sample utterances linked to the intent (like tell me the last post ), it will invoke the function passing LastPosts as name.
If that's the case, we can handle the command in order to return to the user the expcted result. In our case, we're going to use the Microsoft.SyndicationFeed.ReaderWriter package we have previously installed to download the RSS feed of this blog, parse it and extract the most recent news. First let's define a helper method called ParseFeed() , which accepts as input the URL of a RSS feed:
We create a new XmlReader object, which is incapsulated inside the RssFeedReader class, which makes simpler navigating through the XML tree of the feed. By using a while loop, we read each item of the feed using the Read() method. If the node we're reading is, indeed, a feed item, we read its content using the ReadItem() method and we extract the Title property.
Now we can use this method to return to the Run() method of the function the full list of articles published on this blog:
The code is very similar to the one we have used to handle the launch request. We compose a message and we add the title of the first news retrieved from the RSS feed (which is the last published, from a chronological point of view). We create a SpeakResponse by calling the Tell() method of the ResponseBuilder class and, in the end, we encapsulate it inside a OkObjectResult object, which we return to Alexa.
In order to try this new feature run again the Azure Function on your local machine. If you haven't terminated ngrok, it should be still up & running, ready to forward every request coming to your assigned URL to your local web server. As such, just open again the Alexa Simulator and, this time, type the following command:
If you have done everything correctly, Alexa should prompt you with the title of the last published article:

Now that we have verified that our function is working as expected, we are ready to deploy it on Azure. This way, we can continue the testing without having to keep our Azure Function simulator up & running on our local machine.
The easiest way to publish our Azure Function is through Visual Studio. Right click on your project and choose Publish . You'll have the chance to publish it using an existing Azure App Service plan or to create a new one. In my case, I have chosen to create a new one. Regardless of your choice, make sure to enable the Run from ZIP (recommended) option. The Web Deploy approach, in fact, doesn't work very well with Azure Functions, since most of the times it will require you to go to the Azure portal and stop the function before being able to perform a new deploy.
In the next step you'll be able to configure your Azure Function directly from Visual Studio:

App name is the most important parameter, since it will determine the default URL assigned to it, which will be https://.azurewebsites.net .
The other dropdowns will allow you to choose which Azure subscription (in case you have multiple ones connected to the same account), Resource Group, Hosting Plan and Storage Account you want to use.
Once you have finished press Create . The process will take a while because, other than deploying the files which compose your function, Visual Studio will also take care of creating all the required infrastructure on Azure to host it.
The next times, instead, the process will be much faster, since Visual Studio will just copy the updated files to the remote location.
The last step is to go back to the Alexa Developer Console and change the endpoint. It shouldn't be anymore the URL assigned by ngrok, but we need to replace it with the one assigned by Azure. You can copy it directly from the Publish window:
Just remember to add the API endpoint to the URL. In my case, since the URL of my Azure App Service is https://appconsultskill.azurewebsites.net , I had to specify as endpoint https://appconsultskill.azurewebsites.net/api/alexa .

If you're planning to keep using the free Azure domain instead of your custom one, you can keep the option My development endpoint is a sub-domain of a domain that has a wildcart certificate from a certificate authority selected.
If you want to test that your function is still working also after the deployment, just go back to the Alexa Simulator. You should be able to repeat the same tests we've done before with success.
In this (long) post we have seen how to build our first Alexa skill by reusing technologies and platforms we are familiar with: C#, Visual Studio and Azure. Despite being very simple, it's fully functional. However, we aren't quite ready to submit it to certification. In order to make it available to every user who owns an Echo device, in fact, we need to pass a technical validation and a manual certification. If we go to the Amazon Developer Console we will see a section called Certification , with a step called Functional test . This tool will run a series of technical tests on your skill, which are required to pass before being able to submit it for the manual certification.
If you run the validation tool now you will see that, despite our skill is working fine in the simulator, it will fail multiple checks. The reason is that, in order to be submitted, a skill must:
In the next post we'll see the steps to do. In the meantime, you can play with the sample source hosted on GitHub .
Happy coding!
Amazon has recently released the vocal assistant Alexa and its lineup of Echo devices also in Italy. I had the chance to play with some of them during my trips in the US and I was pleasantly surprised by the quality of the voice interaction. They also have a good integration with the Microsoft ecosystem. You can connect an Office 365 calendar so that Alexa can read your daily appointments or create a new one; we have recently released Cortana for Alexa , which allows to interact with Cortana directly from an Echo device; we have announced that Skype will be released for Echo devices as well.
As such, I took the chance of the Italian release to make my house "smarter" and I purchased an Echo Plus with some smart devices, like bulbs and power plugs.
I've immediately been intrigued by the concept of "skills", which are basically applications for a vocal assistant. A skill allows to bring 3rd party services to Alexa and to extend the features it can provide. You can find on the market smart home skills, which allow Alexa to control a huge number of smart devices; you can find flash briefing skills, which can deliver you daily news from the most important news sources; you can find games, unit converters, and so on.
I've decided to start exploring how to build skills for Alexa and, at the beginning, I found myself outside my comfort zone. From a technical point of view, skills are basically REST endpoints. When you invoke a skill, Alexa performs a HTTP POST connection against your endpoint which contains, as payload, a JSON with all the details about the request, like the recognized command. Nothing too complex. However, the part which scared me a bit was the technical implementation, since the Alexa Skills Kit is all around using Java or JavaScript as development languages and Amazon AWS as a cloud platform to host the skill. Not exactly the technologies I'm most familiar with =)
The good news is that Amazon doesn't impose any specific requirement regarding the platform or the technology behind a skill. The only requirement is about the communication: your endpoint must be able to understand the JSON sent by Alexa and to reply back with another JSON which Alexa can interpret. So, why not trying to build an Alexa Skill using a language (C#), an editor (Visual Studio) and a cloud platform (Azure) I know?
This is exactly what we're going to do in this series of posts!
Choosing the right Azure service
The suggested path to deploy Alexa skills is AWS Lambda, which is the serverless platform provided by Amazon. As such, the choice of which Azure service to use for me was easy: Azure Function, which is the Microsoft approach to serverless computing.
The best development choice for Azure Function is .NET Core, which support is now official since Azure Functions 2.0 has reached GA during Ignite. From a high level point of view, our Azure Function will receive the JSON request, parse it and prepare the appropriate JSON response. However, there's a library that can save you from all the pain in having to manually serialize and deserialize every JSON response. It's called Alexa.NET and it's an open source library from Tim Heuer . If you are familiar with Windows development the name should ring a bell since Tim, before joining the Cloud Developer Advocate team in Microsoft, was responsible of the XAML client developer platform and tools.
Let's create our first skill
Alexa supports multiple types of skills, each of them with a dedicated set of APIs. The type of skill you want to build is based on the kind of experience you want to offer. There are skills specific for Flash Briefings, for music, for handling lists, for smart home devices, etc.
The most flexible approach is to build a Custom Skill , which gives you the APIs to build any kind of experience, which can even go beyond voice. Alexa, in fact, supports also visual content (for devices with a screen, like the Echo Show or the Echo Dot) and cards (which are displayed within the application).
In this series of posts we're going to explore custom skills and we will start with a very basic skill. We will query the feed of this blog to get some information, like the title of the last article published or the list of articles which belong to a specificy category. We won't introduce advanced concepts for the moment, like delivering visual content, cards, supporting authentication, etc.
The goal of these posts, in fact, isn't to turn you into a guru of Alexa skills, but to understand how you can become a guru and, at the same time, keep using familiar tools and technologies. If you want to know everything around skills development, the right place is the Alexa Developer documentation , which covers all the scenarios supported by the platform.
The starting point to create a skill isn't actually the code, but the Amazon's developers dashboard. A skill, in fact, is made by two components:
- The Interaction model , which describes the way the user can interact with the skill. The model defines, for example, the activation command, the supported commands, the optional parameters, etc.
- The function, which is instead the real code. It will take care of retrieving the input data (based on the interaction model), parse it and return a response to the user or to initiate more complex interactions.
Go to the Alexa Developer website and, if you don't have an account, create a new one. You'll have to link to an existing Amazon account. Then open the Skills dashboard and you will see a page like the following one:
Here you will see a list of all the skills you have created / submitted and a button, Create Skill , to create a new one. Press it to start the process.
Here you'll have to choose:
- The Skill name .
- The Default language . You'll be able to add other languages at a later stage.
- The Skill model . In our case, we're going to choose Custom .
In the next step you'll be able to choose between one of the existing template, which will give you a preset list of supported voice commands. In our case we want full control over the process, so choose Start from scratch .
That's all. Now you'll have access to the Alexa Developer Console , which contains all the tools you need to build the interaction model, test and distribute your Alexa Skill.
In the Skill builder checklist you can see an overview of the steps to take, which we're going to follow:
Setting the invocation name
The invocation name is the one which triggers the skills. For example, if the skill is called AppConsult , it means it can be triggered by saying Open AppConsult or Ask AppConsult followed by one of the supported commands.
By default, this field is set with the name you've chosen for the skill when you have created it. However, you can change it by clicking on Invocation and setting the Skill Invocation Name field:
Defining the intents
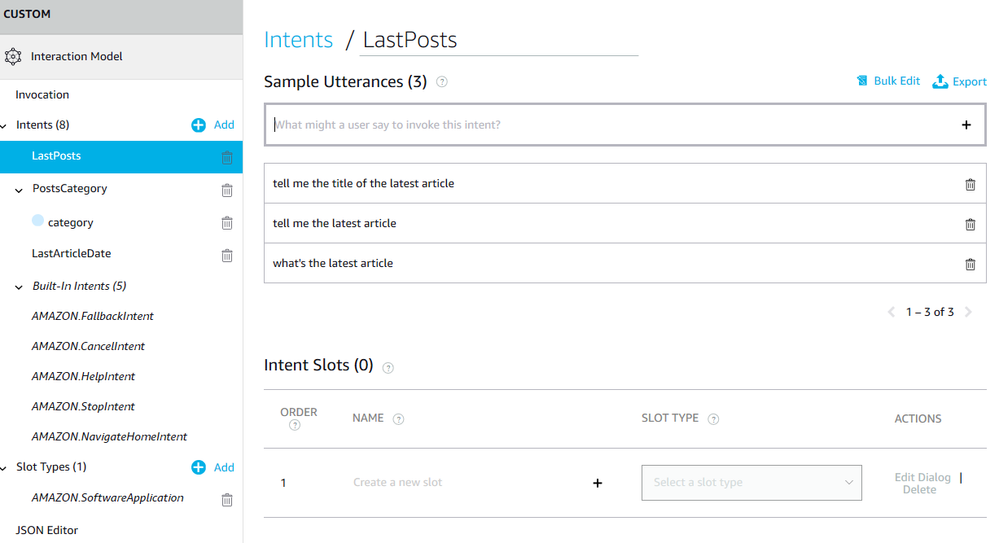
An intent is a command that the user can tell to your skill to perform an action. Typically, each command is mapped with an intent. Since we're going to start with a simple skill, let's start by adding a command to tell to the user the title of the last article published on this blog. Create on the Add button near the Intents section of the Interaction Model sidebar and give it a name. This name doesn't affect the way the command will be recognized, but it's the identifier that your function will receive when it's invoked. In my case, I called it LastPosts .
Once you have created the intent, you can specify one or more Sample Utterances , which are the sentences that can trigger this command. Here are, for example, the ones I've created for my intent:
For the moment ignore the Intent Slots section. It can be used when you create an intent which accepts a parameter, like "show me the weather in Milan ". Milan , in the intent definition, is a slot because the user can pronounce the name of any city and, of course, the Alexa Developer Console doesn't expect us to create a sample utterance for each place in the world. We'll see more details on how to use it in another post.
Now press the Save Model button at the top to save it.
Building the model
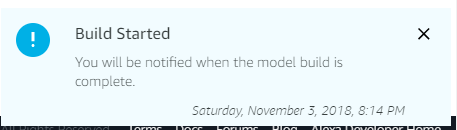
Every time you change the interaction model, by setting for example a new invocation name or by adding / editing / deleting an intent, you need to rebuild it. Think of this process like rebuilding a Visual Studio project once you have changed something in the code. The process will be done in the background and the portal will show you a notification once the build has been completed succesfully.
In order to do it press the Build Model button that you will find at the top of the editor.
That's all for the Invocation Model. Now we can wire it to some code! There's still one step in the checklist, called Endpoints , but we're going to complete it later.
Let's build our Azure Function
An Azure Function (or, generally speaking, the serverless paradigm) takes the Platform-as-a-Service approach to the next level, since you don't have to care not only of maintaning the hardware platform or patching the operating system, but neither of managing the application's platform itself. A function is exactly what the name suggests: a single method that can be invoked by one or more triggers, which are different kind of events.
An Azure Function can be developed with multiple programming languages (C#, Java, JavaScript, etc.) and you can even write the code directly from the Azure portal. However, in our scenario, we need a little bit more power, since we need to leverage the Alexa.NET library mentioned in the beginning. As such, we're going to create our function with an IDE, since it offers us more flexibility. You can either use Visual Studio or Visual Studio Code. I'm choosing the first one because it's the IDE I know best, but the development / deployment experience will be the same also with Visual Studio Code.
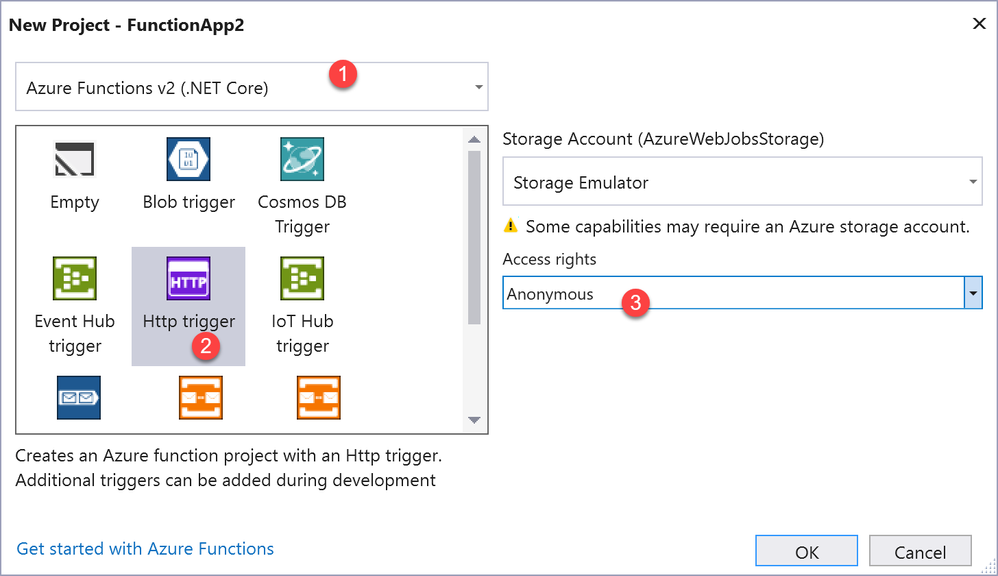
Open Visual Studio 2017 and create a new project using the template under Cloud -> Azure Functions .
Make sure to:
- Choose Azure Functions v2 , which are based on .NET Core
- As mentioned, Azure Functions support a wide range of triggers, which are events that can cause the execution of the function. In our case, Amazon sends a HTTP POST call whenever there's a new command to process. As such, we must choose Http trigger from the list.
- Set Access rights to Anonymous . This means that the function can be invoked from the outside by simply using the plain URL. As we're going to see in the next posts, Amazon will ask us to embed some logic inside the function to validate the request and to make sure it's a legit one. As such, we don't really need the additional security level provided by Azure.
Visual Studio will create a project with just one class, called Function1 , which contains the following definition:
   public static class Function1


   {


   [FunctionName("Function1")]


   public static async Task<IActionResult> Run(


   [HttpTrigger(AuthorizationLevel.Anonymous, "get", "post", Route = null)] HttpRequest req,


   ILogger log)


   {


   log.LogInformation("C# HTTP trigger function processed a request.");


   string name = req.Query["name"];


   string requestBody = await new StreamReader(req.Body).ReadToEndAsync();


   dynamic data = JsonConvert.DeserializeObject(requestBody);


   name = name ?? data?.name;


   return name != null


   ? (ActionResult)new OkObjectResult($"Hello, {name}")


   : new BadRequestObjectResult("Please pass a name on the query string or in the request body");


   }


   }
As you can see, a function is nothing more than a method called Run() , which is invoked when the function is triggered.
Here is how we will change the default template for our purposes:
- The name of the function is set using the [FunctionName] attribute, which decorates the Run() method. The default name is Function1 . Rename it with something more meaningful, like [Alexa] .
- The first part of the signature of the Run() method includes the configuration of the trigger. We can see, for example, that this function reacts to a HttpTrigger and that the authenticatin is set to anonymous. We can leave all the default options, but we can remove get from the list of supported actions. Alexa, in fact, we'll send us all the commands only by using the POST action, so we don't need to support also the GET one.
- The second part of the signature is the most important for us. The req object, which type is HttpRequest , will contain, in fact, the HTTP request sent by Alexa. We're going to use this object to retrieve all the information, like the security signature and the JSON payload.
The default template contains a simple method which parses a query string parameter called name from the URL and returns it back to the caller prefixed by the world Hello . Of course we can safely ignore it, because we're going to replace it with the real code to interact with Alexa.
As first step, we need to install Alexa.NET. Right click on the project, choose Manage NuGet packages , search and install the Alexa.NET package. Since we're already using NuGet, make sure to install also the package called Microsoft.SyndicationFeed.ReaderWriter . It will make easier parsing the RSS feed of the blog. Make sure also that the NuGet package to support the Azure Functions infrastructure (called Microsoft.NET.Sdk.Functions ) is up to date to the latest version.
Now we can start writing some code. Let's start by handling the launch request, which is the default one. It's invoked when the user says Open followed by the invocation name of the skill.
   [FunctionName("Alexa")]


   public static async Task<IActionResult> Run(


   [HttpTrigger(AuthorizationLevel.Function, "post", Route = null)] HttpRequest req,


   ILogger log)


   {


   string json = await req.ReadAsStringAsync();


   var skillRequest = JsonConvert.DeserializeObject<SkillRequest>(json);


   var requestType = skillRequest.GetRequestType();


   if (requestType == typeof(LaunchRequest))


   {


   //handle the request


   }


   return new OkResult();


   }
As already mentioned, Alexa will send us the command through a JSON payload included in the body of the request. As such, the first step is to read the content of the body using the ReadAsStringAsync() method and then to deserialize it using JSON.NET. Alexa.NET offers a class called SkillRequest to map the content of a request, so we can simply use the DeserializeObject() method instead of manually performing the deserialization.
Once we have the request, we can manipulate it to get all the info we need. The most important one is the type of request, since Alexa supports multiple types. We can retrieve this information by calling the GetRequestType() method. In case of a launch request, the result will be the LaunchRequest type. If that's the case, we can handle it in the proper way.
Here is a simple example on how you can handle the launch request:
   [FunctionName("Alexa")]


   public static async Task<IActionResult> Run(


   [HttpTrigger(AuthorizationLevel.Function, "post", Route = null)] HttpRequest req,


   ILogger log)


   {


   string json = await req.ReadAsStringAsync();


   var skillRequest = JsonConvert.DeserializeObject<SkillRequest>(json);


   var requestType = skillRequest.GetRequestType();


   SkillResponse response = null;


   if (requestType == typeof(LaunchRequest))


   {


   response = ResponseBuilder.Tell("Welcome to AppConsult!");


   response.Response.ShouldEndSession = false;


   }


   return new OkObjectResult(response);


   }
Alexa.net offers a class called ResponseBuilder , which you can use to build SkillResponse objects. This class maps the JSON that Alexa expects as output of a request to perform an action.
The ResponseBuilder class offer multiple methods to return different kind of responses, from the basic (like Tell() ) to the most advanced ones (like AskWithCard() ).
Since we're just exploring the basic concepts, for the moment we'll just use the Tell() method, which just returns a voice sentence which is then spoken by Alexa. The best practice, in the launch scenario, is also to set the ShouldEndSession property of the response to false . This means that Alexa won't close the session, but it will keep it open waiting for other commands to send to the same skill. This will allow our skill to support the following interaction model:
- Alexa, open AppConsult
- Welcome to AppConsult!
- Tell me the last article
This way Alexa knows that the last command ( Tell me the last article ) must be passed again to our skill; it isn't a generic Alexa command.
Testing our skill
Before building more complex scenarios, it would be nice to test the current code to make sure everything is working as expected. Amazon offers us two ways to test our skill:
- The Alexa Developer Portal includes an Alexa Simulator , which is basically a chatbot for our skill. You can type or say a command and the tool will show you the response. You have access also to a set of advanced debugging tools, like a panel to see the exact JSON inputs and outputs and a device display, in case your skill can handle also visual content other than voice ones.
- If you have one or more Echo devices in your house you can just use them, as long as you're using the same Amazon account both for the devices and the developer portal. The test skill will be made available like a regular skill, without having to install it.
However, before testing the skill, we need to return to the original skill checklist since we are missing one important setting: the endpoint. So far, in fact, the code of our skill lives only on our computer but, in order to work properly, we need to expose it on a web server, so that the Amazon servers can access to it.
Since we're leveraging an Azure Function, the standard approach would be to publish our function on Azure. This way it will be assigned an URL, which we can set as endpoint on the Amazon portal.
However, when we are in the testing phase, this approach has some drawbacks. Every time we make some changes to the code, we need in fact to publish a new version of the function to Azure. Additionally, Azure supports remote debugging, but it isn't as fast and reliable as local debugging
It would be great to test the skill locally using Visual Studio, but we would need the Alexa engine to run on our machine, which isn't clearly feasible. Is there an easy way to achieve the best of both worlds? Yes, thanks to ngrok !
Ngrok is an open source tool which helps developers during the testing phase of REST APIs, web hooks and, generally speaking, everything that needs to be hosted on a web server to work. Ngrok takes care of exposing your local server to Internet through a public URL with SSL support. This means that we can launch our Azure Function on our local machine and set, in the Alexa Developer Portal, the URL provided by ngrok as endpoint. This way Amazon will invoke the API like if it's running on the cloud but, in reality, all the requests will arrive on your local machine, allowing you to see detailed logs, to set breakpoints in Visual Studio, etc.
As first step, register an account on the official website and then download the tool. It's a command line tool, so unzip the file wherever you prefer. Ideally, you should add the folder as a path in Windows, so that you can invoke ngrok from any location.
Now open Visual Studio and start the debugging on the Azure Function by pressing F5. You will see a command prompt popping out: it's the Azure Function Core Tool, which allows you to run an Azure Function locally. The command prompt will act also as a logging window. Every time the Azure Function will be triggered, we will see the details of the request and the response in the prompt.
Moreover, do you remember the ILogger object included in the signature of the Run() method of the function? Whenever you're going to log a message using this object, it will be displayed in this console.
Once the function is started, you will see in the prompt a message like the following one:
Take note of the port used to expose the function, which should be 7071. Now open a command prompt on the folder where you have uncompressed ngrok and launch the following command:
ngrok http 7071
Ngrok will start and it will expose the HTTP protocol through the 7071 port. In case Visual Studio has assigned to your web server a different port, replace 7071 with the right value.
While ngrok is up and running, you will see the following screen in the command prompt:
As you can see from the forwarding section, ngrok is exposing your local webserver through HTTP and HTTPS. Since we're using the free plan, we will be assigned a random subdomain of the ngrok.io domain (like xyz.ngrok.io).
Now, from the outside, any service can reach the Azure Function exposed by our local web server on the 7071 port using this address.
Now we're ready to configure our Alexa skill to use this interface. Return back to the Alexa Developer Console and, in the Build section, choose Endpoint :
By default, the skill will be set to use the AWS Lambda service provided by Amazon. However, since in our case we're going to use Azure, choose HTTPS and then set the Default region section with the following values:
- In the first field, add the HTTPS endpoint provided by ngrok. This is a strict requirement. You can't host an Alexa skill using HTTP. After the URL you have to add the specific endpoint exposed by the Azure Functin, which is api/ . In our case, the function name is Alexa , so the endpoint will be https://xyz.ngrok.io/api/alexa .
- In the second field, choose from the dropdown the option My development endpoint is a sub-domain of a domain that has a wildcard certificate from a certificate authority . Our function is exposed, in fact, by the ngrok.io domain, which has a SSL certificate that covers every subdomain which is randomly generated by the tool.
As you can see, if you want to load balance your skill, you can provide different endpoints for different regions of the world. Otherwise, all the requests will be sent to the default endpoint, no matter where they're coming from.
Now press Save endpoints at the top, then click on Test in the tab menu. You will access to the Alexa Simulator. As first step, you have to turn on testing support using the following switch:
Now you have access to the simulator. On the left you have the chat window, where you can type the command you want to send to the skill. On the right, instead, you will see the last response from Alexa, followed by the JSON inputs and outputs.
Go on and type, in the chat window, the following command:
open AppConsult
If you have done everything correctly, you should see the request coming in the Azure Function console:
The Alexa Simulator, instead, should reply with the welcome message we have included in the code and, on the right, you can see the JSON request which was submitted and the JSON response which was returned by our function:
Our first Alexa skill is working! Great job!
Take a look at the JSON. The input is the JSON representation of the SkillRequest class, while the output is representation of the SkillResponse class. To prove that we're actually testing using our local Azure Function, simply put a breakpoint in the first line of the function, than type again the open AppConsult command in the Alexa Simulator. You will see the breakpoint being hit and you will have the chance to perform step by step debugging, add watches, etc. This opportunity will be extremely useful when you're going to implement more complex scenarios. However, remember to act fast during the debugging. Alexa, in fact, will drop the session if the skill doesn't return any response in a timely fashion.
From a skill point of view, we aren't doing anything special for the moment. Let's move on and handle our first intent.
Handling an intent
When we have created the invocation model, we have defined an intent call LastPosts . Let's see the code we need to add to our Azure Function to handle it:
   [FunctionName("Alexa")]


   public static async Task<IActionResult> Run(


   [HttpTrigger(AuthorizationLevel.Function, "post", Route = null)] HttpRequest req,


   ILogger log)


   {


   string json = await req.ReadAsStringAsync();


   var skillRequest = JsonConvert.DeserializeObject<SkillRequest>(json);


   var requestType = skillRequest.GetRequestType();


   SkillResponse response = null;


   if (requestType == typeof(LaunchRequest))


   {


   response = ResponseBuilder.Tell("Welcome to AppConsult!");


   response.Response.ShouldEndSession = false;


   }


   else if (requestType == typeof(IntentRequest))


   {


   var intentRequest = skillRequest.Request as IntentRequest;


   if (intentRequest.Intent.Name == "LastPosts")


   {


   //handle the intent


   }


   }


   return new OkObjectResult(response);


   }
We have added a new condition to the function: this time, we check if the request's type is IntentRequest . If that's the case, we can cast the request (stored inside the Request property of the SkillRequest class) to get all the information we need.
The most important one can be found in the Name property of the Intent class: it's the unique identifier of the intent that we have configured in the invocation model. This means that, whenever Alexa will understand one of the sample utterances linked to the intent (like tell me the last post ), it will invoke the function passing LastPosts as name.
If that's the case, we can handle the command in order to return to the user the expcted result. In our case, we're going to use the Microsoft.SyndicationFeed.ReaderWriter package we have previously installed to download the RSS feed of this blog, parse it and extract the most recent news. First let's define a helper method called ParseFeed() , which accepts as input the URL of a RSS feed:
   private static async Task<List<string>> ParseFeed(string url)


   {


   List<string> news = new List<string>();


   using (var xmlReader = XmlReader.Create(url, new XmlReaderSettings { Async = true }))


   {


   RssFeedReader feedReader = new RssFeedReader(xmlReader);


   while (await feedReader.Read())


   {


   if (feedReader.ElementType == Microsoft.SyndicationFeed.SyndicationElementType.Item)


   {


   var item = await feedReader.ReadItem();


   news.Add(item.Title);


   }


   }


   }


   return news;


   }
We create a new XmlReader object, which is incapsulated inside the RssFeedReader class, which makes simpler navigating through the XML tree of the feed. By using a while loop, we read each item of the feed using the Read() method. If the node we're reading is, indeed, a feed item, we read its content using the ReadItem() method and we extract the Title property.
Now we can use this method to return to the Run() method of the function the full list of articles published on this blog:
   [FunctionName("Alexa")]


   public static async Task<IActionResult> Run(


   [HttpTrigger(AuthorizationLevel.Function, "post", Route = null)] HttpRequest req,


   ILogger log)


   {


   string json = await req.ReadAsStringAsync();


   var skillRequest = JsonConvert.DeserializeObject<SkillRequest>(json);


   var requestType = skillRequest.GetRequestType();


   SkillResponse response = null;


   if (requestType == typeof(LaunchRequest))


   {


   response = ResponseBuilder.Tell("Welcome to AppConsult!");


   response.Response.ShouldEndSession = false;


   }


   else if (requestType == typeof(IntentRequest))


   {


   var intentRequest = skillRequest.Request as IntentRequest;


   if (intentRequest.Intent.Name == "LastPosts")


   {


   string rss = "https://blogs.msdn.microsoft.com/appconsult/feed/";


   List<string> news = await ParseFeed(rss);


   string output = $"The title of the last article is {news.FirstOrDefault()}";


   response = ResponseBuilder.Tell(output);


   }


   }


   return new OkObjectResult(response);


   }
The code is very similar to the one we have used to handle the launch request. We compose a message and we add the title of the first news retrieved from the RSS feed (which is the last published, from a chronological point of view). We create a SpeakResponse by calling the Tell() method of the ResponseBuilder class and, in the end, we encapsulate it inside a OkObjectResult object, which we return to Alexa.
In order to try this new feature run again the Azure Function on your local machine. If you haven't terminated ngrok, it should be still up & running, ready to forward every request coming to your assigned URL to your local web server. As such, just open again the Alexa Simulator and, this time, type the following command:
open appconsult and tell me the latest article
If you have done everything correctly, Alexa should prompt you with the title of the last published article:
Deploy the function on Azure
Now that we have verified that our function is working as expected, we are ready to deploy it on Azure. This way, we can continue the testing without having to keep our Azure Function simulator up & running on our local machine.
The easiest way to publish our Azure Function is through Visual Studio. Right click on your project and choose Publish . You'll have the chance to publish it using an existing Azure App Service plan or to create a new one. In my case, I have chosen to create a new one. Regardless of your choice, make sure to enable the Run from ZIP (recommended) option. The Web Deploy approach, in fact, doesn't work very well with Azure Functions, since most of the times it will require you to go to the Azure portal and stop the function before being able to perform a new deploy.
In the next step you'll be able to configure your Azure Function directly from Visual Studio:
App name is the most important parameter, since it will determine the default URL assigned to it, which will be https://.azurewebsites.net .
The other dropdowns will allow you to choose which Azure subscription (in case you have multiple ones connected to the same account), Resource Group, Hosting Plan and Storage Account you want to use.
Once you have finished press Create . The process will take a while because, other than deploying the files which compose your function, Visual Studio will also take care of creating all the required infrastructure on Azure to host it.
The next times, instead, the process will be much faster, since Visual Studio will just copy the updated files to the remote location.
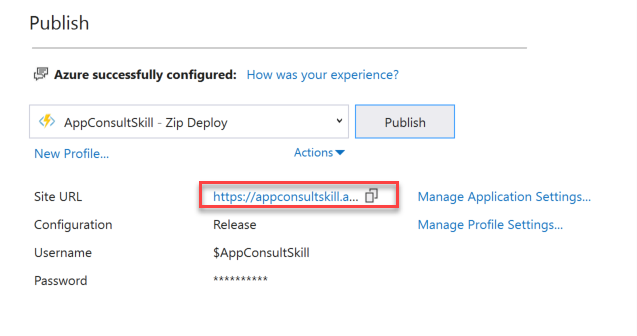
The last step is to go back to the Alexa Developer Console and change the endpoint. It shouldn't be anymore the URL assigned by ngrok, but we need to replace it with the one assigned by Azure. You can copy it directly from the Publish window:
Just remember to add the API endpoint to the URL. In my case, since the URL of my Azure App Service is https://appconsultskill.azurewebsites.net , I had to specify as endpoint https://appconsultskill.azurewebsites.net/api/alexa .
If you're planning to keep using the free Azure domain instead of your custom one, you can keep the option My development endpoint is a sub-domain of a domain that has a wildcart certificate from a certificate authority selected.
If you want to test that your function is still working also after the deployment, just go back to the Alexa Simulator. You should be able to repeat the same tests we've done before with success.
Wrapping up
In this (long) post we have seen how to build our first Alexa skill by reusing technologies and platforms we are familiar with: C#, Visual Studio and Azure. Despite being very simple, it's fully functional. However, we aren't quite ready to submit it to certification. In order to make it available to every user who owns an Echo device, in fact, we need to pass a technical validation and a manual certification. If we go to the Amazon Developer Console we will see a section called Certification , with a step called Functional test . This tool will run a series of technical tests on your skill, which are required to pass before being able to submit it for the manual certification.
If you run the validation tool now you will see that, despite our skill is working fine in the simulator, it will fail multiple checks. The reason is that, in order to be submitted, a skill must:
- Make sure the request is indeed coming from a trusted Amazon service. Since we're hosting the skill on a platform different than AWS Lambda, we need to manually take care of this validation.
- Handle properly not just the custom intents, but also the default ones provided by Alexa, like stop, cancel, etc.
In the next post we'll see the steps to do. In the meantime, you can play with the sample source hosted on GitHub .
Happy coding!
0
Likes
1 Comment
You must be a registered user to add a comment. If you've already registered, sign in. Otherwise, register and sign in.