- Home
- System Center
- System Center Blog
- Update now available for the Virtual Machine Role Authoring Tool
- Subscribe to RSS Feed
- Mark as New
- Mark as Read
- Bookmark
- Subscribe
- Printer Friendly Page
- Report Inappropriate Content

Lest anyone think that the release of the Authoring Tool was a one-time event, we’ve been busy fixing some bugs in the tool and, while we were at it, thought we’d take the time to add a small new feature. While the bugs certainly deserve attention, I thought I’d use this blog post to cover the new feature that we’ve added to the tool. So, let’s see if you can spot what’s different between the initial release of the tool:

and the updated release of the tool:

Did you notice? No? Give up? Ok, maybe this will help:

Hopefully by this point you’ve noticed the new Deploy button which has a “Deploy Resource Extension to Microsoft Azure” option. Using this option, you can deploy Windows-based VM Role Resource Extensions to Windows Azure IaaS virtual machines!
Now that your interest is hopefully piqued, I’m going to use the rest of this blog post to provide an overview of the new Deploy to Azure functionality. As we did with the initial Authoring Tool release, however, you can find more detailed coverage of the new functionality via a series of videos which walk through common VM Role Authoring Tool Azure Deployment activities and scenarios. The videos are available within the VM Role Authoring Tool How-To Videos playlist .
Once you’ve downloaded and installed the updated Authoring Tool release, you’ll need a Microsoft Azure subscription, at least 1 storage account in that subscription (if you’re going to deploy a Resource Extension which specifies application payload) and a management certificate which is valid for said subscription. Be sure to jot down the subscription ID and the thumbprint of the management certificate. While you can paste those values in the tool during the deployment experience, you can also simply open the VMroleAuthor.exe.config file and paste your values there:
<add key="SubscriptionId" value=" <enter the subscription id> " />
<add key="MgtCertThumbprint" value=" <enter the management certificate thumbprint> " />
Deployment Walkthroughs
We didn’t want to duplicate the Azure VM creation experience, so you’ll need an existing IaaS VM to which you will deploy a resource extension (you can automate all of this via PowerShell, but we’ll get to that in a bit). With that said, the first step will be to create an Azure IaaS Windows VM using the from gallery option (note that quick create will work as well). One other thing to keep in mind is that in this update of the Authoring Tool only Windows Resource Extensions are supported:

On the last page of the deployment wizard, make sure to leave the default option to “Install the VM Agent” checked:

For our first walkthrough, we’ll use the Custom Script Sample Gallery Resource which can be downloaded from the Web Platform Installer Service Models feed:

After downloading the sample, go ahead and load the CustomScriptSample.resextpkg Resource Extension into the tool, highlight it, click Deploy and choose Deploy Resource Extension to Microsoft Azure:

On the first page of the deployment wizard, choose the Cloud Service and the Virtual Machine to which you want to deploy the Resource Extension and then click the “Next Page” icon:

On the Deployment Configuration page, enter 1 or more simple commands in the ScriptBlock field, for example:
mkdir C:\Test
echo hello > C:\Test.txt
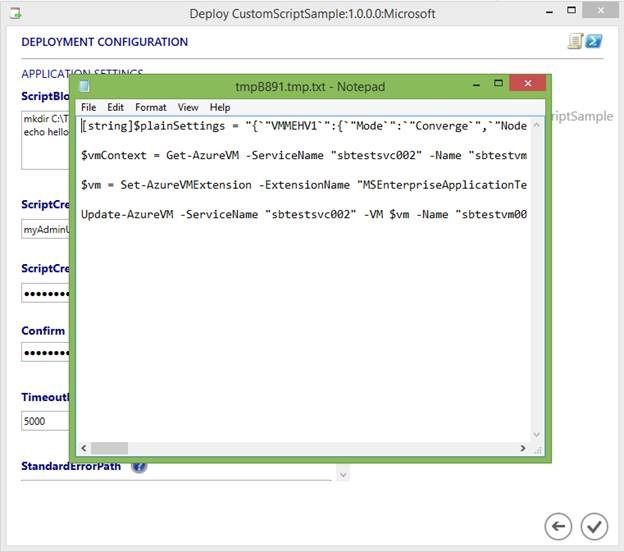
Also make sure to enter a UserName and associated Password of an account on the virtual machine which has rights to execute the commands above (likely the username / password combination you specified when creating the VM in the Azure portal). Do *NOT* click the Deploy icon just yet, as I want to show you a couple other features. First, you can view and optionally save the settings we will pass to our Extension Handler in the virtual machine by clicking the View Settings icon:


Close out the Notepad window and let’s see how you can generate and view a PowerShell script which you can use (Windows Azure PowerShell required) to deploy the Resource Extension. It’s pretty easy, just click the View PowerShell Script icon:

The View Settings and View PowerShell script functionality provide a great starting point for you to not only automate the deployment of Resource Extensions via PowerShell, but also to deploy a Virtual Machine *and* specify the Resource Extension to deploy and configure as part of the provisioning process. For example, assume you saved the settings file above as “mkdir.json”. You could use a PowerShell script similar to the following to execute the entire scenario above in one operation:
Param([string]$servicename,[string]$vmname,[string]$extensionname,[string]$publishername,[string]$extensionversion,[string]$storageaccount, [string]$settingsfile)
[string] $extensionsettings = Get-Content $settingsfile
$subscription = get-azuresubscription -current
Set-AzureSubscription -CurrentStorageAccountName $storageaccount -SubscriptionName $subscription.SubscriptionName
$x = new-azurevmconfig -name $vmname -InstanceSize Small -ImageName "<specify desired Azure image name>"
$x = Add-AzureProvisioningConfig -VM $x -Password "<specify admin user password>" -AdminUsername "<specify admin user account>" -Windows
$x= Set-AzureVMExtension -ExtensionName $extensionname -Publisher $publishername -Version $extensionversion -PrivateConfiguration $extensionsettings -VM $x
New-AzureVM -ServiceName $servicename -Location "West US" -VM $x
For now, however, let’s go ahead and use the tool to finish the deployment. Go ahead and click the Deploy icon:

The Deployment Results page will not only initiate the deployment but also report back incremental status. Once the operation is complete, you should see something like the following:

To verify that the Resource Extension actually did what you told it to do (assuming the ScriptBlock value I used above), connect to the VM and you should find the following:

What about a Resource Extension that contains application payload? I’m glad you asked, let’s walkthrough that experience using the SharePoint Foundation 2010 SP2 – Basic Gallery Resource sample. When creating a VM to which you will deploy this sample, you may want to enable HTTP access during the VM creation experience in the Azure Portal in order to easily test the deployment results:


Go ahead and download the sample from the Web Platform Installer Service Models feed:

After downloading the sample, open up the associated readme and you’ll note the following requirement:
Payload
|
Description |
SharePoint Foundation 2012 SP2 package |
|
Download Location |
http://www.microsoft.com/en-us/download/details.aspx?id=24983 |
|
Procedure |
1. In the extraction folder, create a folder named src . 2. In the src folder you just created, create a folder called SharePointPayload . 3. Copy SharePoint_SP2_en-us.exe into the SharePointPayload folder.
|
After downloading the SharePoint_SP2_en-us.exe file and creating the specified folder structure alongside the SharePointFoundation2010.resextpkg, you should have a folder/file structure like the following:

The SharePointFoundation2010.resextpkg should be in the SharePoint_FoundationBasic_VMRole_Pkg folder and the SharePoint_SP2_en-us.exe should be in the SharePointPayload folder.
Now that we’ve taken care of our payload pre-requisites, let’s see what the deployment of a Resource Extension which contains payload looks like. Load the SharePointFoundation2010.resextpkg Resource Extension into the Authoring tool and initiate the Deploy action. You should see something like this:

As before, select the Cloud Service and Virtual Machine to which you want to deploy. Since this Resource Extension has payload, however, you’ll notice that there is a “Resource Upload Properties” section which was not there in the Custom Script deployment walkthrough. As such, you will also need to choose a storage account and container to which the tool will upload the payload (note the options to Delete automatically after deployment or to let the tool know that the resources have already been uploaded – perhaps by a prior deployment):


Click the Next Page icon and provide values for the Resource Extension parameters:

Now that we’re ready to deploy, go ahead and click the Deploy icon and watch the progress of the deployment (as an anecdotal benchmark, the deployment typically takes about 25 minutes for me, YMMV):

Simply navigate to the Cloud Service / VM with Internet Explorer – or logon to the VM and access http://localhost ) and log in (using the user account you specified during VM creation):

That’s it for now. We’ll shortly be publishing another blog post which will walk through the details of how all of this works along with some troubleshooting tips in the event things go awry.
You can find more information on the MS Enterprise Application Extension Handler in this documentation and please do post issues and feedback in the MSEAH MSDN forum .
Enjoy!
Stephen Baron | Program Manager
Get the latest System Center news on Facebook and Twitter :


System Center All Up:
http://blogs.technet.com/b/systemcenter/
System Center – Configuration Manager Support Team blog:
http://blogs.technet.com/configurationmgr/
System Center – Data Protection Manager Team blog:
http://blogs.technet.com/dpm/
System Center – Orchestrator Support Team blog:
http://blogs.technet.com/b/orchestrator/
System Center – Operations Manager Team blog:
http://blogs.technet.com/momteam/
System Center – Service Manager Team blog:
http://blogs.technet.com/b/servicemanager
System Center – Virtual Machine Manager Team blog:
http://blogs.technet.com/scvmm
Windows Intune:
http://blogs.technet.com/b/windowsintune/
WSUS Support Team blog:
http://blogs.technet.com/sus/
The AD RMS blog:
http://blogs.technet.com/b/rmssupp/
MED-V Team blog: http://blogs.technet.com/medv/
Server App-V Team blog: http://blogs.technet.com/b/serverappv
The Forefront Endpoint Protection blog :
http://blogs.technet.com/b/clientsecurity/
The Forefront Identity Manager blog :
http://blogs.msdn.com/b/ms-identity-support/
The Forefront TMG blog:
http://blogs.technet.com/b/isablog/
The Forefront UAG blog:
http://blogs.technet.com/b/edgeaccessblog/
You must be a registered user to add a comment. If you've already registered, sign in. Otherwise, register and sign in.