- Home
- System Center
- System Center Blog
- Getting started with the Recovery Services Backup Vault interface in Microsoft Azure
- Subscribe to RSS Feed
- Mark as New
- Mark as Read
- Bookmark
- Subscribe
- Printer Friendly Page
- Report Inappropriate Content
~ Rupanter Chhabra | Support Engineer | Microsoft
This article discusses the interface for a Recovery Services Backup Vault in the Microsoft Azure Backup management portal. Each section of the interface is examined, including the various options, settings and information available as well as explanations for each. Note that the creation of the Backup Vault itself is not covered as this example assumes that the Backup Vault already exists. The article uses an example Backup Vault named Backuptest that has already been created and focuses purely on the different options available in the various areas of the Backup Vault interface.
If you’d like some additional background regarding Microsoft Azure Backup, here are a few references that will help get you started
- Azure Virtual Machine Backup : https://azure.microsoft.com/en-us/documentation/articles/backup-azure-vms/
- Microsoft Azure Backup : https://azure.microsoft.com/en-us/documentation/articles/backup-azure-backup-windows-server/ ...
- Microsoft Azure Backup Server : https://azure.microsoft.com/en-us/documentation/articles/backup-azure-dpm-introduction/
Quick Start
Many people tend to miss the Quick Start section (in red below) but it can help us in a lot of different ways.

The Quick Start guide has two sections:
Protect On-premises workloads
This is the section that pertains to Microsoft Azure Backup (MAB) and Microsoft Azure Backup Server.
- The first option here is to download the vault credentials. These are the credentials for the vault and are required during registration. Vault credentials expire after two days, so if you are registering or re-registering a server more than two days after downloading the credentials, you will need to download the vault credentials again.
- The second option is to download the various agents:
- MAB Server (Disk to Disk to Cloud)
- MAB for Windows Server, System Center Data Protection Manager and Windows Client
- Agent for Windows Essentials
The agent is required for Microsoft Azure Backup.
Protect Azure Virtual Machines
This section pertains to virtual machine backup. This backup option is only available for virtual machines that are on Microsoft Azure.
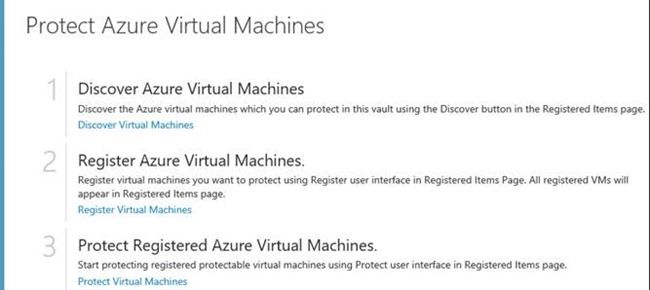
- Discover Azure Virtual Machines : If you have the Windows guest agent installed on the virtual machine that you are trying to backup, you can discover it using the Discover button prior to registering it.
- Register Azure Virtual Machines : You need to register the virtual machines that you want to backup using Azure virtual machine backup, and you can register them via the Azure Portal under the Registered Items tab.
- Protect Registered Azure Virtual Machines : You need to initialize protection for the registered virtual machine, then you can back up the virtual machine by scheduling the backup or by clicking on Backup Now .
Dashboard
Now let’s take a look at how our Dashboard looks and what options are available here.

The Dashboard contains information related to your usage, how much storage has been used, the jobs that are running, the machines that are protected, links to various downloadable options and Information regarding you vault.
Usage Overview:

Once protected, the virtual machine count also increases in the Dashboard page summary. This only represents virtual machines backed up in Azure, not the computers that have downloaded an agent and are backing up through MAB server, the agent or via Data Protection Manager (DPM). The Dashboard also shows the number of jobs from the last 24 hours that were successful, have failed, or are still in progress. By clicking on any of these categories, you can drill down into that category in the Jobs page for more details. Values in the dashboard are refreshed once every 24 hours.
Quick Glance:

Here you have links to the following:
1. Microsoft Azure Backup Agent for Windows Server, Data Protection Manager, Windows Client
2. Microsoft Azure Backup Agent for Windows Server Essentials
3. Microsoft Azure Backup Server (Disk to Disk to Cloud)
4. Vault Credentials - Necessary for registration and re-registration
5. Replication Settings - What kind of replication do we want for our Backup Vault
6. Billing model details
Other information:

As you can see above, this section contains additional information regarding your Backup Vault, such as the current status, the location where the backup vault has been created, the vault storage replication configuration, as well as the subscription ID and name. This is just a short overview of what is associated to the Backup Vault.
Registered Items

This section deals with all the items that have been registered with a particular Backup Vault. It might be an Azure virtual machine, or it could be Windows client, a Windows Essential server, etc. Everything registered can be found in this section.
To see the various kinds of registered Items, you first need to change the type of item that you want to view:
- Azure Virtual Machine : A VM that is hosted on Microsoft Azure
- Windows server : Your on-premises computers (servers, clients, etc.)

After selecting the type, you need to click on the Checkmark button that you see on the right-hand side:

After doing that you get the name of the computer, the type and the status (e.g. if it’s registered or in an error state, or if it's getting registered). You can also select the status from the drop-down list box.
Protected Items

This section deals with all the protected items that are being backed up and protected in a particular Backup Vault. You can also select the type of machine that you want to check the status for, similar to how we did in the Registered Items section. The only difference is that instead of Windows Server , you get an option to view Files and Folders :

After selecting the type, you need to click on the Checkmark button to confirm the selection.
Azure Virtual Machine

Here you can see more details like the name, the type of the machine, the status of the machine (if its protected, or is there an error or warning), details about how many recovery points you have, what policy the Azure machines fall under, and when the newest recovery point was taken.
Files and Folders

As you can see above, here you can view a few more details such as which drive/folder you’re backing up and from which server, as it could be an on-premises server as well. Also included is the type of backup you are performing, the status, the number of recovery points created, as well as the date and time of the oldest and the newest recovery points.
Configure

In the Configure section you can see what kind of storage replication you are using:
Locally Redundant : Locally redundant storage (LRS) replicates your data within the region in which you created your storage account.
Geo Redundant : Geo-redundant storage (GRS) replicates your data to a secondary region that is hundreds of miles away from the primary region.
For more information on storage replication and redundancy types, see the following:
https://azure.microsoft.com/en-in/documentation/articles/storage-redundancy/
Policies

In this section you can see which policies are being used to back up the Azure virtual machines. When you select the policy that you want to see the details for, and there are two tabs: Details and Items .
Details
The Details page contains the name of the policy and what kind of virtual machines the policy is applied to:

You also have the schedule which shows you how often your backup is occurring (daily or weekly), the scheduled time to run the backup, and the time zone for it:

The retention policy specifies the length of time for storing a backup, and you can specify different retention policies based on when the backup is taken. For example, a backup point taken at the end of each quarter may need to be preserved for a longer period for audit purposes, whereas a backup point taken daily, which serves as an operational recovery point, may only need to be preserved for 90 days.

The example above represents the following:
- Daily retention policy: Backups taken daily are stored for 30 days.
- Weekly retention policy: Backups taken every week on Sunday will be preserved for 104 weeks.
- Monthly retention policy: Backups taken on the last Sunday of each month will be preserved for 60 months.
- Yearly retention policy: Backups taken on the first Sunday of every January will be preserved for 10 years.
Items
Under Items you can see which machines are under a specific policy.
Jobs

The Jobs section deals with all of the actions that are performed on and from the Azure portal. The Jobs section gives you the details for any jobs that have been created. It could be anything from registering an Azure machine to running a backup process. For everything that is run from the Azure Portal, a job is created which can be viewed here.
Note that jobs that you run from on-premises machines (Microsoft Azure Backup or Microsoft Azure Backup Server) will not be listed here as those are already listed in the consoles on the servers. This section applies only to actions that are performed on the Microsoft Azure portal.
Here you can filter your results using the following criteria:
1. The type of machine
2. The status of the job:
a. All
b. In Progress
c. Completed
d. Failed
e. Completed with warning
f. Cancelled
g. Cancelling
3. What operation the job was created for:
a. All
b. Register
c. Configure Protection
d. Backup
e. Restore
f. Stop Protection
g. Delete Backup Data
h. Unregister
4. The time range for the job.
After selecting these filters you will see the details:
1. Workload Name: The machine name
2. Type: The type of the machine
3. Operation: Which operation the job is for
4. Status: The current status of the job
5. Date: When the job was started
6. Duration: How much time it took to complete the job
On the bottom of the page, if you don't select any particular job then you will see two options:

Summary Report : This will generate a report of all the jobs in the time range selected.
Export Jobs : This will export the job details to a Microsoft Excel spreadsheet.
If you just want the details for a specific job, select the job, open the job details, then click EXPORT JOBS and it will generate a Microsoft Excel spreadsheet specific to that particular job.
Rupanter Chhabra | Support Engineer | Microsoft


Our Blogs
- Configuration Manager: http://blogs.technet.com/configurationmgr/
- Data Protection Manager: http://blogs.technet.com/dpm/
- Orchestrator: http://blogs.technet.com/b/orchestrator/
- Operations Manager: http://blogs.technet.com/momteam/
- Operations Management Suite: https://blogs.technet.microsoft.com/msoms/
- Service Manager: http://blogs.technet.com/b/servicemanager
- Virtual Machine Manager: http://blogs.technet.com/scvmm
- Microsoft Intune: https://blogs.technet.microsoft.com/intunesupport/
- WSUS: http://blogs.technet.com/sus/
- AD and Azure RMS: http://blogs.technet.com/b/rms/
- Application Virtualization: http://blogs.technet.com/appv/
- MED-V: http://blogs.technet.com/medv/
- Application Proxy: http://blogs.technet.com/b/applicationproxyblog/
- Forefront Endpoint Protection: http://blogs.technet.com/b/clientsecurity/
- Forefront Identity Manager: http://blogs.msdn.com/b/ms-identity-support/
- Forefront TMG: http://blogs.technet.com/b/isablog/
- Forefront UAG: http://blogs.technet.com/b/edgeaccessblog/
You must be a registered user to add a comment. If you've already registered, sign in. Otherwise, register and sign in.