- Home
- System Center
- System Center Blog
- Creating Notification Templates in System Center Service Manager
- Subscribe to RSS Feed
- Mark as New
- Mark as Read
- Bookmark
- Subscribe
- Printer Friendly Page
- Report Inappropriate Content
When you subscribe to receive email notifications from System Center Service Manager you need to choose a notification template that will determine how the email will be formatted when it is sent to you. Besides describing the general process for creating notification templates have a few powerful features which I’ll highlight in this post:
1) the ability to insert contextual values in the subject or body of the email message
2) the ability to format the email message using HTML
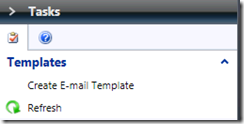
Let’s start by navigating to the Notification/Templates view in the Administration workspace of the main console:

Click on the task on the right ‘Create E-mail Template’
Besides providing the obvious name and description, when you first create a notification template you are prompted to select a class and a management pack:

What does it mean to select a ‘Target class’? Basically, what you are doing is saying ‘This notification template will be used to send notifications about ______.’ where the class you select fills in the blank. For example: ‘This notification template will be used to send notifications about Incident.’ or ‘ ….. about Windows Computer’. Selecting this class does a couple of things:
- Later when you create a notification subscription , you are going to select what class of objects you are subscribing to. Only notification templates that correspond to the selected subscription class can be used. For example, let’s say you created a notification subscription for the Incident class – all created incidents that are Priority = High. You will only be able to send notifications for this subscription using notification templates targeted at the Incident class. It wouldn’t make sense to send notifications for incidents using a change request notification template, right?
- When you are defining the notification template subject and message you can only choose to insert properties of the selected class or properties of a class related to the selected class. For example, let’s say you chose the Incident class. You can choose to insert properties of the Incident class such as Urgency, Priority, Title, etc. and properties of classes related to Incident such as Principal Name or IP Address of the Windows Computer class.
The template will be stored in the management pack you select. This is great for portability from a pre-production to production environment.
When you click Next you will see the wizard page used for defining the E-mail subject and body.

You can simply just type a message subject and message body in here and move on if you want. Or… you can get a little bit more fancy using HTML and/or inserting some properties.
Let’s take a look at inserting properties in the E-mail. Let’s say that when you notify the affected user that an incident has been created for him/her, that you want to inform the user what the incident ID is.
First put in some text like this:

Now, make sure you do this! Position your cursor after the colon at the end of the sentence ‘The ID is:’.
Now, what we want to do is insert the ID of the incident that is being notified about when the email is sent for each incident that is created. Click the Insert button to choose the Incident ID property and you will see the ‘Select Property’ dialog come up.

What you will notice is a listing of all the properties of Incident as well as all the properties it inherits from it’s base classes (in order Trouble Ticket, Work Item, Object) and the generic properties of ‘Display name’, ‘Last modified’, and ‘Time added’. Note that you can also search for Properties which makes it a lot easier if you know what you are looking for:

Select ID and click Add. This will insert some strange looking text in the message:

Basically, this is just a special syntax used by the notification engine to tell it what property values to insert when the notification is being sent. You can ignore all the text between the dollar signs. I highly recommend not trying to edit parts of it (unless you really know what you are doing). Instead, always add and delete these insertion strings as a whole.
Using a notification template like the above will result in an email that looks something like this every time an incident is created and an email is sent to the affected user:

Notice how the incident ID of the new incident I created – IR8 – is added in place of $Context/……$.
Let’s say we wanted to get a little more sophisticated about this and insert a property of a related class such as the first and last name of the person the incident is assigned to. Going back to the notification template properties to the Message subject/body, add in some hard coded text like this (‘The incident has been assigned to:’) and again leave your cursor positioned after the colon:

Click the Insert button again. This time expand the tree on the left under Incident.

On the left you can see all of the relationships from Incident to other classes. Select ‘Assigned To User’ and then search for the ‘First Name’ property. Click Add. Add a space in your notification template message body. Repeat using the Insert… button for the Last Name property of the Assigned to User. Now your notification template should look like this:

Now when the message is received by the user it looks like this:

Cool! … but wait! What happened to the line break I entered in the template between the first and second paragraph?
If you look at the headers of the email, you can see that the Content-Type is set to ‘text/html’ so Outlook which is the mail client I am using for this attempts to render the plain text provided as best as it can and that is why you see the text formatted in the default Times New Roman font. Since I didn’t provide any HTML tags in the email template and Service Manager doesn’t take the liberty of adding them for me, the text is essentially plain text without any kind of formatting including line breaks.
We can easily address this with a little HTML (like a <br/> tag called a “break”) which we can insert directly into the body of the message like this:

This simple modification results in an email that looks like this:

There! That’s better! Now, let’s say you wanted to get really fancy and impress your end users with your fancy notification templates by using HTML. One of the easiest ways to create nice looking HTML templates is by using Microsoft Word (or really any text editor capable of outputting HTML). Let’s say I create a document in Word that looks like this:

Note the relatively basic formatting such as bold, underline, text color and font changes. Now, if I save (File –> Save As) this file as a .html file I can then open it in notepad and copy the HTML.


Now just select all of the HTML code in the Notepad file, copy it, and paste it into your notification template:

Then find the various places in the HTML that you need to insert properties and add those using the ‘Insert…’ button as before. For example the user’s first name after ‘Dear’:

Now you will get a nicely formatted email message that could look something like this:

Now, let’s get a little bit fancier. There are two more things I want to show you:
1) Adding images to an email.
2) Passing context from the object you are notifying about through to a web site via the QueryString.
First, to add images to an email, you need to make sure your images are hosted on some web server on your intranet . If they are on the Internet you’ll get the little red X in your Outlook (or other email client) for privacy/security reasons. Note: you can add the sender to your ‘Safe Senders’ list in Outlook to avoid getting the red ‘x’ for images hosted on the Internet.
Add a line of HTML to your template that looks like this:
<img src=”http://yourserver/SomeImageFile.jpg”/> where you put the URL to your file in the src attribute. In my case I added this:
<img src=”http://smdc/ContosoLogoFile.png”/> after the signature in the email template HTML and now I get this in the email…

Next, let’s say you wanted to send your users to a website to fill out a survey about their satisfaction and you want to pass some context of the incident such as the incident ID to the survey site so the data can be correlated. One way to do this is by passing data on the “QueryString” part of the URL. The QueryString is the part that comes after the ‘?’ in most URLs. For example, let’s say that I have a survey site running on my server ‘surveyserver’. The URL might look something like this:
http://surveyserver/newsurvey.aspx?incidentID=IR232
What we need to do is pass the Incident ID of the incident that we are sending the notification about as part of the QueryString when the user clicks on the link. In other words, the ID number after ‘…?incidentID=’ in the URL needs to be different for each incident that we are notifying about and that number needs to be substituted in at the time we send the email similar to how we substituted it in above. Only in this case, we don’t want to actually show the ugly URL to the user (especially since it could be really long).
To do this you can put some more HTML in your template that looks like this:
Please take our <a href=”http://surveyserver/newsurvey.aspx?incidentID=$Context/Property[Type=’WorkItem!System.WorkItem’]/Id$”>customer satisfaction survey</a>.
Remember that you can insert the $Context.. part using the ‘Insert…’ button.
Now when the user gets the mail it will have a link in it like this:
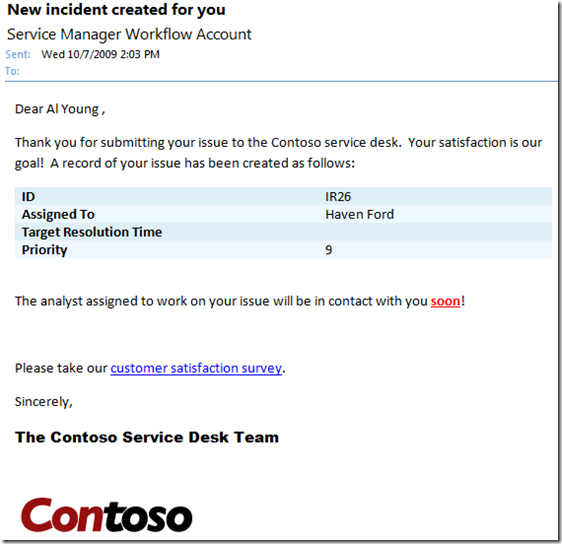
And when the user clicks on the link you can see that ‘IR26’ is passed on the QueryString to the web site.

Given this information and the power of HTML, only your creativity can limit you when it comes to sending notifications in Service Manager!
You must be a registered user to add a comment. If you've already registered, sign in. Otherwise, register and sign in.