- Home
- SQL Server
- SQL Server Blog
- Test Lab: Create an AlwaysOn Availability Group in Windows Azure End-to-End
- Subscribe to RSS Feed
- Mark as New
- Mark as Read
- Bookmark
- Subscribe
- Printer Friendly Page
- Report Inappropriate Content
In this blog, you will learn how to configure AlwaysOn Availability Groups end-to-end using Windows Azure VMs. The steps here are the GUI near-equivalent of the script-based tutorial, which has been published at Tutorial: AlwaysOn Availability Groups in Windows Azure . The end-to-end test lab is designed to help you go through all the basic paces of deploying an end-to-end AlwaysOn scenario in Windows Azure VMs. There are some notable differences between on-premise HADR SQL Server deployments and Windows Azure VM deployments, which I have written in detail at SQL Server High Availability and Disaster Recovery in Windows Azure Virtual Machines . Hopefully, walking through the steps can help you identify these differences and avoid potential pitfalls.
Briefly, the steps in this blog demonstrate how to create an AlwaysOn Availability Groups deployment in Windows Azure VMs with the following characteristics:
- Four VMs are deployed in the same affinity group, virtual network, and cloud service and use the same storage account.
- One VM is the domain controller (DC) server.
- The remaining three VMs form a three-node Windows Server Failover Clustering (WSFC) cluster and are deployed in the same subnet and availability set.
- Two of the WSFC nodes contain SQL Server instances and host an availability group with an availability database.
The figure below is a graphical representation of the solution.

Below is the outline of the steps:
- Create Domain Controller Server
- Create and Prepare WSFC Nodes
- Create WSFC Cluster
- Prepare SQL Server Instances for Availability Group
- Create Availability Group
- Create Public Endpoints for Remote Clients
Create Domain Controller Server
You begin with a new Windows Azure trial account with the Virtual Machine preview enabled. Once you have finished your account and preview feature sign-up, your Windows Azure portal should look similar to the following screenshot:

-
Click the New button at the lower-left corner of the page.
-
Click Network , then click Virtual Network , and then click Custom Create .
-
In Virtual Network Details , specify Name , Region , and Affinity Group Name as shown below. Then, click the right arrow at the bottom-right corner.
-
In DNS Servers and VPN Connectivity , do not change anything and click the right arrow at the bottom-right corner.
-
In Address Space and Subnets , specify Address Space and Subnets as shown below in CIDR format. Then, click the check mark at the bottom-right corner.
-
When virtual network creation is complete, your Windows Azure portal will look similar to the following figure.
-
Next, you create a new storage account you will use to store the VHD files of the VMs. Click New again, then Data Services , then Storage , and then Quick Create . Specify URL and Region/Affinity Group as shown below and click Create Storage Account . You must specify a unique URL for your storage account.
It may take some time for the storage account to be created. When the storage account is created, your Windows Azure portal will look similar to below:
-
Next, you create the VM you will use as the domain controller (DC). Click New again, then Compute , then Virtual Machine , and then From Gallery .
-
In Virtual machine operating system selection , select Windows Server 2008 R2 SP1 . Then, click the right arrow.
-
In Virtual machine configuration , specify Virtual Machine Name , Size , New User Name , New Password , and Confirm as shown below. Then, click the right arrow.
-
In Virtual machine mode , specify DNS Name , Storage Account , Region/Affinity Group/Virtual Network , and Virtual Network Subnets as shown below. Then, click the right arrow.
-
In Virtual machine options , click the check mark to finish configuring the new VM and wait for the VM to be provisioned. This process takes a while to complete, and if you click to the Virtual Machine tab in the Windows Azure portal, you can see ContosoDC cycling states from Starting (Provisioning) to Stopped , Starting , Running (Provisioning) , and finally Running . Once ContosoDC is provisioned, click the Connect button to download the remote desktop (RDP) file to your local directory.
-
Next, you configure ContosoDC as a DC server for corp.contoso.com . Launch the RDP file for ContosoDC and log in using your configured administrator account ( ContosoAdmin ). After you log in, run dcpromo from the Start menu.
- In the wizard, select Use advanced mode installation and click Next , then click Next again.
-
In Choose a Deployment Configuration , select Create a new domain in a new forest and click Next .
-
In Name the Forest Root Domain , type corp.contoso.com and click Next .
- In the Static IP Assignment warning window, click Yes, the computer will use an IP address automatically assigned by a DHCP server (not recommended) .
-
In Additional Domain Controller Options , accept the default DNS server selection and click Next . In the pop-up window, click Yes .
- Click Next again, then specify and confirm the administrator password and click Next , and then click Next again to finish configuring the DC server. After the DC server is provisioned, the VM restarts automatically.
- Next, you configure Active Directory (AD) with the accounts you will use later. Launch the RDP file for ContosoDC again using the default domain administrator credentials ( CORP\Administrator ).
-
Once you log in, open Active Directory Users and Computers from the Start menu.
-
Expand corp.contoso.com , then right-click Users , then point to New , then click User .
-
Specify a user named Install as shown below and click Next .
-
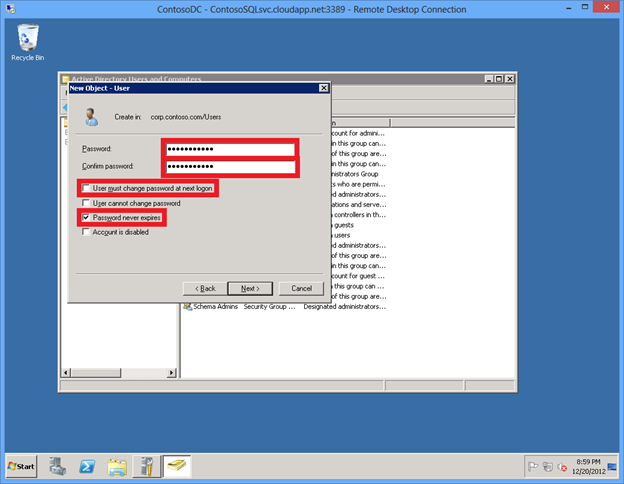
Specify and confirm the account password, then select the check boxes as shown below, and then click Next .
- Click Finish . You have now created CORP\Install in AD. You will use this account to configure the failover cluster and the availability group.
-
Following the same steps, create two additional accounts: CORP\SQLSvc1 and CORP\SQLSvc2 . You will use them as service accounts for the SQL Server instances.
Next, you need to give CORP\Install the necessary permissions for configuring Windows Service Failover Clustering (WSFC).
-
In the View menu, click Advanced Features . This action lets you see all the hidden containers, as well as hidden tabs in the properties windows for AD objects.
-
Right-click corp.contoso.com and click Properties .
-
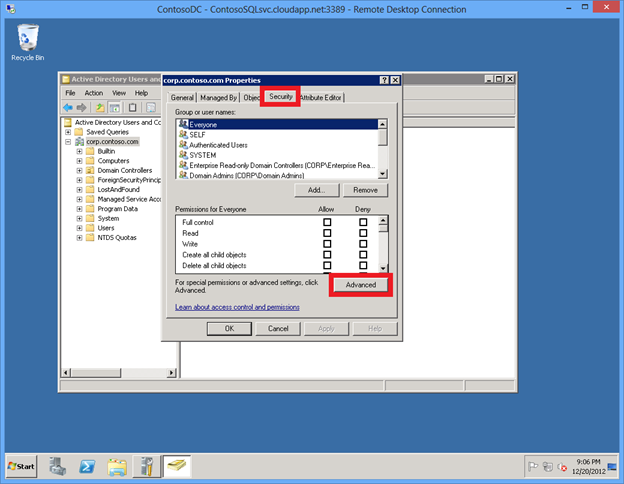
In corp.contos.com Properties , select the Security tab, then click the Advanced button.
-
In Advanced Security Settings for corp , click Add .
-
Type CORP\Install in the text box and click OK .
-
Select Allow for Read all properties and Create Computer objects , then click OK three times to exit corp.contoso.com Properties .
Next, you create the three VMs you will use which includes a WSFC cluster node and two SQL Server VMs. To create each of the VMs, go back to the Windows Azure portal, then click New , then Compute , then Virtual Machine , and then From Gallery .


Create and Prepare WSFC Nodes
In this section, you will create three more VMs in Windows Azure.
-
Use the following table to help you configure the three VMs.
VM1
VM2
VM3
Operating system selection
Windows Server 2008 R2 SP1, December 2012
Microsoft SQL Server 2012 Evaluation Edition
Microsoft SQL Server 2012 Evaluation Edition
Virtual Machine Name
ContosoWSFCNode
ContosoSQL1
ContosoSQL2
Size
Medium
Large
Large
New User Name
ContosoAdmin
ContosoAdmin
ContosoAdmin
Connected to an existing virtual machine
Selected (ContosoDC)
Selected (ContosoDC)
Selected (ContosoDC)
Storage Account
contososa2
contososa2
contososa2
Virtual Network Subnets
Back (10.10.2.0/24)
Back (10.10.2.0/24)
Back (10.10.2.0/24)
Availability Set
Create availability set (SQLHADR)
SQLHADR
SQLHADR
When you select Connect to an existing virtual machine and select ContosoDC (the only choice), it is the same as telling Windows Azure to place the VM in the same cloud service as ContosoDC , which is ContosoSQLsvc as I have specified it in my screenshot earlier. Again, this cloud service name is unique on the internet.
It does not take that much time to configure the three VMs, but be prepared to wait for a long time for all three VMs to be provisioned. Depending on the circumstances, it can take anywhere from a few hours to a full day for Windows Azure to fully provision three VMs.
Once the three VMs are fully provisioned, you need to join them to the corp.contoso.com domain and grant CORP\Install administrative rights to the machines. To do this, follow the steps below for each of the three VMs.
-
Download each VM's remote desktop (RDP) file to your local directory by selecting the VM in the list and clicking the Connect button. To select a VM, click anywhere but the first cell in the row, as shown below.
- Launch the RDP file you downloaded and log into the VM using your configured administrator account ( ContosoAdmin ).
-
Once you are logged in, the Initial Configuration Tasks window is automatically launched. Click the Configure networking link as shown below.
-
The Network Connections window is opened. Right-click Local Area Connection 3 and click Properties .
-
Select Internet Protocol Version 4 (TCP/IPv4) and click Properties .
-
Select Use the following DNS server addresses and specify 10.10.2.4 in Preferred DNS server , as shown below.
The address 10.10.2.4 is the address assigned to a VM in the 10.10.2.0/24 subnet in a Windows Azure virtual network, and that VM is ContosoDC . To verify ContosoDC 's IP address, use the nslookup contosodc in the command prompt, as shown below.
- Click OK twice to commit the changes. You are now able to join the VM to corp.contoso.com .
-
Back in the Initial Configuration Tasks , click the Provide computer name and domain link.
-
In the System Properties dialog, click Change .
-
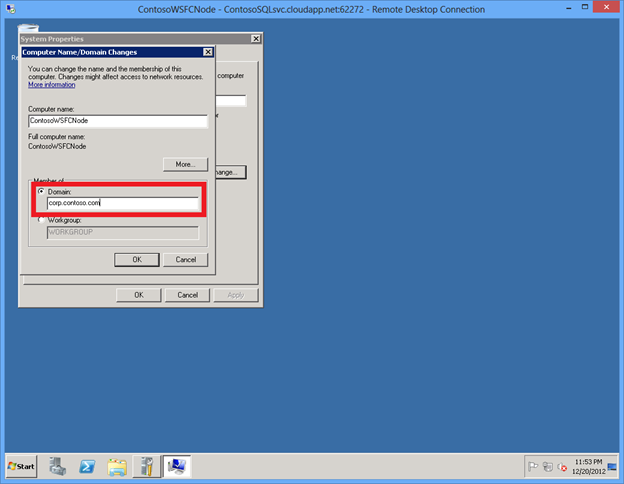
Select the Domain check box and type corp.contoso.com in the text box, then click OK .
- In the Windows Security popup dialog, specify the credentials for the default domain administrator account ( CORP\Administrator ) and the password you specified.
- When you see the "Welcome to the corp.contoso.com domain" message, click OK .
- In Computer Name/Domain Changes , click OK , then click OK in the popup dialog.
- In System Properties , click Close , then click Restart Now in the popup dialog to restart the VM.
- Wait a few minutes for the VM to be restarted, then launch the RDP file again to log into the VM using the BUILTIN\Administrator account.
-
In the Start menu, type " user ", then click Give administrative rights to a domain user .
-
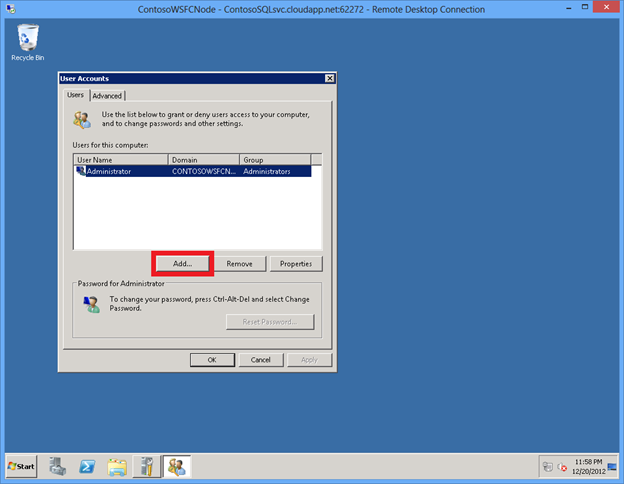
In the User Accounts dialog, click Add .
-
In Add New User , specify Install in User name and CORP in Domain , as shown below, then click Next .
- Select Administrator to add the CORP\Install to the local Administrators group, then click Finish , and then click OK to close the User Accounts dialog.
-
Next, you add the Failover Clustering feature to the VM. In the Initial Configuration Tasks window, click Add features .
-
In the Add Features Wizard , select Failover Clustering and click Next .
- In Confirm Installation Selections , click Install .
- When the Failover Clustering feature installation is completed, click Close .
- Log out of the VM.


Create WSFC Cluster
In this section, you create the WSFC cluster that will host the availability group you will create later. By now, you should have done the following to each of the three VMs you will use in the WSFC cluster:
- Fully provisioned in Windows Azure
- Joined VM to the domain
- Added CORP\Install to the local Administrators group
- Added the Failover Clustering feature
All these are prerequisites on each VM before you can join it to the WSFC cluster.
Also, note that the Windows Azure virtual network does not behave in the same way as an on-premise network, you need to create the cluster in the following order:
- Create a single-node cluster on one of the nodes (ContosoSQL1)
- Modify the cluster IP address to an unused IP address (10.10.2.101)
- Bring the cluster name online
- Remove the IP address resource for the cluster group
- Add the other nodes (ContosoSQL2 and ContosoWSFCNode)
Finally, you are ready to move on. Follow the steps below to fully configure the cluster.
- Launch the RDP file for ContosoSQL1 and log in using the credentials for CORP\Install .
-
Open Server Manager , then expand the Features node, then right-click Failover Cluster Manager , and then click Create a Cluster , as shown below.
-
In the Create Cluster Wizard , click Next . Then, type ContosoSQL1 in Enter server name and click Add , and then click Next again, as shown below.
- In the Validation Warning page, click No, I do not require support from Microsoft for this cluster, and therefore do not want to run the validation tests. When I click Next, continue creating the cluster. Then, click Next .
-
In the Cluser Name text box, type Cluster1 , then click Next .
- In the Confirmation page, click Next to begin cluster creation. Once the cluster is created, click Finish to close the wizard.
-
In Server Manager , expand Failover Cluster Manager , then click Cluster1.corp.contoso.com , then scroll down in the center pane, and then expand Cluster Core Resources . You should see both the Name and the IP Address resources in the Failed state. The IP address resource cannot be brought online because the cluster is assigned the same IP address as that of the machine itself, which is a duplicate address. Right-click the failed IP Address resource, and then click Properties , as shown below.
-
Select Static IP Address and specify 10.10.2.101 in the Address text box, as shown below. Then, click OK .
-
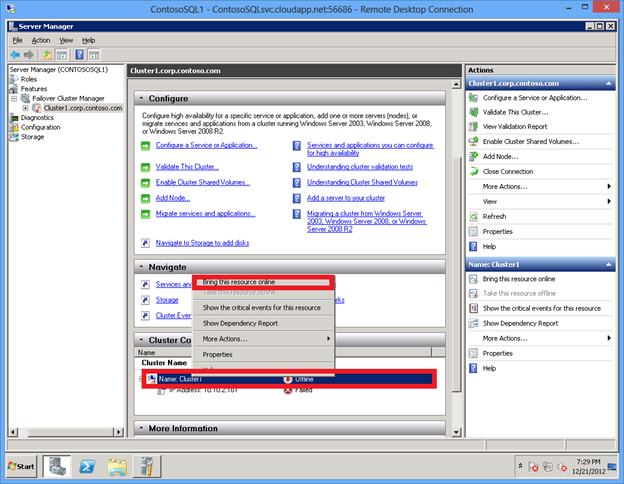
In the Cluster Core Resources section, rlight-click Name: Cluster1 and click Bring this resource online , as shown below. Then, wait until both resources are online. When the cluster name resource comes online, it updates the DC server with a new AD computer account. This AD account will be used to run the availability group clustered service later.
-
Now that the AD account is created, bring the cluster name offline. Right-click the Name: Cluster1 resource and click Take this resource offline . In the pop-up confirmation dialog, click Take Name: Cluster1 offline .
-
Next, remove the cluster IP address, which is not needed to run the availability group. Right-click IP Address: 10.10.2.101 and click Delete . After you delete the cluster IP address, the Name: Cluster1 resource can no long come online because it depends on the IP address resource. However, your availability group does not depend on the cluster name or IP address in order to work properly, so you can leave the cluster name offline.
-
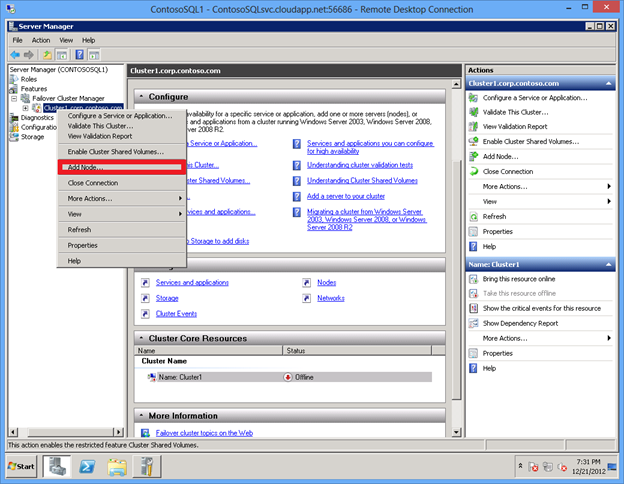
Finally, you add the remaining nodes to the cluster. In the browser tree, right-click Cluster.corp.contoso.com and click Add Node .
-
In the Add Node Wizard , click Next . Then, in the Select Servers page, add ContosoSQL2 and ContosoWSFCNode to the list by typing the server name in Enter server name and then clicking Add . Once your list looks similar to the screenshot below, click Next .
-
In the Validation Warning page, click No, I do not require support from Microsoft for this cluster, and therefore do not want to run the validation tests. When I click Next, continue creating the cluster. Then, click Next twice to add the nodes. Once the nodes are added to the cluster, click Finish .
Failover Cluster Manager should now show that your cluster has three nodes and list them in the Nodes container, as shown below.
- Log out of the remote desktop session.


Prepare SQL Server Instances for Availability Group
In this section, you will do the following on both ContosoSQL1 and contosoSQL2:
- Add a login for NT AUTHORITY\System with a necessary permissions set to the default SQL Server instance
- Add CORP\Install as a sysadmin role to the default SQL Server instance
- Open the firewall for remote access of SQL Server
- Enable the AlwaysOn Availability Groups feature
- Change the SQL Server service account to CORP\SQLSvc1 and CORP\SQLSvc2 , respectively
The actions above can be performed in any order, nevertheless the steps below will walk through them in order. Follow the steps for both ContosoSQL1 and ContosoSQL2 :
- If you have not logged out of the remote desktop session for the VM, do so now.
- Launch the RDP file for the VM and log in as BUILTIN\Administrator.
-
First, you add CORP\Install as a sysadmin role to the default SQL Server instance. From the Start menu, launch SQL Server Management Studio .
- Click Connect to connect to the default SQL Server instance.
-
In Object Explorer , expand Security , right-click Logins , and click New Login .
- Type NT AUTHORITY\System in Login name and click OK .
- In Object Explorer , right-click NT AUTHORITY\System and click Properties .
-
In the Securables page, for the local server, select Grant for the following permissions and click OK .
- Alter any availability group
- Connect SQL
- View server state
- In Object Explorer , right-click Logins again and click New Login .
-
Type CORP\Install in Login name .
-
In the Server Roles page, select sysadmin . Then, click OK . Once the login is created, you can see it by expanding Logins in Object Explorer .
-
From the Start menu, launch Windows Firewall with Advanced Security .
-
Right-click Inbound Rules and click New Rule .
-
In the Rule Type page, select Program , then click Next .
-
In the Program page, select This program path and type %ProgramFiles%\Microsoft SQL Server\MSSQL11.MSSQLSERVER\MSSQL\Binn\sqlservr.exe in the text box. Then, click Next .
- In the Action page, keep Allow the connection selected and click Next .
- In the Profile page, accept the default settings and click Next .
-
In the Name page, specify a rule name, such as SQL Server (Program Rule) in the Name text box, then click Finish .
-
Next, you enable the AlwaysOn Availability Groups feature. From the Start menu, launch SQL Server Configuration Manager .
-
In the browser tree, click SQL Server Services , then right-click the SQL Server (MSSQLSERVER) service and click Properties .
-
Click the AlwaysOn High Availability tab, then select Enable AlwaysOn Availability Groups , and then click Apply . Click OK in the pop-up dialog, and do not close the properties window yet. You will restart the SQL Server service after you change the service account.
-
Next, you change the SQL Server service account. Click the Log On tab, then type CORP\SQLSvc1 (for ContosoSQL1 ) or CORP\SQLSvc2 (for ContosoSQL2 ) in Account Name , then fill in and confirm the password, and then click OK .
- In the pop-up window, click Yes to restart the SQL Server service. After the SQL Server service is restarted, the changes you made in the properties window are effective.
- Log out of the VM.


Create Availability Group
You are now ready to configure an availability group. Below is an outline of what you will do:
- Create a new database ( MyDB1 ) on ContosoSQL1
- Take both a full backup and a transaction log backup of the database
- Restore the full and log backups to ContosoSQL2 with the NORECOVERY option
- Create the availability group ( AG1 ) with synchronous commit, automatic failover, and readable secondary replicas
Follow the instructions below:
- If you have not already logged out of the remote desktop sessions for ContosoSQL1 and ContosoSQL2 , do so now.
- Launch the RDP file for ContosoSQL1 and log in as CORP\Install .
- First, under C:\ , create a directory called backup . You will use this directory use to back up and restore your database.
-
Right-click the new directory, point to Share with , and then click Specific people .
-
Add CORP\SQLSvc1 and give it the Read/Write permission, then add CORP\SQLSvc2 and give it the Read permission, and then click Share . Once the file sharing process is complete, click Done .
- Next, you create the database. From the Start menu, launch SQL Server Management Studio , then click Connect to connect to the default SQL Server instance.
-
In the Object Explorer , right-click Databases and click New Database .
-
In Database name , type MyDB1 , then click OK .
-
Next, you take a full backup of the database. In the Object Explorer , expand Databases , then right-click MyDB1 , then point to Tasks , and then click Back Up .
-
In the Source section, keep Backup type set to Full . In the Destination section, click Remove to remove the default file path for the backup file.
-
In the Destination section, click Add .
-
In the File name text box, type \\ContosoSQL1\backup\MyDB1.bak . Then, click OK , and then click OK again to backup the database. When the backup operation completes, click OK again to close the dialog.
-
Next, you take a transaction log backup of the database. In the Object Explorer , expand Databases , then right-click MyDB1 , then point to Tasks , and then click Back Up .
- In Backup type, select Transaction Log . Keep the Destination file path set to the one you specified earlier and click OK . Once the backup operation completes, click OK again.
- Next, you restore the full and transaction log backups on ContosoSQL2 . Launch the RDP file for ContosoSQL2 and log in as CORP\Install . Leave the remote desktop session for ContosoSQL1 open.
- From the Start menu, launch SQL Server Management Studio , then click Connect to connect to the default SQL Server instance.
-
In the Object Explorer , right-click Databases and click Restore Database .
-
In the Source section, select Device , and click the … button.
-
In Select backup devices , click Add .
-
In Backup file location , type \\ContosoSQL1\backup , then click Refresh , then select MyDB1.bak , then click OK , and then click OK again. You should now see the full backup and the log backup in the Backup sets to restore pane.
-
Go to the Options page, then select RESTORE WITH NORECOVERY in Recovery state , and then click OK to restore the database. Once the restore operation completes, click OK .
-
Now, you create an availability group. Go back to the remote desktop session for ContosoSQL1 . In the Object Explorer in SSMS, right-click AlwaysOn High Availability and click New Availability Group Wizard .
-
In the Introduction page, click Next . In the Specify Availability Group Name page, type AG1 in Availability group name , then click Next again.
-
In the Select Databases page, select MyDB1 and click Next . The database meets the prerequisites for an availability group because you have taken at least one full backup on the intended primary replica.
-
In the Specify Replicas page, click Add Replica .
-
The Connect to Server dialog pops up. Type ContosoSQL2 in Server name , then click Connect .
-
Back in the Specify Replicas page, you should now see ContosoSQL2 listed in Available Replicas . Configure the replicas as shown below. When you are finished, click Next .
-
In the Select Initial Data Synchronization page, select Join only and click Next . You have already performed data synchronization manually when you took the full and transaction backups on ContosoSQL1 and restored them on ContosoSQL2 . You can instead choose not to perform the backup and restore operations on your database and select Full to let the New Availability Group Wizard perform data synchronization for you. However, this is not recommended for very large databases that are found in some enterprises.
-
In the Validation page, click Next . This page should look similar to below. There is a warning for the listener configuration because you have not configured an availability group listener. I intentionally skipped that step because availability group listeners are not currently supported in Windows Azure VMs.
-
In the Summary page, click Finish , then wait while the wizard configures the new availability group. In the Progress page, you can click More details to view the detailed progress. Once the wizard is finished, inspect the Results page to verify that the availability group is successfully created, as shown below, then click Close to exit the wizard.
-
In the Object Explorer , expand AlwaysOn High Availability , then expand Availability Groups . You should now see the new availability group in this container. Right-click AG1 (Primary) and click Show Dashboard .
Your AlwaysOn Dashboard should look similar to the one shown below. You can see the replicas, the failover mode of each replica and the synchronization state.
-
From the Start menu, open Server Manager again, then expand Features , then expand Failover Cluster Manager , then expand Cluster1.corp.contoso.com , and then expand Services and applications . A new clustered service called AG1 has been created in Cluster1 to represent the availability group that you just configured. Note that AG1 does not have any IP address by which database clients can connect to the availability group, because you did not configure one and because that IP address would not work even if you configured it because the Windows Azure virtual network does not support static IP addresses.
CAUTION: Do not try to fail over this clustered service. All failover operations should be performed from within AlwaysOn Dashboard in SSMS. For more information, see http://blogs.msdn.com/b/sqlalwayson/archive/2012/03/30/do-not-use-windows-failover-cluster-ma... .


Create Public Endpoints for Remote Clients
The new availability group is now online, but it is still not yet accessible from the internet. If your database client, such as an IIS server, runs within the same Windows Azure virtual network, then it is able to connect to the database servers directly within the virtual network and no additional steps are required. However, if your database client runs elsewhere, such as in your corporation's private network, you must open endpoints in Windows Azure to allow database access.
Follow the steps below:
-
Back in your Windows Azure portal, click Virtual Machines , then click ContosoSQL1 .
-
In the dashboard for ContosoSQL1 , click Endpoints , then click Add Endpoint .
-
In the Add Endpoint dialog, leave Add Endpoint selected and click the right arrow in the bottom-right corner.
-
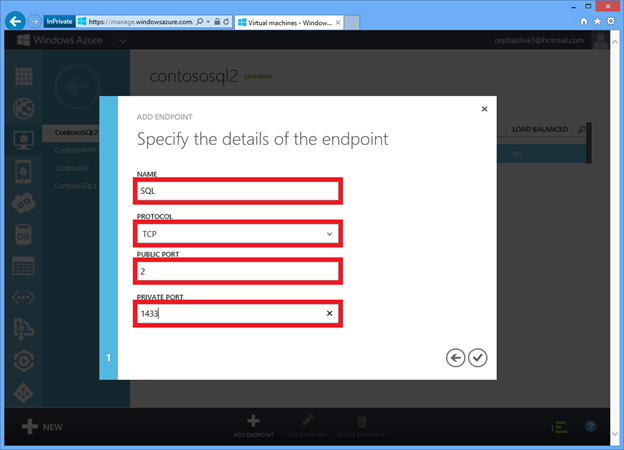
Specify the endpoint details as shown below, then click the check mark in the bottom-right corner to commit the changes.
The private TCP port 1433 is the default port SQL Server uses to accept incoming remote connections. Note also that the public port 1 is actually opened on the cloud service ContosoSQLsvc which you created in the beginning, which is the only way to access the virtual machines. If you haven't noticed in the remote desktop connections, you have been connecting to different VMs by via the unique ports that Windows Azure has assigned to them within the cloud service.
-
Next, in the Windows Azure portal, click ContosoSQL2 , then click Add Endpoint .
-
In the Add Endpoint dialog, leave Add Endpoint selected and click the right arrow in the bottom-right corner.
-
Specify the endpoint details as shown below, then click the check mark in the bottom-right corner to commit the changes. Since port 1 on cloud service ContosoSQLsvc is already used by ContosoSQL1 , you use port 2 here.


You are done! You can remotely connect to these servers by pointing to the cloud service and the respective external port: ContosoSQLsvc.cloudapp.com:1 for ContosoSQL1 and ContosoSQLsvc.cloudapp.com:2 for ContosoSQL2 .
You must be a registered user to add a comment. If you've already registered, sign in. Otherwise, register and sign in.