- Home
- Content Management
- The SharePoint Community blog
- O365 and OneDrive with ADAL, Microsoft Graph API & Office Add-In
- Subscribe to RSS Feed
- Mark as New
- Mark as Read
- Bookmark
- Subscribe
- Printer Friendly Page
- Report Inappropriate Content
First published on TECHNET on Oct 16, 2017
This post is a contribution from Manish Joshi, an engineer with the SharePoint Developer Support team
This blog demonstrates creating an Office add-in and retrieving data from SharePoint Online and One Drive within the add-in. The add-in uses ADAL.js for authentication and retrieving access token. In addition it uses Graph API and SharePoint REST API for accessing data from One Drive and SharePoint Online.
Create new Azure Web app
- Browse to Azure Portal https://portal.azure.com .
- Click on App Services
- Click Add-> Web Apps-> Click Create
- Set a unique App name. Example : o365officeaddin.
- Set Resource Group: Either Create New or Select Existing. Click on Create.
- Browse back to app services to seethe newly created web app.
- Click on the newly created web app -> Click Get publish profile from the menu in right section.
- Click Save File-> The file will be saved in "C:\Users\<<username>>\Downloads" folder with name o365officeaddin.PublishSettings
Register new Azure App
- Click on Azure Active Directory-> Click Switch directory
- Select your corporate Directory. In my case it’s Contoso.
- Click App registrations-> Click New application registration
- Enter Name: o365officeaddin
- Select Application type: Web App/ API
- Enter Sign-on URL as the url of the newly created azure web app. Example : https://o365officeaddin.azurewebsites.net/Home.html
- Click on Azure Active Directory-> Click App registrations-> Click o365officeadin-> Click Properties
- Set App ID URI: https://yourO365tenant.onmicrosoft.com/o365officeaddin. Click Save.
- Edit the reply Urls and add the url of your web app with an additional query string “?et=”
Example -: https://yourO365tenant.onmicrosoft.com/o365officeaddin/Home.html?et=
Note the reply urls are cases sensitive and you may get an error if there is a case mismatch.
- Make a note of "Application Id" we will use this later in javascript code for the clientId.

- Click Manifest-> Update value for “oauth2AllowImplicitFlow” to "true". Click Save
Grant Permissions to the new Azure app
- Click Required permissions-> Click Windows Azure Active Directory
- Under "Delegated Permissions" check following:
- Sign in and read user profile
- Read and write directory data
- Access the directory as the signed-in user
Click Save
- Click Add-> Select an API
- Click Microsoft Graph-> Click Select
- Under "Delegated Permissions" check following:
- Sign in and read user profile
- Read and write directory data
- Access the directory as the signed-in user
- Have full access to user files
- Have full access to all files user can access
Click Save
- Click Select-> Click Done
- Click Add-> Select an API
- Click Office 365 SharePoint Online-> Click Select
- Under "Delegated Permissions" check following:
- Read and write user files
- Run search queries as a user
- Read and write managed metadata
- Click Microsoft Graph->Click Grant Permissions-> Click Yes
- Click Select-> Click Done
Create new Word Add-in Project
- Launch Visual Studio 2015-> Click New Project
- Under Office/SharePoint-> Select Web Add-ins-> Select Word Add-in
- Give Name: o365officeaddin-> Click OK
- In Home.html Insert following code just after <body>. In the below code update the sharePointTenantName with your tenant name and the clientId with the Application Id we copied in the earlier steps.
<div id="content-header">
<strong><span class='app-user navbar-text'></span></strong>
<div class="search-area">
<input id="tb-search-input" type="text" value="search query" />
<input id="btn-search" type="button" value="Search" /><input id="btn-onedrive" type="button" value="OneDrive" />
<div id="search-results">
</div>
</div>
</div>
<script type="text/javascript">
(function (window, $) {
// Azure AD App Manifest - Set 'oauth2AllowImplicitFlow' property to 'true' ("oauth2AllowImplicitFlow": true)
// https://docs.microsoft.com/en-us/azure/active-directory/develop/active-directory-application-manifes...
var sharePointTenantName = '<<yourO365tenant>>';
var config = window.config = {
tenant: sharePointTenantName + '.onmicrosoft.com',
clientId: 'feea2058-6ff6-4847-9dfe-854400becd24',
postLogoutRedirectUri: window.location.origin,
endpoints: {
graphApiUrl: 'https://graph.microsoft.com',
sharePointUrl: 'https://' + sharePointTenantName + '.sharepoint.com'
},
cacheLocation: 'localStorage'
};
var authContext = new AuthenticationContext(config);
var $userDisplay = $(".app-user");
var $searchInput = $('#tb-search-input');
var $searchButton = $('#btn-search');
var $searchResultsDiv = $('#search-results');
var $onedriveButton = $('#btn-onedrive');
var isCallback = authContext.isCallback(window.location.hash);
authContext.handleWindowCallback();
// Check Login Status, Update UI
var user = authContext.getCachedUser();
if (user) {
$userDisplay.html(user.userName);
$userDisplay.show();
$searchButton.click(function () {
var searchText = $searchInput.val();
$searchResultsDiv.empty();
if (searchText.length > 0) {
search(searchText);
}
});
$onedriveButton.click(function () {
onedrive();
});
}
else {
authContext.login();
$userDisplay.empty();
$userDisplay.hide();
$searchInput.hide();
$searchButton.hide();
}
function search(searchText) {
var searchEndpoint = 'https://' + sharePointTenantName + '.sharepoint.com/_api/search/query?querytext=\'' + searchText + '\'';
authContext.acquireToken(config.endpoints.sharePointUrl, function (error, token) {
if (error || !token) {
console.log(error);
}
else {
$.ajax({
beforeSend: function (request) {
request.setRequestHeader("Accept", "application/json");
},
type: "GET",
url: searchEndpoint,
dataType: "json",
headers: {
'Authorization': 'Bearer ' + token,
}
}).done(function (response) {
$searchResultsDiv.html(JSON.stringify(response));
}).fail(function (response) {
console.log(response.responseText);
});
}
});
}
function onedrive() {
var onedriveEndpoint = "https://graph.microsoft.com/v1.0/me";
authContext.acquireToken(config.endpoints.graphApiUrl, function (error, token) {
if (error || !token) {
console.log(error);
}
else {
$.ajax({
beforeSend: function (request) {
request.setRequestHeader("Accept", "application/json");
},
type: "GET",
url: onedriveEndpoint,
dataType: "json",
headers: {
'Authorization': 'Bearer ' + token,
}
}).done(function (response) {
$searchResultsDiv.html(JSON.stringify(response));
}).fail(function (response) {
console.log(response.responseText);
});
}
});
}
})(window, window.jQuery);
</script>
- Add the below script reference in the head section
<script src="//secure.aadcdn.microsoftonline-p.com/lib/1.0.0/js/adal.min.js"></script>
Publish and install the Add-in
- Click Build-> Build Solution
- Right click o365officeaddin project-> Select Publish
- Current profile: Click <New…>
- Browse to path where you have saved the o365officeaddin.PublishSettings file. Click Finish
- Click Deploy your web project-> Click Publish
- Once publish has succeeded Click Package the add-in
- Change the URL to the url of the azure web app we created in previous steps. Example https://o365officeaddin.azurewebsites.net. Click Finish
- Next it will generate the o365officeaddinManifest.xml file. This file will be generated in the folder "bin\Debug\app.publish\OfficeAppManifests".
- Browse to your Office 365 site
- Browse to a document library
- Edit an existing Word Document or create a new one -> Click Open-> Click Word Online
- Click INSERT-> Click Office Add-ins
- Click Upload My Add-In
- Click Browse-> Browse to o365officeaddinManifest.xml location-> Click Upload
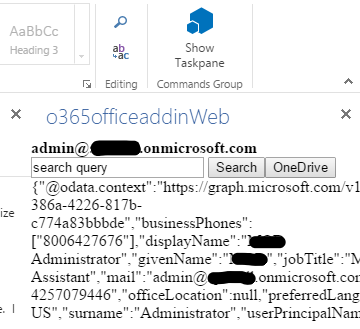
- Click "Show Taskpane" to see your Add-in UI
- Enter a search text in the search query box-> Click Search-> You will see JSON for the search results returned.

- Click OneDrive button to see it get details of the current user from OneDrive using graph REST endpoint.
Installing the Add-in to App Catalog
We can make the add-in available globally instead of having to upload the manifest.xml file everytime. When we packaged the add-in in the earlier step the .app file for the add-in was also generated at the path "bin\Debug\app.publish". Follow the below steps to make this add-in available globally across your tenant without requiring to upload the manifest.xml file every time.
- Browse to the app catalog site collection in your tenant
- Go to Apps for SharePoint
- Upload the office365addin.app file from the location "bin\Debug\app.publish"
- Install the add-in in the app catalog site collection by going to Site Actions -> Add an App
- One the app is installed Browse to document library in any site collection in your tenant and add or edit a word document in browser.
- Click on "Insert" -> "Office Add-ins" command in the ribbon . You should be able to see your office add-in under My Organization tab

You must be a registered user to add a comment. If you've already registered, sign in. Otherwise, register and sign in.