- Home
- Security, Compliance, and Identity
- Core Infrastructure and Security Blog
- Creating Rules and Monitors with a Schedule/Understanding XML internals!
- Subscribe to RSS Feed
- Mark as New
- Mark as Read
- Bookmark
- Subscribe
- Printer Friendly Page
- Report Inappropriate Content
First published on MSDN on Nov 17, 2009
The ability to build rules and monitors that have an associated schedule for operation was part of MOM 2005 and easy to implement. As several other blog posts have pointed out, it is also possible to introduce such a schedule for rules and monitors in OpsMgr 2007.
Rules - http://blogs.msdn.com/boris_yanushpolsky/archive/2008/09/19/configuring-rules-to-run-during-busines...
Monitors - http://nocentdocent.wordpress.com/2009/01/20/running-a-monitor-during-business-hours/
The challenge with OpsMgr 2007 has been that it is not possible to introduce such a schedule directly on a rule or monitor in a sealed management pack – and there is no UI component in the OpsMgr console that exposes this functionality. If there is a default rule or monitor where an operational schedule is desired the only option is to disable the rule or monitor and recreate it in a custom management pack with the desired schedule.
Although there are other posts that address this topic none of them go in depth to explain the various elements that are part of a rule and monitor to create a schedule and none I’ve seen attempt to relate the authoring console back to the underlying XML. A full understanding of how this works requires understanding both the authoring console components and the XML generated by the authoring console. The goal of this post then will be to present the graphical means of creating a schedule while pulling in the XML to show how everything links together. That said, let’s get started.
If you haven’t worked with the authoring console in R2 yet – get started. It is a very flexible tool for authoring and I can think of very little need or argument that would justify continuing to author in the OpsMgr UI <OK, off soap box>…..
For our examples we will create 2 rules and 2 monitors.
Rule 1 – Standard event rule with no schedule
Rule 2 – Standard event rule with a schedule
Monitor 1 – Standard event monitor with no schedule
Monitor 2 – Standard event monitor with a schedule
We will use standard event rules/monitors because they are common and easy to create. The general principles presented here, however, apply to all of the various rule and monitor options.
To get started, we launch the authoring console.

You will notice that there isn’t much that can be done with the authoring console until either a new management pack is created or an existing management pack is opened. We will create a new one. To do so, select File > New. Supply an identify for the management pack, which will be it’s filename, select to create an empty management pack and click next.
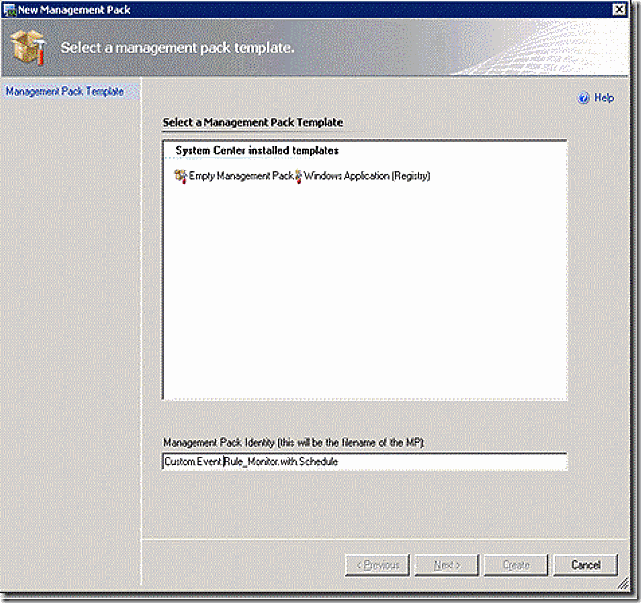
Enter a display name for the management pack – this will be the name of the management pack as seen in the OpsMgr UI. Once entered, select empty management pack and then select create. This will create the new management pack and make it ready for editing. 
Creating the management pack should have placed the focus of the authoring console on the ‘Health Model’ node. If it didn’t, select that now. Before continuing let’s make one adjustment to the authoring console that will help us keep track of management pack versions. From the menu select Tools > Options. This will bring up the screen below. Select to ‘auto-increment’ the management pack version. When importing management packs with changes you should ensure the version number reflects that ther is a revision but it’s easy to forget to do so. Setting this option in the authoring console ensures you don’t forget!

OK, on to authoring. We will start with rules. In the Health Model pane click on rules and then in the center rules pane, right-click and select New > Alerting > Windows Event

On the general tab of the Windows Event wizard that comes up, supply the element ID – which is the internal ID of the event, the Display Name – which will be displayed in the OpsMgr UI, the target and the category. Click net to proceed.
For this example I’ve chosen the Windows Server Operating System class as my target. This class may not always be appropriate – make sure you understand how to properly target. I have written an article in Technet magazine that describes targeting – available here – and have also written a chapter on targeting in the upcoming OpsMgr R2 Unleashed ebook.

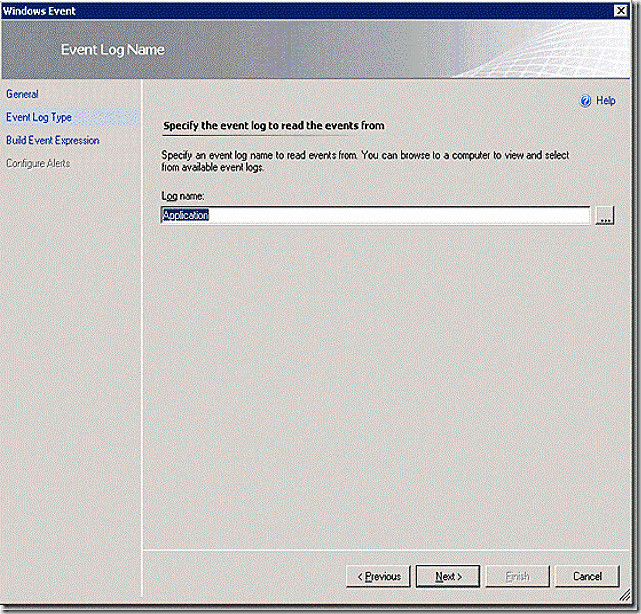
On the Event Log Type page of the wizard, choose which event log contains the event of interest. For our example we will use the application log – select it and click next.
On the Build Event Expression page of he wizard we configure the event of interest. The default options are to choose an Event ID and also an Event Source. For our example all we need is the Event ID so delete the line for Event Source, enter 1000 for the Event ID and click next.

The final page of the wizard allows configuration of alerts. Input an alert name and choose finish. 
With this complete we now have a simple event rule that will operating 24/7 to scan for an event 1000 on all Windows servers.
Next we need to create our rule that will be modified to run on a schedule. To do so, work back through the steps above but this time use different values as follows:
Element ID: Custom.Event.Rule_Monitor.with.Schedule.Standard.Event.Rule.with.Alert.WITH.Schedule
Display Name: Standard Event Rule with Alert – WITH schedule
Target: Microsoft.Windows.Server.OperatingSystem
Category: Alert
Log Name: Application
Event ID: 1001
Alert Name: Simple Alerting Event Rule - With Schedule
After completing your second rule the Authoring Console should appear as follows: 
Now, let’s modify the second rule to only be active during certain times of the day. To do so, select the second rule, right-click and select properties and then select the module tab.
In case it’s not obvious from the screen shot – note that there are no tabs to allow editing the event log, event ID or alert properties. What the wizard did was create MODULES and plug them into the rule where required. The section of the wizard where we configured to use the application log and to look for event 1001 (remember, we are looking at the properties of rule 2) actually created a data source (DS) module leveraging the built in Microsoft.Windows.EventProvider component. There are lots of other Data Sources but the one selected is the one needed to pull information from the event log. If you were to edit the Data Sources section you could edit these settings. Further, creating the alert in the wizard caused an Actions module to get created and plugged in as shown leveraging the built in System.Health.GenerateAlert component.

Notably vacant is the condition detection section. This is the section that allows us to leverage the schedule based component of OpsMgr. Let’s create it. On the condition detection selection select Create. This action pulls up a list of condition detection components available. There is a long list and all of these should be self-explanatory.

The one we are interested in is the scheduler so put in schedule in the look for box, select the only entry that remains in the list and in the Module ID section label this as CD (short for condition detection – you can use whatever you want in this box but CD is common). Select Ok when finished.

With this complete our modules screen now has a condition detection. Now we have to edit our condition detection to specify it’s settings. Click on edit under the condition detection section.

The edit button brings up the configuration screen as shown. From here, select configure.

The configure page is where the schedule options are set. The schedule shown means that this event rule will only be PROCESSED from 6:00 AM to 11:00 PM on Monday, Wednesdays and Fridays.
I capitalize PROCESSED for a reason. When we create a schedule it’s natural to think that the rule or monitor is being turned off outside of these time frames. This is not correct. What we are creating is a condition detection module which means that the event will still be detected 24/7 on the agent and sent to the condition detection module. Based on our settings and assuming the event is picked up outside our schedule, the module will return that the data should not be handled and discard it – but the workflow will still fire up initially! A minor distinction but one worth understanding.
Note also that the wizard allows for choosing times that the rule should be processed as well as when it should not.

There is one more thing we need to do for our scheduled rule in order for it to work. Boris points this out on his blog which is where I discovered it! There is a bug in the authoring console where a needed snip of XML is not added. Back at the main schedulefilter window, select edit to pull up the XML section we need to modify.

After setting the schedule and clicking edit, the XML section that shows up for editing will be as follows.
<Configuration p1:noNamespaceSchemaLocation="C:\Documents and Settings\Administrator.STARTREKNG\Local Settings\Temp\1\CD - System.SchedulerFilter.xsd" xmlns:p1=" http://www.w3.org/2001/XMLSchema-instance" >
<SchedulerFilter>
<ProcessDataMode>OnSchedule</ProcessDataMode>
<Schedule>
<WeeklySchedule>
<Windows>
<Daily>
<Start>06:00</Start>
<End>23:00</End>
<DaysOfWeekMask>42</DaysOfWeekMask>
</Daily>
</Windows>
</WeeklySchedule>
<ExcludeDates></ExcludeDates>
</Schedule>
<TimeXPathQuery>TimeXPathQuery</TimeXPathQuery>
</SchedulerFilter>
</Configuration>
All that is needed is a simple change, replace TimeXPathQuery with UseCurrentTime as shown. Note that editing in XML for use in the auth console is case sensitive.
<Configuration p1:noNamespaceSchemaLocation="C:\Documents and Settings\Administrator.STARTREKNG\Local Settings\Temp\1\CD - System.SchedulerFilter.xsd" xmlns:p1=" http://www.w3.org/2001/XMLSchema-instance" >
<SchedulerFilter>
<ProcessDataMode>OnSchedule</ProcessDataMode>
<Schedule>
<WeeklySchedule>
<Windows>
<Daily>
<Start>06:00</Start>
<End>23:00</End>
<DaysOfWeekMask>42</DaysOfWeekMask>
</Daily>
</Windows>
</WeeklySchedule>
<ExcludeDates></ExcludeDates>
</Schedule>
<UseCurrentTime>true</UseCurrentTime>
</SchedulerFilter>
</Configuration>
You only need to change this section for the RULE – not the monitor!
Save the XML section – if there are errors you should get a warning.
With our edits complete, select OK back to the main authoring console screen and save the current version of our management pack. Now that we’ve built the schedule in the UI it’s time to look at the resulting XML. It’s not that bad so don’t be nervous!
With the management pack saved, open it in your favorite XML editor – I use Notepad++. This is a simple management pack – just two rules so far. When you open the XML it will likely not be collapsed – to me it always helps to start with the XML collapsed to it’s major sections and start to drill in from there. Depending on the editor, you may not be able to do this. The collapsed view in Notepad++ makes our ‘scary XML’ management pack look quite simple – and it really is.

The two rules we are interested in are in the Monitoring Section. Lets expand just the monitoring section and take a look at our two rules one at a time. The first thing we need to understand is that every rule and monitor MUST have a data source. It may not be obvious in the case of monitors, but there is always a datasource,
The XML below is for rule 1. It is a bit busy at first glance but the goal of this diagram is to demonstrate how the UI elements (both OpsMgr UI and Authoring Console UI) are represented in XML. I also include the expanded DisplayStrings section of the XML. If searching the XML for the name of a UI element (rule/monitor/view/task/etc) you likely will first find a hit in the display strings section and will need to track back from here. Each UI element is represented by a unique ID that does not appear in the console. The DisplayStrings section ties together the console name and the element ID name. Once you discover the element ID name, use it for further searching and you will find the UI element of interest.

In the example above the initial line of the Rule definition runs off the screen as indicated by the line trying to correlate the UI target element to where target is shown in XML. The full line is below for reference.
<Rule ID="Custom.Event.Rule_Monitor.with.Schedule.Standard.Event.Rule.with.Alert.NO.Schedule" Enabled="true" Target="Windows!Microsoft.Windows.Server.OperatingSystem" ConfirmDelivery="true" Remotable="true" Priority="Normal" DiscardLevel="100">
OK, so hopefully that helps explain how the XML fits in to the picture – but that was just rule 1. We haven’t seen the XML for rule 2 yet – our scheduled rule. The only thing different about rule 2 is that it adds a condition detection section. The XML is below – since we have so many elements in common between rule 1 and 2 I’ve avoided commenting the common elements again and instead highlight only the schedule specific elements.

So completes our example with rules – hopefully you have a good understanding about the structure of the XML from this example. On to monitors. Building the monitors is also easy but there are more complexities both in the UI and in the XML. Like our rule example, lets start by building a simple event monitor in the UI that operates 24/7. In the authoring console, select the Health Model node, select monitors and in the center monitors section, right-click and select new > Windows Events > Simple > Event Reset as shown

On the general tab enter values for the monitor element ID, the display name, choose a target – Windows Server Operating System in this example, choose System.Health.AvailabilityState as the parent monitor and then choose a category for the monitor – Availability Health in this example, and click next.


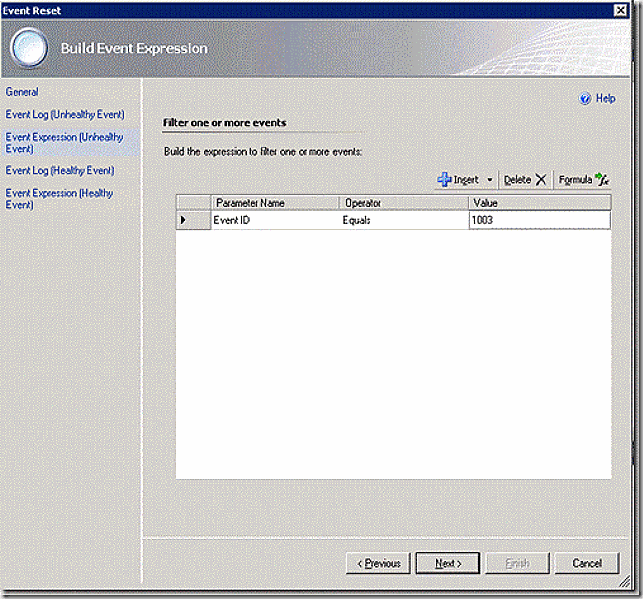
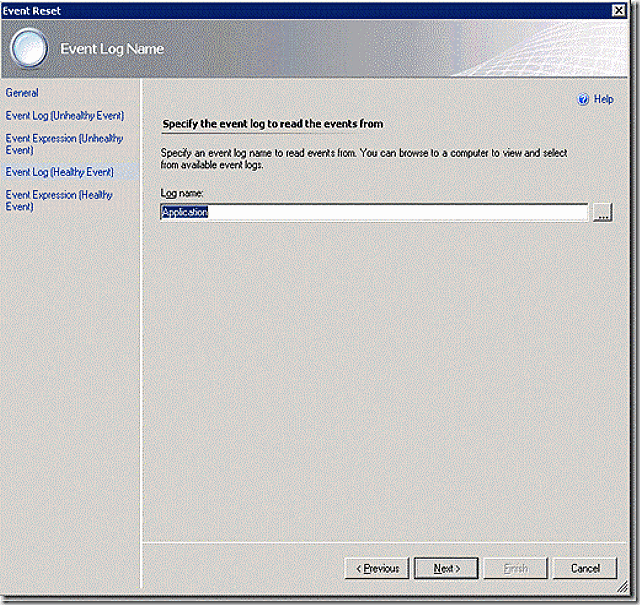
On the next two screens, configure the event log and event that will trigger state back to healthy. In this case, the application log and event 1004 and click finish.

We stated that this should be an alerting monitor – and there was no UI to configure alerting so once the monitor is saved go into properties of the monitor, select the alerting tab and configure the monitor to generate alerts and to generate an alert when the monitor is in the warning health state. Once complete, select OK to close the monitor.

With this complete we have a simple event monitor that will operate 24/7 and detect an event 1003 (Unhealth) and 1004 (Healthy), adjusting state accordingly.
Next we need to create our monitor that will be modified to run on a schedule. To do so, work back through the steps above but this time use different values as follows:
Element ID:Custom.Event.Rule_Monitor.with.Schedule.Standard.Event.Monitor.with.Alert.WITH.Schedule
Display Name: Standard Event MOnitor with Alert WITH Schedule
Target: Microsoft.Windows.Server.OperatingSystem
Parent Monitor: System.Health.AvailabilityState
Category: AvailabilityHealth
Unhealthy Event Log: Application
Unhealthy Event: 1005
Health Event log: Application
Healthy Event: 1006
Once complete, remember to go back to properties and configure the new scheduled monitor for alerting on warning state. Once the two monitors are built the authoring console UI should appear as follows:

OK – now lets add our schedule to the second monitor – are you excited? :) Remember earlier that I mentioned that every rule and monitor has a data source and that the data source can vary depending on where we are obtaining data – it can even be custom. For monitors the data source is contained in a section called the monitortype. So, in order to introduce a schedule (and other modifications – but thats beyond the scope of this blog entry) we are REALLY interested in the monitor type because that module is where we introduce our customizations.
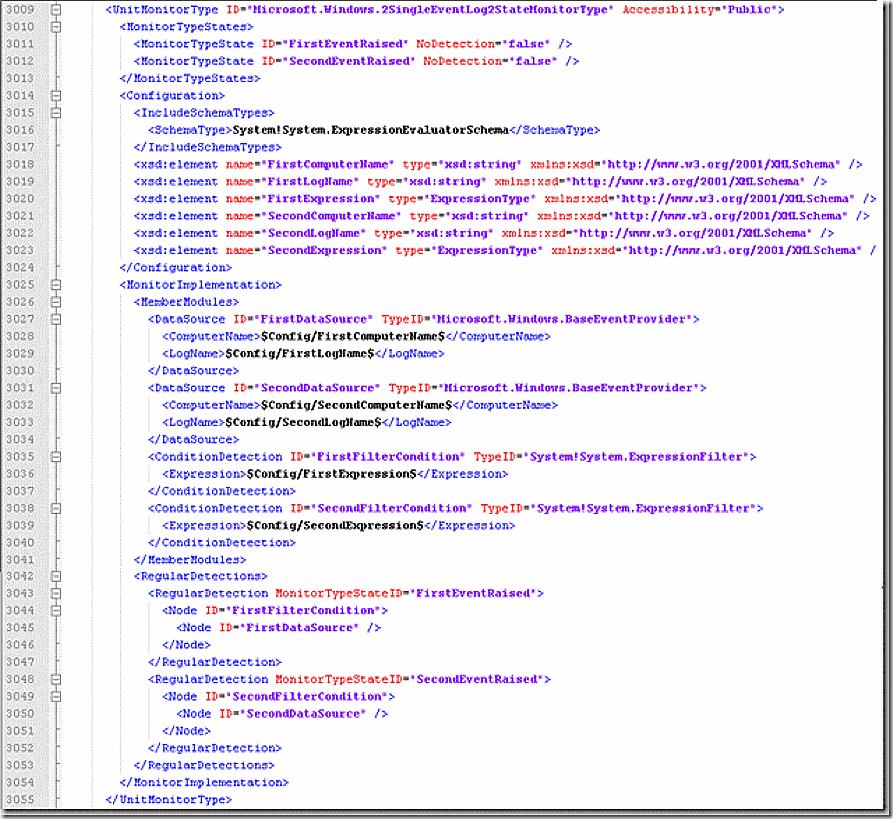
The first thing you need to know is the name of the monitor type that your monitor is referencing. This is found on the definition line for the monitor and generally refers back to a system management pack. We will look at the full XML in a minute but for now I’ve copied the monitor definition line. We can tell that the monitortype (typeid) is the Microsoft.Windows.2SingleeventLog2StateMonitorType. We also see the red section tells us that this monitortype is defined in the Microsoft.Windows.Library system library. The red part of the monitortype definition is an alias that is defined in the references section of the XML. I’ll show you in the XML shortly how all of this links up.
<UnitMonitor ID="Custom.Event.Rule_Monitor.with.Schedule.Standard.Event.Monitor.with.Alert.WITH.Schedule" Accessibility="Internal" Enabled="true" Target="Windows!Microsoft.Windows.Server.OperatingSystem" ParentMonitorID="Health!System.Health.AvailabilityState" Remotable="true" Priority="Normal" TypeID="Windows!Microsoft.Windows.2SingleEventLog2StateMonitorType" ConfirmDelivery="true">
Our event monitor works because it references the stated monitortype in the sealed system management pack. As mentioned, the monitortype section is the place where we want to introduce our customizations – but since it’s in a sealed management pack we can’t adjust it there (we wouldn’t want to anyway). The solution is to find this monitortype in the system management pack and copy it to our management pack and make an adjustment to use the local copy rather than the system copy.
The needed monitor type is in the microsoft.windows.library management pack (we know this because of our references) – open that system management pack (which will require you convert it to readable XML – Kevin has a good blog on how to export management packs here . The Monitor Type of interest, Microsoft.Windows.2SingleEventLog2.StateMonitorType is shown from the microsoft.windows.library management pack.
All we need to do is paste this section inside our current management pack as shown. Note that only enough of the management pack XML is shown to demonstrate where to place the section correctly.

If you jump ahead of me and try to save and import the management pack at this stage, it will fail!
Note that there are two more curve balls we have to deal with as shown in the XMLt. These are dependencies for this moduletype – one is internal to the microsoft.windows.library management pack (note no alias) and the other is in the system (system.library) management pack. Dealing with these issues is very easy. Let’s take them one at a time.
Microsoft.Windows.BaseEventProvider – note that there is no alias on these two entries. Why? Because the expectation is that the definition for this provider is in the same management pack as was the monitortype we copied. Remember that the only component we are interested in is the monitortype module so it’s completely fair to simply make an edit to add an alias to refer back to the microsoft.windows.library management pack.
System!System.ExpressionFilter – In truth these entries wouldn’t cause an error. Why? Note that there is already an alias (system) defined on this entry that indicates these filters are in the system.library management pack. Since the alias is already defined in our management pack it should work fine.

I’ve made the required changes to the XML below (circled in red) and now, if you try, the management pack will import – but we aren’t done with it yet!

OK, with all of the changes made there is one VERY IMPORTANT change we haven’t made yet. We have to configure our scheduled monitor to use the monitor type we copied into our management pack. To set this monitortype apart we will rename it and we will also reconfigure the unit monitor to use it. The changes required are below.

Drum roll please – NOW we can open the XML in the authoring console to see what we’ve actually done. Make sure you save the management pack with all of the changes and then open it up. Go to the type library node under monitor types and we see that we have a monitor type defined!

Now, once we know how all the pieces fit together we could have just as easily built the monitor type totally in the UI – but remember I said it helps to know the UI and XML? This is why – often you will go ‘XML diving’ to come up with an example of how an item should be configured!
So is it always going to be this involved to add a schedule? No – the more you do this you will find shortcuts – and you can built monitortypes by hand once you have experience – but this is the easiest way to demonstrate how everything comes together.
Let’s see what changes resulted in the monitor type as a result of our XML editing. Select properties on the monitortype. First, notice on the General tab that we have an ID for our monitortype but there is no assigned name. Why? Monitortypes are not visible in the OpsMgr UI so there is no need for the name field to be complete in XML. The authoring console, however, requires that this field be complete or it won’t allow changes made in this section to be saved. Also notice an option to select what runas account this monitortype should use. If specific credentials are required, select an appropriate runas account. Our example uses the default.

On the states tab we see that this monitortype is defined as a two state monitor. The ID’s listed can be customized but doing so would require additional edits to the monitor itself which references these values.

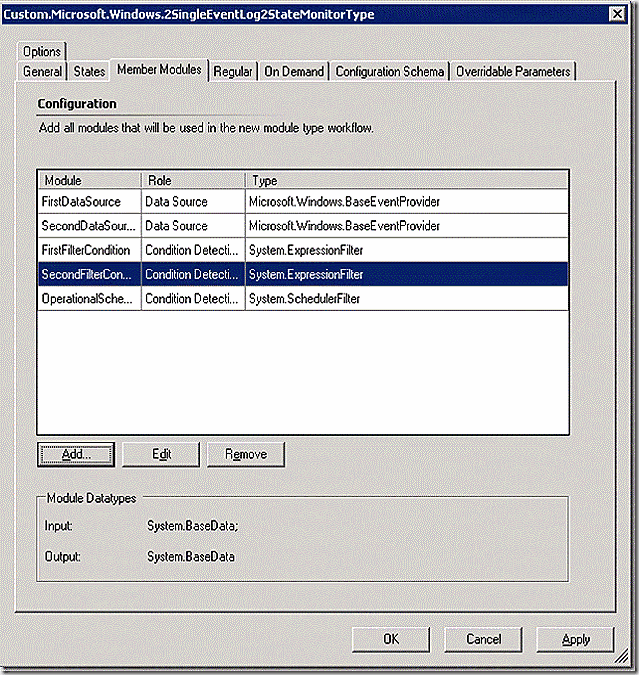
The member module tab is where things get interesting. This is where all of the modules that make up our monitoring workflow are defined. We can see that our datasource and filter modules are defined. Let’s stop there for a minute. Notice that there are two data sources and two filter modules. Why? Because this monitor type is a 2 state event monitor – meaning that there are two event logs and two event ID’s that need to be evaluated. This, two data sources and two filters!

Staying with the member module tab, this is where we need to add a module to handle scheduling of our monitor. Select add and enter schedule in the look for box. Notice that 4 options match the schedule filter. Which one should we pick? Looking at the role for each option the answer is quickly clear – we are building a condition detection schedule filter so we will choose the condition detection filter – and there is only one. Once selected, enter OperationalScheduleCD as the module ID and select OK.

After selecting OK a screen should appear allowing you to configure the new filter. This is now very similar to what we did with our rule. Select configure and add a schedule where our monitor operates daily from 6:00 am to 11:00 pm as shown.


Once complete, the member module tab will look as follows
On the Regular tab we pull our modules just created together to form our workflow. Notice that there are two items we have to handle – a condition were the first event is raised and a condition where the second event is raised. This brings up an interesting point. The goal here is to schedule our monitor so that it is only active during certain hours. But, the REAL goal very likely is to prevent teams from getting alerts/pages when monitor is supposed to be off. If, however, the monitor were to detect a condition where a healthy state resumed while monitoring is disabled, we likely would want to process that change. It all boils down to how the schedule module is implemented.

The first event raised is the event that causes state to change to unhealthy and alerts (and potentially pages) to fire. We definitely want to include our schedule filter in the first event workflow. To do so, put a check mark by the member module labeled CD (Be sure FirstEventRaised is highlighted) and adjust the workflow to pass information as follows
FirstDataSource ---> FirstFilterCondition
FirstFilterCondition ---> OperationalScheduleCD
OperationalScheduleCD ---> Monitor State Output
You could also have setup the flow differently so that the operational schedule came immediately after FirstDataSource.
With these settings the FirstEventWorkflow will only complete and output data during schedule hours.

There is also our SecondEventRaised workflow. This is the one that will detect an event to put the monitor back in a healthy state so, to me, it doesn’t make sense to put this workflow on a schedule since we want to know that health has returned regardless of when and also because if we miss the healthy event there is no guarantee it will be produced again!. Based on that, no modifications are required for the SecondEventRaised workflow.

The remaining tabs are not relevant to building our scheduled monitor so we will pass them for now but the On Demand is interesting and deserves some comment. In the OpsMgr UI health explorer section there is an option to recalculate health. While this option is present and can be selected for every monitor in health explorer it does not work with every monitor – only those that are built to support On Demand health recalculation! Ah, so THAT is what the On Demand node in our monitortype is for! Correct. IF you want your monitor to support On Demand health recalculation you have to configure the workflow to allow for it on the On Demand tab. Our monitortype doesn’t support On Demand recalculation so we are passing it here. A further wrinkle – not every monitortype CAN support recalculation – only those that use a probe based data source.
OK – BIG EXHALE!!!! We have now completed building our scheduled monitor! WooHoo, celebration and excitement! Before getting too out of hand, save your work in the authoring console and we will take a look at what we’ve done in the XML and see how all of our UI configurations maps out. Like before, I’ll start with our monitor that doesn’t have a schedule to show the core UI components used to build a monitor and how they map to XML. I’ll then show the XML specific to the monitortype we built, scheduling and how all of those changes link into the monitor. Also, I will only be showing the portions of XML that are applicable to the subject at hand – some areas will be collapsed or omitted. Lastly, for completeness I turned on word wrap so we will be able to see the full text rather than having some scroll off the screen.

OK, thats enough to numb the senses – lets dig in a bit deeper! Now that we understand how to correlate a basic event monitor built in the UI to it’s resulting XML, let’s look at the XML that specifically ties a monitor to it’s monitortype and associated configuration. As shown above, monitortypes generally are defined in the system management packs and accessed by reference. For our scheduling example, we copied the needed monitor type and made some adjustments. Here’s how it all fits together. Note again that certain sections that aren’t applicable or that we have already covered are collapsed.

And thats it! Hopefully this helps illustrate how XML links together and correlates to the UI. the sample management pack that was built as part of this blog post is attached for reference. Happy authoring/scheduling!
You must be a registered user to add a comment. If you've already registered, sign in. Otherwise, register and sign in.